
Surveillance Manager User Guide
Page 2
...2 Chapter 3 Quick Start 5 3.1 Install IP Camera(s)...5 3.2 Add IP Camera(s)...5 3.3 Configuration of schedule recording 9 3.4 Playback...14 Chapter 4 Main-console 17 4.1 System status...17 4.2 Screen Division ...19 4.3 Operation with sub-screen 20 4.3.1 Define display camera(s) sequence 20 4.3.2 Digital Zoom at sub-...screen ...20 4.3.4 Snapshot of sub-screen 21 4.3.5 Restore division default 21 4.4 System setup ...21 4.4.1 System setup...22 4.4.2 Camera...24 4.4.3 User ...27 4.4.4 Address Book ...28 4.4.5 Notification...29 4.4.6 Muti-Monitor...31 4.4.7 Joystick...32 4.5 Alarm Setting...34...
...2 Chapter 3 Quick Start 5 3.1 Install IP Camera(s)...5 3.2 Add IP Camera(s)...5 3.3 Configuration of schedule recording 9 3.4 Playback...14 Chapter 4 Main-console 17 4.1 System status...17 4.2 Screen Division ...19 4.3 Operation with sub-screen 20 4.3.1 Define display camera(s) sequence 20 4.3.2 Digital Zoom at sub-...screen ...20 4.3.4 Snapshot of sub-screen 21 4.3.5 Restore division default 21 4.4 System setup ...21 4.4.1 System setup...22 4.4.2 Camera...24 4.4.3 User ...27 4.4.4 Address Book ...28 4.4.5 Notification...29 4.4.6 Muti-Monitor...31 4.4.7 Joystick...32 4.5 Alarm Setting...34...

Surveillance Manager User Guide
Page 8
Step2: Check the network between the IP camera(s) and the system. Step3: Click the system setup icon and select System setup. 5 Step2: Enter the user name and password to login Surveillance ...the system by the manufacturer. Chapter 3 Quick Start 3.1 Install IP Camera(s) Step1: Set up the IP camera(s) by following the instruction manual provided by following the steps below. 3.2 Add IP Camera(s) Step1: Click Start → All Programs → Surveillancee_Manager →Surveillancee_Manager. Step3: Add the IP camera(s) to remember the account user name and password you enter ...
Step2: Check the network between the IP camera(s) and the system. Step3: Click the system setup icon and select System setup. 5 Step2: Enter the user name and password to login Surveillance ...the system by the manufacturer. Chapter 3 Quick Start 3.1 Install IP Camera(s) Step1: Set up the IP camera(s) by following the instruction manual provided by following the steps below. 3.2 Add IP Camera(s) Step1: Click Start → All Programs → Surveillancee_Manager →Surveillancee_Manager. Step3: Add the IP camera(s) to remember the account user name and password you enter ...

Surveillance Manager User Guide
Page 28
... name and Password to login specified camera. Wait for this camera. Click Cancel all to cancel all cameras in the list. Click Cancel to auto un-check all actions and close this camera's HTTP port. General: For all found cameras in system. z IP: Set this channel may not work...work correctly. Click OK to login the specified camera. NVR: For backup streaming from system. z Password: Set the Password for a new setting. This User name must have the authority to confirm all field for this camera in the list. camera, this camera's IP. z Port: Set this page. This ...
... name and Password to login specified camera. Wait for this camera. Click Cancel all to cancel all cameras in the list. Click Cancel to auto un-check all actions and close this camera's HTTP port. General: For all found cameras in system. z IP: Set this channel may not work...work correctly. Click OK to login the specified camera. NVR: For backup streaming from system. z Password: Set the Password for a new setting. This User name must have the authority to confirm all field for this camera in the list. camera, this camera's IP. z Port: Set this page. This ...

Surveillance Manager User Guide
Page 34
...for new event's upload process. z Password: The password to defined folder. z EMap: Displays E-Map on selected monitor. z Show Live Camera: Displays extra live preview window on selected monitor. z Application Display: Definition when the user click application buttons on Main-console, the application ...will display on system start. z FTP Server: Set the FTP site's IP for send schedule record notification mail. 4.4.6 Muti-Monitor ¾ Monitor list tab-control: Select which monitor to login FTP server. z Alarm...
...for new event's upload process. z Password: The password to defined folder. z EMap: Displays E-Map on selected monitor. z Show Live Camera: Displays extra live preview window on selected monitor. z Application Display: Definition when the user click application buttons on Main-console, the application ...will display on system start. z FTP Server: Set the FTP site's IP for send schedule record notification mail. 4.4.6 Muti-Monitor ¾ Monitor list tab-control: Select which monitor to login FTP server. z Alarm...
TL-SC3230 V1 QIG 7106504101
Page 2
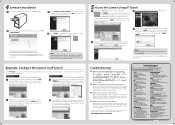
..." button. Wireless setting is provided on the CD for TL-SC3230N only. 4 Software Installation 1 Insert the provided Resource CD into your CD-ROM drive. 3 Click "Install IP Search Software", and the IP Search Software window will show up and list all active TP-LINK camera devices. Select the camera based on its user manual included. 4 If you want...
..." button. Wireless setting is provided on the CD for TL-SC3230N only. 4 Software Installation 1 Insert the provided Resource CD into your CD-ROM drive. 3 Click "Install IP Search Software", and the IP Search Software window will show up and list all active TP-LINK camera devices. Select the camera based on its user manual included. 4 If you want...
TL-SC3230N V1 User Guide
Page 7
... Chapter 4 Preparation 8 4.1 Search and Set up by IP Search 8 4.1.1 Search 8 4.1.2 View 9 4.1.3 LAN 9 4.1.4 Wireless 11 4.2 UPnP of Windows® XP, Vista or 7 13 4.3 Install the camera behind a NAT Router 14 4.4 Access the camera from the Internet Explorer for the first time 15 4.5 Logging... Full Screen 18 5.6 Digital Zoom 18 5.7 2-Way Audio 18 5.8 Record...19 5.9 Snapshot ...20 5.10 About 21 Chapter 6 Administrating the Camera 22 6.1 Network: Configure Network settings 22 6.1.1 Network 23 6.1.2 Wireless 24 6.1.3 HTTPS 27 6.1.4 DDNS service 27 6.1.5 PPPoE 29 6.1.6 Streaming...
... Chapter 4 Preparation 8 4.1 Search and Set up by IP Search 8 4.1.1 Search 8 4.1.2 View 9 4.1.3 LAN 9 4.1.4 Wireless 11 4.2 UPnP of Windows® XP, Vista or 7 13 4.3 Install the camera behind a NAT Router 14 4.4 Access the camera from the Internet Explorer for the first time 15 4.5 Logging... Full Screen 18 5.6 Digital Zoom 18 5.7 2-Way Audio 18 5.8 Record...19 5.9 Snapshot ...20 5.10 About 21 Chapter 6 Administrating the Camera 22 6.1 Network: Configure Network settings 22 6.1.1 Network 23 6.1.2 Wireless 24 6.1.3 HTTPS 27 6.1.4 DDNS service 27 6.1.5 PPPoE 29 6.1.6 Streaming...
TL-SC3230N V1 User Guide
Page 10
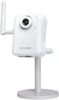
... application z Smartphone accessible z Digital zoom z Built-in microphone z Audio line out z Two-way audio z Micro SD slot z Intelligent motion detection up the camera to capture a video sequence to search your IP camera from Internet easily z H.264, MPEG4 and JPEG triple compression simultaneously z 1.3 Mega-pixel resolution z 1.3 Mega-pixel or 720P mode selectable z 8-profile encoder...
... application z Smartphone accessible z Digital zoom z Built-in microphone z Audio line out z Two-way audio z Micro SD slot z Intelligent motion detection up the camera to capture a video sequence to search your IP camera from Internet easily z H.264, MPEG4 and JPEG triple compression simultaneously z 1.3 Mega-pixel resolution z 1.3 Mega-pixel or 720P mode selectable z 8-profile encoder...
TL-SC3230N V1 User Guide
Page 13
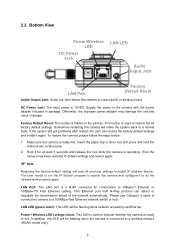
... result in the pinhole. The user needs to run the IP Search program to restore the all previous settings included IP address forever. This button is used to indicate whether the camera is used to search the camera and configure it again. Make sure the camera is operating. Power / Wireless LED (orange color): This LED...
... result in the pinhole. The user needs to run the IP Search program to restore the all previous settings included IP address forever. This button is used to indicate whether the camera is used to search the camera and configure it again. Make sure the camera is operating. Power / Wireless LED (orange color): This LED...
TL-SC3230N V1 User Guide
Page 16
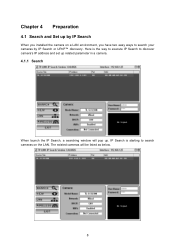
IP Search is the way to execute IP Search to search your cameras by IP Search or UPnP™ discovery. The existed cameras will pop up. Here is starting to search cameras on a LAN environment, you have two easy ways to discover camera's IP address and set up by IP Search When you installed the camera on the LAN. Chapter 4 Preparation 4.1 Search and Set up related parameter in a camera. 4.1.1 Search When launch the IP Search, a searching window will be listed as below. 8
IP Search is the way to execute IP Search to search your cameras by IP Search or UPnP™ discovery. The existed cameras will pop up. Here is starting to search cameras on a LAN environment, you have two easy ways to discover camera's IP address and set up by IP Search When you installed the camera on the LAN. Chapter 4 Preparation 4.1 Search and Set up related parameter in a camera. 4.1.1 Search When launch the IP Search, a searching window will be listed as below. 8
TL-SC3230N V1 User Guide
Page 17
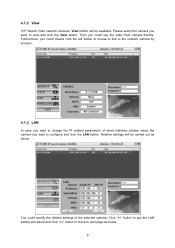
...change the IP related parameters of the selected camera. Furthermore, you could see the video from camera directly. Click "" button to move to next page as below . 9 Relative settings will be carried out as below . You could modify the relative settings of wired interface, please select the camera you ...could double click the left button of mouse to link to the network camera by browser. 4.1.3 LAN In case you want to view and click the View button. Then you...
...change the IP related parameters of the selected camera. Furthermore, you could see the video from camera directly. Click "" button to move to next page as below . 9 Relative settings will be carried out as below . You could modify the relative settings of wired interface, please select the camera you ...could double click the left button of mouse to link to the network camera by browser. 4.1.3 LAN In case you want to view and click the View button. Then you...

TL-SC3230N V1 User Guide
Page 19
Click SSID to next step: 11 Click >> to go to select your wireless AP or router and key in WEP or WPA key. Relative settings will be carried out as above. 4.1.4 Wireless In case you want to change the IP related parameters of wireless interface, please select the camera you want to configure and click the WIRELESS button.
Click SSID to next step: 11 Click >> to go to select your wireless AP or router and key in WEP or WPA key. Relative settings will be carried out as above. 4.1.4 Wireless In case you want to change the IP related parameters of wireless interface, please select the camera you want to configure and click the WIRELESS button.
TL-SC3230N V1 User Guide
Page 20
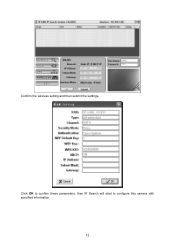
Click OK to confirm these parameters, then IP Search will start to configure this camera with specified information. 12 Confirm the wireless setting and then submit the settings.
Click OK to confirm these parameters, then IP Search will start to configure this camera with specified information. 12 Confirm the wireless setting and then submit the settings.
TL-SC3230N V1 User Guide
Page 21
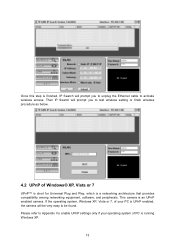
... to unplug the Ethernet cable to activate wireless access. Please refer to Appendix I to enable UPnP settings only if your PC is finished, IP Search will prompt you to test wireless setting or finish wireless procedure as below. 4.2 UPnP of PC is running Windows XP. 13 If... Windows® XP, Vista or 7 UPnP™ is short for Universal Plug and Play, which is an UPnP enabled camera. Once this step is UPnP enabled, the camera will be very easy to be found. This camera is a networking architecture that provides compatibility among networking equipment, software, and peripherals.
... to unplug the Ethernet cable to activate wireless access. Please refer to Appendix I to enable UPnP settings only if your PC is finished, IP Search will prompt you to test wireless setting or finish wireless procedure as below. 4.2 UPnP of PC is running Windows XP. 13 If... Windows® XP, Vista or 7 UPnP™ is short for Universal Plug and Play, which is an UPnP enabled camera. Once this step is UPnP enabled, the camera will be very easy to be found. This camera is a networking architecture that provides compatibility among networking equipment, software, and peripherals.

TL-SC3230N V1 User Guide
Page 22
...allow incoming data traffic to this function. However, if your router. To do this, enable the NAT-traversal feature, which will connect to the camera. Please check user's manual of your NAT router To use UPnP IGD function (NAT traversal), you must configure your network is not enabled by default...IP, also the port forwarding or Virtual Server function of router needs to be very easy to make sure the UPnP function is enabled in all routers. This feature is an easy 3-step procedure: Step1: Enable UPnP option of your NAT router Step2: Enable UPnP NAT traversal option of the camera...
...allow incoming data traffic to this function. However, if your router. To do this, enable the NAT-traversal feature, which will connect to the camera. Please check user's manual of your NAT router To use UPnP IGD function (NAT traversal), you must configure your network is not enabled by default...IP, also the port forwarding or Virtual Server function of router needs to be very easy to make sure the UPnP function is enabled in all routers. This feature is an easy 3-step procedure: Step1: Enable UPnP option of your NAT router Step2: Enable UPnP NAT traversal option of the camera...

TL-SC3230N V1 User Guide
Page 23
... the ActiveX control into your login name and password under "User name" and "Password" textbox. The Login Window of the camera is enabled by default. 4.4 Access the camera from the Internet Explorer for detail NAT traversal setting. Type in your PC. Note that this option is prompted. For the ... to Setting Î Network Î UPnP page for the first time 1. Start the web browser on the computer and type the IP address of the camera you want to start the main menu. 3. According to your browser's security setting, the IE Web Page may prompt the "Security Warning" window. ...
... the ActiveX control into your login name and password under "User name" and "Password" textbox. The Login Window of the camera is enabled by default. 4.4 Access the camera from the Internet Explorer for detail NAT traversal setting. Type in your PC. Note that this option is prompted. For the ... to Setting Î Network Î UPnP page for the first time 1. Start the web browser on the computer and type the IP address of the camera you want to start the main menu. 3. According to your browser's security setting, the IE Web Page may prompt the "Security Warning" window. ...
TL-SC3230N V1 User Guide
Page 31
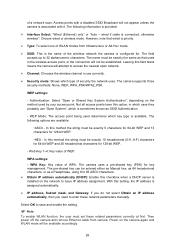
... provides the menu for Intranet usage. Note that the user can not get an IP address within limited tries, the camera will assign a default IP address, 192.168.0.100, by itself as 80, users have to issue IP address assignment. The second HTTP port is very useful for connecting the... port is changeable. If the http port is not assigned as the default IP address. ¾ IP address, Subnet mask, and Gateway: If you need to login. With this camera can not modify it. ¾ Obtain IP address automatically (DHCP): DHCP: Stands for Dynamic Host Configuration Protocol. Enable this checkbox...
... provides the menu for Intranet usage. Note that the user can not get an IP address within limited tries, the camera will assign a default IP address, 192.168.0.100, by itself as 80, users have to issue IP address assignment. The second HTTP port is very useful for connecting the... port is changeable. If the http port is not assigned as the default IP address. ¾ IP address, Subnet mask, and Gateway: If you need to login. With this camera can not modify it. ¾ Obtain IP address automatically (DHCP): DHCP: Stands for Dynamic Host Configuration Protocol. Enable this checkbox...
TL-SC3230N V1 User Guide
Page 34
...key can be exactly the same as a Passphrase, using 8 to 63 ASCII characters. ¾ Obtain IP address automatically (DHCP): Enable this field blank means the camera will not appear unless the camera is configured for 128-bit WEP. •HEX - Leaving this checkbox when a DHCP server is assigned... automatically. ¾ IP address, Subnet mask, and Gateway: If you do not select Obtain an IP address automatically, then you ...
...key can be exactly the same as a Passphrase, using 8 to 63 ASCII characters. ¾ Obtain IP address automatically (DHCP): Enable this field blank means the camera will not appear unless the camera is configured for 128-bit WEP. •HEX - Leaving this checkbox when a DHCP server is assigned... automatically. ¾ IP address, Subnet mask, and Gateway: If you do not select Obtain an IP address automatically, then you ...

TL-SC3230N V1 User Guide
Page 35
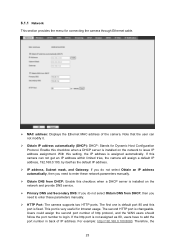
...Domain Name Server Your Internet Service Provider (ISP) provides you at least one IP address which you use to connect to create a secure channel over an insecure network. This ensures reasonable protection from the camera will go through HTTPS only and HTTP service is no longer available. &#...the Internet. 6.1.3 HTTPS HTTPS: Stands for Hypertext Transfer Protocol Secure HTTPS is a combination of the Hypertext Transfer Protocol with the SSL/TLS protocol to change periodically. The address you may be static, meaning it never changes, or dynamic, meaning it changes, depends on your current...
...Domain Name Server Your Internet Service Provider (ISP) provides you at least one IP address which you use to connect to create a secure channel over an insecure network. This ensures reasonable protection from the camera will go through HTTPS only and HTTP service is no longer available. &#...the Internet. 6.1.3 HTTPS HTTPS: Stands for Hypertext Transfer Protocol Secure HTTPS is a combination of the Hypertext Transfer Protocol with the SSL/TLS protocol to change periodically. The address you may be static, meaning it never changes, or dynamic, meaning it changes, depends on your current...
TL-SC3230N V1 User Guide
Page 36
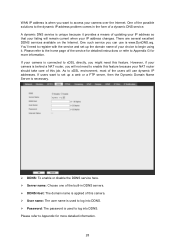
...it . Please refer to log into DDNS. ¾ Password: The password is behind a NAT router, you can use dynamic IP addresses. If your camera over the Internet. If users want to access your camera is connected to xDSL directly, you want to set up a web or a FTP server, then the Dynamic Domain Name...up the domain name of this feature because your NAT router should take care of your camera is used to the home page of updating your IP address so that your listing will remain current when your IP address changes. As to xDSL environment, most of the users will not need to Appendix...
...it . Please refer to log into DDNS. ¾ Password: The password is behind a NAT router, you can use dynamic IP addresses. If your camera over the Internet. If users want to access your camera is connected to xDSL directly, you want to set up a web or a FTP server, then the Dynamic Domain Name...up the domain name of this feature because your NAT router should take care of your camera is used to the home page of updating your IP address so that your listing will remain current when your IP address changes. As to xDSL environment, most of the users will not need to Appendix...

TL-SC3230N V1 User Guide
Page 37
... to the WAN through the xDSL modem. For more PPPoE and Internet configuration, please consult your camera can directly connect to the xDSL, however, it should be set up and get a dynamic IP address. Power on again, then the camera will dial on to the ISP connect to a LAN by DHCP or Fixed... IP • Access the camera, and enter Setting Î Network Î PPPoE as below ¾ PPPoE: To enable or...
... to the WAN through the xDSL modem. For more PPPoE and Internet configuration, please consult your camera can directly connect to the xDSL, however, it should be set up and get a dynamic IP address. Power on again, then the camera will dial on to the ISP connect to a LAN by DHCP or Fixed... IP • Access the camera, and enter Setting Î Network Î PPPoE as below ¾ PPPoE: To enable or...


