User Guide
Page 2
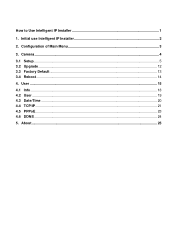
User ...15 4.1 Info ...18 4.2 User ...19 4.3 Date/Time ...20 4.4 TCP/IP ...21 4.5 PPPoE...23 4.6 DDNS ...24 5. Camera ...4 3.1 Setup...5 3.2 Upgrade ...12 3.3 Factory Default ...13 3.4 Reboot ...14 4. Initial use Intelligent IP Installer 2 2. About...25 Configuration of Main Menu 3 3. How to Use Intelligent IP Installer 1 1.
User ...15 4.1 Info ...18 4.2 User ...19 4.3 Date/Time ...20 4.4 TCP/IP ...21 4.5 PPPoE...23 4.6 DDNS ...24 5. Camera ...4 3.1 Setup...5 3.2 Upgrade ...12 3.3 Factory Default ...13 3.4 Reboot ...14 4. Initial use Intelligent IP Installer 2 2. About...25 Configuration of Main Menu 3 3. How to Use Intelligent IP Installer 1 1.

User Guide
Page 3
If you to Intelligent IP Installer. How to Use Intelligent IP Installer This chapter introduces how to use IP cameras with Microsoft web browsers and Intelligent IP Installer in Windows operating systems. This document focuses on introducing you want to know how to monitor the image from the camera using Intelligent IP Installer. The IP cameras can be used with Microsoft web browsers, please check the camera user manuals. 1
If you to Intelligent IP Installer. How to Use Intelligent IP Installer This chapter introduces how to use IP cameras with Microsoft web browsers and Intelligent IP Installer in Windows operating systems. This document focuses on introducing you want to know how to monitor the image from the camera using Intelligent IP Installer. The IP cameras can be used with Microsoft web browsers, please check the camera user manuals. 1

User Guide
Page 5
... network. User Click this button to optimize video setting. You can connect the specific Network Cameras to get live video and to get and set basic values. This section includes Info, User, Date Time, TCP/IP, PPPoE and DDNS. ) Note: Only ...
... network. User Click this button to optimize video setting. You can connect the specific Network Cameras to get live video and to get and set basic values. This section includes Info, User, Date Time, TCP/IP, PPPoE and DDNS. ) Note: Only ...

User Guide
Page 6
... 15 second to 192.168.1.254. The method of the address inside this range is seeking from the DHCP server. ID. ) Note: ¾ If the camera is no DHCP server, the video server will appear in red text. Name and Mod. If there is not located in the "IP Address" field... reflect those on the LAN status). Camera The Camera page provides you all Network Cameras in the network, it displays Network Cameras information including Name, IP Address, MAC, Mod. Search:Click it will try to search Network...
... 15 second to 192.168.1.254. The method of the address inside this range is seeking from the DHCP server. ID. ) Note: ¾ If the camera is no DHCP server, the video server will appear in red text. Name and Mod. If there is not located in the "IP Address" field... reflect those on the LAN status). Camera The Camera page provides you all Network Cameras in the network, it displays Network Cameras information including Name, IP Address, MAC, Mod. Search:Click it will try to search Network...

User Guide
Page 7
... page. The following screen will display: ) Note: For IP cameras not in local network area (which appears in red in the search screen), you can still use IP cameras with Microsoft web browses. 3.1 Setup Choose a network camera, click on Setup to change the configurations of the administrator to ...the main page. 5 Link to IE:After searching Network Cameras in network, you can click to specific Network Cameras in search area and press Link to IE to use setup to change the configurations. You have to key in...
... page. The following screen will display: ) Note: For IP cameras not in local network area (which appears in red in the search screen), you can still use IP cameras with Microsoft web browses. 3.1 Setup Choose a network camera, click on Setup to change the configurations of the administrator to ...the main page. 5 Link to IE:After searching Network Cameras in network, you can click to specific Network Cameras in search area and press Link to IE to use setup to change the configurations. You have to key in...

User Guide
Page 9
Press Next to continue, Previous to go back, Cancel to go to the main page. 7 Date/Time settings: You can set the date/time of the network camera here. See "Hint" for details.
Press Next to continue, Previous to go back, Cancel to go to the main page. 7 Date/Time settings: You can set the date/time of the network camera here. See "Hint" for details.

User Guide
Page 10
See "Hint" for details. Network settings: You can change the network settings of the network camera here. Press Next to continue, Previous to go back, Cancel to go to the main page. 8
See "Hint" for details. Network settings: You can change the network settings of the network camera here. Press Next to continue, Previous to go back, Cancel to go to the main page. 8

User Guide
Page 14
3.2 Upgrade Choose a network camera, click on Upgrade to enter the upgrade page. The device will display: Choose the firmware image file you want to upgrade and press Upgrade to start. You have to key in the username and password of the administrator to upgrade the firmware. The following screen will automatically reboot after upgrade. 12
3.2 Upgrade Choose a network camera, click on Upgrade to enter the upgrade page. The device will display: Choose the firmware image file you want to upgrade and press Upgrade to start. You have to key in the username and password of the administrator to upgrade the firmware. The following screen will automatically reboot after upgrade. 12
User Guide
Page 15
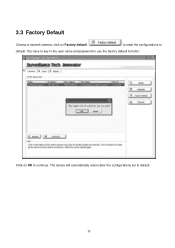
Click on Factory default to reset the configurations to continue. 3.3 Factory Default Choose a network camera, click on OK to default. The device will automatically reboot after the configurations set to use the factory default function. You have to key in the user name and password to default. 13
Click on Factory default to reset the configurations to continue. 3.3 Factory Default Choose a network camera, click on OK to default. The device will automatically reboot after the configurations set to use the factory default function. You have to key in the user name and password to default. 13

User Guide
Page 16
to use the reboot function. The device will automatically reboot. 14 3.4 Reboot Choose a network camera, click on OK to continue. You have to key Click on Reboot in the user name and password to reboot the device.
to use the reboot function. The device will automatically reboot. 14 3.4 Reboot Choose a network camera, click on OK to continue. You have to key Click on Reboot in the user name and password to reboot the device.
User Guide
Page 17
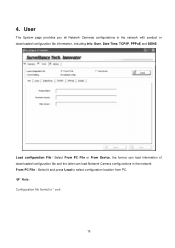
4. From PC File:Select it and press Load to select configuration location from PC. ) Note: Configuration file format is * conf. 15 User The System page provides you all Network Cameras configurations in the network. Load configuration File:Select From PC File or From Device, the former can load information of downloaded configuration file and the latter can load Network Camera configurations in the network with product or downloaded configuration file information, including Info, User, Date Time, TCP/IP, PPPoE and DDNS.
4. From PC File:Select it and press Load to select configuration location from PC. ) Note: Configuration file format is * conf. 15 User The System page provides you all Network Cameras configurations in the network. Load configuration File:Select From PC File or From Device, the former can load information of downloaded configuration file and the latter can load Network Camera configurations in the network with product or downloaded configuration file information, including Info, User, Date Time, TCP/IP, PPPoE and DDNS.

User Guide
Page 21
4.2 User The Network Camera default account and password setting is intended to Live View. 19 Use this menu to set the username and password of Administrator and up to 9 ... mode. ¾ Viewer authentication:Allows any viewer direct access to be accessed by others. Intelligent IP Installer provides to assign a password if the Network Camera is "admin/admin".
4.2 User The Network Camera default account and password setting is intended to Live View. 19 Use this menu to set the username and password of Administrator and up to 9 ... mode. ¾ Viewer authentication:Allows any viewer direct access to be accessed by others. Intelligent IP Installer provides to assign a password if the Network Camera is "admin/admin".

User Guide
Page 22
.... ¾ Keep current setting:Select this mode to keep the current date and time of the camera. ¾ Synchronize with PC:Select this mode to make the date and time of the camera the same as the monitoring PC. ¾ Manual setting:Select this mode to manually adjust the...; Synchronize with NTP:Specify the NTP server name and the Refresh Interval to synchronize the date and time of the camera with those of the time server, known as the NTP (Network Time Protocol) server. ) Note: The NTP server (Network Time Protocol) is the time ...
.... ¾ Keep current setting:Select this mode to keep the current date and time of the camera. ¾ Synchronize with PC:Select this mode to make the date and time of the camera the same as the monitoring PC. ¾ Manual setting:Select this mode to manually adjust the...; Synchronize with NTP:Specify the NTP server name and the Refresh Interval to synchronize the date and time of the camera with those of the time server, known as the NTP (Network Time Protocol) server. ) Note: The NTP server (Network Time Protocol) is the time ...

User Guide
Page 23
...to use a port number other than 80 on the Network setting page or in the Setup Program, access the camera by typing the IP address of the camera on the web browser as follows: Example: when HTTP port number is installed from the pulldown box. 4.4 ...TCP/IP ¾ HTTP Port: Select port 80 in the area where the camera is set to a number other than 80, select the text box and enter a port number between 1024 and 65535. ) Note:... network of computers. ¾ NTP server name:Type the host name or IP address of the camera. 21
...to use a port number other than 80 on the Network setting page or in the Setup Program, access the camera by typing the IP address of the camera on the web browser as follows: Example: when HTTP port number is installed from the pulldown box. 4.4 ...TCP/IP ¾ HTTP Port: Select port 80 in the area where the camera is set to a number other than 80, select the text box and enter a port number between 1024 and 65535. ) Note:... network of computers. ¾ NTP server name:Type the host name or IP address of the camera. 21

User Guide
Page 24
z Secondary DNS:Enter the IP address of the camera. z IP Address:Enter the IP address of the secondary DNS server, if necessary. 22 z Default Gateway:Enter the default gateway. z Primary DNS:...
z Secondary DNS:Enter the IP address of the camera. z IP Address:Enter the IP address of the secondary DNS server, if necessary. 22 z Default Gateway:Enter the default gateway. z Primary DNS:...

User Guide
Page 25
4.5 PPPoE Use this when you connect the camera through PPPoE (Point -to- Type it up to 32 characters. ¾ Confirm:Re-type the password to confirm. ¾ Obtain DNS server automatically:...
4.5 PPPoE Use this when you connect the camera through PPPoE (Point -to- Type it up to 32 characters. ¾ Confirm:Re-type the password to confirm. ¾ Obtain DNS server automatically:...

User Guide
Page 2
......19 3.7 Save Video ...19 3.8 Save Image ...20 3.9 Print ...20 3.10 Backup ...20 3.11 Log Viewer...22 3.11.1. Show Camera: ...15 2.4.4. CONTENTS 1.1 System Requirement 1 1.2 Installation ...1 1.3 Quick Start...5 2.1 Start ...11 2.2 Information Window 13 2.3 PTZ Camera Control 13 2.3.1. Preset/ Go:...13 2.3.2. Zoom:...13 2.3.3. Unusual Event 22 3.11.2. Manual Record 15 2.4.6. System Log:...23 4.1 Day Mode...
......19 3.7 Save Video ...19 3.8 Save Image ...20 3.9 Print ...20 3.10 Backup ...20 3.11 Log Viewer...22 3.11.1. Show Camera: ...15 2.4.4. CONTENTS 1.1 System Requirement 1 1.2 Installation ...1 1.3 Quick Start...5 2.1 Start ...11 2.2 Information Window 13 2.3 PTZ Camera Control 13 2.3.1. Preset/ Go:...13 2.3.2. Zoom:...13 2.3.3. Unusual Event 22 3.11.2. Manual Record 15 2.4.6. System Log:...23 4.1 Day Mode...

User Guide
Page 3
... - Startup ...35 6.1.2. Status Display...37 6.2 Setting - OSD Setting:...39 6.2.4. IP Camera / Video Server Setting Panel 40 6.3 Setting - Always Record 28 4.7.2. Event - Camera ...37 6.2.1. Add Camera...37 6.2.2. Monitor Display 42 6.7 Save/ Load Configuration 43 6.8 Log Viewer...44 6.8.1. ...Default: ...27 4.5.2. General ...35 6.1.1. Automatically Popup Event Report 35 6.1.3. Camera Parameter 39 6.2.3. I/O Device 40 6.4 Setting - Record on Motion 28 4.7.3. Log Viewer - Pre-record/ Post-record ...
... - Startup ...35 6.1.2. Status Display...37 6.2 Setting - OSD Setting:...39 6.2.4. IP Camera / Video Server Setting Panel 40 6.3 Setting - Always Record 28 4.7.2. Event - Camera ...37 6.2.1. Add Camera...37 6.2.2. Monitor Display 42 6.7 Save/ Load Configuration 43 6.8 Log Viewer...44 6.8.1. ...Default: ...27 4.5.2. General ...35 6.1.1. Automatically Popup Event Report 35 6.1.3. Camera Parameter 39 6.2.3. I/O Device 40 6.4 Setting - Record on Motion 28 4.7.3. Log Viewer - Pre-record/ Post-record ...

User Guide
Page 4
Play/ Stop/Drop 58 7.2.6. Live Streaming Server 50 6.11 About Main Console 53 7.1 Setup Panel...55 7.1.1. Digital Zoom:...58 7.2.5. Backup...46 6.9.2. Information Display Window 58 8.1 Server IP...59 8.2 Remote Live Viewer 59 8.3 Remote Playback ...60 PTZ Camera Control 57 7.2.4. Delete Recorded Information from the System 48 6.10 Network Service ...50 6.10.1. 6.9 Backup ...46 6.9.1. Setup Panel-Server 56 7.2 Show Camera(s) On the Display Screen 56 7.2.1. Server and Camera List 57 7.2.3. Log In/ Log Out 57 7.2.2.
Play/ Stop/Drop 58 7.2.6. Live Streaming Server 50 6.11 About Main Console 53 7.1 Setup Panel...55 7.1.1. Digital Zoom:...58 7.2.5. Backup...46 6.9.2. Information Display Window 58 8.1 Server IP...59 8.2 Remote Live Viewer 59 8.3 Remote Playback ...60 PTZ Camera Control 57 7.2.4. Delete Recorded Information from the System 48 6.10 Network Service ...50 6.10.1. 6.9 Backup ...46 6.9.1. Setup Panel-Server 56 7.2 Show Camera(s) On the Display Screen 56 7.2.1. Server and Camera List 57 7.2.3. Log In/ Log Out 57 7.2.2.

User Guide
Page 9
... box and enter again at the edit of Password Confirm. Now enjoy our Intelligent Surveillance Solution. 1.3 Quick Start Install IP camera(s) Step 1: Setup the IP camera(s) following below steps. Step 3: Add the IP camera(s) to Start > All Programs > IP Surveillance > Main Console. Step 3: In Main Console, go to Config > Setting to the system...
... box and enter again at the edit of Password Confirm. Now enjoy our Intelligent Surveillance Solution. 1.3 Quick Start Install IP camera(s) Step 1: Setup the IP camera(s) following below steps. Step 3: Add the IP camera(s) to Start > All Programs > IP Surveillance > Main Console. Step 3: In Main Console, go to Config > Setting to the system...


