Quick Installation Guide
Page 1
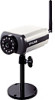
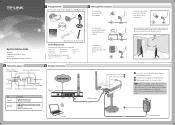
...port is linked, but there is no Ethernet connection. 1 Package Contents 2 Warning Before Installation Note: The product model shown in this QIG is TL-SC3171G, as an oven 3 Physical Description Antenna Connector (For TL-SC3171G Only) Ethernet... to direct sunlight Quick Installation Guide TL-SC3171 Day/Night Surveillance Camera TL-SC3171G Wireless Day/Night Surveillance Camera 7106503246 Quick Installation Guide TL-SC3171 Day/Night Surveillance Camera TL-SC3171G Wireless Day/Night Surveillance Camera (The antenna is for TL-SC3171G only) System Requirement The following operating...
...port is linked, but there is no Ethernet connection. 1 Package Contents 2 Warning Before Installation Note: The product model shown in this QIG is TL-SC3171G, as an oven 3 Physical Description Antenna Connector (For TL-SC3171G Only) Ethernet... to direct sunlight Quick Installation Guide TL-SC3171 Day/Night Surveillance Camera TL-SC3171G Wireless Day/Night Surveillance Camera 7106503246 Quick Installation Guide TL-SC3171 Day/Night Surveillance Camera TL-SC3171G Wireless Day/Night Surveillance Camera (The antenna is for TL-SC3171G only) System Requirement The following operating...
User Guide
Page 6
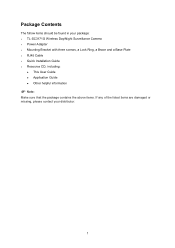
Package Contents The follow items should be found in your package: ¾ TL-SC3171G Wireless Day/Night Surveillance Camera ¾ Power Adapter ¾ Mounting Bracket with three screws, a Lock Ring, a Brace and a Base Plate ¾ RJ45 Cable ¾ Quick Installation Guide ¾ Resource CD, including: z This User Guide z Application Guide z Other helpful information ) Note: Make sure that the package contains the above items. If any of the listed items are damaged or missing, please contact your distributor. 1
Package Contents The follow items should be found in your package: ¾ TL-SC3171G Wireless Day/Night Surveillance Camera ¾ Power Adapter ¾ Mounting Bracket with three screws, a Lock Ring, a Brace and a Base Plate ¾ RJ45 Cable ¾ Quick Installation Guide ¾ Resource CD, including: z This User Guide z Application Guide z Other helpful information ) Note: Make sure that the package contains the above items. If any of the listed items are damaged or missing, please contact your distributor. 1
User Guide
Page 8
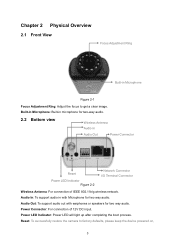
... Audio In Audio Out Power Connector Reset Power LED Indicator Figure 2-2 Network Connector I/O Terminal Connector Wireless Antenna: For connection of 12V DC input. Audio Out: To support audio out with Microphone for two way audio. Chapter 2 Physical Overview 2.1 Front View Focus ... defaults, please keep the device powered on, 3 Power LED Indicator: Power LED will light up after completing the boot process. Reset: To successfully restore the camera to get a clear image. Power Connector: For connection of IEEE 802.11b...
... Audio In Audio Out Power Connector Reset Power LED Indicator Figure 2-2 Network Connector I/O Terminal Connector Wireless Antenna: For connection of 12V DC input. Audio Out: To support audio out with Microphone for two way audio. Chapter 2 Physical Overview 2.1 Front View Focus ... defaults, please keep the device powered on, 3 Power LED Indicator: Power LED will light up after completing the boot process. Reset: To successfully restore the camera to get a clear image. Power Connector: For connection of IEEE 802.11b...
User Guide
Page 33
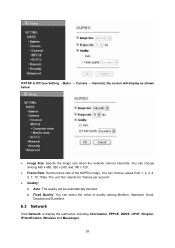
...; Camera → General), the screen will be automatically decided. You can choose among 640 x 480, 320 x 240, and 160 x 120. ¾ Frame Rate: Set the frame rate of quality among Medium, Standard, Good, Detailed and Excellent. 6.3 Network Click Network to display the submenus including Information, PPPoE, DDNS, UPnP, Bonjour, IP Notification, Wireless...
...; Camera → General), the screen will be automatically decided. You can choose among 640 x 480, 320 x 240, and 160 x 120. ¾ Frame Rate: Set the frame rate of quality among Medium, Standard, Good, Detailed and Excellent. 6.3 Network Click Network to display the submenus including Information, PPPoE, DDNS, UPnP, Bonjour, IP Notification, Wireless...
User Guide
Page 43
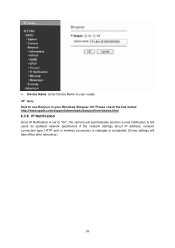
Please check the link below: http://www.apple.com/support/downloads/bonjourforwindows.html 6.3.6 IP Notification Once IP Notification is changed or completed. (Some settings will take effect after rebooting.) 38 ¾ Device Name: Enter Device Name to your needs. ) Note: How to tell users its updated network parameters if the network settings about IP address, network connection type, HTTP port or wireless connection is set to "On", the camera will automatically send an e-mail notification to use Bonjour in your Windows Browser UI?
Please check the link below: http://www.apple.com/support/downloads/bonjourforwindows.html 6.3.6 IP Notification Once IP Notification is changed or completed. (Some settings will take effect after rebooting.) 38 ¾ Device Name: Enter Device Name to your needs. ) Note: How to tell users its updated network parameters if the network settings about IP address, network connection type, HTTP port or wireless connection is set to "On", the camera will automatically send an e-mail notification to use Bonjour in your Windows Browser UI?

User Guide
Page 45
...the IP address of the POP server. This setting is necessary when the SMTP server which is used for the camera in Authentication. You can configure the wireless function for reply mail and sending system messages from the SMTP server. ¾ Subject: Type the subject/title of...mail up to 384 characters. Default value provides network information including IP, Port, MAC, Model, Firmware Version and Web Version. 6.3.7 Wireless Choose Network → Wireless, you can specify more than one recipient E-mail address using the POP user account. z POP server name: It is necessary when...
...the IP address of the POP server. This setting is necessary when the SMTP server which is used for the camera in Authentication. You can configure the wireless function for reply mail and sending system messages from the SMTP server. ¾ Subject: Type the subject/title of...mail up to 384 characters. Default value provides network information including IP, Port, MAC, Model, Firmware Version and Web Version. 6.3.7 Wireless Choose Network → Wireless, you can specify more than one recipient E-mail address using the POP user account. z POP server name: It is necessary when...
User Guide
Page 46
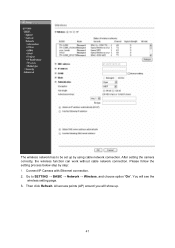
Go to be set up . 41 Please follow the setting process below step by using cable network connection. All access points (AP) around you will see the wireless setting page. 3. The wireless network has to SETTING → BASIC → Network → Wireless, and choose option "On". Connect IP Camera with Ethernet connection. 2. Then click Refresh. After setting the camera correctly, the wireless function can work without cable network connection. You will show up by step: 1.
Go to be set up . 41 Please follow the setting process below step by using cable network connection. All access points (AP) around you will see the wireless setting page. 3. The wireless network has to SETTING → BASIC → Network → Wireless, and choose option "On". Connect IP Camera with Ethernet connection. 2. Then click Refresh. After setting the camera correctly, the wireless function can work without cable network connection. You will show up by step: 1.
User Guide
Page 49
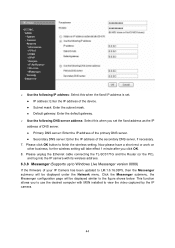
...OK. 8. Secondary DNS server: Enter the IP address of the primary DNS server. This function allows you to use the desired computer with its wireless address. 6.3.8 Messenger (Supports up to LM.1.6.16.03P5, then the Messenger submenu will take effect 1 minute after you set . IP address: Enter... the device. Please click OK button to view the video captured by the IP camera. 44 Subnet mask: Enter the subnet mask. Please unplug the Ethernet cable connecting the TL-SC3171G and the Router (or the PC), and log into the IP camera with MSN installed to finish the wireless setting.
...OK. 8. Secondary DNS server: Enter the IP address of the primary DNS server. This function allows you to use the desired computer with its wireless address. 6.3.8 Messenger (Supports up to LM.1.6.16.03P5, then the Messenger submenu will take effect 1 minute after you set . IP address: Enter... the device. Please click OK button to view the video captured by the IP camera. 44 Subnet mask: Enter the subnet mask. Please unplug the Ethernet cable connecting the TL-SC3171G and the Router (or the PC), and log into the IP camera with MSN installed to finish the wireless setting.


