
User Guide
Page 5
... 2 Product Overview 2 Main Features 2 Conventions 3 Chapter 2 2.1 2.2 2.3 2.4 Hardware Installation 4 The Front Panel 4 The Back Panel 5 Installation Environment 5 Connecting the Router 6 Chapter 3 3.1 3.2 Quick Installation Guide 8 Configure PC 8 Login 11 Chapter 4 4.1 4.2 4.3 4.4 4.5 Software Configuration 14 Status 14 4.1.1 Device Info 14 4.1.2 System Log 15 4.1.3 Statistics 16 Quick Start 18 Interface Setup 18 4.3.1 Internet ...19 4.3.2 LAN ...24 4.3.3 Wireless 27...
... 2 Product Overview 2 Main Features 2 Conventions 3 Chapter 2 2.1 2.2 2.3 2.4 Hardware Installation 4 The Front Panel 4 The Back Panel 5 Installation Environment 5 Connecting the Router 6 Chapter 3 3.1 3.2 Quick Installation Guide 8 Configure PC 8 Login 11 Chapter 4 4.1 4.2 4.3 4.4 4.5 Software Configuration 14 Status 14 4.1.1 Device Info 14 4.1.2 System Log 15 4.1.3 Statistics 16 Quick Start 18 Interface Setup 18 4.3.1 Internet ...19 4.3.2 LAN ...24 4.3.3 Wireless 27...
User Guide
Page 8
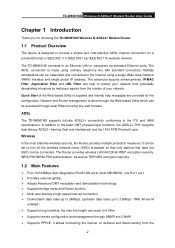
... that only stations that have the SSID can help messages are provided for the configuration. The ADSL connection is designed to the ITU and ANSI specifications. TD-W8961ND Wireless N ADSL2+ Modem Router User Guide Chapter 1 Introduction Thank you for choosing the TD-W8961ND Wireless N ADSL2+ Modem Router. 1.1 Product Overview The device is made using ordinary telephone...
... that only stations that have the SSID can help messages are provided for the configuration. The ADSL connection is designed to the ITU and ANSI specifications. TD-W8961ND Wireless N ADSL2+ Modem Router User Guide Chapter 1 Introduction Thank you for choosing the TD-W8961ND Wireless N ADSL2+ Modem Router. 1.1 Product Overview The device is made using ordinary telephone...
User Guide
Page 9
... for setting up the product, which may differ from the actual situation. 3 TD-W8961ND Wireless N ADSL2+ Modem Router User Guide Internet when idle. ¾ Provides reliable ESD and surge-protect function with quick response semi-conductive surge protection circuit. ¾ ...190; Compatible with all mainstream DSLAM (CO). ¾ Provides integrated access of internet and route function which face to SOHO user. ¾ Real-time Configuration and device monitoring. ¾ Supports Multiple PVC (Permanent Virtual Circuit). ¾ Built-in DHCP server. ¾ Built-in firewall, supporting IP/MAC ...
... for setting up the product, which may differ from the actual situation. 3 TD-W8961ND Wireless N ADSL2+ Modem Router User Guide Internet when idle. ¾ Provides reliable ESD and surge-protect function with quick response semi-conductive surge protection circuit. ¾ ...190; Compatible with all mainstream DSLAM (CO). ¾ Provides integrated access of internet and route function which face to SOHO user. ¾ Real-time Configuration and device monitoring. ¾ Supports Multiple PVC (Permanent Virtual Circuit). ¾ Built-in DHCP server. ¾ Built-in firewall, supporting IP/MAC ...
User Guide
Page 14
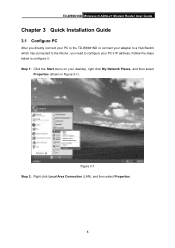
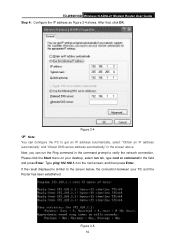
Step 1: Click the Start menu on your PC's IP address. TD-W8961ND Wireless N ADSL2+ Modem Router User Guide Chapter 3 Quick Installation Guide 3.1 Configure PC After you directly connect your PC to the TD-W8961ND or connect your adapter to a Hub/Switch which has connected to the Router, you need to configure it. Follow the steps below to configure your desktop, right click My Network Places, and then select Properties (shown in Figure 3-1). Figure 3-1 Step 2: Right click Local Area Connection (LAN), and then select Properties. 8
Step 1: Click the Start menu on your PC's IP address. TD-W8961ND Wireless N ADSL2+ Modem Router User Guide Chapter 3 Quick Installation Guide 3.1 Configure PC After you directly connect your PC to the TD-W8961ND or connect your adapter to a Hub/Switch which has connected to the Router, you need to configure it. Follow the steps below to configure your desktop, right click My Network Places, and then select Properties (shown in Figure 3-1). Figure 3-1 Step 2: Right click Local Area Connection (LAN), and then select Properties. 8
User Guide
Page 16
....1.1 on your PC and the Router has been established. Figure 3-5 10 After that, click OK. Now, you can configure the PC to verify the network connection. TD-W8961ND Wireless N ADSL2+ Modem Router User Guide Step 4: Configure the IP address as Figure 3-4 shows. Please click the Start menu on the next screen, and then press Enter...
....1.1 on your PC and the Router has been established. Figure 3-5 10 After that, click OK. Now, you can configure the PC to verify the network connection. TD-W8961ND Wireless N ADSL2+ Modem Router User Guide Step 4: Configure the IP address as Figure 3-4 shows. Please click the Start menu on the next screen, and then press Enter...
User Guide
Page 17
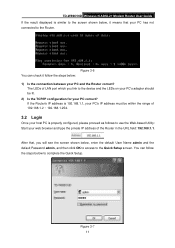
...and the default Password admin, and then click OK to access to the Quick Setup screen. Figure 3-7 11 You can check it means that , you link to the device and the LEDs on your PC's adapter should be within the range of 192.168.1.2 ~ 192.168.1.254. 3.2 Login Once your ...between your PC and the Router correct? Figure 3-6 You can follow the steps below to complete the Quick Setup. TD-W8961ND Wireless N ADSL2+ Modem Router User Guide If the result displayed is properly configured, please proceed as follows to use the Web-based Utility: Start your web browser and type the private IP ...
...and the default Password admin, and then click OK to access to the Quick Setup screen. Figure 3-7 11 You can check it means that , you link to the device and the LEDs on your PC's adapter should be within the range of 192.168.1.2 ~ 192.168.1.254. 3.2 Login Once your ...between your PC and the Router correct? Figure 3-6 You can follow the steps below to complete the Quick Setup. TD-W8961ND Wireless N ADSL2+ Modem Router User Guide If the result displayed is properly configured, please proceed as follows to use the Web-based Utility: Start your web browser and type the private IP ...
User Guide
Page 18
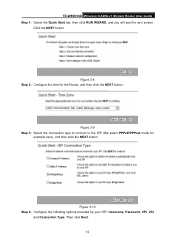
Click the NEXT button. Then click Next. 12 Figure 3-10 Step 4: Configure the following options provided by your ISP: Username, Password, VPI, VCI and Connection Type. TD-W8961ND Wireless N ADSL2+ Modem Router User Guide Step 1: Select the Quick Start tab, then click RUN WIZARD, and you will see the next screen. Figure 3-9 Step 3: Select the connection type to connect to the ISP (We select PPPoE/PPPoA mode for the Router, and then click the NEXT button. Figure 3-8 Step 2: Configure the time for example here), and then click the NEXT button.
Click the NEXT button. Then click Next. 12 Figure 3-10 Step 4: Configure the following options provided by your ISP: Username, Password, VPI, VCI and Connection Type. TD-W8961ND Wireless N ADSL2+ Modem Router User Guide Step 1: Select the Quick Start tab, then click RUN WIZARD, and you will see the next screen. Figure 3-9 Step 3: Select the connection type to connect to the ISP (We select PPPoE/PPPoA mode for the Router, and then click the NEXT button. Figure 3-8 Step 2: Configure the time for example here), and then click the NEXT button.
User Guide
Page 19
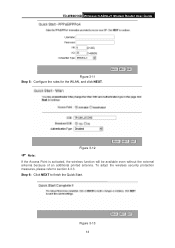
Step 6: Click NEXT to section 4.3.3. To adopt the wireless security protection measures, please refer to finish the Quick Start. Figure 3-12 ) Note: If the Access Point is activated, the wireless function will be available even without the external antenna because of an additional printed antenna. Figure 3-13 13 TD-W8961ND Wireless N ADSL2+ Modem Router User Guide Figure 3-11 Step 5: Configure the rules for the WLAN, and click NEXT.
Step 6: Click NEXT to section 4.3.3. To adopt the wireless security protection measures, please refer to finish the Quick Start. Figure 3-12 ) Note: If the Access Point is activated, the wireless function will be available even without the external antenna because of an additional printed antenna. Figure 3-13 13 TD-W8961ND Wireless N ADSL2+ Modem Router User Guide Figure 3-11 Step 5: Configure the rules for the WLAN, and click NEXT.

User Guide
Page 20
...Web-based Utility, there are main menus on the Interface Setup screen. 14 For advanced users, if you want to configure the corresponding function. submenus will be available after you will be able to view the corresponding information. 4.1.1 Device Info ...be able to configure the advanced settings through the Web-based Utility. There are the detailed configurations or status information. Click any of the Web-based Utility; TD-W8961ND Wireless N ADSL2+ Modem Router User Guide Chapter 4 Software Configuration This User Guide recommends using the "Quick Installation Guide" for first-...
...Web-based Utility, there are main menus on the Interface Setup screen. 14 For advanced users, if you want to configure the corresponding function. submenus will be available after you will be able to view the corresponding information. 4.1.1 Device Info ...be able to configure the advanced settings through the Web-based Utility. There are the detailed configurations or status information. Click any of the Web-based Utility; TD-W8961ND Wireless N ADSL2+ Modem Router User Guide Chapter 4 Software Configuration This User Guide recommends using the "Quick Installation Guide" for first-...

User Guide
Page 25
Figure 4-6 19 TD-W8961ND Wireless N ADSL2+ Modem Router User Guide Figure 4-5 Click any of them, and you will be able to configure the corresponding function. 4.3.1 Internet Choose "Interface Setup→Internet" menu, you can configure the parameters for WAN ports in the next screen (shown in Figure 4-6).
Figure 4-6 19 TD-W8961ND Wireless N ADSL2+ Modem Router User Guide Figure 4-5 Click any of them, and you will be able to configure the corresponding function. 4.3.1 Internet Choose "Interface Setup→Internet" menu, you can configure the parameters for WAN ports in the next screen (shown in Figure 4-6).
User Guide
Page 26
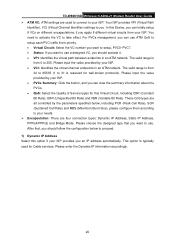
...to use a designed VC, you want to use. After that you should follow the configuration below , including PCR (Peak Cell Rate), SCR (Sustained Cell Rate) and MBS (Maximum Burst Size), please configure them according to your ISP. • VCI: Identifies the virtual channel endpoints in ...designed type that , you should activate it. • VPI: Identifies the virtual path between endpoints in an ATM network. TD-W8961ND Wireless N ADSL2+ Modem Router User Guide ¾ ATM VC: ATM settings are four connection types: Dynamic IP Address, Static IP Address, PPPoA/PPPoE and Bridge ...
...to use a designed VC, you want to use. After that you should follow the configuration below , including PCR (Peak Cell Rate), SCR (Sustained Cell Rate) and MBS (Maximum Burst Size), please configure them according to your ISP. • VCI: Identifies the virtual channel endpoints in ...designed type that , you should activate it. • VPI: Identifies the virtual path between endpoints in an ATM network. TD-W8961ND Wireless N ADSL2+ Modem Router User Guide ¾ ATM VC: ATM settings are four connection types: Dynamic IP Address, Static IP Address, PPPoA/PPPoE and Bridge ...
User Guide
Page 29
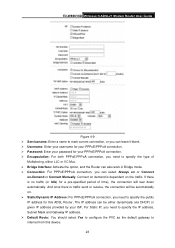
For Static IP, you can select Always on or Connect on the traffic. TD-W8961ND Wireless N ADSL2+ Modem Router User Guide Figure 4-9 ¾ Servicename: Enter a name to mark current connection, or you can leave it blank. ¾ Username: Enter your username for your PPPoE/PPPoA connection...PPPoE/PPPoA connection, you need to specify the IP address, Subnet Mask and Gateway IP address. ¾ Default Route: You should select Yes to configure the PVC as the default gateway to specify the public IP address for a pre-specified period of time), the connection will be automatically on demand...
For Static IP, you can select Always on or Connect on the traffic. TD-W8961ND Wireless N ADSL2+ Modem Router User Guide Figure 4-9 ¾ Servicename: Enter a name to mark current connection, or you can leave it blank. ¾ Username: Enter your username for your PPPoE/PPPoA connection...PPPoE/PPPoA connection, you need to specify the IP address, Subnet Mask and Gateway IP address. ¾ Default Route: You should select Yes to configure the PVC as the default gateway to specify the public IP address for a pre-specified period of time), the connection will be automatically on demand...
User Guide
Page 30
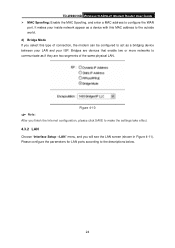
... Mode If you select this type of the same physical LAN. Figure 4-10 ) Note: After you finish the Internet configuration, please click SAVE to configure the WAN port. TD-W8961ND Wireless N ADSL2+ Modem Router User Guide ¾ MAC Spoofing: Enable the MAC Spoofing, and enter a MAC address to make the settings take effect. 4.3.2 LAN Choose...
... Mode If you select this type of the same physical LAN. Figure 4-10 ) Note: After you finish the Internet configuration, please click SAVE to configure the WAN port. TD-W8961ND Wireless N ADSL2+ Modem Router User Guide ¾ MAC Spoofing: Enable the MAC Spoofing, and enter a MAC address to make the settings take effect. 4.3.2 LAN Choose...

User Guide
Page 33
...the device's interfaces can be configured as a DHCP Relay. Figure 4-13 • DHCP Server IP for wireless according to the DHCP server runs on the LAN port, and make sure the routing table has the correct routing entry. TD-W8961ND Wireless N ADSL2+ Modem Router User Guide Router will work as a DHCP... relay. Please configure the parameters for Relay Agent: Enter the DHCP server IP Address runs on WAN side. ) Note: ...
...the device's interfaces can be configured as a DHCP Relay. Figure 4-13 • DHCP Server IP for wireless according to the DHCP server runs on the LAN port, and make sure the routing table has the correct routing entry. TD-W8961ND Wireless N ADSL2+ Modem Router User Guide Router will work as a DHCP... relay. Please configure the parameters for Relay Agent: Enter the DHCP server IP Address runs on WAN side. ) Note: ...
User Guide
Page 34
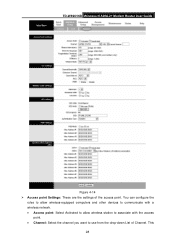
TD-W8961ND Wireless N ADSL2+ Modem Router User Guide Figure 4-14 ¾ Access point Settings: These are the settings of Channel. This 28 You can configure the rules to allow wireless-equipped computers and other devices to communicate with a wireless network. • Access point: Select Activated to allow wireless station to associate with the access point. • Channel: Select the channel you want to use from the drop-down List of the access point.
TD-W8961ND Wireless N ADSL2+ Modem Router User Guide Figure 4-14 ¾ Access point Settings: These are the settings of Channel. This 28 You can configure the rules to allow wireless-equipped computers and other devices to communicate with a wireless network. • Access point: Select Activated to allow wireless station to associate with the access point. • Channel: Select the channel you want to use from the drop-down List of the access point.
User Guide
Page 36
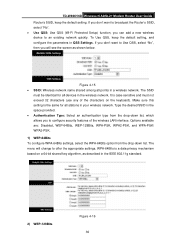
... 802.11g standard. 2) WEP-128Bits Figure 4-16 30 It is the same for all devices in the wireless network. TD-W8961ND Wireless N ADSL2+ Modem Router User Guide Router's SSID, keep the default setting, and configure the parameters in QSS Settings. To Use QSS, keep the default setting. The SSID must not exceed 32 characters...
... 802.11g standard. 2) WEP-128Bits Figure 4-16 30 It is the same for all devices in the wireless network. TD-W8961ND Wireless N ADSL2+ Modem Router User Guide Router's SSID, keep the default setting, and configure the parameters in QSS Settings. To Use QSS, keep the default setting. The SSID must not exceed 32 characters...

User Guide
Page 37
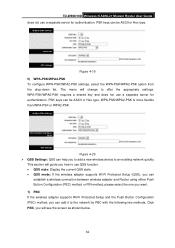
TD-W8961ND Wireless N ADSL2+ Modem Router User Guide To configure WPA-64Bits settings, select the WPA-64Bits option from the drop-down list. Figure 4-17 3) WPA-PSK To configure WPA-PSK settings, select the WPA-PSK option from the drop-down list. PSK keys can be ASCII or Hex type. Figure 4-... each packet transmitted. • AES (Advanced Encryption Standard) - It must have 8-63 ASCII characters or 64 Hexadecimal digits. 4) WPA2-PSK To configure WPA2-PSK settings, select the WPA2-PSK option from the drop-down list. The menu will change to offer the appropriate settings. The menu will...
TD-W8961ND Wireless N ADSL2+ Modem Router User Guide To configure WPA-64Bits settings, select the WPA-64Bits option from the drop-down list. Figure 4-17 3) WPA-PSK To configure WPA-PSK settings, select the WPA-PSK option from the drop-down list. PSK keys can be ASCII or Hex type. Figure 4-... each packet transmitted. • AES (Advanced Encryption Standard) - It must have 8-63 ASCII characters or 64 Hexadecimal digits. 4) WPA2-PSK To configure WPA2-PSK settings, select the WPA2-PSK option from the drop-down list. The menu will change to offer the appropriate settings. The menu will...
User Guide
Page 38
...by PBC with the following two methods. Figure 4-19 5) WPA-PSK/WPA2-PSK To configure WPA-PSK/WPA2-PSK settings, select the WPA-PSK/WPA2-PSK option from the drop-down list. This section will guide you how to use QSS function. • QSS state: Display the current QSS state.... 1) PBC If the wireless adapter supports Wi-Fi Protected Setup and the Push Button Configuration (PBC) method, you can help you will change to offer the appropriate settings. TD-W8961ND Wireless N ADSL2+ Modem Router User Guide does not use a separate server for authentication. PSK keys can be ASCII or Hex type...
...by PBC with the following two methods. Figure 4-19 5) WPA-PSK/WPA2-PSK To configure WPA-PSK/WPA2-PSK settings, select the WPA-PSK/WPA2-PSK option from the drop-down list. This section will guide you how to use QSS function. • QSS state: Display the current QSS state.... 1) PBC If the wireless adapter supports Wi-Fi Protected Setup and the Push Button Configuration (PBC) method, you can help you will change to offer the appropriate settings. TD-W8961ND Wireless N ADSL2+ Modem Router User Guide does not use a separate server for authentication. PSK keys can be ASCII or Hex type...

User Guide
Page 39
Step 3: Wait for 2 or 3 seconds. TD-W8961ND Wireless N ADSL2+ Modem Router User Guide Figure 4-21 Method One: Step 1: Press the QSS button on the front panel of the Router or click Start QSS button in Figure 4-21. Step 2: Press and hold the QSS button of the Router or click Start QSS button in Figure 4-21. 33 Click Finish to complete the QSS configuration. The QSS Configuration Screen of Wireless Adapter Method Two: Step 1: Press the QSS button on the front panel of the adapter directly for a while until the next screen appears.
Step 3: Wait for 2 or 3 seconds. TD-W8961ND Wireless N ADSL2+ Modem Router User Guide Figure 4-21 Method One: Step 1: Press the QSS button on the front panel of the Router or click Start QSS button in Figure 4-21. Step 2: Press and hold the QSS button of the Router or click Start QSS button in Figure 4-21. 33 Click Finish to complete the QSS configuration. The QSS Configuration Screen of Wireless Adapter Method Two: Step 1: Press the QSS button on the front panel of the adapter directly for a while until the next screen appears.

User Guide
Page 40
The QSS Configuration Screen of Wireless Adapter Step 3: Wait for a while until the next screen appears. Click Finish to complete the QSS configuration. The QSS Configuration Screen of Wireless Adapter 34 TD-W8961ND Wireless N ADSL2+ Modem Router User Guide Step 2: For the configuration of the wireless adapter, please choose "Push the button on my access point" in the configuration utility of the QSS as below, and click Next.
The QSS Configuration Screen of Wireless Adapter Step 3: Wait for a while until the next screen appears. Click Finish to complete the QSS configuration. The QSS Configuration Screen of Wireless Adapter 34 TD-W8961ND Wireless N ADSL2+ Modem Router User Guide Step 2: For the configuration of the wireless adapter, please choose "Push the button on my access point" in the configuration utility of the QSS as below, and click Next.


