Quick Installation Guide
Page 4
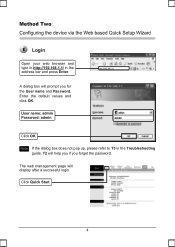
Enter the default values and click OK. The web management page will prompt you forget the password. A dialog box will display after a successful login. T2 will help you if you for the User name and Password. Click Quick Start 4 Login Open your web browser and type in http://192.168.1.1/ in the Troubleshooting guide. User name: admin Password: admin Click OK Note If the dialog box does not pop up, please refer to T3 in the address bar and press Enter.
Enter the default values and click OK. The web management page will prompt you forget the password. A dialog box will display after a successful login. T2 will help you if you for the User name and Password. Click Quick Start 4 Login Open your web browser and type in http://192.168.1.1/ in the Troubleshooting guide. User name: admin Password: admin Click OK Note If the dialog box does not pop up, please refer to T3 in the address bar and press Enter.
Quick Installation Guide
Page 8
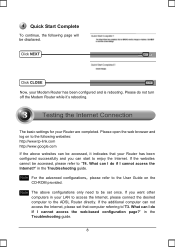
...configured successfully and you want other computers in your LAN to access the Internet, please connect the desired computer to the User Guide on to the following page will be set that computer referring to"T3. Click NEXT Click CLOSE Now, your Router are ...Note For the advanced configurations,please refer to the ADSL Router directly. in the Troubleshooting guide. in the Troubleshooting guide. 8 Quick Start Complete To continue, the following websites: http://www.tp-link.com http://www.google.com If the above configurations only need to be displayed. Please do...
...configured successfully and you want other computers in your LAN to access the Internet, please connect the desired computer to the User Guide on to the following page will be set that computer referring to"T3. Click NEXT Click CLOSE Now, your Router are ...Note For the advanced configurations,please refer to the ADSL Router directly. in the Troubleshooting guide. in the Troubleshooting guide. 8 Quick Start Complete To continue, the following websites: http://www.tp-link.com http://www.google.com If the above configurations only need to be displayed. Please do...

Quick Installation Guide
Page 16
Technical Support „ For more troubleshooting help, go to www.tp-link.com/support/faq.asp „ To download the latest Firmware, Driver, Utility and User Guide, go to www.tp-link.com/support/download.asp „ For all other technical support, please contact us by using the following: ...Global USA/Canada Tel: +86 755 26504400 Toll Free: +1 866 225 8139 E-mail : support@tp-link.com E-mail: support.usa@tp-link.com Service time:24hrs...
Technical Support „ For more troubleshooting help, go to www.tp-link.com/support/faq.asp „ To download the latest Firmware, Driver, Utility and User Guide, go to www.tp-link.com/support/download.asp „ For all other technical support, please contact us by using the following: ...Global USA/Canada Tel: +86 755 26504400 Toll Free: +1 866 225 8139 E-mail : support@tp-link.com E-mail: support.usa@tp-link.com Service time:24hrs...
User Guide
Page 5
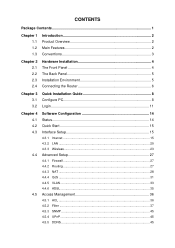
... Contents ...1 Chapter 1 1.1 1.2 1.3 Introduction 2 Product Overview 2 Main Features 2 Conventions 3 Chapter 2 2.1 2.2 2.3 2.4 Hardware Installation 4 The Front Panel 4 The Back Panel 5 Installation Environment 5 Connecting the Router 6 Chapter 3 3.1 3.2 Quick Installation Guide 8 Configure PC 8 Login 11 Chapter 4 4.1 4.2 4.3 4.4 4.5 Software Configuration 14 Status 14 Quick Start 15 Interface Setup 15 4.3.1 Internet ...15 4.3.2 LAN ...20 4.3.3 Wireless 23 Advanced Setup 27...
... Contents ...1 Chapter 1 1.1 1.2 1.3 Introduction 2 Product Overview 2 Main Features 2 Conventions 3 Chapter 2 2.1 2.2 2.3 2.4 Hardware Installation 4 The Front Panel 4 The Back Panel 5 Installation Environment 5 Connecting the Router 6 Chapter 3 3.1 3.2 Quick Installation Guide 8 Configure PC 8 Login 11 Chapter 4 4.1 4.2 4.3 4.4 4.5 Software Configuration 14 Status 14 Quick Start 15 Interface Setup 15 4.3.1 Internet ...15 4.3.2 LAN ...20 4.3.3 Wireless 23 Advanced Setup 27...
User Guide
Page 7
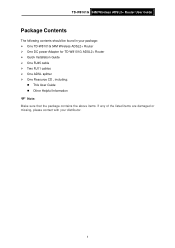
TD-W8101G 54M Wireless ADSL2+ Router User Guide Package Contents The following contents should be found in your package: ¾ One TD-W8101G 54M Wireless ADSL2+ Router ¾ One DC power Adapter for TD-W8101G ADSL2+ Router ¾ Quick Installation Guide ¾ One RJ45 cable ¾ Two RJ11 cables ¾ One ADSL splitter ¾ One Resource CD , including: z This User Guide z Other Helpful Information ) Note: Make sure that the package contains the above items. If any of the listed items are damaged or missing, please contact with your distributor. 1
TD-W8101G 54M Wireless ADSL2+ Router User Guide Package Contents The following contents should be found in your package: ¾ One TD-W8101G 54M Wireless ADSL2+ Router ¾ One DC power Adapter for TD-W8101G ADSL2+ Router ¾ Quick Installation Guide ¾ One RJ45 cable ¾ Two RJ11 cables ¾ One ADSL splitter ¾ One Resource CD , including: z This User Guide z Other Helpful Information ) Note: Make sure that the package contains the above items. If any of the listed items are damaged or missing, please contact with your distributor. 1
User Guide
Page 8
...Annex M enabled). ¾ Supports long transfers, the max line length can help messages are provided for the configuration. TD-W8101G 54M Wireless ADSL2+ Router User Guide Chapter 1 Introduction 1.1 Product Overview Thank you for a private Ethernet or 802.11g/802.11b wireless network. In addition... to the ITU and ANSI specifications. ADSL The TD-W8101G supports full-rate ADSL2+ connectivity conforming to the basic DMT ...
...Annex M enabled). ¾ Supports long transfers, the max line length can help messages are provided for the configuration. TD-W8101G 54M Wireless ADSL2+ Router User Guide Chapter 1 Introduction 1.1 Product Overview Thank you for a private Ethernet or 802.11g/802.11b wireless network. In addition... to the ITU and ANSI specifications. ADSL The TD-W8101G supports full-rate ADSL2+ connectivity conforming to the basic DMT ...
User Guide
Page 9
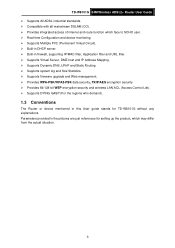
... Control List). ¾ Supports DYING GASP (For the regions who demand). 1.3 Conventions The Router or device mentioned in this User guide stands for TD-W8101G without any explanations. TD-W8101G 54M Wireless ADSL2+ Router User Guide ¾ Supports All ADSL industrial standards. ¾ Compatible with all mainstream DSLAM (CO). ¾ Provides integrated access of internet and...
... Control List). ¾ Supports DYING GASP (For the regions who demand). 1.3 Conventions The Router or device mentioned in this User guide stands for TD-W8101G without any explanations. TD-W8101G 54M Wireless ADSL2+ Router User Guide ¾ Supports All ADSL industrial standards. ¾ Compatible with all mainstream DSLAM (CO). ¾ Provides integrated access of internet and...
User Guide
Page 10
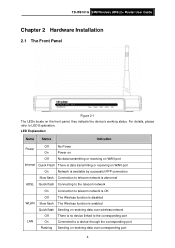
TD-W8101G 54M Wireless ADSL2+ Router User Guide Chapter 2 Hardware Installation 2.1 The Front Panel Figure 2-1 The LEDs locate on WAN port On Network is available by successful PPP connection Slow flash Connection to ... Wireless function is disabled Slow flash The Wireless function is enabled Quick flash Sending or receiving data over wireless network Off There is no device linked to the corresponding port LAN On Connected to LED Explanation. For details, please refer to a device through the corresponding port Flashing Sending or receiving data...
TD-W8101G 54M Wireless ADSL2+ Router User Guide Chapter 2 Hardware Installation 2.1 The Front Panel Figure 2-1 The LEDs locate on WAN port On Network is available by successful PPP connection Slow flash Connection to ... Wireless function is disabled Slow flash The Wireless function is enabled Quick flash Sending or receiving data over wireless network Off There is no device linked to the corresponding port LAN On Connected to LED Explanation. For details, please refer to a device through the corresponding port Flashing Sending or receiving data...
User Guide
Page 11
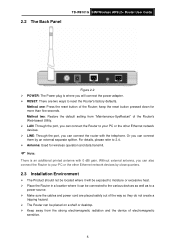
...; Make sure the cables and power cord are two ways to 2.4. ¾ Antenna: Used for more than five seconds. 2.2 The Back Panel TD-W8101G 54M Wireless ADSL2+ Router User Guide Figure 2-2 ¾ POWER: The Power plug is an additional printed antenna with the telephone. Without external antenna, you can connect them by close...
...; Make sure the cables and power cord are two ways to 2.4. ¾ Antenna: Used for more than five seconds. 2.2 The Back Panel TD-W8101G 54M Wireless ADSL2+ Router User Guide Figure 2-2 ¾ POWER: The Power plug is an additional printed antenna with the telephone. Without external antenna, you can connect them by close...
User Guide
Page 12
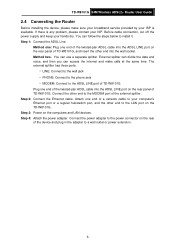
... one: Plug one end of the twisted-pair ADSL cable into the ADSL LINE port on the rear panel of TD-W8101G, and insert the other end to the power connector on the TD-W8101G. The external splitter has three ports: • LINE: Connect to the wall jack • PHONE: Connect to the phone... or a regular hub/switch port, and the other end to the LAN port on the rear of the external splitter. You can use a separate splitter. TD-W8101G 54M Wireless ADSL2+ Router User Guide 2.4 Connecting the Router Before installing the device, please make calls at the same time.
... one: Plug one end of the twisted-pair ADSL cable into the ADSL LINE port on the rear panel of TD-W8101G, and insert the other end to the power connector on the TD-W8101G. The external splitter has three ports: • LINE: Connect to the wall jack • PHONE: Connect to the phone... or a regular hub/switch port, and the other end to the LAN port on the rear of the external splitter. You can use a separate splitter. TD-W8101G 54M Wireless ADSL2+ Router User Guide 2.4 Connecting the Router Before installing the device, please make calls at the same time.
User Guide
Page 14
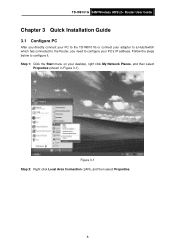
Figure 3-1 Step 2: Right click Local Area Connection (LAN), and then select Properties. 8 TD-W8101G 54M Wireless ADSL2+ Router User Guide Chapter 3 Quick Installation Guide 3.1 Configure PC After you directly connect your PC to the TD-W8101G or connect your adapter to a Hub/Switch which has connected to the Router, you need to configure it. Step 1: Click the Start menu on your PC's IP address. Follow the steps below to configure your desktop, right click My Network Places, and then select Properties (shown in Figure 3-1).
Figure 3-1 Step 2: Right click Local Area Connection (LAN), and then select Properties. 8 TD-W8101G 54M Wireless ADSL2+ Router User Guide Chapter 3 Quick Installation Guide 3.1 Configure PC After you directly connect your PC to the TD-W8101G or connect your adapter to a Hub/Switch which has connected to the Router, you need to configure it. Step 1: Click the Start menu on your PC's IP address. Follow the steps below to configure your desktop, right click My Network Places, and then select Properties (shown in Figure 3-1).
User Guide
Page 15
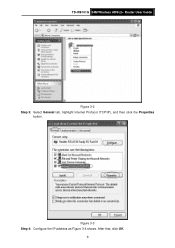
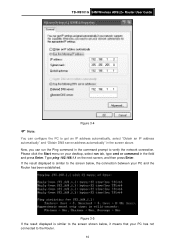
Figure 3-3 Step 4: Configure the IP address as Figure 3-4 shows. After that, click OK. 9 TD-W8101G 54M Wireless ADSL2+ Router User Guide Figure 3-2 Step 3: Select General tab, highlight Internet Protocol (TCP/IP), and then click the Properties button.
Figure 3-3 Step 4: Configure the IP address as Figure 3-4 shows. After that, click OK. 9 TD-W8101G 54M Wireless ADSL2+ Router User Guide Figure 3-2 Step 3: Select General tab, highlight Internet Protocol (TCP/IP), and then click the Properties button.
User Guide
Page 16
... ping 192.168.1.1 on your PC and the Router has been established. Now, you can configure the PC to verify the network connection. TD-W8101G 54M Wireless ADSL2+ Router User Guide Figure 3-4 ) Note: You can run tab, type cmd or command in the screen above. Please click the Start menu on the next...
... ping 192.168.1.1 on your PC and the Router has been established. Now, you can configure the PC to verify the network connection. TD-W8101G 54M Wireless ADSL2+ Router User Guide Figure 3-4 ) Note: You can run tab, type cmd or command in the screen above. Please click the Start menu on the next...
User Guide
Page 17
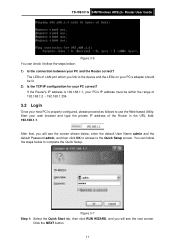
... to access to complete the Quick Setup. Click the NEXT button. 11 TD-W8101G 54M Wireless ADSL2+ Router User Guide Figure 3-6 You can follow the steps below: 1) Is the connection between your PC and the Router correct? After that, you link to use the Web-based Utility: Start your web browser and type the...
... to access to complete the Quick Setup. Click the NEXT button. 11 TD-W8101G 54M Wireless ADSL2+ Router User Guide Figure 3-6 You can follow the steps below: 1) Is the connection between your PC and the Router correct? After that, you link to use the Web-based Utility: Start your web browser and type the...
User Guide
Page 18
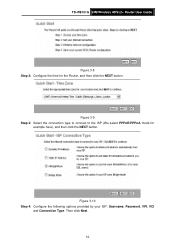
Figure 3-9 Step 3: Select the connection type to connect to the ISP (We select PPPoE/PPPoA mode for the Router, and then click the NEXT button. Figure 3-10 Step 4: Configure the following options provided by your ISP: Username, Password, VPI, VCI and Connection Type. Then click Next. 12 TD-W8101G 54M Wireless ADSL2+ Router User Guide Figure 3-8 Step 2: Configure the time for example here), and then click the NEXT button.
Figure 3-9 Step 3: Select the connection type to connect to the ISP (We select PPPoE/PPPoA mode for the Router, and then click the NEXT button. Figure 3-10 Step 4: Configure the following options provided by your ISP: Username, Password, VPI, VCI and Connection Type. Then click Next. 12 TD-W8101G 54M Wireless ADSL2+ Router User Guide Figure 3-8 Step 2: Configure the time for example here), and then click the NEXT button.
User Guide
Page 19
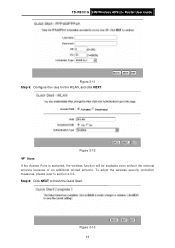
Step 6: Click NEXT to section 4.3.3. Figure 3-13 13 To adopt the wireless security protection measures, please refer to finish the Quick Start. Figure 3-12 ) Note: If the Access Point is activated, the wireless function will be available even without the external antenna because of an additional printed antenna. TD-W8101G 54M Wireless ADSL2+ Router User Guide Figure 3-11 Step 5: Configure the rules for the WLAN, and click NEXT.
Step 6: Click NEXT to section 4.3.3. Figure 3-13 13 To adopt the wireless security protection measures, please refer to finish the Quick Start. Figure 3-12 ) Note: If the Access Point is activated, the wireless function will be available even without the external antenna because of an additional printed antenna. TD-W8101G 54M Wireless ADSL2+ Router User Guide Figure 3-11 Step 5: Configure the rules for the WLAN, and click NEXT.
User Guide
Page 20
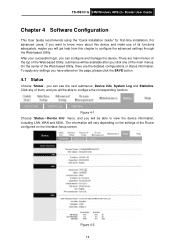
... this chapter to configure the corresponding function. Click any settings you have altered on the Interface Setup screen. TD-W8101G 54M Wireless ADSL2+ Router User Guide Chapter 4 Software Configuration This User Guide recommends using the "Quick Installation Guide" for first-time installation. After your successful login, you will get help from this device and make...
... this chapter to configure the corresponding function. Click any settings you have altered on the Interface Setup screen. TD-W8101G 54M Wireless ADSL2+ Router User Guide Chapter 4 Software Configuration This User Guide recommends using the "Quick Installation Guide" for first-time installation. After your successful login, you will get help from this device and make...
User Guide
Page 21
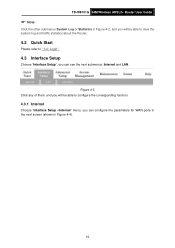
... screen (shown in Figure 4-2, and you will be able to " 3.2: Login". 4.3 Interface Setup Choose "Interface Setup", you can see the next submenus: Internet and LAN. TD-W8101G 54M Wireless ADSL2+ Router User Guide ) Note: Click the other submenus System Log or Statistics in Figure 4-4). 15
... screen (shown in Figure 4-2, and you will be able to " 3.2: Login". 4.3 Interface Setup Choose "Interface Setup", you can see the next submenus: Internet and LAN. TD-W8101G 54M Wireless ADSL2+ Router User Guide ) Note: Click the other submenus System Log or Statistics in Figure 4-4). 15
User Guide
Page 22
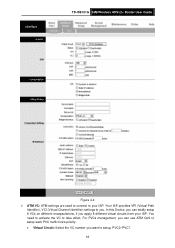
For PVCs management, you can totally setup 8 VCs on different encapsulations, if you apply 8 different virtual circuits from your ISP. In this Device, you can use ATM QoS to setup each PVC traffic line's priority. • Virtual Circuit: Select the VC number you want to take effect. Your ISP provides VPI (Virtual Path Identifier), VCI (Virtual Channel Identifier) settings to your ISP. TD-W8101G 54M Wireless ADSL2+ Router User Guide Figure 4-4 ¾ ATM VC: ATM settings are used to connect to you. You need to activate the VC to setup, PVC0~PVC7. 16
For PVCs management, you can totally setup 8 VCs on different encapsulations, if you apply 8 different virtual circuits from your ISP. In this Device, you can use ATM QoS to setup each PVC traffic line's priority. • Virtual Circuit: Select the VC number you want to take effect. Your ISP provides VPI (Virtual Path Identifier), VCI (Virtual Channel Identifier) settings to your ISP. TD-W8101G 54M Wireless ADSL2+ Router User Guide Figure 4-4 ¾ ATM VC: ATM settings are used to connect to you. You need to activate the VC to setup, PVC0~PVC7. 16

User Guide
Page 23
... channel endpoints in an ATM network. Please enter the Dynamic IP information accordingly. RIP2-B and RIP2-M are both sent in an ATM network. TD-W8101G 54M Wireless ADSL2+ Router User Guide • Status: If you want to use a designed VC, you should follow the configuration below , including PCR (Peak Cell Rate), SCR (Sustained...
... channel endpoints in an ATM network. Please enter the Dynamic IP information accordingly. RIP2-B and RIP2-M are both sent in an ATM network. TD-W8101G 54M Wireless ADSL2+ Router User Guide • Status: If you want to use a designed VC, you should follow the configuration below , including PCR (Peak Cell Rate), SCR (Sustained...
