
User Guide
Page 2
is a registered trademark of their respective holders. Other brands and product names are subject to make any means or used to change without permission from TP-LINK TECHNOLOGIES CO., LTD. COPYRIGHT & TRADEMARKS Specifications are trademarks or registered trademarks of TP-LINK TECHNOLOGIES CO., LTD. All rights reserved. Copyright © 2008 TP-LINK TECHNOLOGIES CO., LTD. No part of the specifications may be reproduced in any form or by any derivative such as translation, transformation, or adaptation without notice. http://www.tp-link.com
is a registered trademark of their respective holders. Other brands and product names are subject to make any means or used to change without permission from TP-LINK TECHNOLOGIES CO., LTD. COPYRIGHT & TRADEMARKS Specifications are trademarks or registered trademarks of TP-LINK TECHNOLOGIES CO., LTD. All rights reserved. Copyright © 2008 TP-LINK TECHNOLOGIES CO., LTD. No part of the specifications may be reproduced in any form or by any derivative such as translation, transformation, or adaptation without notice. http://www.tp-link.com
User Guide
Page 3
This device complies with part 15 of the following measures: • Reorient or relocate the receiving antenna. • Increase the separation between the equipment and receiver. • Connect the equipment into an outlet on a circuit different from that to which case the user may be required to the following two conditions: 1) This device may cause undesired operation. Operation is no guarantee that may not cause harmful interference. 2) This device must accept any interference received, including interference that interference will not occur in a particular installation. These ...
This device complies with part 15 of the following measures: • Reorient or relocate the receiving antenna. • Increase the separation between the equipment and receiver. • Connect the equipment into an outlet on a circuit different from that to which case the user may be required to the following two conditions: 1) This device may cause undesired operation. Operation is no guarantee that may not cause harmful interference. 2) This device must accept any interference received, including interference that interference will not occur in a particular installation. These ...
User Guide
Page 4
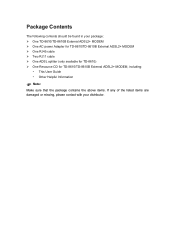
Package Contents The following contents should be found in your package: ¾ One TD-8610/TD-8610B External ADSL2+ MODEM ¾ One AC power Adapter for TD-8610/TD-8610B External ADSL2+ MODEM ¾ One RJ45 cable ¾ Two RJ11 cable ¾ One ADSL splitter (only available for TD-8610) ¾ One Resource CD for TD-8610/TD-8610B External ADSL2+ MODEM, including: • This User Guide • Other Helpful Information ) Note: Make sure that the package contains the above items. If any of the listed items are damaged or missing, please contact with your distributor.
Package Contents The following contents should be found in your package: ¾ One TD-8610/TD-8610B External ADSL2+ MODEM ¾ One AC power Adapter for TD-8610/TD-8610B External ADSL2+ MODEM ¾ One RJ45 cable ¾ Two RJ11 cable ¾ One ADSL splitter (only available for TD-8610) ¾ One Resource CD for TD-8610/TD-8610B External ADSL2+ MODEM, including: • This User Guide • Other Helpful Information ) Note: Make sure that the package contains the above items. If any of the listed items are damaged or missing, please contact with your distributor.
User Guide
Page 5
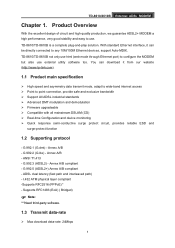
CONTENTS Chapter 1. Product Overview 1 1.1 Product main specification 1 1.2 Supporting protocol 1 1.3 Transmit data-rate 1 1.4 ATM property 2 1.5 System support 2 1.6 Working environment 2 1.7 Electric parameter 2 Chapter 2. Hardware Installation Guide 3 2.1 System requirement 3 2.2 LED explanation 3 2.3 Rear-panel...4 2.4 Hardware installation procedures 4 Chapter 3. How to use 6 3.1 Computer Configuration 6 3.2 Login...7 3.3 Setup ...8 3.4 Software Dial 9 Appendix A: Default Configuration 10
CONTENTS Chapter 1. Product Overview 1 1.1 Product main specification 1 1.2 Supporting protocol 1 1.3 Transmit data-rate 1 1.4 ATM property 2 1.5 System support 2 1.6 Working environment 2 1.7 Electric parameter 2 Chapter 2. Hardware Installation Guide 3 2.1 System requirement 3 2.2 LED explanation 3 2.3 Rear-panel...4 2.4 Hardware installation procedures 4 Chapter 3. How to use 6 3.1 Computer Configuration 6 3.2 Login...7 3.3 Setup ...8 3.4 Software Dial 9 Appendix A: Default Configuration 10
User Guide
Page 6
... provides reliable ESD and surge-protect function 1.2 Supporting protocol - With standard Ethernet interface, it from our website (http://www.tp-link.com). 1.1 Product main specification ¾ High speed and asymmetry data transmit mode, adapt to wide-band internet access ¾...external utility software too. G.992.2 (G.lite) - G.992.5 (ADSL2+) Annex A/B compliant - I.432 ATM physical layer compliant -Supports RFC2516 (PPPoE) * - TD-8610/TD-8610B not only use html (web mode through Ethernet port) to any 10M/100M Ethernet devices, support Auto-MDIX. G.992.3 (ADSL2) - Annex A/B - Annex...
... provides reliable ESD and surge-protect function 1.2 Supporting protocol - With standard Ethernet interface, it from our website (http://www.tp-link.com). 1.1 Product main specification ¾ High speed and asymmetry data transmit mode, adapt to wide-band internet access ¾...external utility software too. G.992.2 (G.lite) - G.992.5 (ADSL2+) Annex A/B compliant - I.432 ATM physical layer compliant -Supports RFC2516 (PPPoE) * - TD-8610/TD-8610B not only use html (web mode through Ethernet port) to any 10M/100M Ethernet devices, support Auto-MDIX. G.992.3 (ADSL2) - Annex A/B - Annex...
User Guide
Page 7
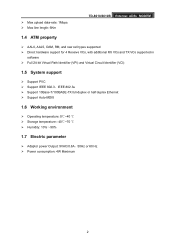
¾ Max upload data-rate: 1Mbps ¾ Max line length: 6Km TD-8610/8610B External ADSL MODEM 1.4 ATM property ¾ AAL0, AAL5, OAM, RM, and raw cell types supported ¾ Direct hardware support for 4 Receive VCs, with additional ...
¾ Max upload data-rate: 1Mbps ¾ Max line length: 6Km TD-8610/8610B External ADSL MODEM 1.4 ATM property ¾ AAL0, AAL5, OAM, RM, and raw cell types supported ¾ Direct hardware support for 4 Receive VCs, with additional ...
User Guide
Page 8
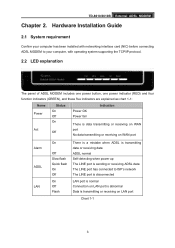
...'s network The LINE port is disconnected LAN port is normal Connection on LAN port is abnormal Data is transmitting or receiving on LAN port Chart 1-1 3 TD-8610/8610B External ADSL MODEM Chapter 2.
...'s network The LINE port is disconnected LAN port is normal Connection on LAN port is abnormal Data is transmitting or receiving on LAN port Chart 1-1 3 TD-8610/8610B External ADSL MODEM Chapter 2.
User Guide
Page 9
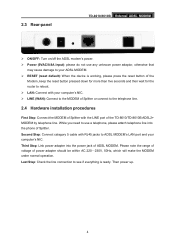
...; RESET (reset default): When the device is ready. Second Step: Connect category 5 cable with the LINE port of the TD-8610/TD-8610B ADSL2+ MODEM by telephone line. Third Step: Link power adapter into the phone of Splitter. Please note the range of voltage of ADSL MODEM. Then power up. 4 While... you need to use any unknown power adaptor, otherwise that may cause damage to ADSL MODEM's LAN port and your computer's NIC. 2.3 Rear-panel TD-8610/8610B ...
...; RESET (reset default): When the device is ready. Second Step: Connect category 5 cable with the LINE port of the TD-8610/TD-8610B ADSL2+ MODEM by telephone line. Third Step: Link power adapter into the phone of Splitter. Please note the range of voltage of ADSL MODEM. Then power up. 4 While... you need to use any unknown power adaptor, otherwise that may cause damage to ADSL MODEM's LAN port and your computer's NIC. 2.3 Rear-panel TD-8610/8610B ...
User Guide
Page 11
...-press (Mouse) Network Neighbor -> Choose Properties -> Double-press TCP/IP. How to Chapter 2, and then turn on the power. 2. Connect the cable according to use TD-8610/8610B External ADSL MODEM 3.1 Computer Configuration 1.
...-press (Mouse) Network Neighbor -> Choose Properties -> Double-press TCP/IP. How to Chapter 2, and then turn on the power. 2. Connect the cable according to use TD-8610/8610B External ADSL MODEM 3.1 Computer Configuration 1.
User Guide
Page 12
... see the page (Figure 3-4). then enter user name (admin), password (admin), you will see some information such as link rate. 7 When ADSL connection is successful through PING command. Please repeat the previous steps again. TD-8610/8610B External ADSL MODEM Choose Properties -> Right-click Local Connection -> Choose Properties -> Double-press Internet Protocol (TCP...
... see the page (Figure 3-4). then enter user name (admin), password (admin), you will see some information such as link rate. 7 When ADSL connection is successful through PING command. Please repeat the previous steps again. TD-8610/8610B External ADSL MODEM Choose Properties -> Right-click Local Connection -> Choose Properties -> Double-press Internet Protocol (TCP...
User Guide
Page 13
You can press Next to "Management→Password". (Figure 3-5) Figure 3-5 3.3 Setup 1) Choose ATM PVCs Configuration (See Figure 3-6) 2) Enter the VPI/VCI value which is admin; TD-8610/8610B External ADSL MODEM Figure 3-4 The default user name and its password is provided by your ISP, click Save to finish the configuration. if you want to change it, please go to add VPI/VCI value. 8
You can press Next to "Management→Password". (Figure 3-5) Figure 3-5 3.3 Setup 1) Choose ATM PVCs Configuration (See Figure 3-6) 2) Enter the VPI/VCI value which is admin; TD-8610/8610B External ADSL MODEM Figure 3-4 The default user name and its password is provided by your ISP, click Save to finish the configuration. if you want to change it, please go to add VPI/VCI value. 8
User Guide
Page 14
There is some software working on your PC. TD-8610/8610B External ADSL MODEM Figure 3-6 3.4 Software Dial TD-8610/TD-8610B works in bridged (RFC 1483 Bridged) mode to connect to install dial software on WINDOWS in market, example for EnterNet3000, RASPPPoE and WinPeET. 9 You need to the Internet.
There is some software working on your PC. TD-8610/8610B External ADSL MODEM Figure 3-6 3.4 Software Dial TD-8610/TD-8610B works in bridged (RFC 1483 Bridged) mode to connect to install dial software on WINDOWS in market, example for EnterNet3000, RASPPPoE and WinPeET. 9 You need to the Internet.