

802.1X Client Software User Guide
Page 4
... system. The server system is usually a common user terminal computer. The 802.1X client software should be installed on the TP-Link switch prevents unauthorized clients from accessing the network. 802.1x operates in the Supplicant System. 2. Supported Platforms 32-...acquire information about the installation and configuration of three entities: Supplicant System (Client), Authenticator System and Authentication System. Typical Topology The 802.1x architecture consists of the 802.1X Client Software. 1 Installation 1. When using the TP-Link switch as this user guide ...
... system. The server system is usually a common user terminal computer. The 802.1X client software should be installed on the TP-Link switch prevents unauthorized clients from accessing the network. 802.1x operates in the Supplicant System. 2. Supported Platforms 32-...acquire information about the installation and configuration of three entities: Supplicant System (Client), Authenticator System and Authentication System. Typical Topology The 802.1x architecture consists of the 802.1X Client Software. 1 Installation 1. When using the TP-Link switch as this user guide ...

802.1X Client Software User Guide
Page 5
...directory with this interface, please ensure that both the TP-Link switch and the authentication server supports the authentication methods in the Authentication Server. Select Advanced Authentication and click Advanced Setting to accomplish the installation. 2 Configuration 1. Follow the InstallSheild Wizard to perform EAP-TLS...switch does not support advanced authentication. 2. to enter no more than 31 characters. Try to run the TP-Link 802.1X Client Figure 1-2 TP-Link 802.1X Client Enter the Name and the Password for EAP-MD5 or PAP authentication method specified in the...
...directory with this interface, please ensure that both the TP-Link switch and the authentication server supports the authentication methods in the Authentication Server. Select Advanced Authentication and click Advanced Setting to accomplish the installation. 2 Configuration 1. Follow the InstallSheild Wizard to perform EAP-TLS...switch does not support advanced authentication. 2. to enter no more than 31 characters. Try to run the TP-Link 802.1X Client Figure 1-2 TP-Link 802.1X Client Enter the Name and the Password for EAP-MD5 or PAP authentication method specified in the...

802.1X Client Software User Guide
Page 7
... IP address automatically: Select this option is selected, the notification of network disconnection will send the EAPOL Start packets to load the following screen for configuring the connection properties. The Client can be assigned the IP address by Unicast: When this option if the Client automatically obtains the IP address from...
... IP address automatically: Select this option is selected, the notification of network disconnection will send the EAPOL Start packets to load the following screen for configuring the connection properties. The Client can be assigned the IP address by Unicast: When this option if the Client automatically obtains the IP address from...

802.1X Client Software User Guide
Page 9
... this error dialog box pop up when starting up the TP-Link 802.1X Client Software? This TP-Link 802.1X Client Software is customized for installation, and run the client software again. A2: No. 3 FAQ Q1: Why does this TP-Link 802.1X Client Software compliable with the switches of the ...other manufacturers? You are suggested to go to http://www.winpcap.org to set the password being automatically saved? A3: Yes. A1: It's because the supported DLL file is encrypted. 6 The password saved in the configuration...
... this error dialog box pop up when starting up the TP-Link 802.1X Client Software? This TP-Link 802.1X Client Software is customized for installation, and run the client software again. A2: No. 3 FAQ Q1: Why does this TP-Link 802.1X Client Software compliable with the switches of the ...other manufacturers? You are suggested to go to http://www.winpcap.org to set the password being automatically saved? A3: Yes. A1: It's because the supported DLL file is encrypted. 6 The password saved in the configuration...

Jetstream Smart Switch Installation Guide
Page 3
Contents Chapter 1 Introduction 01 1.1 Product Overview 01 1.2 Appearance 01 Chapter 2 Installation 08 2.1 Package Contents 08 2.2 Safety Precautions 08 2.3 Installation Tools 10 2.4 Product Installation 10 Chapter 3 Connection 12 3.1 Ethernet Port 12 3.2 SFP/SFP+ Port 12 3.3 Verify Installation 12 3.4 Power On 12 3.5 Initialization 13 Chapter 4 Configuration----------- 14 4.1 Configuration Overview 14 4.2 Standalone Mode 14 4.3 Controller Mode 15 Appendix A Troubleshooting--------- 18 Appendix B Specifications---------- 19
Contents Chapter 1 Introduction 01 1.1 Product Overview 01 1.2 Appearance 01 Chapter 2 Installation 08 2.1 Package Contents 08 2.2 Safety Precautions 08 2.3 Installation Tools 10 2.4 Product Installation 10 Chapter 3 Connection 12 3.1 Ethernet Port 12 3.2 SFP/SFP+ Port 12 3.3 Verify Installation 12 3.4 Power On 12 3.5 Initialization 13 Chapter 4 Configuration----------- 14 4.1 Configuration Overview 14 4.2 Standalone Mode 14 4.3 Controller Mode 15 Appendix A Troubleshooting--------- 18 Appendix B Specifications---------- 19

Jetstream Smart Switch Installation Guide
Page 4
...■■ Front Panel The front panel of T1500-28TC (TL-SL2428) is also a Power Sourcing Equipment (PSE*). Some of T1600G-18TS (TL-SG2216) 01 Introduction LEDs Reset 10/100/1000 Mbps RJ45 Port SFP Port Figure 1-2 Front Panel of the RJ45 ports...-standardized framework and smart configuration capacity can fully meet the need of service features and multiple powerful functions with excellent performance, and is shown as the following figure. Link aggregation increases aggregated bandwidth, optimizing the transport of networks. TP-Link Gigabit Smart Switch integrates ...
...■■ Front Panel The front panel of T1500-28TC (TL-SL2428) is also a Power Sourcing Equipment (PSE*). Some of T1600G-18TS (TL-SG2216) 01 Introduction LEDs Reset 10/100/1000 Mbps RJ45 Port SFP Port Figure 1-2 Front Panel of the RJ45 ports...-standardized framework and smart configuration capacity can fully meet the need of service features and multiple powerful functions with excellent performance, and is shown as the following figure. Link aggregation increases aggregated bandwidth, optimizing the transport of networks. TP-Link Gigabit Smart Switch integrates ...

Jetstream Smart Switch Installation Guide
Page 9
...→Stack Management→Stack Config page and configure the New Unit ID. Port Feature Model 100M/1000 M/10Gbps 10/100/1000 Mbps RJ45 Port RJ45 Port 10/100 Mbps RJ45 Port SFP Port SFP+ Port T1500-28TC / 4 24 2 / T1600G-18TS / 16 / 2 / T1600G-28TS / 24 / 4 / T1600G-52TS / 48 / 4 / T1600G-52PS / 48 / 4 / T1700G-28TQ.... LED Mode Switch Button Press this button to install the SFP module. Green Flashing: A 1000 Mbps device is linked to the corresponding port. Yellow On: A 10/100 Mbps device is being transmitted or received. Off: No device is...
...→Stack Management→Stack Config page and configure the New Unit ID. Port Feature Model 100M/1000 M/10Gbps 10/100/1000 Mbps RJ45 Port RJ45 Port 10/100 Mbps RJ45 Port SFP Port SFP+ Port T1500-28TC / 4 24 2 / T1600G-18TS / 16 / 2 / T1600G-28TS / 24 / 4 / T1600G-52TS / 48 / 4 / T1600G-52PS / 48 / 4 / T1700G-28TQ.... LED Mode Switch Button Press this button to install the SFP module. Green Flashing: A 1000 Mbps device is linked to the corresponding port. Yellow On: A 10/100 Mbps device is being transmitted or received. Off: No device is...

Jetstream Smart Switch Installation Guide
Page 10
...Security Slot Secure the lock (not provided) into the security slot to prevent the device from the Related Documents: https://www.tp-link.com/us/configuration-guides/lightning_protection_guide/. Power Socket Connect the female connector of your switch and go to the product Support web page, refer to ...measures, go to https://www.tp-link.com/support, search the model number of the power cord here, and the male connector to the Lightning Protection Guide from being stolen. Grounding Terminal The switch already comes with Ground Cable. Here we take T1600G-28TS as the following figure. ...
...Security Slot Secure the lock (not provided) into the security slot to prevent the device from the Related Documents: https://www.tp-link.com/us/configuration-guides/lightning_protection_guide/. Power Socket Connect the female connector of your switch and go to the product Support web page, refer to ...measures, go to https://www.tp-link.com/support, search the model number of the power cord here, and the male connector to the Lightning Protection Guide from being stolen. Grounding Terminal The switch already comes with Ground Cable. Here we take T1600G-28TS as the following figure. ...

Jetstream Smart Switch Installation Guide
Page 13
Remove the adhesive backing papers from the Related Documents: https://www.tp-link.com/us/configuration-guides/lightning_protection_guide/. Note: For detailed lightning protection measures, go to https://www.tp-link.com/support, search the model number of your switch and go to the product Support web page, refer to support the entire weight of the ...
Remove the adhesive backing papers from the Related Documents: https://www.tp-link.com/us/configuration-guides/lightning_protection_guide/. Note: For detailed lightning protection measures, go to https://www.tp-link.com/support, search the model number of your switch and go to the product Support web page, refer to support the entire weight of the ...

Jetstream Smart Switch Installation Guide
Page 17
... in the large-scale network, which consists of our official website: https://www.tp-link.com/support/download/. ■■ Using the CLI ■■ Set up a Telnet or SSH connection to configure and mange the switch. After a successful login, the main page will be ...admin for Standalone Mode Switch PC ■■ Using the GUI 1. The first time you log in . For the detailed configurations, refer to Controller Mode, configurations of our official website: https://www.tplink.com/support/download/. 4.2 Standalone Mode In Standalone Mode, use the default IP address...
... in the large-scale network, which consists of our official website: https://www.tp-link.com/support/download/. ■■ Using the CLI ■■ Set up a Telnet or SSH connection to configure and mange the switch. After a successful login, the main page will be ...admin for Standalone Mode Switch PC ■■ Using the GUI 1. The first time you log in . For the detailed configurations, refer to Controller Mode, configurations of our official website: https://www.tplink.com/support/download/. 4.2 Standalone Mode In Standalone Mode, use the default IP address...

Jetstream Smart Switch Installation Guide
Page 18
Typically, the switch obtains IP address from https://www.tp-link.com/support/download/omada-software-controller/. 2. Run the file and follow the wizard to the User Guide and CLI Guide. All devices can be centrally configured and monitored via Omada Software/Hardware Controller Router Switch Or ...our official website: https://www.tp-link.com/download-center.html Note: For certain devices, you may need to change the password the first time you log in the same subnet. On the PC with mass devices. Note: Before the following configurations, make sure the switch and...
Typically, the switch obtains IP address from https://www.tp-link.com/support/download/omada-software-controller/. 2. Run the file and follow the wizard to the User Guide and CLI Guide. All devices can be centrally configured and monitored via Omada Software/Hardware Controller Router Switch Or ...our official website: https://www.tp-link.com/download-center.html Note: For certain devices, you may need to change the password the first time you log in the same subnet. On the PC with mass devices. Note: Before the following configurations, make sure the switch and...
Jetstream Smart Switch Installation Guide
Page 19
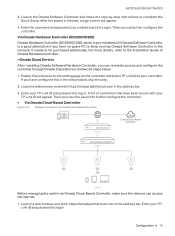
... you created and click Log in the setup wizard, skip the step. 2. Enter your TP-Link ID will appear. 4. Then you have been bound with Omada Software Controller, is pre-installed with your TP-Link ID and password to further configure the controller. ■■ Via Omada Cloud-Based Controller Figure 4-3 Manage the network via...
... you created and click Log in the setup wizard, skip the step. 2. Enter your TP-Link ID will appear. 4. Then you have been bound with Omada Software Controller, is pre-installed with your TP-Link ID and password to further configure the controller. ■■ Via Omada Cloud-Based Controller Figure 4-3 Manage the network via...

Jetstream Smart Switch Installation Guide
Page 20
The controller will appear in via your TP-Link ID. Then wait until your controller at a local site or a remote site via the created username and password. 4. Click Launch and follow the step-by-... 2. Click Add Controller and subscribe to complete the Quick Setup. Follow the instructions to the User Guide of our official website: https://www.tp-link.com/support/download/. 17 Configuration Then you can add devices to the controller manually through the serial numbers at the bottom of the product. * Omada App With the...
The controller will appear in via your TP-Link ID. Then wait until your controller at a local site or a remote site via the created username and password. 4. Click Launch and follow the step-by-... 2. Click Add Controller and subscribe to complete the Quick Setup. Follow the instructions to the User Guide of our official website: https://www.tp-link.com/support/download/. 17 Configuration Then you can add devices to the controller manually through the serial numbers at the bottom of the product. * Omada App With the...

Jetstream Smart Switch Installation Guide
Page 21
... sure the Ethernet cable is connected properly. 2. Then the IP address of the switch? Appendix A Troubleshooting 18 Q2. Q3. If you still cannot access the configuration page, please reset the switch to reset the system. JetStream Smart Switch Appendix A Troubleshooting Q1. What could I do if I forgot the username and password of...
... sure the Ethernet cable is connected properly. 2. Then the IP address of the switch? Appendix A Troubleshooting 18 Q2. Q3. If you still cannot access the configuration page, please reset the switch to reset the system. JetStream Smart Switch Appendix A Troubleshooting Q1. What could I do if I forgot the username and password of...

Jetstream Smart Switches User Guide
Page 2
... Conventions...1 More Information...2 Accessing the Switch Determine the Management Method ...4 Web Interface Access...5 Login...5 Save the Configuration File...6 Disable the Web Server...7 Configure the Switch's IP Address and Default Gateway...8 Command Line Interface Access...10 Console Login (only for switch with...System System...21 Overview...21 Supported Features...21 System Info Configurations...23 Using the GUI...23 Viewing the System Summary...23 Configuring the Device Description...26 Configuring the System Time...27 Configuring the Daylight Saving Time...28 Using the CLI...29 Viewing ...
... Conventions...1 More Information...2 Accessing the Switch Determine the Management Method ...4 Web Interface Access...5 Login...5 Save the Configuration File...6 Disable the Web Server...7 Configure the Switch's IP Address and Default Gateway...8 Command Line Interface Access...10 Console Login (only for switch with...System System...21 Overview...21 Supported Features...21 System Info Configurations...23 Using the GUI...23 Viewing the System Summary...23 Configuring the Device Description...26 Configuring the System Time...27 Configuring the Daylight Saving Time...28 Using the CLI...29 Viewing ...

Jetstream Smart Switches User Guide
Page 3
... Using the GUI...36 Creating Accounts...36 Configuring Enable Password...37 Using the CLI...38 Creating Accounts...38 Configuring Enable Password...39 System Tools Configurations...42 Using the GUI...42 Configuring the Boot File...42 Restoring the Configuration of the Switch...44 Backing up the Configuration File...44 Upgrading the Firmware...45 Rebooting the switch...46...
... Using the GUI...36 Creating Accounts...36 Configuring Enable Password...37 Using the CLI...38 Creating Accounts...38 Configuring Enable Password...39 System Tools Configurations...42 Using the GUI...42 Configuring the Boot File...42 Restoring the Configuration of the Switch...44 Backing up the Configuration File...44 Upgrading the Firmware...45 Rebooting the switch...46...

Jetstream Smart Switches User Guide
Page 4
...85 Supported Features...85 Basic Parameters Configurations...86 Using the GUI...86 Using the CLI...87 Port Isolation Configurations...90 Using the GUI...90 Using the CLI...91 Loopback Detection Configuration...93 Using the GUI...93 Using the CLI...95 Configuration Examples...97 Example for Port ...Isolation...97 Network Requirements...97 Configuration Scheme...97 Using the GUI...97 ...
...85 Supported Features...85 Basic Parameters Configurations...86 Using the GUI...86 Using the CLI...87 Port Isolation Configurations...90 Using the GUI...90 Using the CLI...91 Loopback Detection Configuration...93 Using the GUI...93 Using the CLI...95 Configuration Examples...97 Example for Port ...Isolation...97 Network Requirements...97 Configuration Scheme...97 Using the GUI...97 ...

Jetstream Smart Switches User Guide
Page 5
... GUI...118 Using the CLI...119 Appendix: Default Parameters...122 Managing MAC Address Table MAC Address Table...124 Overview...124 Supported Features...124 MAC Address Configurations...126 Using the GUI...126 Adding Static MAC Address Entries ...126 Modifying the Aging Time of Dynamic Address Entries 128 Adding MAC Filtering Address Entries...
... GUI...118 Using the CLI...119 Appendix: Default Parameters...122 Managing MAC Address Table MAC Address Table...124 Overview...124 Supported Features...124 MAC Address Configurations...126 Using the GUI...126 Adding Static MAC Address Entries ...126 Modifying the Aging Time of Dynamic Address Entries 128 Adding MAC Filtering Address Entries...

Jetstream Smart Switches User Guide
Page 6
......144 Network Topology...145 Using the GUI...145 Using the CLI...148 Appendix: Default Parameters ...151 Configuring MAC VLAN Overview...153 MAC VLAN Configuration...154 Using the GUI...154 Configuring 802.1Q VLAN...154 Binding the MAC Address to the VLAN...154 Enabling MAC VLAN for the Port...155 Using the CLI...156...
......144 Network Topology...145 Using the GUI...145 Using the CLI...148 Appendix: Default Parameters ...151 Configuring MAC VLAN Overview...153 MAC VLAN Configuration...154 Using the GUI...154 Configuring 802.1Q VLAN...154 Binding the MAC Address to the VLAN...154 Enabling MAC VLAN for the Port...155 Using the CLI...156...

Jetstream Smart Switches User Guide
Page 7
Appendix: Default Parameters...168 Configuring Protocol VLAN Overview...170 Protocol VLAN Configuration...171 Using the GUI...171 Configuring 802.1Q VLAN...171 Creating Protocol Template...172 Configuring Protocol VLAN...173 Using the CLI...174 Configuring 802.1Q VLAN...174 Creating a Protocol Template...174 Configuring Protocol VLAN...175 Configuration Example ...178 Network Requirements...178 Configuration Scheme...178 Using the GUI...
Appendix: Default Parameters...168 Configuring Protocol VLAN Overview...170 Protocol VLAN Configuration...171 Using the GUI...171 Configuring 802.1Q VLAN...171 Creating Protocol Template...172 Configuring Protocol VLAN...173 Using the CLI...174 Configuring 802.1Q VLAN...174 Creating a Protocol Template...174 Configuring Protocol VLAN...175 Configuration Example ...178 Network Requirements...178 Configuration Scheme...178 Using the GUI...
