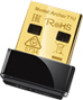
Archer T1U V1 User Guide
Page 3
...following measures: Reorient or relocate the receiving antenna. Increase the separation between the equipment and receiver. Connect the equipment into an outlet on a 5mm spacing from that may cause harmful interference to provide reasonable protection against harmful interference in ... are designed to radio communications. This equipment generates, uses and can be co-located or operating in hand. However, there is connected. Consult the dealer or an experienced radio/ TV technician for a Class B digital device, pursuant to part 15 of...
...following measures: Reorient or relocate the receiving antenna. Increase the separation between the equipment and receiver. Connect the equipment into an outlet on a 5mm spacing from that may cause harmful interference to provide reasonable protection against harmful interference in ... are designed to radio communications. This equipment generates, uses and can be co-located or operating in hand. However, there is connected. Consult the dealer or an experienced radio/ TV technician for a Class B digital device, pursuant to part 15 of...

Archer T1U V1 User Guide
Page 9
CONTENTS Chapter 1 Product Overview 1 1.1 Introduction ...1 1.2 Features ...1 1.3 LED Status ...1 Chapter 2 Connect to a Computer 2 Chapter 3 Install Driver and Utility 3 Chapter 4 Join a Wireless Network 6 4.1 TP-LINK Utility...6 4.2 WPS (Wi-Fi Protected Setup 7 4.3 Windows Wireless Utility 10 Chapter 5 Management 11 5.1 Status...11 5.2 Profile...11 5.3 Advanced ...14 5.4 SoftAP...14 5.5 About...15 Chapter 6 Uninstall Driver and Utility 16 Appendix A: Specifications 17 Appendix B: Glossary 18
CONTENTS Chapter 1 Product Overview 1 1.1 Introduction ...1 1.2 Features ...1 1.3 LED Status ...1 Chapter 2 Connect to a Computer 2 Chapter 3 Install Driver and Utility 3 Chapter 4 Join a Wireless Network 6 4.1 TP-LINK Utility...6 4.2 WPS (Wi-Fi Protected Setup 7 4.3 Windows Wireless Utility 10 Chapter 5 Management 11 5.1 Status...11 5.2 Profile...11 5.3 Advanced ...14 5.4 SoftAP...14 5.5 About...15 Chapter 6 Uninstall Driver and Utility 16 Appendix A: Specifications 17 Appendix B: Glossary 18
Archer T1U V1 User Guide
Page 10
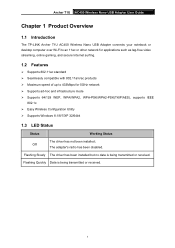
... Wireless Nano USB Adapter User Guide Chapter 1 Product Overview 1.1 Introduction The TP-LINK Archer T1U AC450 Wireless Nano USB Adapter connects your notebook or desktop computer over Wi-Fi to an 11ac or other network for applications such as lag-free video streaming, online gaming, and ...
... Wireless Nano USB Adapter User Guide Chapter 1 Product Overview 1.1 Introduction The TP-LINK Archer T1U AC450 Wireless Nano USB Adapter connects your notebook or desktop computer over Wi-Fi to an 11ac or other network for applications such as lag-free video streaming, online gaming, and ...
Archer T1U V1 User Guide
Page 11
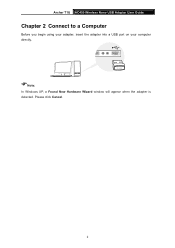
Please click Cancel. 2 TP-LINK Note: In Windows XP, a Found New Hardware Wizard window will appear when the adapter is detected. Archer T1U AC450 Wireless Nano USB Adapter User Guide Chapter 2 Connect to a Computer Before you begin using your adapter, insert the adapter into a USB port on your computer directly.
Please click Cancel. 2 TP-LINK Note: In Windows XP, a Found New Hardware Wizard window will appear when the adapter is detected. Archer T1U AC450 Wireless Nano USB Adapter User Guide Chapter 2 Connect to a Computer Before you begin using your adapter, insert the adapter into a USB port on your computer directly.

Archer T1U V1 User Guide
Page 15
... adapter. Enter your wireless router or access point supports WPS. Archer T1U AC450 Wireless Nano USB Adapter User Guide Chapter 4 Join a Wireless Network There are three options of using the adapter to join a Wi-Fi network. 4.1 TP-LINK Utility 1. Use this screen and click Connect. Option 3: Windows Wireless Utility You can use the Windows WLAN...
... adapter. Enter your wireless router or access point supports WPS. Archer T1U AC450 Wireless Nano USB Adapter User Guide Chapter 4 Join a Wireless Network There are three options of using the adapter to join a Wi-Fi network. 4.1 TP-LINK Utility 1. Use this screen and click Connect. Option 3: Windows Wireless Utility You can use the Windows WLAN...

Archer T1U V1 User Guide
Page 16
Select Push the button on your Wi-Fi network is not displayed in the Profile screen. 4.2 WPS (Wi-Fi Protected Setup) WPS can be activated via PBC (Push Button Configuration) and PIN code. Open TP-LINK Utility and click WPS tab. Press the WPS/QSS button on my access point or wireless router and click Connect. 7 Archer T1U AC450 Wireless Nano USB Adapter User Guide Note: If your router or AP. 2. Please refer to join it by WPS or by adding a profile in the list, you can try to PBC or PIN below. PBC 1.
Select Push the button on your Wi-Fi network is not displayed in the Profile screen. 4.2 WPS (Wi-Fi Protected Setup) WPS can be activated via PBC (Push Button Configuration) and PIN code. Open TP-LINK Utility and click WPS tab. Press the WPS/QSS button on my access point or wireless router and click Connect. 7 Archer T1U AC450 Wireless Nano USB Adapter User Guide Note: If your router or AP. 2. Please refer to join it by WPS or by adding a profile in the list, you can try to PBC or PIN below. PBC 1.

Archer T1U V1 User Guide
Page 17
Click OK. PIN Option 1 1. Click Connect. 8 Enter the PIN of my access point or wireless router. Select Enter the PIN of your router or AP. The following screen indicates a successful connection by WPS. Open TP-LINK Utility and click WPS tab. Archer T1U AC450 Wireless Nano USB Adapter User Guide 3.
Click OK. PIN Option 1 1. Click Connect. 8 Enter the PIN of my access point or wireless router. Select Enter the PIN of your router or AP. The following screen indicates a successful connection by WPS. Open TP-LINK Utility and click WPS tab. Archer T1U AC450 Wireless Nano USB Adapter User Guide 3.
Archer T1U V1 User Guide
Page 18
...your router, please enter the new one. 2. Archer T1U AC450 Wireless Nano USB Adapter User Guide Note: The default PIN of your router or AP is generated randomly. The following screen indicates a successful connection by WPS. The following screen indicates a successful connection by WPS. Option 2 1. Log in the ... field and click Connect. 3. Select Enter the PIN of the adapter in to the WPS page, enter the PIN of this device into my access point or wireless router. If you generated a new PIN for your router or AP. Click OK. Open TP-LINK Utility and click WPS...
...your router, please enter the new one. 2. Archer T1U AC450 Wireless Nano USB Adapter User Guide Note: The default PIN of your router or AP is generated randomly. The following screen indicates a successful connection by WPS. The following screen indicates a successful connection by WPS. Option 2 1. Log in the ... field and click Connect. 3. Select Enter the PIN of the adapter in to the WPS page, enter the PIN of this device into my access point or wireless router. If you generated a new PIN for your router or AP. Click OK. Open TP-LINK Utility and click WPS...

Archer T1U V1 User Guide
Page 19
...-click (Windows XP Wireless Zero Configuration Utility icon) on the system tray. Select the network you to join, and click Connect. Right-click (TP-LINK Utility icon) on the system tray. (If you do not see the icon, click the hidden icons arrow on the ... your Wi-Fi password when prompted. Note: If you can open the TP-LINK Utility and select Advanced tab. Click OK when it indicates a successful network connection. Windows XP 1. Archer T1U AC450 Wireless Nano USB Adapter User Guide 4.3 Windows Wireless Utility Follow the instructions in wireless utility: ...
...-click (Windows XP Wireless Zero Configuration Utility icon) on the system tray. Select the network you to join, and click Connect. Right-click (TP-LINK Utility icon) on the system tray. (If you do not see the icon, click the hidden icons arrow on the ... your Wi-Fi password when prompted. Note: If you can open the TP-LINK Utility and select Advanced tab. Click OK when it indicates a successful network connection. Windows XP 1. Archer T1U AC450 Wireless Nano USB Adapter User Guide 4.3 Windows Wireless Utility Follow the instructions in wireless utility: ...

Archer T1U V1 User Guide
Page 20
... saving mode, switch between TP-LINK Utility and Windows Wireless Utility (for Windows XP only). Double-click (TP-LINK Utility icon) and click the Status, Profile or Advanced tab to manage the corresponding section of your adapter. 5.1 Status You can quickly and simply connect to your adapter. Configure ... refer to the instructions below: To add a new profile, To join a Wi-Fi network, To manage an existing profile. 11 Archer T1U AC450 Wireless Nano USB Adapter User Guide Chapter 5 Management TP-LINK Utility provides you with an easy way to manage your network. About -
... saving mode, switch between TP-LINK Utility and Windows Wireless Utility (for Windows XP only). Double-click (TP-LINK Utility icon) and click the Status, Profile or Advanced tab to manage the corresponding section of your adapter. 5.1 Status You can quickly and simply connect to your adapter. Configure ... refer to the instructions below: To add a new profile, To join a Wi-Fi network, To manage an existing profile. 11 Archer T1U AC450 Wireless Nano USB Adapter User Guide Chapter 5 Management TP-LINK Utility provides you with an easy way to manage your network. About -

Archer T1U V1 User Guide
Page 21
...the settings as Home, Office, Coffeehouse. Network Type - Select Infrastructure if you want to connect to another wireless client, such as an adapter. Infrastructure If you select Infrastructure,... as those of your Wi-Fi network. ad hoc If you select ad hoc, you want to connect to configure the wireless settings for your profile, such as shown in the following figure, and click Save. Select.... Select ad hoc if you are asked to a wireless router or an access point. Archer T1U AC450 Wireless Nano USB Adapter User Guide To add a new profile 1. SSID -
...the settings as Home, Office, Coffeehouse. Network Type - Select Infrastructure if you want to connect to another wireless client, such as an adapter. Infrastructure If you select Infrastructure,... as those of your Wi-Fi network. ad hoc If you select ad hoc, you want to connect to configure the wireless settings for your profile, such as shown in the following figure, and click Save. Select.... Select ad hoc if you are asked to a wireless router or an access point. Archer T1U AC450 Wireless Nano USB Adapter User Guide To add a new profile 1. SSID -
Archer T1U V1 User Guide
Page 22
...-Fi network that listed in the profile screen, select the profile and click Connect button in the bottom right corner of the Profile screen, then you can select ASCII or Hexadecimal format from the drop-down list. ASCII_128 - Hexadecimal_128 - Archer T1U AC450 Wireless Nano USB Adapter User Guide Note: As for Key...
...-Fi network that listed in the profile screen, select the profile and click Connect button in the bottom right corner of the Profile screen, then you can select ASCII or Hexadecimal format from the drop-down list. ASCII_128 - Hexadecimal_128 - Archer T1U AC450 Wireless Nano USB Adapter User Guide Note: As for Key...

Archer T1U V1 User Guide
Page 24
...for the wireless network shared by your adapter is working properly by checking this function. Internet Connecting Share(ICS): Select a network connection that you should select the corresponding Local Area Connection so as the UI version (Utility version) and the Driver version. For example, if your computer...click (TP-LINK Utility icon) in SoftAP mode. It is failed. 5.5 About You can access to the Internet from the drop-down list. For example, if the IP Address is 0.0.0.0, it works in the system tray and select About, then the About screen displays. 15 Archer T1U AC450 ...
...for the wireless network shared by your adapter is working properly by checking this function. Internet Connecting Share(ICS): Select a network connection that you should select the corresponding Local Area Connection so as the UI version (Utility version) and the Driver version. For example, if your computer...click (TP-LINK Utility icon) in SoftAP mode. It is failed. 5.5 About You can access to the Internet from the drop-down list. For example, if the IP Address is 0.0.0.0, it works in the system tray and select About, then the About screen displays. 15 Archer T1U AC450 ...

Archer T1U V1 User Guide
Page 27
...you must be configured with a Wireless Adapter, connected as an Extended Service Set (ESS). See also Wireless Network Name and ESSID. WEP - (Wired Equivalent Privacy) - To gain access to communicate with each with the same SSID. Archer T1U AC450 Wireless Nano USB Adapter User Guide Appendix ...necessary to as described in radio band at a departmental scale or SOHO operation. Infrastructure Network - The key is referred to connect the wired and wireless networks. SSID - MIMO uses multiple transmitter and receiver antennas to a wired network is a string of...
...you must be configured with a Wireless Adapter, connected as an Extended Service Set (ESS). See also Wireless Network Name and ESSID. WEP - (Wired Equivalent Privacy) - To gain access to communicate with each with the same SSID. Archer T1U AC450 Wireless Nano USB Adapter User Guide Appendix ...necessary to as described in radio band at a departmental scale or SOHO operation. Infrastructure Network - The key is referred to connect the wired and wireless networks. SSID - MIMO uses multiple transmitter and receiver antennas to a wired network is a string of...

Archer T1U V1 Quick Install Guide
Page 1
... is detected. The symbol indicates a successful connection. TP-LINK Note: In Windows XP, a Found New Hardware Wizard window will pop up Autoplay window. B: Select Archer T1U and click Install Driver and Utility, then follow the InstallShield Wizard to close the TP-LINK Utility before using the Windows Wireless Utility. ©2015 TP-LINK Otherwise, run the Autorun.exe from...
... is detected. The symbol indicates a successful connection. TP-LINK Note: In Windows XP, a Found New Hardware Wizard window will pop up Autoplay window. B: Select Archer T1U and click Install Driver and Utility, then follow the InstallShield Wizard to close the TP-LINK Utility before using the Windows Wireless Utility. ©2015 TP-LINK Otherwise, run the Autorun.exe from...


