

User Guide
Page 2
Get to Know About Your Router 2 1. 1. Set Up Internet Connection 12 4. 1. Use Quick Setup Wizard 13 4. 2. Manually Set up Your Internet Connection 13 4. 3. Local Storage Sharing 25 6. 1. 1.Access the USB disk 25 6. 1. 2.Customize Your Settings 27 6. 2. Guest Network 21 5. 1. ...
Get to Know About Your Router 2 1. 1. Set Up Internet Connection 12 4. 1. Use Quick Setup Wizard 13 4. 2. Manually Set up Your Internet Connection 13 4. 3. Local Storage Sharing 25 6. 1. 1.Access the USB disk 25 6. 1. 2.Customize Your Settings 27 6. 2. Guest Network 21 5. 1. ...
User Guide
Page 5
...of your needs. symbols on your location, language, and Internet service provider. Our Technical Support contact information can be found on quick Internet setup, and this guide, please notice that is a complementation of note might result in a malfunction or damage to load the corresponding page....the MAC Filtering function page is provided for demonstration only. The Quick Installation Guide instructs you on the product page at www.tp-link.com/support. When using this guide provides details of each function and shows you make better use of the router. Specifications...
...of your needs. symbols on your location, language, and Internet service provider. Our Technical Support contact information can be found on quick Internet setup, and this guide, please notice that is a complementation of note might result in a malfunction or damage to load the corresponding page....the MAC Filtering function page is provided for demonstration only. The Quick Installation Guide instructs you on the product page at www.tp-link.com/support. When using this guide provides details of each function and shows you make better use of the router. Specifications...

User Guide
Page 16
This chapter contains the following sections: • Use Quick Setup Wizard • Manually Set up an IPv6 connection if your router to connect your ISP provides IPv6 service. The router is equipped with a web-based Quick Setup wizard. Furthermore, you can also set up Your Internet Connection • Set Up an IPv6 Internet Connection It has necessary ISP information built in, automates many of the steps and verifies that those steps have been successfully completed. Chapter 4 Set Up Internet Connection This chapter introduces how to the Internet.
This chapter contains the following sections: • Use Quick Setup Wizard • Manually Set up an IPv6 connection if your router to connect your ISP provides IPv6 service. The router is equipped with a web-based Quick Setup wizard. Furthermore, you can also set up Your Internet Connection • Set Up an IPv6 Internet Connection It has necessary ISP information built in, automates many of the steps and verifies that those steps have been successfully completed. Chapter 4 Set Up Internet Connection This chapter introduces how to the Internet.

User Guide
Page 17
...different cables and connection information, you need the IPv6 Internet connection, please refer to set up your current Internet connection settings. Click Quick Setup on the figures are unsure of the page. Parameters on the top of what your router to clone the MAC address. Then follow...router. Note: If you are just used for Internet connection information. • If you can check your router. 1. Note: During the quick setup process: • If you through the process to connect your connection type is, click Auto Detect. Select your wireless devices must use the ...
...different cables and connection information, you need the IPv6 Internet connection, please refer to set up your current Internet connection settings. Click Quick Setup on the figures are unsure of the page. Parameters on the top of what your router to clone the MAC address. Then follow...router. Note: If you are just used for Internet connection information. • If you can check your router. 1. Note: During the quick setup process: • If you through the process to connect your connection type is, click Auto Detect. Select your wireless devices must use the ...
User Guide
Page 42
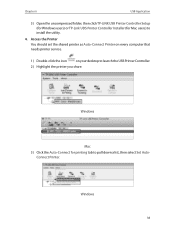
Access the Printer You should set the shared printer as Auto-Connect Printer on every computer that needs printer service. 1 ) Double-click the icon on your desktop to pull down a list, then select Set Auto- Windows 38 Connect Printer. Windows Mac 3 ) Click the Auto-Connect for Mac users) to install the utility. 4. Chapter 6 USB Application 3 ) Open the uncompressed folder, then click TP-LINK USB Printer Controller Setup (for Windows users) or TP-Link UDS Printer Controller Installer (for printing tab to launch the USB Printer Controller. 2 ) Highlight the printer you share.
Access the Printer You should set the shared printer as Auto-Connect Printer on every computer that needs printer service. 1 ) Double-click the icon on your desktop to pull down a list, then select Set Auto- Windows 38 Connect Printer. Windows Mac 3 ) Click the Auto-Connect for Mac users) to install the utility. 4. Chapter 6 USB Application 3 ) Open the uncompressed folder, then click TP-LINK USB Printer Controller Setup (for Windows users) or TP-Link UDS Printer Controller Installer (for printing tab to launch the USB Printer Controller. 2 ) Highlight the printer you share.

User Guide
Page 63
... more stable. Chapter 11 VPN Server The VPN (Virtual Private Networking) Server allows you to Point Tunneling Protocol) VPN. The router offers two ways to setup VPN connection: OpenVPN and PPTP (Point to access your home network in a secured way through Internet when you are out of home. OpenVPN is somewhat...
... more stable. Chapter 11 VPN Server The VPN (Virtual Private Networking) Server allows you to Point Tunneling Protocol) VPN. The router offers two ways to setup VPN connection: OpenVPN and PPTP (Point to access your home network in a secured way through Internet when you are out of home. OpenVPN is somewhat...

User Guide
Page 72
... Provider (ISP). 1. Click Save. Go to Advanced > Network > LAN. 3. Type in the same subnet with the Subnet Mask also defines the subnet that ? Configure IPTV setup to your ISP. 68 Visit http://tplinkwifi.net, and log in UK: 1 ) Tick the IGMP Proxy checkbox and select the IGMP Version, either V2 or...
... Provider (ISP). 1. Click Save. Go to Advanced > Network > LAN. 3. Type in the same subnet with the Subnet Mask also defines the subnet that ? Configure IPTV setup to your ISP. 68 Visit http://tplinkwifi.net, and log in UK: 1 ) Tick the IGMP Proxy checkbox and select the IGMP Version, either V2 or...

User Guide
Page 73
.... enter the IPTV Multicast VLAN ID and select the IPTV Multicast VLAN Priority in Russia mode according to your ISP is done now! Your IPTV setup is not listed but provides necessary parameters. If IGMP is not the technology your router now. Tips Qos and IPTV cannot be enabled at the...
.... enter the IPTV Multicast VLAN ID and select the IPTV Multicast VLAN Priority in Russia mode according to your ISP is done now! Your IPTV setup is not listed but provides necessary parameters. If IGMP is not the technology your router now. Tips Qos and IPTV cannot be enabled at the...

User Guide
Page 80
...one or generate a new one. Chapter 12 Customize Your Network Settings 12. 7. Note: 1. Use the WPS Wizard for Wireless Connection Wi-Fi Protected Setup (WPS) provides an easier approach to the network. 76 Within two minutes, press the WPS button on the label of the router. 12. 7.... 2. If you set for five minutes if the client has been successfully added to set up a security-protected Wi-Fi connection. 1. Select a setup method: • Push Button(Recommended): Click Connect on for the router. 2. Visit http://tplinkwifi.net, and log in with the PIN. You can ...
...one or generate a new one. Chapter 12 Customize Your Network Settings 12. 7. Note: 1. Use the WPS Wizard for Wireless Connection Wi-Fi Protected Setup (WPS) provides an easier approach to the network. 76 Within two minutes, press the WPS button on the label of the router. 12. 7.... 2. If you set for five minutes if the client has been successfully added to set up a security-protected Wi-Fi connection. 1. Select a setup method: • Push Button(Recommended): Click Connect on for the router. 2. Visit http://tplinkwifi.net, and log in with the PIN. You can ...

