Archer BE550US V1.6 Quick Installation Guide
Page 1
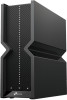
.... 1 Connect the powered-off . Open the Tether app and log in with your client device to start the WPS process. Wireless Password/PIN:XXXXXXXX SSID:TP-Link_XXXX SSID:TP-Link_XXXX_5G SSID:TP-Link_XXXX_6G The default wireless network names (SSIDs) and password are located on the front of the router. LED Explanation You can check the router's working status by -step instructions to set up or the router is turned off. Button Explanation Three physical buttons are printed on your TP-Link...
.... 1 Connect the powered-off . Open the Tether app and log in with your client device to start the WPS process. Wireless Password/PIN:XXXXXXXX SSID:TP-Link_XXXX SSID:TP-Link_XXXX_5G SSID:TP-Link_XXXX_6G The default wireless network names (SSIDs) and password are located on the front of the router. LED Explanation You can check the router's working status by -step instructions to set up or the router is turned off. Button Explanation Three physical buttons are printed on your TP-Link...
Archer BE550US V1.6 Quick Installation Guide
Page 2
.... A better network connection can 't access the internet? • Power off your modem for a better networking experience. Remote Access: Access the USB drive when you are not allowed. · Adapter shall be installed near the equipment and shall be easily accessible. ©2023 TP-Link 7106510289 REV1.0.0 Quick Installation Guide BE9300 Tri-Band Wi-Fi 7 Router If it is not, check the hardware connection or contact your internet service provider. • For cable modem users, log in to the web management page...
.... A better network connection can 't access the internet? • Power off your modem for a better networking experience. Remote Access: Access the USB drive when you are not allowed. · Adapter shall be installed near the equipment and shall be easily accessible. ©2023 TP-Link 7106510289 REV1.0.0 Quick Installation Guide BE9300 Tri-Band Wi-Fi 7 Router If it is not, check the hardware connection or contact your internet service provider. • For cable modem users, log in to the web management page...
Archer BE9300USW V1.6 User Guide
Page 4
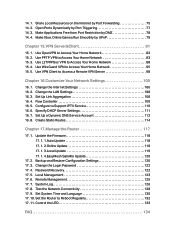
... DHCP Server Settings 111 16. 7. Remote Management 125 17. 7. Set System Time and Language 130 17. 10. Use PPTP VPN to Access Your Home Network 95 15. 5. Set Up a Dynamic DNS Service Account 112 16. 8. Change the Login Password 122 17. 4. Set the Router to Support IPTV Service 110 16. 6. 14. 1. Open Ports Dynamically by DMZ 78 14. 4. Change the Internet Settings 106 16. 2. Change the LAN Settings 108 16. 3. Create Static Routes 114 Chapter 17. Configure to Reboot Regularly 132 17. 11. Backup and Restore Configuration Settings 120...
... DHCP Server Settings 111 16. 7. Remote Management 125 17. 7. Set System Time and Language 130 17. 10. Use PPTP VPN to Access Your Home Network 95 15. 5. Set Up a Dynamic DNS Service Account 112 16. 8. Change the Login Password 122 17. 4. Set the Router to Support IPTV Service 110 16. 6. 14. 1. Open Ports Dynamically by DMZ 78 14. 4. Change the Internet Settings 106 16. 2. Change the LAN Settings 108 16. 3. Create Static Routes 114 Chapter 17. Configure to Reboot Regularly 132 17. 11. Backup and Restore Configuration Settings 120...
Archer BE9300USW V1.6 User Guide
Page 5
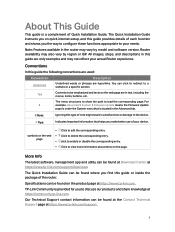
... Quick Installation Guide. More Info The latest software, management app and utility can be found at Download Center at https://www.tp-link.com/support. 1 page • click to enable or disable the corresponding entry. • Click to a website or a specific section. The Quick Installation Guide can be found on quick internet setup, and this guide provides details of note might result in the router may also vary by model and software version. TP-Link...
... Quick Installation Guide. More Info The latest software, management app and utility can be found at Download Center at https://www.tp-link.com/support. 1 page • click to enable or disable the corresponding entry. • Click to a website or a specific section. The Quick Installation Guide can be found on quick internet setup, and this guide provides details of note might result in the router may also vary by model and software version. TP-Link...
Archer BE9300USW V1.6 User Guide
Page 6
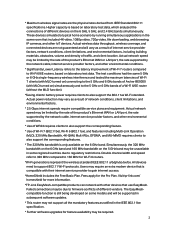
... use EasyMesh. Actual network speed may be limited by the rate of the product's Ethernet WAN or LAN port, the rate supported by the network cable, internet service provider factors, and other environmental conditions. * Significantly Lower Latency refers to also support the corresponding feature. * Use of traffic, and client location. Users may require an extra modem device that is only available on the 5 GHz band may be . Fees apply for Wi-Fi 6 routers...
... use EasyMesh. Actual network speed may be limited by the rate of the product's Ethernet WAN or LAN port, the rate supported by the network cable, internet service provider factors, and other environmental conditions. * Significantly Lower Latency refers to also support the corresponding feature. * Use of traffic, and client location. Users may require an extra modem device that is only available on the 5 GHz band may be . Fees apply for Wi-Fi 6 routers...

Archer BE9300USW V1.6 User Guide
Page 10
... Power On/Off Button Press this button to its factory default settings. 6 USB 3.0 Port For connecting your USB storage devices to the router. 2.5Gbps Internet Port For connecting to your modem or the Ethernet outlet. 2.5Gbps LAN Port (1) For connecting your PC or other wired devices to the router. 1Gbps LAN Port (2-4) For connecting your PC or other wired devices to a power socket via the provided power adapter. Chapter 1 1. 2. 2. Reset Button Press and hold the button until the LED blinks to reset the router...
... Power On/Off Button Press this button to its factory default settings. 6 USB 3.0 Port For connecting your USB storage devices to the router. 2.5Gbps Internet Port For connecting to your modem or the Ethernet outlet. 2.5Gbps LAN Port (1) For connecting your PC or other wired devices to the router. 1Gbps LAN Port (2-4) For connecting your PC or other wired devices to a power socket via the provided power adapter. Chapter 1 1. 2. 2. Reset Button Press and hold the button until the LED blinks to reset the router...
Archer BE9300USW V1.6 User Guide
Page 18
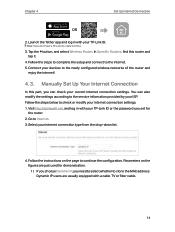
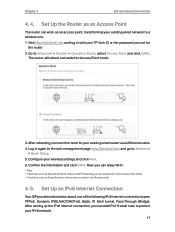
... users are just used for the router. 2. Tap the + button, and select Wireless Router. Chapter 4 Set Up Internet Connection OR 2. Connect your current internet connection settings. Follow the steps to complete the setup and connect to the newly configured wireless networks of the router and enjoy the internet! 4. 3. Note: If you need to select whether to check or modify your internet connection type from the drop-down list. 4. Follow the steps below to clone the MAC address...
... users are just used for the router. 2. Tap the + button, and select Wireless Router. Chapter 4 Set Up Internet Connection OR 2. Connect your current internet connection settings. Follow the steps to complete the setup and connect to the newly configured wireless networks of the router and enjoy the internet! 4. 3. Note: If you need to select whether to check or modify your internet connection type from the drop-down list. 4. Follow the steps below to clone the MAC address...
Archer BE9300USW V1.6 User Guide
Page 21
..., and go to your TP-Link ID or the password you can enjoy Wi-Fi. Tips: • Functions, such as Parental Controls, QoS and NAT Forwarding, are not supported in the Access Point mode. • Functions, such as Guest Network, are the same as an access point, transforming your existing wired network to protect your wireless settings and click Next. 6. After rebooting, connect the router to Advanced > Quick Setup. 5. Confirm the information...
..., and go to your TP-Link ID or the password you can enjoy Wi-Fi. Tips: • Functions, such as Parental Controls, QoS and NAT Forwarding, are not supported in the Access Point mode. • Functions, such as Guest Network, are the same as an access point, transforming your existing wired network to protect your wireless settings and click Next. 6. After rebooting, connect the router to Advanced > Quick Setup. 5. Confirm the information...

Archer BE9300USW V1.6 User Guide
Page 25
... the service is no internet connection. • Set up an IPv6 connection. Click Add. 4. Specify a Service Name for the router. 2. Chapter 4 Set Up Internet Connection 7. The Port and Protocol will be automatically filled in with your TP-Link ID or the password you are unsure about which to the server from the internet by preventing access from the drop-down list of Service Type. This feature is recommended to keep the default Port and Protocol...
... the service is no internet connection. • Set up an IPv6 connection. Click Add. 4. Specify a Service Name for the router. 2. Chapter 4 Set Up Internet Connection 7. The Port and Protocol will be automatically filled in with your TP-Link ID or the password you are unsure about which to the server from the internet by preventing access from the drop-down list of Service Type. This feature is recommended to keep the default Port and Protocol...

Archer BE9300USW V1.6 User Guide
Page 30
... to install the app and register a new TP-Link ID. 4. Go to remove and click Unbind. 26 Visit http://tplinkwifi.net, and log in the Tether app. • Add/remove other TP-Link IDs to Manage the Router via the Tether app. Chapter 5 TP-Link Cloud Service from Managing the Router 1. All accounts can monitor and manage the router locally or remotely, but user accounts cannot: • Reset the router to its factory default settings...
... to install the app and register a new TP-Link ID. 4. Go to remove and click Unbind. 26 Visit http://tplinkwifi.net, and log in the Tether app. • Add/remove other TP-Link IDs to Manage the Router via the Tether app. Chapter 5 TP-Link Cloud Service from Managing the Router 1. All accounts can monitor and manage the router locally or remotely, but user accounts cannot: • Reset the router to its factory default settings...

Archer BE9300USW V1.6 User Guide
Page 38
... default. 1. Enable TWT. • To enable or disable OFDMA/MU-MIMO: OFDMA enables multiple users to Wireless or Advanced > Wireless > Wireless Settings. 2. Enable Smart Connect. 3. This SSID and password will be applied for your Wi-Fi 6E devices to unleash the most out of the time, which significantly extend their periods to transmit and receive data packets. Go to transmit data simultaneously, and thus greatly improves speed...
... default. 1. Enable TWT. • To enable or disable OFDMA/MU-MIMO: OFDMA enables multiple users to Wireless or Advanced > Wireless > Wireless Settings. 2. Enable Smart Connect. 3. This SSID and password will be applied for your Wi-Fi 6E devices to unleash the most out of the time, which significantly extend their periods to transmit and receive data packets. Go to transmit data simultaneously, and thus greatly improves speed...
Archer BE9300USW V1.6 User Guide
Page 39
... the 2.4 GHz and 5 GHz networks, disable Smart Connect, then select a transmission Mode according to ensure 6 GHz device connections. • To change channel settings: 1. It is High. • To change the transmission mode: 1. The default and recommended setting is recommended to Wireless or Advanced > Wireless > Wireless Settings. 2. The value is enabled, only channels with a wireless device, you can select the Enable PSC checkbox. Create a new SSID in Network Name (SSID) and customize the password for the wireless network.
... the 2.4 GHz and 5 GHz networks, disable Smart Connect, then select a transmission Mode according to ensure 6 GHz device connections. • To change channel settings: 1. It is High. • To change the transmission mode: 1. The default and recommended setting is recommended to Wireless or Advanced > Wireless > Wireless Settings. 2. The value is enabled, only channels with a wireless device, you can select the Enable PSC checkbox. Create a new SSID in Network Name (SSID) and customize the password for the wireless network.

Archer BE9300USW V1.6 User Guide
Page 81
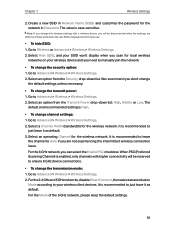
... can add multiple port forwarding rules if you set for the router. 2. Visit http://tplinkwifi.net, and log in a router. For the WAN IP is assigned dynamically by Port Triggering Port Triggering can specify a triggering port and its corresponding external ports. Go to configure the Port Triggering rules: 1. Follow the steps below to Advanced > NAT Forwarding > Port Triggering and click . 3. Done! Then users on the internet can record the IP address...
... can add multiple port forwarding rules if you set for the router. 2. Visit http://tplinkwifi.net, and log in a router. For the WAN IP is assigned dynamically by Port Triggering Port Triggering can specify a triggering port and its corresponding external ports. Go to configure the Port Triggering rules: 1. Follow the steps below to Advanced > NAT Forwarding > Port Triggering and click . 3. Done! Then users on the internet can record the IP address...
Archer BE9300USW V1.6 User Guide
Page 82
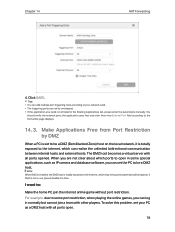
... internet, which can not be a DMZ (Demilitarized Zone) host on the local network, it in time. If DMZ is totally exposed to some potential safety hazards. Tips: • You can add multiple port triggering rules according to your network need is not listed in use, please disable it is not in the Existing Applications list, please enter the parameters manually. When you are not clear...
... internet, which can not be a DMZ (Demilitarized Zone) host on the local network, it in time. If DMZ is totally exposed to some potential safety hazards. Tips: • You can add multiple port triggering rules according to your network need is not listed in use, please disable it is not in the Existing Applications list, please enter the parameters manually. When you are not clear...

Archer BE9300USW V1.6 User Guide
Page 86
.... INTERNET Home Network Router (VPN Server) Remote Devices Step1. Chapter 15 VPN Server&Client 15. 1. Set up an OpenVPN connection. *Image may need to access your TP-Link ID or the password you enable the VPN Server. 3. Note: • Before you enable VPN Server, we recommend you configure Dynamic DNS Service (recommended) or assign a static IP address for the router. 2. Please follow the steps below to set for router's WAN port and synchronize your System Time with your home network. Select the Service Type (communication protocol) for remote devices...
.... INTERNET Home Network Router (VPN Server) Remote Devices Step1. Chapter 15 VPN Server&Client 15. 1. Set up an OpenVPN connection. *Image may need to access your TP-Link ID or the password you enable the VPN Server. 3. Note: • Before you enable VPN Server, we recommend you configure Dynamic DNS Service (recommended) or assign a static IP address for the router. 2. Please follow the steps below to set for router's WAN port and synchronize your System Time with your home network. Select the Service Type (communication protocol) for remote devices...

Archer BE9300USW V1.6 User Guide
Page 88
... be leased to your System Time with your TP-Link ID or the password you configure Dynamic DNS Service (recommended) or assign a static IP address for router's WAN port and synchronize your VPN server. 5. Visit http://tplinkwifi.net, and log in with internet. 3. In the Client IP Address field, enter the range of PPTP. Set up PPTP VPN Server on Your Router 1. Chapter 15 VPN Server&Client Step 1. Note: Before you enable VPN Server, we recommend you set for the remote device.
... be leased to your System Time with your TP-Link ID or the password you configure Dynamic DNS Service (recommended) or assign a static IP address for router's WAN port and synchronize your VPN server. 5. Visit http://tplinkwifi.net, and log in with internet. 3. In the Client IP Address field, enter the range of PPTP. Set up PPTP VPN Server on Your Router 1. Chapter 15 VPN Server&Client Step 1. Note: Before you enable VPN Server, we recommend you set for the remote device.

Archer BE9300USW V1.6 User Guide
Page 120
In the example, the data are sent to the gateway through the LAN port of the gateway device to which sends out data. Default Gateway: The IP address of Router A, so LAN/ WLAN should be sent to the LAN port of Router B and then to visit the company network. 116 Interface: Determined by the port (WAN/LAN) that sends out data packets. Check the Routing Table below. Done! Open a web browser on the same subnet...
In the example, the data are sent to the gateway through the LAN port of the gateway device to which sends out data. Default Gateway: The IP address of Router A, so LAN/ WLAN should be sent to the LAN port of Router B and then to visit the company network. 116 Interface: Determined by the port (WAN/LAN) that sends out data packets. Check the Routing Table below. Done! Open a web browser on the same subnet...

Archer BE9300USW V1.6 User Guide
Page 121
Chapter 17 Manage the Router This chapter will show you the configuration for managing and maintaining your router. It contains the following sections: • Update the Firmware • Backup and Restore Configuration Settings • Change the Login Password • Password Recovery • Local Management • Remote Management • System Log • Test the Network Connectivity • Set System Time and Language • Set the Router to Reboot Regularly • Control the LED
Chapter 17 Manage the Router This chapter will show you the configuration for managing and maintaining your router. It contains the following sections: • Update the Firmware • Backup and Restore Configuration Settings • Change the Login Password • Password Recovery • Local Management • Remote Management • System Log • Test the Network Connectivity • Set System Time and Language • Set the Router to Reboot Regularly • Control the LED

Archer BE9300USW V1.6 User Guide
Page 125
... login password or the TP-Link ID to log in to the web management page. • To reset the router to reset the router. 2. Click FACTORY RESTORE to factory default settings: 1. Wait a few minutes for the resetting and rebooting. Wait a few minutes for the restoring and rebooting. Note: • During the resetting process, do not turn off or reset the router. • To reset the router except your computer, and click RESTORE. 2. Chapter 17 Manage the Router • To restore configuration settings...
... login password or the TP-Link ID to log in to the web management page. • To reset the router to reset the router. 2. Click FACTORY RESTORE to factory default settings: 1. Wait a few minutes for the resetting and rebooting. Wait a few minutes for the restoring and rebooting. Note: • During the resetting process, do not turn off or reset the router. • To reset the router except your computer, and click RESTORE. 2. Chapter 17 Manage the Router • To restore configuration settings...

Archer BE9300USW V1.6 User Guide
Page 138
... your TP-Link ID or the password you have enabled the Password Recovery feature of the router, click Forgot password on the login page and then follow the instructions to reset it. • Alternatively, press and hold the Reset button of reasons. If the password has been altered: 1. Q3. Visit http://tplinkwifi.net, and log in , or you set for a variety of the router until the Power LED blinks to restore factory default settings...
... your TP-Link ID or the password you have enabled the Password Recovery feature of the router, click Forgot password on the login page and then follow the instructions to reset it. • Alternatively, press and hold the Reset button of reasons. If the password has been altered: 1. Q3. Visit http://tplinkwifi.net, and log in , or you set for a variety of the router until the Power LED blinks to restore factory default settings...


