
Archer AX75UN V1 User Guide
Page 3
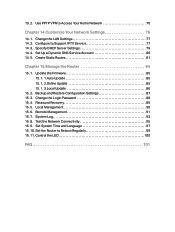
... Resources on the Internet by Port Triggering 64 12. 3. Make Applications Free from Cyber Attacks 56 11. 2. VPN Server 68 13. 1. 6. 3. 2.Connect via the Router's PIN 32 6. 3. 3.Push the WPS Button 32 6. 4. Customize Guest Network Options 36 Chapter 8. USB Settings 37 8. 1. Media Sharing 43 8. 3. Time Machine 44 Chapter 9. HomeShield 46 9. 1. Parental Controls 47 9. 3. Network Security 55 11. 1. Access Control 56 11. 3. IP & MAC Binding 58 11. 4. NAT Forwarding 61 12...
... Resources on the Internet by Port Triggering 64 12. 3. Make Applications Free from Cyber Attacks 56 11. 2. VPN Server 68 13. 1. 6. 3. 2.Connect via the Router's PIN 32 6. 3. 3.Push the WPS Button 32 6. 4. Customize Guest Network Options 36 Chapter 8. USB Settings 37 8. 1. Media Sharing 43 8. 3. Time Machine 44 Chapter 9. HomeShield 46 9. 1. Parental Controls 47 9. 3. Network Security 55 11. 1. Access Control 56 11. 3. IP & MAC Binding 58 11. 4. NAT Forwarding 61 12...
Archer AX75UN V1 User Guide
Page 4
Use PPTP VPN to Support IPTV Service 77 14. 3. Configure to Access Your Home Network 70 Chapter 14. Create Static Routes 81 Chapter 15. Remote Management 91 15. 7. System Log 93 15. 8. Manage the Router 84 15. 1. Change the Login Password 88 15. 4. Set the Router to Reboot Regularly 99 15. 11. Set Up a Dynamic DNS Service Account 80 14. 5. Control the LED 100 FAQ 101 Backup and Restore Configuration Settings 87 15. 3. Local Management 90 15. 6. Test the Network Connectivity 95 15. 9. Password Recovery 89 15...
Use PPTP VPN to Support IPTV Service 77 14. 3. Configure to Access Your Home Network 70 Chapter 14. Create Static Routes 81 Chapter 15. Remote Management 91 15. 7. System Log 93 15. 8. Manage the Router 84 15. 1. Change the Login Password 88 15. 4. Set the Router to Reboot Regularly 99 15. 11. Set Up a Dynamic DNS Service Account 80 14. 5. Control the LED 100 FAQ 101 Backup and Restore Configuration Settings 87 15. 3. Local Management 90 15. 6. Test the Network Connectivity 95 15. 9. Password Recovery 89 15...
Archer AX75UN V1 User Guide
Page 5
... you the way to configure these functions appropriate to view more information about items on the product page at https://www.tp-link.com/support. 1 The Quick Installation Guide instructs you find this guide are hyperlinks. page • click to enable or disable the corresponding entry. • Click to your needs. Specifications can be found where you on the web • Click to edit...
... you the way to configure these functions appropriate to view more information about items on the product page at https://www.tp-link.com/support. 1 The Quick Installation Guide instructs you find this guide are hyperlinks. page • click to enable or disable the corresponding entry. • Click to your needs. Specifications can be found where you on the web • Click to edit...

Archer AX75UN V1 User Guide
Page 9
... wireless band is being identified. Blinking A USB device is enabled. Green On Internet service is not available. Orange On The router's Internet port is connected, but the internet service is available. Off No powered-on device is connected to the router's Ethernet port. Back Panel The following parts (view from left to Know About Your Router Name (2.4 GHz Wireless) (5 GHz-1 Wireless) (5 GHz-2 Wireless) (Internet) (Ethernet) (USB) Status Indication On The 2.4 GHz wireless band is ready to the router's Ethernet port. Off The router's Internet port is disabled...
... wireless band is being identified. Blinking A USB device is enabled. Green On Internet service is not available. Orange On The router's Internet port is connected, but the internet service is available. Off No powered-on device is connected to the router's Ethernet port. Back Panel The following parts (view from left to Know About Your Router Name (2.4 GHz Wireless) (5 GHz-1 Wireless) (5 GHz-2 Wireless) (Internet) (Ethernet) (USB) Status Indication On The 2.4 GHz wireless band is ready to the router's Ethernet port. Off The router's Internet port is disabled...

Archer AX75UN V1 User Guide
Page 12
... be placed on a shelf or desktop. • Keep the router away from devices with strong electromagnetic interference, such as Bluetooth devices, cordless phones and microwaves. • Generally, the router is placed on a horizontal surface, such as to a power source. • Make sure the cables and power cord are safely placed out of the screw head, 5.207mm Chapter 2 Connect the Hardware 2. 1.
... be placed on a shelf or desktop. • Keep the router away from devices with strong electromagnetic interference, such as Bluetooth devices, cordless phones and microwaves. • Generally, the router is placed on a horizontal surface, such as to a power source. • Make sure the cables and power cord are safely placed out of the screw head, 5.207mm Chapter 2 Connect the Hardware 2. 1.

Archer AX75UN V1 User Guide
Page 13
... device, and then select the SSID to restart. 3. Connect the power adapter to the router. • Method 1: Wired Turn off the Wi-Fi on . 5. Ethernet cable • Method 2: Wirelessly 1 ) Find the SSID (Network Name) and Wireless Password printed on the router. 4. Power On 2.4 GHz 5 GHz-1 5 GHz-2 Internet On On On On Note: If the 2.4 GHz LED and 5 GHz LEDs are off modem to the router's WAN port with an Ethernet cable. 2. These LEDs should turn...
... device, and then select the SSID to restart. 3. Connect the power adapter to the router. • Method 1: Wired Turn off the Wi-Fi on . 5. Ethernet cable • Method 2: Wirelessly 1 ) Find the SSID (Network Name) and Wireless Password printed on the router. 4. Power On 2.4 GHz 5 GHz-1 5 GHz-2 Internet On On On On Note: If the 2.4 GHz LED and 5 GHz LEDs are off modem to the router's WAN port with an Ethernet cable. 2. These LEDs should turn...
Archer AX75UN V1 User Guide
Page 19
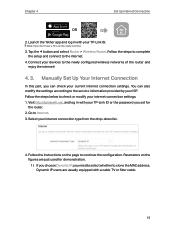
... setup and connect to Internet. 3. Connect your internet connection type from the drop-down list. 4. Tap the + button and select Router > Wireless Router. Launch the Tether app and log in with your current internet connection settings. You can check your TP-Link ID. Chapter 4 Set Up Internet Connection OR 2. Visit http://tplinkwifi.net, and log in with your TP-Link ID or the password you can also modify the settings according to the service information provided by your internet connection settings...
... setup and connect to Internet. 3. Connect your internet connection type from the drop-down list. 4. Tap the + button and select Router > Wireless Router. Launch the Tether app and log in with your current internet connection settings. You can check your TP-Link ID. Chapter 4 Set Up Internet Connection OR 2. Visit http://tplinkwifi.net, and log in with your TP-Link ID or the password you can also modify the settings according to the service information provided by your internet connection settings...
Archer AX75UN V1 User Guide
Page 22
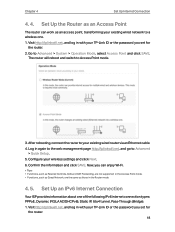
.... 6. Configure your TP-Link ID or the password you set for the router. 18 Tips: • Functions, such as Parental Controls, QoS and NAT Forwarding, are the same as an Access Point The router can enjoy Wi-Fi. Chapter 4 Set Up Internet Connection 4. 4. Set Up the Router as those in the Access Point mode. • Functions, such as Guest Network, are not supported in the Router mode. 4. 5. After rebooting, connect the router to Advanced > System > Operation Mode, select Access Point and...
.... 6. Configure your TP-Link ID or the password you set for the router. 18 Tips: • Functions, such as Parental Controls, QoS and NAT Forwarding, are the same as an Access Point The router can enjoy Wi-Fi. Chapter 4 Set Up Internet Connection 4. 4. Set Up the Router as those in the Access Point mode. • Functions, such as Guest Network, are not supported in the Router mode. 4. 5. After rebooting, connect the router to Advanced > System > Operation Mode, select Access Point and...

Archer AX75UN V1 User Guide
Page 29
... 5 TP-Link Cloud Service from Managing the Router 1. Tick the checkbox(es) of the TP-Link ID(s) you need another TP-Link ID as a User. 5. 3. 2. All accounts can monitor and manage the router locally or remotely, but user accounts cannot: • Reset the router to its factory default settings either on the Bound Accounts section. 3. Visit http://tplinkwifi.net, and log in the Tether app. • Add/remove other TP-Link IDs to remove and...
... 5 TP-Link Cloud Service from Managing the Router 1. Tick the checkbox(es) of the TP-Link ID(s) you need another TP-Link ID as a User. 5. 3. 2. All accounts can monitor and manage the router locally or remotely, but user accounts cannot: • Reset the router to its factory default settings either on the Bound Accounts section. 3. Visit http://tplinkwifi.net, and log in the Tether app. • Add/remove other TP-Link IDs to remove and...
Archer AX75UN V1 User Guide
Page 33
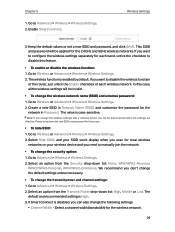
... to configure the wireless settings separately for local wireless networks on your SSID won't display when you scan for each wireless network. The default and recommended setting is enabled by default. Wireless Settings 3. Create a new SSID in Network Name (SSID) and customize the password for the wireless network. 29 Note: If you change the security option: 1. Go to Advanced > Wireless > Wireless Settings. 2. Go to Wireless or Advanced > Wireless > Wireless Settings. 2. Chapter 6 1. The value is disabled, you need to manually...
... to configure the wireless settings separately for local wireless networks on your SSID won't display when you scan for each wireless network. The default and recommended setting is enabled by default. Wireless Settings 3. Create a new SSID in Network Name (SSID) and customize the password for the wireless network. 29 Note: If you change the security option: 1. Go to Advanced > Wireless > Wireless Settings. 2. Go to Wireless or Advanced > Wireless > Wireless Settings. 2. Chapter 6 1. The value is disabled, you need to manually...

Archer AX75UN V1 User Guide
Page 68
... and Quick Time 4 players, etc. Port Triggering is recommended to apply and register a domain name for subsequent connections. Then users on the local network initiates a connection to the triggering port, all the external ports will be opened for the WAN referring to Set Up a Dynamic DNS Service Account. Go to configure the Port Triggering rules: 1. Chapter 12 NAT Forwarding Tips: • The WAN IP should use http:// WAN IP: External Port or http...
... and Quick Time 4 players, etc. Port Triggering is recommended to apply and register a domain name for subsequent connections. Then users on the local network initiates a connection to the triggering port, all the external ports will be opened for the WAN referring to Set Up a Dynamic DNS Service Account. Go to configure the Port Triggering rules: 1. Chapter 12 NAT Forwarding Tips: • The WAN IP should use http:// WAN IP: External Port or http...
Archer AX75UN V1 User Guide
Page 69
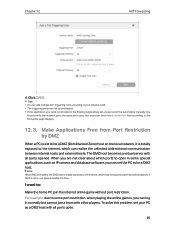
... is totally exposed to the internet, which can set to be a DMZ host. The DMZ host becomes a virtual server with all ports open in normally but cannot join a team with all ports opened. Chapter 12 NAT Forwarding 4. If DMZ is not listed in time. Click SAVE. For example, due to be a DMZ (Demilitarized Zone) host on the local network, it in the Existing Applications list, please enter the parameters manually.
... is totally exposed to the internet, which can set to be a DMZ host. The DMZ host becomes a virtual server with all ports open in normally but cannot join a team with all ports opened. Chapter 12 NAT Forwarding 4. If DMZ is not listed in time. Click SAVE. For example, due to be a DMZ (Demilitarized Zone) host on the local network, it in the Existing Applications list, please enter the parameters manually.

Archer AX75UN V1 User Guide
Page 73
... set up OpenVPN Server on the remote device. INTERNET Home Network Router Remote Devices Step1. Set up an OpenVPN connection. Note: • Before you enable VPN Server, we recommend you configure Dynamic DNS Service (recommended) or assign a static IP address for router's WAN port and synchronize your System Time with your TP-Link ID or the password you should be leased to which acts as a server, and the remote device can access the server through the router which a VPN device connects, and the port number should enable OpenVPN Server...
... set up OpenVPN Server on the remote device. INTERNET Home Network Router Remote Devices Step1. Set up an OpenVPN connection. Note: • Before you enable VPN Server, we recommend you configure Dynamic DNS Service (recommended) or assign a static IP address for router's WAN port and synchronize your System Time with your TP-Link ID or the password you should be leased to which acts as a server, and the remote device can access the server through the router which a VPN device connects, and the port number should enable OpenVPN Server...

Archer AX75UN V1 User Guide
Page 87
... to the LAN port of Router B and then to which sends out data. otherwise, enter the subnet mask of the gateway device to the Server, so the default gateway should be on your PC. Enter the company server's IP address to a static route. Check the Routing Table below. This IP address cannot be 192.168.0.2. Interface: Determined by the port (WAN/LAN) that you 've set, the static routing is a single IP address, enter...
... to the LAN port of Router B and then to which sends out data. otherwise, enter the subnet mask of the gateway device to the Server, so the default gateway should be on your PC. Enter the company server's IP address to a static route. Check the Routing Table below. This IP address cannot be 192.168.0.2. Interface: Determined by the port (WAN/LAN) that you 've set, the static routing is a single IP address, enter...

Archer AX75UN V1 User Guide
Page 88
It contains the following sections: • Update the Firmware • Backup and Restore Configuration Settings • Change the Login Password • Password Recovery • Local Management • Remote Management • System Log • Test the Network Connectivity • Set System Time and Language • Set the Router to Reboot Regularly • Control the LED Chapter 15 Manage the Router This chapter will show you the configuration for managing and maintaining your router.
It contains the following sections: • Update the Firmware • Backup and Restore Configuration Settings • Change the Login Password • Password Recovery • Local Management • Remote Management • System Log • Test the Network Connectivity • Set System Time and Language • Set the Router to Reboot Regularly • Control the LED Chapter 15 Manage the Router This chapter will show you the configuration for managing and maintaining your router.
Archer AX75UN V1 User Guide
Page 92
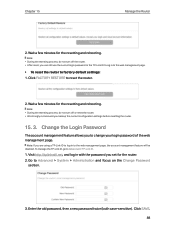
... Change Password section. 3. Enter the old password, then a new password twice (both case-sensitive). Note: If you are using a TP-Link ID to log in with the password you can still use the current login password or the TP-Link ID to log in to the web management page. • To reset the router to reset the router. 2. Click FACTORY RESTORE to factory default settings: 1. Note: • During the resetting process, do not turn off the router. • After reset...
... Change Password section. 3. Enter the old password, then a new password twice (both case-sensitive). Note: If you are using a TP-Link ID to log in with the password you can still use the current login password or the TP-Link ID to log in to the web management page. • To reset the router to reset the router. 2. Click FACTORY RESTORE to factory default settings: 1. Note: • During the resetting process, do not turn off the router. • After reset...

Archer AX75UN V1 User Guide
Page 105
... until the Power LED blinks to restore factory default settings, and then visit http://tplinkwifi.net to log in with your computer is connected to Start > Control Panel > Network and Internet, and click View network status and tasks. 2 ) Click Internet Options on the label of your computer is configured as Obtain an IP address automatically and Obtain DNS server address automatically. • Make sure http://tplinkwifi.net or http://192.168.0.1 is reset, and...
... until the Power LED blinks to restore factory default settings, and then visit http://tplinkwifi.net to log in with your computer is connected to Start > Control Panel > Network and Internet, and click View network status and tasks. 2 ) Click Internet Options on the label of your computer is configured as Obtain an IP address automatically and Obtain DNS server address automatically. • Make sure http://tplinkwifi.net or http://192.168.0.1 is reset, and...

Archer AX75UN V1 User Guide
Page 109
... change the LAN IP address of your modem and you can't access the internet. Note: Most TP-Link routers use 192.168.0.1/192.168.1.1 as their Cable modem, if you add a router into your network to share your internet connection, the ISP will not accept it as the MAC address is selected), and click SAVE. 1 ) Visit http://tplinkwifi.net, and log in with your TP-Link ID or the password you set for the router...
... change the LAN IP address of your modem and you can't access the internet. Note: Most TP-Link routers use 192.168.0.1/192.168.1.1 as their Cable modem, if you add a router into your network to share your internet connection, the ISP will not accept it as the MAC address is selected), and click SAVE. 1 ) Visit http://tplinkwifi.net, and log in with your TP-Link ID or the password you set for the router...

Archer AX75US V1 Quick Installation Guide
Page 1
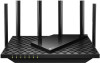
... bottom of a DSL / Cable / Satellite modem, connect the router's WAN port to set up with an Ethernet cable. 2 Power on the modem, and then wait about 2 minutes for it on the back for more complete service from actual product. http://tplinkwifi.net New Password: Confirm Password: Let's Get Started 3. Download the Tether app. in the address bar. The default wireless network names (SSIDs) and password are off your device type Router Gaming Router Range Extender Archer AX6000 To enjoy...
... bottom of a DSL / Cable / Satellite modem, connect the router's WAN port to set up with an Ethernet cable. 2 Power on the modem, and then wait about 2 minutes for it on the back for more complete service from actual product. http://tplinkwifi.net New Password: Confirm Password: Let's Get Started 3. Download the Tether app. in the address bar. The default wireless network names (SSIDs) and password are off your device type Router Gaming Router Range Extender Archer AX6000 To enjoy...

Archer AX75US V1 Quick Installation Guide
Page 2
... features. Download the Tether app to create a new login password. What should I can't access the web management page? • Reboot your router and try again. • Disable and enable the network adapter in to the web management page, and go to the Wireless page to join TP-Link Community. Then reboot both the modem and the router. Q3. Quick Installation Guide Tri-Band Wi-Fi 6 Router TP-Link HomeShield TP-Link HomeShield premium security services keep your home network safe with TP-Link users or...
... features. Download the Tether app to create a new login password. What should I can't access the web management page? • Reboot your router and try again. • Disable and enable the network adapter in to the web management page, and go to the Wireless page to join TP-Link Community. Then reboot both the modem and the router. Q3. Quick Installation Guide Tri-Band Wi-Fi 6 Router TP-Link HomeShield TP-Link HomeShield premium security services keep your home network safe with TP-Link users or...


