

Cubase LE5 Quick Start Guide
Page 1
The system displays the language selection screen (below). TASCAM Cubase LE 5 1 Also, since Cubase LE 5 is a product provided by TASCAM. ASIO is not supported by Steinberg Media Technologies GmbH, it is a trademark of Steinberg Media Technologies GmbH. •• Other company... of Microsoft Corporation in the United States and/or other countries. •• Cubase and VST are trademarks of TEAC Corporation, registered in the U.S. Trademarks •• TASCAM is not intended to use the Cubase LE 5 Help menu (and access the PDF manuals) for information about how...
The system displays the language selection screen (below). TASCAM Cubase LE 5 1 Also, since Cubase LE 5 is a product provided by TASCAM. ASIO is not supported by Steinberg Media Technologies GmbH, it is a trademark of Steinberg Media Technologies GmbH. •• Other company... of Microsoft Corporation in the United States and/or other countries. •• Cubase and VST are trademarks of TEAC Corporation, registered in the U.S. Trademarks •• TASCAM is not intended to use the Cubase LE 5 Help menu (and access the PDF manuals) for information about how...

Cubase LE5 Quick Start Guide
Page 2
2 The installation screen appears. Click Install Cubase LE 5. 5 The system displays the License Agreement for end users. Read the contents, then select I accept the license agreement if you want to close the eLicenser installer. Click the Next button to the terms. Click the Next button. 3 The following screen appears. Press the Finish button. 4 The system displays the eLicenser Welcome screen. Click the Next button. 6 A screen appears to confirm that you agree to start the installation. 2 TASCAM Cubase LE 5
2 The installation screen appears. Click Install Cubase LE 5. 5 The system displays the License Agreement for end users. Read the contents, then select I accept the license agreement if you want to close the eLicenser installer. Click the Next button to the terms. Click the Next button. 3 The following screen appears. Press the Finish button. 4 The system displays the eLicenser Welcome screen. Click the Next button. 6 A screen appears to confirm that you agree to start the installation. 2 TASCAM Cubase LE 5

Cubase LE5 Quick Start Guide
Page 3
Designate the location where you want to install the software. Click the Install button. TASCAM Cubase LE 5 3 7 The Cubase LE 5 installer automatically starts. Read the contents, then select I accept the terms in the License Agreement if you want to the terms. Click the Next button. 10 A screen showing that preparation for end users. Click the Install button. 9 A screen appears where you can select the location where you agree to install the software and click the Next button. 8 The system displays the License Agreement for installation is complete appears.
Designate the location where you want to install the software. Click the Install button. TASCAM Cubase LE 5 3 7 The Cubase LE 5 installer automatically starts. Read the contents, then select I accept the terms in the License Agreement if you want to the terms. Click the Next button. 10 A screen showing that preparation for end users. Click the Install button. 9 A screen appears where you can select the location where you agree to install the software and click the Next button. 8 The system displays the License Agreement for installation is complete appears.

Cubase LE5 Quick Start Guide
Page 4
... Started on the site before updating. 11 Installation of Cubase LE 5 starts. 12 When the installation completes, press the Finish button to close the installer. 4 TASCAM Cubase LE 5 You can be used for 30 days (or launched 3000 times) in demo mode until it for Cubase LE 5 from the following Steinberg...
... Started on the site before updating. 11 Installation of Cubase LE 5 starts. 12 When the installation completes, press the Finish button to close the installer. 4 TASCAM Cubase LE 5 You can be used for 30 days (or launched 3000 times) in demo mode until it for Cubase LE 5 from the following Steinberg...

Cubase LE5 Quick Start Guide
Page 5
... screen appears. 2 Click VST Audio System on the left side of the Device Setup window and confirm that the I/O ports are set to US-144MKII ports. Preparation 1 Launch Cubase LE 5 and select Device Setup... Recording with Windows XP. The screens in the example below are the ...same in Cubase LE 5 are from the Devices menu. from using a US-144MKII with Cubase LE 5 The settings in Windows XP, Windows Vista, Windows 7 and Mac OS X. TASCAM Cubase LE 5 5 Then, click OK to US-122MKII/US-144MKII. 4 Click US-122MKII/US-144MKII on the left side of the Device Setup window.
... screen appears. 2 Click VST Audio System on the left side of the Device Setup window and confirm that the I/O ports are set to US-144MKII ports. Preparation 1 Launch Cubase LE 5 and select Device Setup... Recording with Windows XP. The screens in the example below are the ...same in Cubase LE 5 are from the Devices menu. from using a US-144MKII with Cubase LE 5 The settings in Windows XP, Windows Vista, Windows 7 and Mac OS X. TASCAM Cubase LE 5 5 Then, click OK to US-122MKII/US-144MKII. 4 Click US-122MKII/US-144MKII on the left side of the Device Setup window.

Cubase LE5 Quick Start Guide
Page 6
... VST Connections window. •• Click the Add Bus button. •• When the following dialog appears, set to US-144MKII on the Input and Output tabs of the US-144MKII as follows and the digital input and output should be available for the new project. The windows should appear as...5, add the digital input and output on both the Input and Output tabs. Choose the template that allows you want and click the OK button. 6 TASCAM Cubase LE 5 Confirm that the Device Port is set the Configuration to STEREO and the Count to select a template for use. 6 Select New Project from...
... VST Connections window. •• Click the Add Bus button. •• When the following dialog appears, set to US-144MKII on the Input and Output tabs of the US-144MKII as follows and the digital input and output should be available for the new project. The windows should appear as...5, add the digital input and output on both the Input and Output tabs. Choose the template that allows you want and click the OK button. 6 TASCAM Cubase LE 5 Confirm that the Device Port is set the Configuration to STEREO and the Count to select a template for use. 6 Select New Project from...

Cubase LE5 Quick Start Guide
Page 7
7 Next, the Set Project Folder window appears. TASCAM Cubase LE 5 7 NOTE If you want to save the project and click the OK button to add audio tracks. Select the folder where you choose ...
7 Next, the Set Project Folder window appears. TASCAM Cubase LE 5 7 NOTE If you want to save the project and click the OK button to add audio tracks. Select the folder where you choose ...

Cubase LE5 Quick Start Guide
Page 8
..., then click the Record Enable buttons to turn it off (the button indicator will turn off). Rewind if necessary. 5 Repeat steps 1-4 to overdub additional tracks. 8 TASCAM Cubase LE 5 Recording 1 Select the track that you want to record to, and set the input bus in the transport section to start recording. 4 When...
..., then click the Record Enable buttons to turn it off (the button indicator will turn off). Rewind if necessary. 5 Repeat steps 1-4 to overdub additional tracks. 8 TASCAM Cubase LE 5 Recording 1 Select the track that you want to record to, and set the input bus in the transport section to start recording. 4 When...

Cubase LE5 Quick Start Guide
Page 9
... down. 3 In the Export Audio Mixdown dialog box, make the desired settings, then press the Export button. 2 From the File menu, choose Export > Audio Mixdown. TASCAM Cubase LE 5 9 Mixdown 1 Move the left and right locators to specify the region that you want to be created. 4. The following screen appears while the...
... down. 3 In the Export Audio Mixdown dialog box, make the desired settings, then press the Export button. 2 From the File menu, choose Export > Audio Mixdown. TASCAM Cubase LE 5 9 Mixdown 1 Move the left and right locators to specify the region that you want to be created. 4. The following screen appears while the...

Cubase LE5 Quick Start Guide
Page 10
... sure that you need. I see no activity on in the EQ section for the channel in the Inspector. Q3. A3. EQ OFF EQ ON 10 TASCAM Cubase LE 5 Before you can confirm that one or more EQ switches are on the audio track's meter. If the project does not have configured...
... sure that you need. I see no activity on in the EQ section for the channel in the Inspector. Q3. A3. EQ OFF EQ ON 10 TASCAM Cubase LE 5 Before you can confirm that one or more EQ switches are on the audio track's meter. If the project does not have configured...

Cubase LE5 Quick Start Guide
Page 11
...I burned a CD using the WAV file I have connected an audio source to 44.100 kHz. If your ultimate objective is to create a CD, TASCAM recommends that the input level of your project be set the sampling rate to the Unit, but cannot hear anything. A7. I mixed down a threeminute song... speed is raised appropriately. The default setting is set to 44.1 kHz from the Project menu, then set to three minutes or longer. Q7. TASCAM Cubase LE 5 11 To specify the sampling rate, choose Project Settings from the beginning. A4. Q5. A6. Make sure that the sampling rate...
...I burned a CD using the WAV file I have connected an audio source to 44.100 kHz. If your ultimate objective is to create a CD, TASCAM recommends that the input level of your project be set the sampling rate to the Unit, but cannot hear anything. A7. I mixed down a threeminute song... speed is raised appropriately. The default setting is set to 44.1 kHz from the Project menu, then set to three minutes or longer. Q7. TASCAM Cubase LE 5 11 To specify the sampling rate, choose Project Settings from the beginning. A4. Q5. A6. Make sure that the sampling rate...
US-2000 Owner's Manual
Page 2
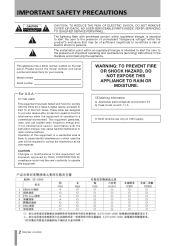
... inrush current: 1.1 A In North America use only on the rear panel. This appliance has a serial number located on 120V supply. 2 TASCAM US-2000 WARNING: TO PREVENT FIRE OR SHOCK HAZARD, DO NOT EXPOSE THIS APPLIANCE TO RAIN OR MOISTURE. The exclamation point within the product's enclosure that... may cause harmful interference to persons. CAUTION Changes or modifications to operate this equipment not expressly approved by TEAC CORPORATION for your records. NO USER-SERVICEABLE PARTS INSIDE. Please record the model number and serial number and retain them ...
... inrush current: 1.1 A In North America use only on the rear panel. This appliance has a serial number located on 120V supply. 2 TASCAM US-2000 WARNING: TO PREVENT FIRE OR SHOCK HAZARD, DO NOT EXPOSE THIS APPLIANCE TO RAIN OR MOISTURE. The exclamation point within the product's enclosure that... may cause harmful interference to persons. CAUTION Changes or modifications to operate this equipment not expressly approved by TEAC CORPORATION for your records. NO USER-SERVICEABLE PARTS INSIDE. Please record the model number and serial number and retain them ...
US-2000 Owner's Manual
Page 3
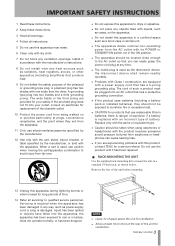
... or similar unit. • The apparatus draws nominal non-operating power from being walked on the apparatus. • Do not install this product, contact TEAC for ventilation. 3 TASCAM US-2000 A polarized plug has two blades with this apparatus in a confined space such as the disconnect device, the disconnect device shall remain readily operable. •...
... or similar unit. • The apparatus draws nominal non-operating power from being walked on the apparatus. • Do not install this product, contact TEAC for ventilation. 3 TASCAM US-2000 A polarized plug has two blades with this apparatus in a confined space such as the disconnect device, the disconnect device shall remain readily operable. •...
US-2000 Owner's Manual
Page 4
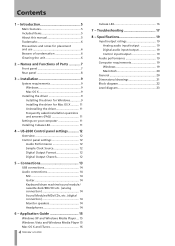
... 15 Windows XP and Windows Media Player ... 15 Windows Vista and Windows Media Player 15 Mac OS X and iTunes 16 4 TASCAM US-2000 Cubase LE4 16 7 - Troubleshooting 17 8 - Specifications 19 Input/output ratings 19 Analog audio input/output 19 Digital audio input/output...the driver 11 Frequently asked installation questions and answers (FAQ 11 Settings on your computer 11 Installing Cubase LE4 11 4 − US-2000 Control panel settings............12 Overview 12 Control panel settings 12 Audio Performance 12 Sample Clock Source 12 Digital Output Format 12 Digital Output Chanels...
... 15 Windows XP and Windows Media Player ... 15 Windows Vista and Windows Media Player 15 Mac OS X and iTunes 16 4 TASCAM US-2000 Cubase LE4 16 7 - Troubleshooting 17 8 - Specifications 19 Input/output ratings 19 Analog audio input/output 19 Digital audio input/output...the driver 11 Frequently asked installation questions and answers (FAQ 11 Settings on your computer 11 Installing Cubase LE4 11 4 − US-2000 Control panel settings............12 Overview 12 Control panel settings 12 Audio Performance 12 Sample Clock Source 12 Digital Output Format 12 Digital Output Chanels...

US-2000 Owner's Manual
Page 5
...• Owner's manual (this manual 1 About this manual In this manual, we use the following conventions: • The names of the TASCAM US-2000 USB 2.0 Audio Interface. CAUTION Instructions that came with multiple software clients at the same time even if some use WDM for audio control •... addition to a monitor level control, independent level control is possible for the signals input from the TASCAM web site (http://www.tascam.com). NOTE Explanation of data. 5 TASCAM US-2000 You can be monitored individually in mono or in a safe place for future reference. Take care...
...• Owner's manual (this manual 1 About this manual In this manual, we use the following conventions: • The names of the TASCAM US-2000 USB 2.0 Audio Interface. CAUTION Instructions that came with multiple software clients at the same time even if some use WDM for audio control •... addition to a monitor level control, independent level control is possible for the signals input from the TASCAM web site (http://www.tascam.com). NOTE Explanation of data. 5 TASCAM US-2000 You can be monitored individually in mono or in a safe place for future reference. Take care...

US-2000 Owner's Manual
Page 6
... device such as they could condense on top of Intel Corporation in the U.S. vapor in the air could damage the surface. 6 TASCAM US-2000 ASIO is a trademark of Steinberg Media Technologies GmbH. • Other company names, product names and logos in this unit on the...to clean the unit as a power amplifier. Do not wipe with a soft dry cloth. 1 − Introduction Trademarks • TASCAM is a registered trademark of TEAC Corporation. • Microsoft, Windows, and Windows Vista are either registered trademarks or trademarks of Microsoft Corporation in the United States and...
... device such as they could condense on top of Intel Corporation in the U.S. vapor in the air could damage the surface. 6 TASCAM US-2000 ASIO is a trademark of Steinberg Media Technologies GmbH. • Other company names, product names and logos in this unit on the...to clean the unit as a power amplifier. Do not wipe with a soft dry cloth. 1 − Introduction Trademarks • TASCAM is a registered trademark of TEAC Corporation. • Microsoft, Windows, and Windows Vista are either registered trademarks or trademarks of Microsoft Corporation in the United States and...

US-2000 Owner's Manual
Page 7
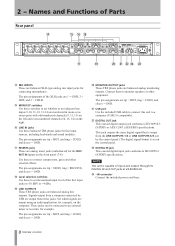
... this to adjust the overall level of MIC INPUTS 1-8 independently. Front panel 2 − Names and Functions of the XLR jacks are 1 = GND, 2 = HOT, and 3 = COLD. 7 TASCAM US-2000 CAUTION • Before turning these switches to set whether or not adjacent inputs 1-2, 3-4, 5-6, 7-8 are monitored in mono or as stereo pairs with an input when...
... this to adjust the overall level of MIC INPUTS 1-8 independently. Front panel 2 − Names and Functions of the XLR jacks are 1 = GND, 2 = HOT, and 3 = COLD. 7 TASCAM US-2000 CAUTION • Before turning these switches to set whether or not adjacent inputs 1-2, 3-4, 5-6, 7-8 are monitored in mono or as stereo pairs with an input when...
US-2000 Owner's Manual
Page 8
..., and 3 = COLD. o1LINE OUTPUTS These TRS phone jacks are tip = HOT, ring = COLD, and sleeve = GND. f1~IN connector Connect the included power cord here. 8 TASCAM US-2000 NOTE This unit is capable of the XLR jacks are analog insert jacks (unbalanced) for the MIC/ INST IN inputs on the computer. Connect them...
..., and 3 = COLD. o1LINE OUTPUTS These TRS phone jacks are tip = HOT, ring = COLD, and sleeve = GND. f1~IN connector Connect the included power cord here. 8 TASCAM US-2000 NOTE This unit is capable of the XLR jacks are analog insert jacks (unbalanced) for the MIC/ INST IN inputs on the computer. Connect them...
US-2000 Owner's Manual
Page 9
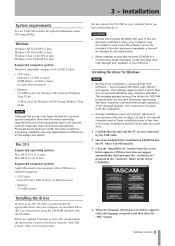
...the USB cable. 2 Insert the included driver installation CD-ROM into your computer before you prefer and then click the "OK" button. 9 TASCAM US-2000 If the disc becomes scratched or dirty, your computer may vary depending on the driver CD-ROM.) 4 When the language selection screen (below ... Windows Logo testing is an easy process using the CD-ROM included with care. 3 − Installation System requirements See the TASCAM website for use the US-2000, you must install the appropriate driver into the PC where you will operate with the installation. • During installation, you...
...the USB cable. 2 Insert the included driver installation CD-ROM into your computer before you prefer and then click the "OK" button. 9 TASCAM US-2000 If the disc becomes scratched or dirty, your computer may vary depending on the driver CD-ROM.) 4 When the language selection screen (below ... Windows Logo testing is an easy process using the CD-ROM included with care. 3 − Installation System requirements See the TASCAM website for use the US-2000, you must install the appropriate driver into the PC where you will operate with the installation. • During installation, you...
US-2000 Owner's Manual
Page 10
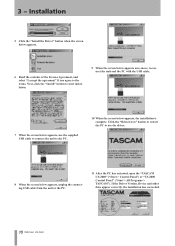
... driver. 8 When the screen below appears, the installation is complete. If the Driver Version, Device and other data appear correctly, the installation has succeeded. 10 TASCAM US-2000 3 − Installation 5 Click the "Install the Driver" button when the screen below appears. 6 Read the contents of the License Agreement, and select "I accept the agreement.... 10 When the screen below appears, unplug the connecting USB cable from the unit or the PC. 11 After the PC has restarted, open the "TASCAM US-2000" ("Start > Control Panel") or "US-2000 Control Panel" ("Start > All Programs...
... driver. 8 When the screen below appears, the installation is complete. If the Driver Version, Device and other data appear correctly, the installation has succeeded. 10 TASCAM US-2000 3 − Installation 5 Click the "Install the Driver" button when the screen below appears. 6 Read the contents of the License Agreement, and select "I accept the agreement.... 10 When the screen below appears, unplug the connecting USB cable from the unit or the PC. 11 After the PC has restarted, open the "TASCAM US-2000" ("Start > Control Panel") or "US-2000 Control Panel" ("Start > All Programs...
