Owners Manual
Page 4
...As the unit may become warm during operation, always leave sufficient space around the unit for future reference. See Page 12 for choosing TEAC. In this case, turn off the unit. < The nominal temperature should get the best performance from the wall outlet, always pull... If you for instructions. 4 Contents Before using the unit 4 Handling Records 5 How to Replace the Stylus 5 Discs 6 Turntable Cover 7 Handling Cassette Tape 8 Connection 9 Unit Functions and Remote Control 10 Parts of the Turntable 12 Remote Control Unit 13 Basic Operation 13 Listening to the Radio 14...
...As the unit may become warm during operation, always leave sufficient space around the unit for future reference. See Page 12 for choosing TEAC. In this case, turn off the unit. < The nominal temperature should get the best performance from the wall outlet, always pull... If you for instructions. 4 Contents Before using the unit 4 Handling Records 5 How to Replace the Stylus 5 Discs 6 Turntable Cover 7 Handling Cassette Tape 8 Connection 9 Unit Functions and Remote Control 10 Parts of the Turntable 12 Remote Control Unit 13 Basic Operation 13 Listening to the Radio 14...
Owners Manual
Page 5
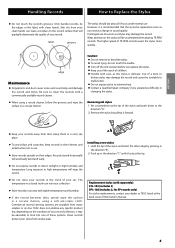
...edges or the label, with stable temperature and humidity. < If the record becomes dirty, gently wipe the surface in use. < Store records upright on -line. However, it may damage the record and cause the turntable to malfunction. < Do not expose stylus to look into one of... replace the stylus. < Keep out of the reach of your car. Records stored horizontally will warp the record. TEAC does not endorse any specific product but, depending on the condition of children. < Handle with a commercially available record cleaner. Prolonged use . Caution: < Do not remove or bend the ...
...edges or the label, with stable temperature and humidity. < If the record becomes dirty, gently wipe the surface in use. < Store records upright on -line. However, it may damage the record and cause the turntable to malfunction. < Do not expose stylus to look into one of... replace the stylus. < Keep out of the reach of your car. Records stored horizontally will warp the record. TEAC does not endorse any specific product but, depending on the condition of children. < Handle with a commercially available record cleaner. Prolonged use . Caution: < Do not remove or bend the ...
Owners Manual
Page 7
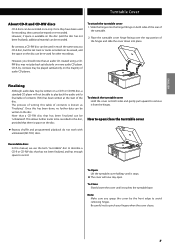
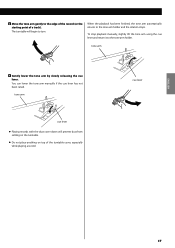
... the audio until a final table of contents (TOC) has been written at the start of the turntable. 2. Note: Make sure you should note that there is space on the disc can be re-used for recording, they have been used in much the same way as "finalizing". Be careful not to remove... it stops. < The cover will not be recorded once only. Once they cannot be used for other recordings. Place the turntable cover hinge fittings over the top portion of the hinges and slide the cover down into the hinge fittings on...
... the audio until a final table of contents (TOC) has been written at the start of the turntable. 2. Note: Make sure you should note that there is space on the disc can be re-used for recording, they have been used in much the same way as "finalizing". Be careful not to remove... it stops. < The cover will not be recorded once only. Once they cannot be used for other recordings. Place the turntable cover hinge fittings over the top portion of the hinges and slide the cover down into the hinge fittings on...
Owners Manual
Page 8
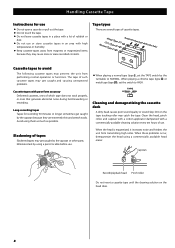
...applicator dampened with a lot of such cassette tapes may catch the tape. Long-recording tapes Tapes for use . When playing a chrome tape (type @) or metal tape (type !%), set the TAPE switch by the turntable to HIGH. Cassette tapes with high temperatures or humidity. < Keep cassette tapes... tape. < Do not leave cassette tapes in a place with a commercially available cleaning solution every ten hours of cassette tapes. Capstan Record/playback head Pinch roller Do not insert a cassette tape until the cleaning solution on the tape tracking roller may get caught and causing ...
...applicator dampened with a lot of such cassette tapes may catch the tape. Long-recording tapes Tapes for use . When playing a chrome tape (type @) or metal tape (type !%), set the TAPE switch by the turntable to HIGH. Cassette tapes with high temperatures or humidity. < Keep cassette tapes... tape. < Do not leave cassette tapes in a place with a commercially available cleaning solution every ten hours of cassette tapes. Capstan Record/playback head Pinch roller Do not insert a cassette tape until the cleaning solution on the tape tracking roller may get caught and causing ...
Owners Manual
Page 12
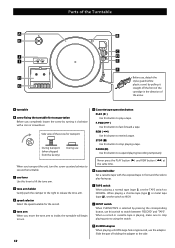
... use the adaptor. K 45 RPM adaptor When playing a 45 RPM large hole single record, use When you move the tone arm to inside, the turntable will begin to turn the screw counterclockwise to fast-forward a tape. Parts of the Turntable Before use, detach the stylus guard (white plastic cover) by pulling it clockwise...
... use the adaptor. K 45 RPM adaptor When playing a 45 RPM large hole single record, use When you move the tone arm to inside, the turntable will begin to turn the screw counterclockwise to fast-forward a tape. Parts of the Turntable Before use, detach the stylus guard (white plastic cover) by pulling it clockwise...
Owners Manual
Page 13
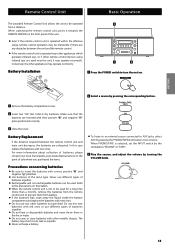
... unit and main unit decreases, the batteries are inserted with their labels. < When the remote control unit is selected, set the INPUT switch by the turntable to "RECORD" or "TAPE". 3 Play the source, and adjust the volume by turning the VOLUME knob. 13 Refer to the precautions on their positive "+" and negative...
... unit and main unit decreases, the batteries are inserted with their labels. < When the remote control unit is selected, set the INPUT switch by the turntable to "RECORD" or "TAPE". 3 Play the source, and adjust the volume by turning the VOLUME knob. 13 Refer to the precautions on their positive "+" and negative...
Owners Manual
Page 16
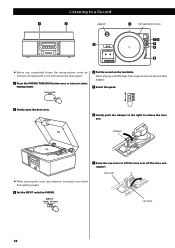
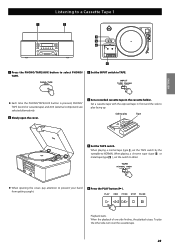
clamper 7 Raise the cue lever to release the tone arm. cue lever 16 When playing a 45 RPM large hole single record, use , completely loosen the transportation screw by turning it clockwise with a coin and remove the stylus guard. 1 Press the PHONO/TAPE/AUX ... When opening the cover, pay attention to prevent your hand from getting caught. 3 Set the INPUT switch to select PHONO/TAPE. 4 Put the record on the turntable. Listening to a Record adaptor transportation screw < Before use the included adaptor. 5 Select the speed. 2 Gently open the dust cover. 6 Gently push the clamper to ...
clamper 7 Raise the cue lever to release the tone arm. cue lever 16 When playing a 45 RPM large hole single record, use , completely loosen the transportation screw by turning it clockwise with a coin and remove the stylus guard. 1 Press the PHONO/TAPE/AUX ... When opening the cover, pay attention to prevent your hand from getting caught. 3 Set the INPUT switch to select PHONO/TAPE. 4 Put the record on the turntable. Listening to a Record adaptor transportation screw < Before use the included adaptor. 5 Select the speed. 2 Gently open the dust cover. 6 Gently push the clamper to ...
Owners Manual
Page 17
...has not been raised. When the playback has been finished, the tone arm automatically returns to the tone arm holder. The turntable will prevent dust from settling on the turntable. < Do not place anything on top of a track). cue lever 17 ENGLISH 8 Move the tone arm gently to turn.... tone arm cue lever < Playing records with the dust cover down will begin to the edge of the record (or the starting point of the turntable cover, especially...
...has not been raised. When the playback has been finished, the tone arm automatically returns to the tone arm holder. The turntable will prevent dust from settling on the turntable. < Do not place anything on top of a track). cue lever 17 ENGLISH 8 Move the tone arm gently to turn.... tone arm cue lever < Playing records with the dust cover down will begin to the edge of the record (or the starting point of the turntable cover, especially...
Owners Manual
Page 23
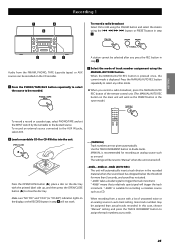
When playing a chrome tape (type @ ) or metal tape (type !% ), set the TAPE switch by the turntable to NORMAL. When playing a normal tape (type !), set the switch to HIGH. < When opening the cover, pay attention to prevent your hand from getting caught. 6 .... 3 Set the INPUT switch to TAPE. < Each time the PHONO/TAPE/AUX button is pressed, PHONO/ TAPE (record or cassette tape) and AUX (external component) are selected alternatively. 2 Slowly open the cover. 4 Set a recorded cassette tape in front and the side to play facing up. Set a cassette tape with the exposed tape...
When playing a chrome tape (type @ ) or metal tape (type !% ), set the TAPE switch by the turntable to NORMAL. When playing a normal tape (type !), set the switch to HIGH. < When opening the cover, pay attention to prevent your hand from getting caught. 6 .... 3 Set the INPUT switch to TAPE. < Each time the PHONO/TAPE/AUX button is pressed, PHONO/ TAPE (record or cassette tape) and AUX (external component) are selected alternatively. 2 Slowly open the cover. 4 Set a recorded cassette tape in front and the side to play facing up. Set a cassette tape with the exposed tape...
Owners Manual
Page 25
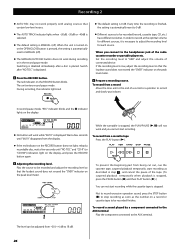
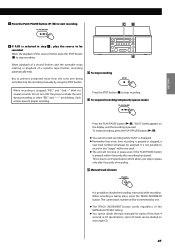
... button is pressed once, the current mode is recommended for recording a noiseless source such as the PRESET button in the tuner mode.) To record a record or cassette tape, select PHONO/TAPE and set the INPUT switch by the turntable to be recorded. 3 Select the mode of unwanted noise or an analog ...source in the recorded material when the sound level has dropped below the threshold...
... button is pressed once, the current mode is recommended for recording a noiseless source such as the PRESET button in the tuner mode.) To record a record or cassette tape, select PHONO/TAPE and set the INPUT switch by the turntable to be recorded. 3 Select the mode of unwanted noise or an analog ...source in the recorded material when the sound level has dropped below the threshold...
Owners Manual
Page 26
... sound does not exceed the "OVER" indicator on a record or cassette tape to 0 dB. < The AUTO TRACK indicator lights when -20dB, -30dB or -40dB is selected. < The default setting is displayed. 4 Press the RECORD button. While the turntable is stopped, the PLAY/PAUSE (y/J) will work and you... connect to be recorded finishes. Play the source to "0dB" and adjust the volume of the tape. (To suspend playback...
... sound does not exceed the "OVER" indicator on a record or cassette tape to 0 dB. < The AUTO TRACK indicator lights when -20dB, -30dB or -40dB is selected. < The default setting is displayed. 4 Press the RECORD button. While the turntable is stopped, the PLAY/PAUSE (y/J) will work and you... connect to be recorded finishes. Play the source to "0dB" and adjust the volume of the tape. (To suspend playback...
Owners Manual
Page 27
When playback of a record finishes and the turntable stops rotating or playback of the source finishes, press the STOP button (H) to stop recording. This is due to a CD specification which allows you stop or pause even if the PLAY/PAUSE button is stopped, "REC" and "-End---" blink for tracks of recording. But to prevent unwanted...
When playback of a record finishes and the turntable stops rotating or playback of the source finishes, press the STOP button (H) to stop recording. This is due to a CD specification which allows you stop or pause even if the PLAY/PAUSE button is stopped, "REC" and "-End---" blink for tracks of recording. But to prevent unwanted...
Owners Manual
Page 32
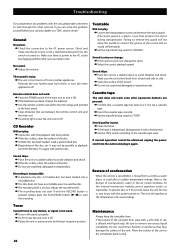
.... If not, set or similar appliances. Sound quality is not possible. Sound skips. Recording is poor. The unit will not allow the needle to turn the other appliances off. Maintenance Always keep the turntable clean. General No power. e Check the connection to avoid vibration and shock. Relocate ... range and pointed at the temperature of the unit to a TV set a cassette tape. Use a recordable disc. To prevent this, or if this chart and see if you call your dealer or a TEAC service center. e If a strong light is dirty, clean the surface of the unit gets dirty, ...
.... If not, set or similar appliances. Sound quality is not possible. Sound skips. Recording is poor. The unit will not allow the needle to turn the other appliances off. Maintenance Always keep the turntable clean. General No power. e Check the connection to avoid vibration and shock. Relocate ... range and pointed at the temperature of the unit to a TV set a cassette tape. Use a recordable disc. To prevent this, or if this chart and see if you call your dealer or a TEAC service center. e If a strong light is dirty, clean the surface of the unit gets dirty, ...
Owners Manual
Page 33
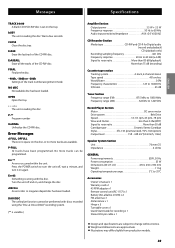
... response 20 Hz to 20 kHz (±3 dB) Signal to noise ratio More than 85 dB (playback) More than 75 dB (recording) Cassette tape section Tracking system 4-track, 2-channel stereo Tape speed 4.8 cm/sec Wow&flutter 0.3% Frequency characteristic 125 to 10,000 Hz...45 RPM adaptor x 1 Remote control unit (RC-1157) x 1 Battery (AA, alkaline or MN) x 2 FM antenna x 1 AM antenna x 1 Hinge x 2 Turntable cover x 1 Quick Start Guide for recording x 1 Stereo RCA pin cable x 1 < Design and specifications are subject to turn it on again. Turn the unit off , wait a minute, and turn the...
... response 20 Hz to 20 kHz (±3 dB) Signal to noise ratio More than 85 dB (playback) More than 75 dB (recording) Cassette tape section Tracking system 4-track, 2-channel stereo Tape speed 4.8 cm/sec Wow&flutter 0.3% Frequency characteristic 125 to 10,000 Hz...45 RPM adaptor x 1 Remote control unit (RC-1157) x 1 Battery (AA, alkaline or MN) x 2 FM antenna x 1 AM antenna x 1 Hinge x 2 Turntable cover x 1 Quick Start Guide for recording x 1 Stereo RCA pin cable x 1 < Design and specifications are subject to turn it on again. Turn the unit off , wait a minute, and turn the...


