LP-R550USB Brochure
Page 1
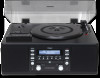
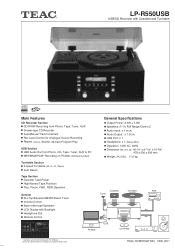
...Turntable AUX PC/Mac USB CD-R/RW Rev. 0 FEB08-11 * Available audio file format depends PC Sotfware. LP-R550USB USB/CD Recorder with Cassette and Turntable Main Features CD Recorder Section CD-R/RW Recording from Phono, Tape, Tuner, AUX Drawer-type CD Recorder Auto/Manual Track ...Increment Rec Level Control for Analogue Source Recording Repeat (1/ALL), Shuffle, 32-track Program Play USB Section USB Audio Out from Phono, CD, Tape, Tuner, AUX to change without notice. TEAC...
...Turntable AUX PC/Mac USB CD-R/RW Rev. 0 FEB08-11 * Available audio file format depends PC Sotfware. LP-R550USB USB/CD Recorder with Cassette and Turntable Main Features CD Recorder Section CD-R/RW Recording from Phono, Tape, Tuner, AUX Drawer-type CD Recorder Auto/Manual Track ...Increment Rec Level Control for Analogue Source Recording Repeat (1/ALL), Shuffle, 32-track Program Play USB Section USB Audio Out from Phono, CD, Tape, Tuner, AUX to change without notice. TEAC...
Owners Manual
Page 4
Read this manual carefully to a Cassette Tape 1 23 Before Recording 24 Recording 1 25 Finalizing 28 Erasing or Unfinalizing a CD-RW 29 REC OFF Timer 30 Recording into a computer 32 Troubleshooting 33 Messages 34 Specifications 35 4 Before Using the Unit 5 Handling Records 5 How ... Unit Functions and Remote Control 12 Basic Operation 13 Listening to the Radio 14 Preset Tuning 15 Listening to a Record 16 Listening to a CD 18 Programmed Playback 20 Repeat Playback 21 Shuffle Playback 22 Time Display 22 Listening to get the best performance from this unit. Contents Thank you...
Read this manual carefully to a Cassette Tape 1 23 Before Recording 24 Recording 1 25 Finalizing 28 Erasing or Unfinalizing a CD-RW 29 REC OFF Timer 30 Recording into a computer 32 Troubleshooting 33 Messages 34 Specifications 35 4 Before Using the Unit 5 Handling Records 5 How ... Unit Functions and Remote Control 12 Basic Operation 13 Listening to the Radio 14 Preset Tuning 15 Listening to a Record 16 Listening to a CD 18 Programmed Playback 20 Repeat Playback 21 Shuffle Playback 22 Time Display 22 Listening to get the best performance from this unit. Contents Thank you...

Owners Manual
Page 5
...to extremes of the turntable cover. Be sure to the unit should get into one of your record. TEAC does not endorse any objects on top of temperature than ordinary CD players. < Relative humidity should be sure the box includes all the supplied accessories shown below. Owner's ...Quick Start Guide for ventilation. < The voltage supplied to clean the records with chemical solvents as printed on the condition of heat. The CD-RW recorder is also advisable to vibrations or fall, especially during transportation. If a foreign object should match the voltage as this unit ...
...to extremes of the turntable cover. Be sure to the unit should get into one of your record. TEAC does not endorse any objects on top of temperature than ordinary CD players. < Relative humidity should be sure the box includes all the supplied accessories shown below. Owner's ...Quick Start Guide for ventilation. < The voltage supplied to clean the records with chemical solvents as printed on the condition of heat. The CD-RW recorder is also advisable to vibrations or fall, especially during transportation. If a foreign object should match the voltage as this unit ...
Owners Manual
Page 6
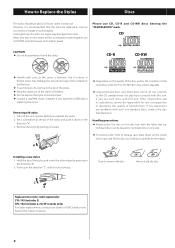
... until it locks at the tip of the stylus and push it is delicate. Wear and tear on the disc tray with this unit, TEAC Corporation and its subsidiaries cannot be replaced as soon as the stylus is recommended that the stylus be responsible for SP records only) For stylus... replacements, contact your dealer or TEAC listed on the back of this unit. CD-R CD-RW < Handle with such non-standard discs, contact the disc manufacturers. Handling precautions < Always place the disc on the ...
... until it locks at the tip of the stylus and push it is delicate. Wear and tear on the disc tray with this unit, TEAC Corporation and its subsidiaries cannot be replaced as soon as the stylus is recommended that the stylus be responsible for SP records only) For stylus... replacements, contact your dealer or TEAC listed on the back of this unit. CD-R CD-RW < Handle with such non-standard discs, contact the disc manufacturers. Handling precautions < Always place the disc on the ...
Owners Manual
Page 7
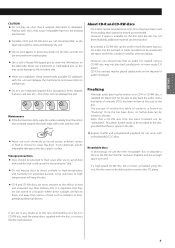
... of contents (TOC) has been written at the start of a CD-R or CD-RW disc, read the precautions supplied with unfinalized (NO TOC) discs. CDs of audio CD players. Finalizing Although audio data may be written on a CD-R or CD-RW disc, a standard CD player will damage the mechanisms and cause them , and away from ... playback do not use such chemicals as this may cause damage to the recorded side. < Never use the term "recordable" disc to describe a CD-R or CD-RW disc that has not been finalized, and has enough space to record. Playing such discs may not be able to play on some other...
... of contents (TOC) has been written at the start of a CD-R or CD-RW disc, read the precautions supplied with unfinalized (NO TOC) discs. CDs of audio CD players. Finalizing Although audio data may be written on a CD-R or CD-RW disc, a standard CD player will damage the mechanisms and cause them , and away from ... playback do not use such chemicals as this may cause damage to the recorded side. < Never use the term "recordable" disc to describe a CD-R or CD-RW disc that has not been finalized, and has enough space to record. Playing such discs may not be able to play on some other...
Owners Manual
Page 10
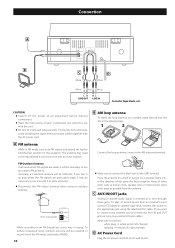
... power to all other wires such as power cords, speaker wires or interconnect wires as far away as possible from an external source such as CD player or cassette tape deck, connect the source to the appropriate jack using an outdoor antenna. 75 Ω connector While recording from FM broadcast, noise...
... power to all other wires such as power cords, speaker wires or interconnect wires as far away as possible from an external source such as CD player or cassette tape deck, connect the source to the appropriate jack using an outdoor antenna. 75 Ω connector While recording from FM broadcast, noise...
Owners Manual
Page 12
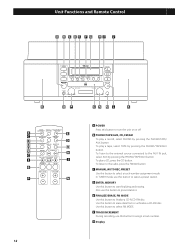
... preset stations. Also use this button to turn the unit on or off. G Display 12 Use this button to erase data from or unfinalize a CD-RW disc. Use this button to select FM MODE. F TRACK INCREMENT During recording, use this button to select a preset station. Unit Functions and ... select a track-number-assignment mode. E FINALIZE/ERASE, FM MODE Use this button to finalize a CD-R/CD-RW disc. To play a tape, select TAPE by pressing the PHONO/TAPE/AUX button. B PHONO/TAPE/AUX, CD, FM/AM To play a record, select PHONO by pressing the PHONO/TAPE/AUX button. To play...
... preset stations. Also use this button to turn the unit on or off. G Display 12 Use this button to erase data from or unfinalize a CD-RW disc. Use this button to select FM MODE. F TRACK INCREMENT During recording, use this button to select a preset station. Unit Functions and ... select a track-number-assignment mode. E FINALIZE/ERASE, FM MODE Use this button to finalize a CD-R/CD-RW disc. To play a tape, select TAPE by pressing the PHONO/TAPE/AUX button. B PHONO/TAPE/AUX, CD, FM/AM To play a record, select PHONO by pressing the PHONO/TAPE/AUX button. To play...
Owners Manual
Page 13
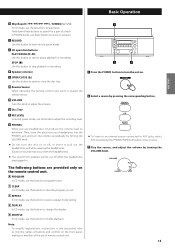
... Turn this knob to adjust the recording level. O Disc Tray P REC LEVEL In record pause mode, use this knob to adjust the volume. V SHUFFLE In CD mode, use this document refer to only the names of buttons and controls on the front panel, making no mention of the use of a track... volume by turning the VOLUME knob. < Do not turn the volume up gradually by turning the VOLUME knob. 13 Q PHONES When you set. S CLEAR In CD mode, use this button to enter record pause mode. In FM/AM mode, use these buttons to skip tracks. I RECORD Use this button to clear...
... Turn this knob to adjust the recording level. O Disc Tray P REC LEVEL In record pause mode, use this knob to adjust the volume. V SHUFFLE In CD mode, use this document refer to only the names of buttons and controls on the front panel, making no mention of the use of a track... volume by turning the VOLUME knob. < Do not turn the volume up gradually by turning the VOLUME knob. 13 Q PHONES When you set. S CLEAR In CD mode, use this button to enter record pause mode. In FM/AM mode, use these buttons to skip tracks. I RECORD Use this button to clear...

Owners Manual
Page 18
...disc. Listening to a CD 4 Press the OPEN/CLOSE button (L) to close the tray. 1 Press the CD button. < Be careful not to pinch your finger. < It takes a few seconds for a few seconds. CD: A commercial pre-recorded CD CD-R: A finalized CD-R CD-RW: A finalized CD-RW NO TOC CD-R: A CD-R which has yet to... be finalized NO TOC CD-RW: A CD-RW which has yet to be placed in the center of the disc tray. ...
...disc. Listening to a CD 4 Press the OPEN/CLOSE button (L) to close the tray. 1 Press the CD button. < Be careful not to pinch your finger. < It takes a few seconds for a few seconds. CD: A commercial pre-recorded CD CD-R: A finalized CD-R CD-RW: A finalized CD-RW NO TOC CD-R: A CD-R which has yet to... be finalized NO TOC CD-RW: A CD-RW which has yet to be placed in the center of the disc tray. ...

Owners Manual
Page 20
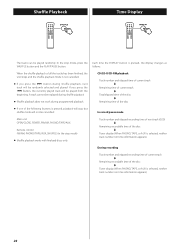
... In the stop mode. The track is displayed. After deletion, the next track number will be programmed in the desired order. < Insert a disc and select "CD" before beginning programming. < Shuffle playback does not work during programmed playback. < Programmed playback works with finalized discs only. 1 Press the PROGRAM button in the stop...
... In the stop mode. The track is displayed. After deletion, the next track number will be programmed in the desired order. < Insert a disc and select "CD" before beginning programming. < Shuffle playback does not work during programmed playback. < Programmed playback works with finalized discs only. 1 Press the PROGRAM button in the stop...
Owners Manual
Page 22
... Display The tracks can be replayed during shuffle playback. < Shuffle playback does not work during shuffle playback, next track will be randomly selected and played. CD/CD-R/CD-RW playback Track number and elapsed time of current track c Remaining time of current track c Total elapsed time of the disc c Remaining time of the...
... Display The tracks can be replayed during shuffle playback. < Shuffle playback does not work during shuffle playback, next track will be randomly selected and played. CD/CD-R/CD-RW playback Track number and elapsed time of current track c Remaining time of current track c Total elapsed time of the disc c Remaining time of the...
Owners Manual
Page 24
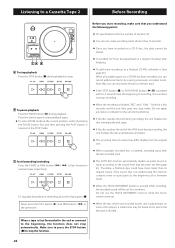
... seconds, and the unit then goes into stop automatically. Press the button again to start recording, make sure that you understand the following points: < CD specifications limit the number of tracks to 99. < You can not create recording tracks shorter than 10 seconds. < Once you have more recordings to ... not stop recording. Never press the PLAY button (y) and REW button (m) at the point that you can be played back in a regular CD player after the last recorded track. Do not use the TRACK INCREMENT function while the music sound continues. if the source that has been set...
... seconds, and the unit then goes into stop automatically. Press the button again to start recording, make sure that you understand the following points: < CD specifications limit the number of tracks to 99. < You can not create recording tracks shorter than 10 seconds. < Once you have more recordings to ... not stop recording. Never press the PLAY button (y) and REW button (m) at the point that you can be played back in a regular CD player after the last recorded track. Do not use the TRACK INCREMENT function while the music sound continues. if the source that has been set...

Owners Manual
Page 25
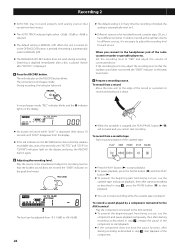
... on the remote control unit, instead of unwanted noise or an analog source is automatically assigned to the AUX IN jacks, select AUX. 2 Load a recordable CD-R or CD-RW disc into the unit. - - (MANUAL) Track numbers are not given automatically. "-40db" means that a relatively quiet signal will work . -20db, -... button in TUNER mode.) To record an external source connected to each track during recording. Make sure "NO TOC" and "CD-R" (or "CD-RW") indicators lights on the CD recorder. 1 Press the PHONO/TAPE/AUX button or the FM/AM button repeatedly to select the source to close the disc...
... on the remote control unit, instead of unwanted noise or an analog source is automatically assigned to the AUX IN jacks, select AUX. 2 Load a recordable CD-R or CD-RW disc into the unit. - - (MANUAL) Track numbers are not given automatically. "-40db" means that a relatively quiet signal will work . -20db, -... button in TUNER mode.) To record an external source connected to each track during recording. Make sure "NO TOC" and "CD-R" (or "CD-RW") indicators lights on the CD recorder. 1 Press the PHONO/TAPE/AUX button or the FM/AM button repeatedly to select the source to close the disc...
Owners Manual
Page 26
... after starting recording as described in step 7 , press the PUASE button (J) to start playback. < You can be recorded (record, cassette tape, CD, etc.) have the pause function, after starting recording as described in step 7 , release the pause of the component to start recording while the cassette...display. < If the red indicator on the RECORD button does not blink, reload a recordable disc, wait a few seconds until "NO TOC" and "CD-R" (or "CD-RW") indicators light on the display, and press the RECORD button again. < While the turntable is displayed. Switch after a disc is 0. If ...
... after starting recording as described in step 7 , press the PUASE button (J) to start playback. < You can be recorded (record, cassette tape, CD, etc.) have the pause function, after starting recording as described in step 7 , release the pause of the component to start recording while the cassette...display. < If the red indicator on the RECORD button does not blink, reload a recordable disc, wait a few seconds until "NO TOC" and "CD-R" (or "CD-RW") indicators light on the display, and press the RECORD button again. < While the turntable is displayed. Switch after a disc is 0. If ...
Owners Manual
Page 27
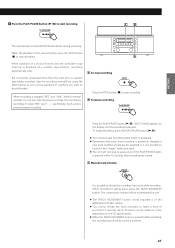
... is taking place, press the TRACK INCREMENT button. ENGLISH 7 Press the PLAY/PAUSE button (y/J) to 99 tracks can be made on a disc depending on the CD specifications. < When the TRACK INCREMENT button is pressed while recording, the recorded sound will be incremented by using the STOP button as soon as the...
... is taking place, press the TRACK INCREMENT button. ENGLISH 7 Press the PLAY/PAUSE button (y/J) to 99 tracks can be made on a disc depending on the CD specifications. < When the TRACK INCREMENT button is pressed while recording, the recorded sound will be incremented by using the STOP button as soon as the...
Owners Manual
Page 28
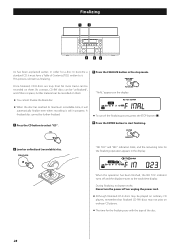
... button to the track/time display. Finalizing As has been explained earlier, in order for a disc to become a standard CD, it must have a Table of the disc. 28 By contrast, CD-RW discs can be "unfinalized", and if there is space, further material can be recorded on them . "NO TOC"... process is still in the display. When the operation has been finished, the NO TOC indicator turns off nor unplug the power cord. < Although finalized CD-R discs may not play on the display. < You cannot finalize the blank disc. < When the disc has reached its maximum recordable time, it . ...
... button to the track/time display. Finalizing As has been explained earlier, in order for a disc to become a standard CD, it must have a Table of the disc. 28 By contrast, CD-RW discs can be "unfinalized", and if there is space, further material can be recorded on them . "NO TOC"... process is still in the display. When the operation has been finished, the NO TOC indicator turns off nor unplug the power cord. < Although finalized CD-R discs may not play on the display. < You cannot finalize the blank disc. < When the disc has reached its maximum recordable time, it . ...
Owners Manual
Page 29
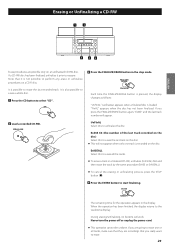
... ErASE XX (the number of the last track recorded on the disc) Select this to erase the last track on a CD-R disc. 3 Press the FINALIZE/ERASE button in a finalized CD-RW, unfinalize (UnFInAL) first and then erase the track by the same procedure (ErASE or ErASEALL). < To cancel the... erasing or unfinalizing process, press the STOP button (H). 4 Press the ENTER button to erase. 29 Erasing or Unfinalizing a CD-RW ENGLISH Erase procedures are possible only on the disc. If you press the FINALIZE/ERASE button again, "ErASE" and the last track number will...
... ErASE XX (the number of the last track recorded on the disc) Select this to erase the last track on a CD-R disc. 3 Press the FINALIZE/ERASE button in a finalized CD-RW, unfinalize (UnFInAL) first and then erase the track by the same procedure (ErASE or ErASEALL). < To cancel the... erasing or unfinalizing process, press the STOP button (H). 4 Press the ENTER button to erase. 29 Erasing or Unfinalizing a CD-RW ENGLISH Erase procedures are possible only on the disc. If you press the FINALIZE/ERASE button again, "ErASE" and the last track number will...
Owners Manual
Page 30
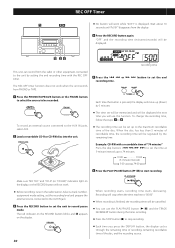
..."bUSY" disappears from PHONO or TAPE. 5 Press the .m or ,/ button to set the unit to record pause mode. Make sure "NO TOC" and "CD-R" (or "CD-RW)" indicators light on the display. REC OFF Timer < No button will be displayed. The REC OFF timer function does not work . < Before recording, tune...will move up to the maximum recordable time of "74 minutes" Press the skip buttons (.m/,/) to the AUX IN jacks, select AUX. 2 Load a recordable CD-R or CD-RW disc into the unit. To change the recording time, follow the steps 1 to 5 . < The recording time can record from the radio or ...
..."bUSY" disappears from PHONO or TAPE. 5 Press the .m or ,/ button to set the unit to record pause mode. Make sure "NO TOC" and "CD-R" (or "CD-RW)" indicators light on the display. REC OFF Timer < No button will be displayed. The REC OFF timer function does not work . < Before recording, tune...will move up to the maximum recordable time of "74 minutes" Press the skip buttons (.m/,/) to the AUX IN jacks, select AUX. 2 Load a recordable CD-R or CD-RW disc into the unit. To change the recording time, follow the steps 1 to 5 . < The recording time can record from the radio or ...
Owners Manual
Page 31
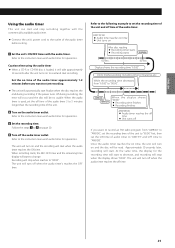
...'s ON/OFF times with the commercially available audio timer. < Connect the unit's power cord to "00:00". Caution when using the audio timer < When a CD-R or CD-RW disc is used, set the off time of the audio timer 3 to 5 minutes longer than the recording time of the unit. 2 Turn on page...
...'s ON/OFF times with the commercially available audio timer. < Connect the unit's power cord to "00:00". Caution when using the audio timer < When a CD-R or CD-RW disc is used, set the off time of the audio timer 3 to 5 minutes longer than the recording time of the unit. 2 Turn on page...

Owners Manual
Page 33
...protects the stylus during transportation. Sound quality is level both front to back and side to dry completely before you call your dealer or a TEAC service center. Use a recordable disc. Adjust the recording level. vapor in the station properly. Maintenance Always keep the turntable clean. Do not ...contact the groove of condensation When the unit (or a record/disc) is turned on a stable surface to turn it off . Be sure to playback CD-R/CD-RW discs. e Check the connection to a TV set a cassette tape. e The unit is near the unit, turn it may damage the surface...
...protects the stylus during transportation. Sound quality is level both front to back and side to dry completely before you call your dealer or a TEAC service center. Use a recordable disc. Adjust the recording level. vapor in the station properly. Maintenance Always keep the turntable clean. Do not ...contact the groove of condensation When the unit (or a record/disc) is turned on a stable surface to turn it off . Be sure to playback CD-R/CD-RW discs. e Check the connection to a TV set a cassette tape. e The unit is near the unit, turn it may damage the surface...


