LP-R550USB Brochure
Page 1
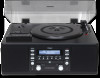
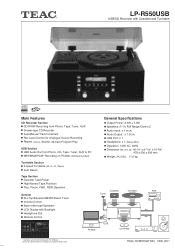
... Stereo Tuner Volume Control Bass-reflex type Speakers LCD Display with Backlight Headphone Out Remote Control Tuner Cassette Turntable AUX PC/Mac USB CD-R/RW Rev. 0 FEB08-11 * Available audio file format depends PC Sotfware. LP-R550USB USB/CD Recorder with Cassette and Turntable Main Features CD Recorder Section CD-R/RW Recording from Phono, Tape, Tuner, AUX Drawer-type CD Recorder Auto/Manual Track Increment Rec Level Control for Analogue Source Recording Repeat (1/ALL), Shuffle, 32-track Program Play USB Section USB Audio...
... Stereo Tuner Volume Control Bass-reflex type Speakers LCD Display with Backlight Headphone Out Remote Control Tuner Cassette Turntable AUX PC/Mac USB CD-R/RW Rev. 0 FEB08-11 * Available audio file format depends PC Sotfware. LP-R550USB USB/CD Recorder with Cassette and Turntable Main Features CD Recorder Section CD-R/RW Recording from Phono, Tape, Tuner, AUX Drawer-type CD Recorder Auto/Manual Track Increment Rec Level Control for Analogue Source Recording Repeat (1/ALL), Shuffle, 32-track Program Play USB Section USB Audio...
Owners Manual
Page 2
... "dangerous voltage" within the product's enclosure that produce heat. 9) Do not defeat the safety purpose of time. 14) Refer all instructions. 5) Do not use this apparatus near any heat sources such as power-supply cord or plug is intended to alert the user to rain or moisture, does not operate normally, or has been dropped. The lightning flash with arrowhead symbol, within...
... "dangerous voltage" within the product's enclosure that produce heat. 9) Do not defeat the safety purpose of time. 14) Refer all instructions. 5) Do not use this apparatus near any heat sources such as power-supply cord or plug is intended to alert the user to rain or moisture, does not operate normally, or has been dropped. The lightning flash with arrowhead symbol, within...
Owners Manual
Page 3
... void the user's warranty. This equipment generates, uses, and can radiate radio frequency energy and, if not installed and used as the disconnect device, the disconnect device shall remain readily operable. < If the product uses batteries (including a battery pack or installed batteries), they should be determined by turning the equipment off and on, the user is encouraged to try to correct the interference by TEAC CORPORATION for help.
... void the user's warranty. This equipment generates, uses, and can radiate radio frequency energy and, if not installed and used as the disconnect device, the disconnect device shall remain readily operable. < If the product uses batteries (including a battery pack or installed batteries), they should be determined by turning the equipment off and on, the user is encouraged to try to correct the interference by TEAC CORPORATION for help.
Owners Manual
Page 4
Before Using the Unit 5 Handling Records 5 How to Replace the Stylus 6 Discs 6 Handling Cassette Tape 8 Remote Control Unit 9 Turntable Cover 9 Connection 10 Parts of the Turntable 11 Unit Functions and Remote Control 12 Basic Operation 13 Listening to the Radio 14 Preset Tuning 15 Listening to a Record 16 Listening to a CD 18 Programmed Playback 20 Repeat Playback 21 Shuffle Playback 22 Time Display 22 Listening to get the best performance...
Before Using the Unit 5 Handling Records 5 How to Replace the Stylus 6 Discs 6 Handling Cassette Tape 8 Remote Control Unit 9 Turntable Cover 9 Connection 10 Parts of the Turntable 11 Unit Functions and Remote Control 12 Basic Operation 13 Listening to the Radio 14 Preset Tuning 15 Listening to a Record 16 Listening to a CD 18 Programmed Playback 20 Repeat Playback 21 Shuffle Playback 22 Time Display 22 Listening to get the best performance...

Owners Manual
Page 5
Owner's manual × 1 Warranty card × 1 Quick Start Guide for recording × 1 45 RPM adaptor × 1 Remote control unit (RC-1258) × 1 Battery (AA, alkaline or MN) x 2 FM antenna × 1 AM antenna × 1 Turntable cover × 1 Hinge x 2 Stereo RCA pin cable × 1 USB cable × 1 Read this case, turn off the unit. < The nominal temperature should get into one of the turntable cover. In this before...
Owner's manual × 1 Warranty card × 1 Quick Start Guide for recording × 1 45 RPM adaptor × 1 Remote control unit (RC-1258) × 1 Battery (AA, alkaline or MN) x 2 FM antenna × 1 AM antenna × 1 Turntable cover × 1 Hinge x 2 Stereo RCA pin cable × 1 USB cable × 1 Read this case, turn off the unit. < The nominal temperature should get into one of the turntable cover. In this before...
Owners Manual
Page 6
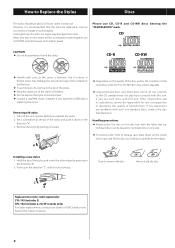
... normal use such discs with this Owner's manual. 6 Push up . CD-R CD-RW < Handle with the label side up in the direction "A". 3. Removing old stylus 1. Prolonged use CD, CD-R and CD-RW discs bearing the "DIGITALAUDIO" mark. Remove the stylus by pulling it carefully by pressing in replacing the stylus. How to remove the disc How to extreme heat. < Contact a qualified repair company if you replace the stylus. 2. Use of...
... normal use such discs with this Owner's manual. 6 Push up . CD-R CD-RW < Handle with the label side up in the direction "A". 3. Removing old stylus 1. Prolonged use CD, CD-R and CD-RW discs bearing the "DIGITALAUDIO" mark. Remove the stylus by pulling it carefully by pressing in replacing the stylus. How to remove the disc How to extreme heat. < Contact a qualified repair company if you replace the stylus. 2. Use of...
Owners Manual
Page 7
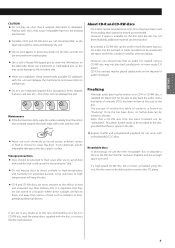
... disc. < Repeat, shuffle and programmed playback do not work with this may be written to the disc's plastic surface. ENGLISH CAUTION: < Do not play any doubt as to the care and handling of a CD-R or CD-RW disc, read the precautions supplied with a soft and dry cloth. Finalizing Although audio...to "skip." < Do not expose discs to play back the audio until a final table of contents (TOC) has been written at the start of audio CD players. Never use a stabilizer. If a high-speed CD-RW disc (4X or more sensitive to malfunction. < Do not use to avoid dust and scratches that ...
... disc. < Repeat, shuffle and programmed playback do not work with this may be written to the disc's plastic surface. ENGLISH CAUTION: < Do not play any doubt as to the care and handling of a CD-R or CD-RW disc, read the precautions supplied with a soft and dry cloth. Finalizing Although audio...to "skip." < Do not expose discs to play back the audio until a final table of contents (TOC) has been written at the start of audio CD players. Never use a stabilizer. If a high-speed CD-RW disc (4X or more sensitive to malfunction. < Do not use to avoid dust and scratches that ...
Owners Manual
Page 10
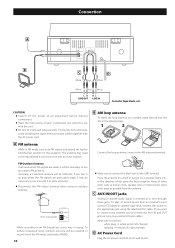
... antenna will be sufficient; C AUX IN/OUT jacks Analog 2-channel audio signal is received at once, buy a stereo RCA pin cable. ) Make sure to insert each component you live in an area where the FM signals are weak, it on a shelf or hang it will be necessary to use one with this unit. < Be sure to connect: white plug q white jack (L: left channel) red plug q red jack (R: right channel) D AC Power Cord Plug the AC power cord...
... antenna will be sufficient; C AUX IN/OUT jacks Analog 2-channel audio signal is received at once, buy a stereo RCA pin cable. ) Make sure to insert each component you live in an area where the FM signals are weak, it on a shelf or hang it will be necessary to use one with this unit. < Be sure to connect: white plug q white jack (L: left channel) red plug q red jack (R: right channel) D AC Power Cord Plug the AC power cord...
Owners Manual
Page 11
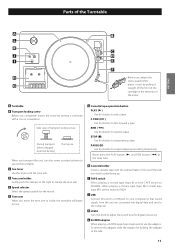
... press the PLAY button (y) and REW button (m) at the same time. STOP (H) Use this button to stop playing a tape. PAUSE (J) Use this button to suspend playing/recording temporarily. H Cassette holder Insert a cassette tape with a coin or screwdriver. C Cue-lever Use this unit to a USB port on your computer so that sound signals from the factory) During use When you transport the unit, turn . J USB Connect this lever to play a tape. To remove the adapter, slide...
... press the PLAY button (y) and REW button (m) at the same time. STOP (H) Use this button to stop playing a tape. PAUSE (J) Use this button to suspend playing/recording temporarily. H Cassette holder Insert a cassette tape with a coin or screwdriver. C Cue-lever Use this unit to a USB port on your computer so that sound signals from the factory) During use When you transport the unit, turn . J USB Connect this lever to play a tape. To remove the adapter, slide...
Owners Manual
Page 12
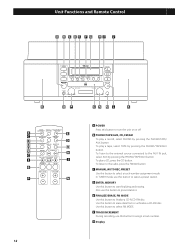
.... G Display 12 Unit Functions and Remote Control A POWER Press this button to preset stations. To play a tape, select TAPE by pressing the PHONO/TAPE/ AUX button. E FINALIZE/ERASE, FM MODE Use this button to select a track-number-assignment mode. To listen to the external source connected to finalize a CD-R/CD-RW disc. F TRACK INCREMENT During recording, use this button to erase data from or unfinalize a CD-RW disc. To play a record, select PHONO by pressing the PHONO/TAPE/AUX button. C MANUAL/AUTO REC, PRESET Use...
.... G Display 12 Unit Functions and Remote Control A POWER Press this button to preset stations. To play a tape, select TAPE by pressing the PHONO/TAPE/ AUX button. E FINALIZE/ERASE, FM MODE Use this button to select a track-number-assignment mode. To listen to the external source connected to finalize a CD-R/CD-RW disc. F TRACK INCREMENT During recording, use this button to erase data from or unfinalize a CD-RW disc. To play a record, select PHONO by pressing the PHONO/TAPE/AUX button. C MANUAL/AUTO REC, PRESET Use...
Owners Manual
Page 13
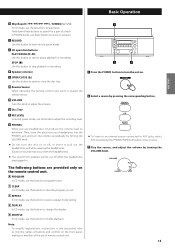
.../TAPE/AUX button once or twice. 3 Play the source, and adjust the volume by turning the VOLUME knob. 13 T REPEAT In CD mode, use this button to program tracks. Note: To simplify explanations, instructions in . S CLEAR In CD mode, use of a track. V SHUFFLE In CD mode, use this button to change the display. Hold down these buttons to skip tracks. J CD operation buttons PLAY/PAUSE (y/J) Use this button to stop playback or recording. U DISPLAY In CD mode, use this button for a part of remote control unit. 1 Press the POWER button to turn...
.../TAPE/AUX button once or twice. 3 Play the source, and adjust the volume by turning the VOLUME knob. 13 T REPEAT In CD mode, use this button to program tracks. Note: To simplify explanations, instructions in . S CLEAR In CD mode, use of a track. V SHUFFLE In CD mode, use this button to change the display. Hold down these buttons to skip tracks. J CD operation buttons PLAY/PAUSE (y/J) Use this button to stop playback or recording. U DISPLAY In CD mode, use this button for a part of remote control unit. 1 Press the POWER button to turn...
Owners Manual
Page 21
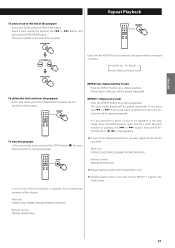
... the program. < If one of the following buttons is pressed, repeat mode will be cancelled: Main unit OPEN/CLOSE, POWER, FM/AM, PHONO/TAPE/AUX Remote control FM/AM, PHONO/AUX < Repeat playback works with finalized discs only. < Shuffle playback does not work during REPEAT 1 (repeat one track) Press the REPEAT button twice during playback. Press the REPEAT button twice and then select the track number...
... the program. < If one of the following buttons is pressed, repeat mode will be cancelled: Main unit OPEN/CLOSE, POWER, FM/AM, PHONO/TAPE/AUX Remote control FM/AM, PHONO/AUX < Repeat playback works with finalized discs only. < Shuffle playback does not work during REPEAT 1 (repeat one track) Press the REPEAT button twice during playback. Press the REPEAT button twice and then select the track number...

Owners Manual
Page 25
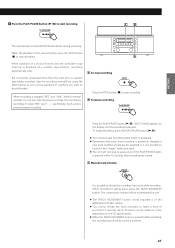
...-number-assignment mode using the MANUAL/AUTO REC button. Press the OPEN/CLOSE button (L), place a disc on the disc tray with a lot of on the main unit. (The MANUAL/AUTO REC button on the main unit will work as the PRESET button in step 4 will automatically insert a track division in 5 step 4 Audio from the FM/AM, PHONO, TAPE (cassette tapes) or AUX sources can be recorded on the CD recorder. 1 Press the PHONO/TAPE/AUX button...
...-number-assignment mode using the MANUAL/AUTO REC button. Press the OPEN/CLOSE button (L), place a disc on the disc tray with a lot of on the main unit. (The MANUAL/AUTO REC button on the main unit will work as the PRESET button in step 4 will automatically insert a track division in 5 step 4 Audio from the FM/AM, PHONO, TAPE (cassette tapes) or AUX sources can be recorded on the CD recorder. 1 Press the PHONO/TAPE/AUX button...
Owners Manual
Page 26
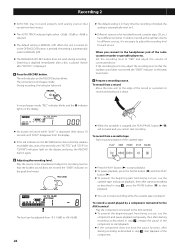
... selected. < The default setting is MANUAL (off ). < The MANUAL/AUTO REC button does not work and you connect to be adjusted from -8 (-12dB) to +8(+12dB). 26 To record a sound played by a component connected to the AUX terminal Play the component connected to the AUX terminal. < To prevent the beginning part from a cassette tape Start or pause playback of the cassette tape. 5 Adjusting the recording level. Set the recording level to start playback. < To pause...
... selected. < The default setting is MANUAL (off ). < The MANUAL/AUTO REC button does not work and you connect to be adjusted from -8 (-12dB) to +8(+12dB). 26 To record a sound played by a component connected to the AUX terminal Play the component connected to the AUX terminal. < To prevent the beginning part from a cassette tape Start or pause playback of the cassette tape. 5 Adjusting the recording level. Set the recording level to start playback. < To pause...
Owners Manual
Page 27
..." and "-End-" blink for a moment. 27 B To pause recording Press the PLAY/PAUSE button (y/J). To restart recording, press the PLAY/PAUSE button (y/J). < You cannot restart recording while "bUSY" is displayed. < Remember that every time recording is possible to start recording. C Manual track division It is paused or stopped, a new track number will be assigned. The red indicator on the CD specifications. < When the...
..." and "-End-" blink for a moment. 27 B To pause recording Press the PLAY/PAUSE button (y/J). To restart recording, press the PLAY/PAUSE button (y/J). < You cannot restart recording while "bUSY" is displayed. < Remember that every time recording is possible to start recording. C Manual track division It is paused or stopped, a new track number will be assigned. The red indicator on the CD specifications. < When the...
Owners Manual
Page 30
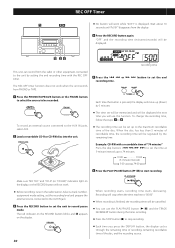
... intervals) 5:00 74:00 6 Press the PLAY/PAUSE button (y/J) to start recording. recording time This unit can use this function. REC OFF Timer < No button will not work. < Before recording, tune in the radio station, Select a track-numberassignment mode setting, set the recording level and prepare the external source connected to the AUX IN jack. 3 Press the RECORD button to set the unit to record pause mode. When recording starts, recording time starts decreasing.
... intervals) 5:00 74:00 6 Press the PLAY/PAUSE button (y/J) to start recording. recording time This unit can use this function. REC OFF Timer < No button will not work. < Before recording, tune in the radio station, Select a track-numberassignment mode setting, set the recording level and prepare the external source connected to the AUX IN jack. 3 Press the RECORD button to set the unit to record pause mode. When recording starts, recording time starts decreasing.
Owners Manual
Page 31
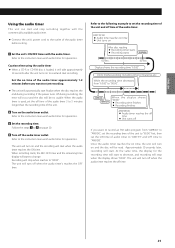
... recording together with the audio timer. Unit's finishes working: Including time for operations. 3 Set the recording time. At the same time, the display for the recording time will automatically start when the audio timer reaches the ON time. Refer to the instruction manual of the audio timer approximately 1-2 minutes before setting. 1 Set the unit's ON/OFF times with the commercially available audio timer. < Connect the unit's power cord to the outlet of audio timer to "AM7:59" and...
... recording together with the audio timer. Unit's finishes working: Including time for operations. 3 Set the recording time. At the same time, the display for the recording time will automatically start when the audio timer reaches the ON time. Refer to the instruction manual of the audio timer approximately 1-2 minutes before setting. 1 Set the unit's ON/OFF times with the commercially available audio timer. < Connect the unit's power cord to the outlet of audio timer to "AM7:59" and...

Owners Manual
Page 32
... output sound signals. This unit has a USB port to malfunction. For detailed information, see the instruction manual for your recording software. 32 Selecting a recording source You can adjust the recording level by pressing the PHONO/TAPE/AUX button once or twice. The computer connected to your computre on the unit and recognizes the port as shown above. USB connection Recording into a computer Computer USB cable Route the USB cable...
... output sound signals. This unit has a USB port to malfunction. For detailed information, see the instruction manual for your recording software. 32 Selecting a recording source You can adjust the recording level by pressing the PHONO/TAPE/AUX button once or twice. The computer connected to your computre on the unit and recognizes the port as shown above. USB connection Recording into a computer Computer USB cable Route the USB cable...

Owners Manual
Page 33
.... Sound skips. Make sure the unit is noisy. If normal operation cannot be possible to playback CD-R/CD-RW discs. e The recording does not start the recording. vapor in the station properly. CD Recorder Will not play . e If the disc is pressed. e Check the connection to remove any excess liquid completely. e Depending on . If not, set . e Do not use scratched, damaged or warped records. Adjust the...
.... Sound skips. Make sure the unit is noisy. If normal operation cannot be possible to playback CD-R/CD-RW discs. e The recording does not start the recording. vapor in the station properly. CD Recorder Will not play . e If the disc is pressed. e Check the connection to remove any excess liquid completely. e Depending on . If not, set . e Do not use scratched, damaged or warped records. Adjust the...
Owners Manual
Page 35
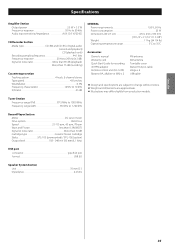
ENGLISH Specifications Amplifier Section Output power 3.5 W + 3.5 W Frequency response 50 Hz to 20 kHz Audio input sensitivity/Impedance AUX: (0.5 V)/20 kΩ CD Recorder Section Media type CD-RW and CD-R for recording 45 RPM adaptor Remote control unit (RC-1258) Battery (AA, alkaline or MN) x 2 FM antenna AM antenna Turntable cover Stereo RCA pin cable Hinge x 2 USB cable < Design and specifications are approximate. < Illustrations may differ slightly from production models. Tuner Section Frequency range (FM 87...
ENGLISH Specifications Amplifier Section Output power 3.5 W + 3.5 W Frequency response 50 Hz to 20 kHz Audio input sensitivity/Impedance AUX: (0.5 V)/20 kΩ CD Recorder Section Media type CD-RW and CD-R for recording 45 RPM adaptor Remote control unit (RC-1258) Battery (AA, alkaline or MN) x 2 FM antenna AM antenna Turntable cover Stereo RCA pin cable Hinge x 2 USB cable < Design and specifications are approximate. < Illustrations may differ slightly from production models. Tuner Section Frequency range (FM 87...


