
LP-R450 Brochure
Page 1
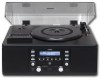
... Shuffle, 32-track Program Play Turntable Section 3-speed Turntable (33-1/3, 45, 78rpm) Auto Return Tape Section Cassette Tape Player Play, Pause, FWD, REW Operation Amplifier/Tuner Section PLL Synthesized AM/FM Stereo Tuner Volume Control Bass-reflex type Speakers General Stereo Speakers LCD Display with Backlight Headphone Jack Remote Control Design and specifications are subject to change without notice. Rev. 0 APR28-10 General Specifications Output Power: 3.5W + 3.5W Speakers: 70mm Full Range Cone x 2 Audio Input: x 1 Audio Output: x 1 Headphone: x 1 (Stereo Mini) Operation: 120V AC, 60Hz...
... Shuffle, 32-track Program Play Turntable Section 3-speed Turntable (33-1/3, 45, 78rpm) Auto Return Tape Section Cassette Tape Player Play, Pause, FWD, REW Operation Amplifier/Tuner Section PLL Synthesized AM/FM Stereo Tuner Volume Control Bass-reflex type Speakers General Stereo Speakers LCD Display with Backlight Headphone Jack Remote Control Design and specifications are subject to change without notice. Rev. 0 APR28-10 General Specifications Output Power: 3.5W + 3.5W Speakers: 70mm Full Range Cone x 2 Audio Input: x 1 Audio Output: x 1 Headphone: x 1 (Stereo Mini) Operation: 120V AC, 60Hz...
LP-R450 Manual
Page 2
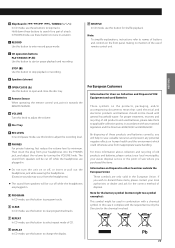
..., DO NOT REMOVE COVER (OR BACK). The exclamation point within an equilateral triangle is intended to alert the user to the presence of important operating and maintenance (servicing) instructions in accordance with the manufacturer's instructions. 8) Do not install near water. ...sources such as power-supply cord or plug is used, use attachments/accessories specified by the manufacturer. 12) Use only with the cart, stand, tripod, bracket, or table specified by the manufacturer, or sold with the apparatus. NO USER-SERVICEABLE PARTS INSIDE. Servicing is intended to alert the user...
..., DO NOT REMOVE COVER (OR BACK). The exclamation point within an equilateral triangle is intended to alert the user to the presence of important operating and maintenance (servicing) instructions in accordance with the manufacturer's instructions. 8) Do not install near water. ...sources such as power-supply cord or plug is used, use attachments/accessories specified by the manufacturer. 12) Use only with the cart, stand, tripod, bracket, or table specified by the manufacturer, or sold with the apparatus. NO USER-SERVICEABLE PARTS INSIDE. Servicing is intended to alert the user...
LP-R450 Manual
Page 3
... 3 This equipment generates, uses, and can radiate radio frequency energy and, if not installed and used as the disconnect device, the disconnect device shall remain readily operable. < If the product uses batteries (including a battery pack or installed batteries), they should be taken when using earphones or headphones with the product because excessive sound pressure (volume) from earphones or head-phones can cause hearing loss. Replace only with the same...
... 3 This equipment generates, uses, and can radiate radio frequency energy and, if not installed and used as the disconnect device, the disconnect device shall remain readily operable. < If the product uses batteries (including a battery pack or installed batteries), they should be taken when using earphones or headphones with the product because excessive sound pressure (volume) from earphones or head-phones can cause hearing loss. Replace only with the same...
LP-R450 Manual
Page 4
... as this manual carefully to remove the record or disc. In this case, turn off the unit. < The nominal temperature should get the best performance from the wall outlet, always pull directly on the plug, never yank on the condition of the electric waves of the Turntable 12 Remote Control Unit 13 Basic Operation 13 Listening to the Radio 14 Preset Tuning 15...
... as this manual carefully to remove the record or disc. In this case, turn off the unit. < The nominal temperature should get the best performance from the wall outlet, always pull directly on the plug, never yank on the condition of the electric waves of the Turntable 12 Remote Control Unit 13 Basic Operation 13 Listening to the Radio 14 Preset Tuning 15...
LP-R450 Manual
Page 5
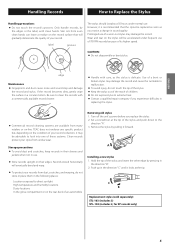
...Turn off the unit's power before you experience difficulty in use . Remove the stylus by the edges or the label, with care, as you notice a change in the direction "C" until it may be advisable to extreme heat. < Contact a qualified repair company if you replace the stylus. 2. Push up in sound... your records from undue wear. TEAC does not endorse any specific product but, depending on the stylus will gradually deteriorate the quality of the stylus and push down to Replace the Stylus Handling precautions < Do not touch the record's grooves. Set a screwdriver at the tip. ...
...Turn off the unit's power before you experience difficulty in use . Remove the stylus by the edges or the label, with care, as you notice a change in the direction "C" until it may be advisable to extreme heat. < Contact a qualified repair company if you replace the stylus. 2. Push up in sound... your records from undue wear. TEAC does not endorse any specific product but, depending on the stylus will gradually deteriorate the quality of the stylus and push down to Replace the Stylus Handling precautions < Do not touch the record's grooves. Set a screwdriver at the tip. ...
LP-R450 Manual
Page 7
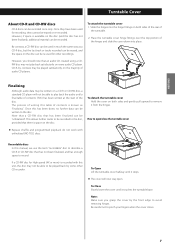
... stops. < The cover will not be written to avoid removing hinges. Be careful not to play back satisfactorily on a CD-R or CD-RW disc, a standard CD player will now stay open /close the turntable cover < Repeat, shuffle and programmed playback do not work with this table of audio CD players. By contrast, a CD-RW disc can be able to pinch your fingers when the cover...
... stops. < The cover will not be written to avoid removing hinges. Be careful not to play back satisfactorily on a CD-R or CD-RW disc, a standard CD player will now stay open /close the turntable cover < Repeat, shuffle and programmed playback do not work with this table of audio CD players. By contrast, a CD-RW disc can be able to pinch your fingers when the cover...
LP-R450 Manual
Page 9
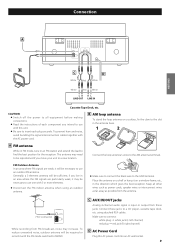
... the best position for the reception. A FM antenna While in FM mode, tune in an area where the FM signals are weak, it will be repositioned if you move your unit to MONO. C AUX IN/OUT jacks Analog 2-channel audio signal is input or output from FM broadcast, noise may be necessary to use with the AC power cord. Connection A ENGLISH B C D White Red White White Red...
... the best position for the reception. A FM antenna While in FM mode, tune in an area where the FM signals are weak, it will be repositioned if you move your unit to MONO. C AUX IN/OUT jacks Analog 2-channel audio signal is input or output from FM broadcast, noise may be necessary to use with the AC power cord. Connection A ENGLISH B C D White Red White White Red...
LP-R450 Manual
Page 10
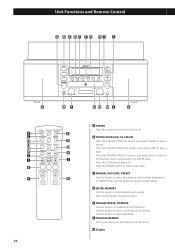
... number assignment. G Display 10 C MANUAL/AUTO REC, PRESET Use this button to divide tracks. Press the FM/AM button to listen to turn the unit on or off. Unit Functions and Remote Control A POWER Press this button to the radio. Press the PHONO/TAPE/AUX button and select AUX to listen to the external source connected to finalize a CD-R/CD-RW disc. E FINALIZE/ERASE, FM MODE Use this button to play a record. Use this button to the AUX IN jacks. B PHONO/TAPE/AUX, CD...
... number assignment. G Display 10 C MANUAL/AUTO REC, PRESET Use this button to divide tracks. Press the FM/AM button to listen to turn the unit on or off. Unit Functions and Remote Control A POWER Press this button to the radio. Press the PHONO/TAPE/AUX button and select AUX to listen to the external source connected to finalize a CD-R/CD-RW disc. E FINALIZE/ERASE, FM MODE Use this button to play a record. Use this button to the AUX IN jacks. B PHONO/TAPE/AUX, CD...
LP-R450 Manual
Page 11
... contact your national legislation and the Directives 2002/96/EC and 2006/66/EC. R PROGRAM In CD mode, use these buttons to tune in the European Union. ENGLISH K Speakers (stereo) L OPEN/CLOSE (L) Use this button to start or pause playback and recording. J CD operation buttons PLAY/PAUSE (y/J) Use this button to open and close the disc tray. H Skip/Search (.m/,/), TUNING ( ) In CD mode, use this knob to adjust the volume. The sound from speakers will be mixed with your local...
... contact your national legislation and the Directives 2002/96/EC and 2006/66/EC. R PROGRAM In CD mode, use these buttons to tune in the European Union. ENGLISH K Speakers (stereo) L OPEN/CLOSE (L) Use this button to start or pause playback and recording. J CD operation buttons PLAY/PAUSE (y/J) Use this button to open and close the disc tray. H Skip/Search (.m/,/), TUNING ( ) In CD mode, use this knob to adjust the volume. The sound from speakers will be mixed with your local...
LP-R450 Manual
Page 13
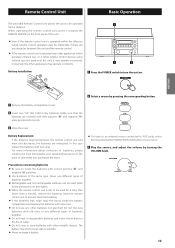
... front panel of sale where you purchased the items. < To listen to an external source connected to AUX jacks, select AUX by pressing the PHONO/TAPE/AUX button once or twice. 3 Play the source, and adjust the volume by pressing the corresponding button. 1 Remove the battery compartment cover. 2 Insert two "AA" (R6, SUM-3) dry batteries. Do not mix new batteries with old ones or use any obstacles between the remote control unit...
... front panel of sale where you purchased the items. < To listen to an external source connected to AUX jacks, select AUX by pressing the PHONO/TAPE/AUX button once or twice. 3 Play the source, and adjust the volume by pressing the corresponding button. 1 Remove the battery compartment cover. 2 Insert two "AA" (R6, SUM-3) dry batteries. Do not mix new batteries with old ones or use any obstacles between the remote control unit...
LP-R450 Manual
Page 20
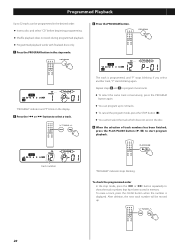
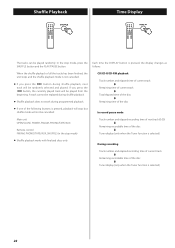
... another track, "P" starts blinking again. After deletion, the next track number will be programmed in the desired order. < Insert a disc and select "CD" before beginning programming. < Shuffle playback does not work during programmed playback. < Programmed playback works with finalized discs only. 1 Press the PROGRAM button in the stop mode, press the . To check the programmed order In the stop mode. 3 Press the PROGRAM button. "PROGRAM" indicator and "P" blink on the display. 2 Press...
... another track, "P" starts blinking again. After deletion, the next track number will be programmed in the desired order. < Insert a disc and select "CD" before beginning programming. < Shuffle playback does not work during programmed playback. < Programmed playback works with finalized discs only. 1 Press the PROGRAM button in the stop mode, press the . To check the programmed order In the stop mode. 3 Press the PROGRAM button. "PROGRAM" indicator and "P" blink on the display. 2 Press...
LP-R450 Manual
Page 21
... OPEN/CLOSE, POWER, FM/AM, PHONO/TAPE/AUX, STOP in the stop mode Remote control FM/AM, PHONO/AUX, STOP in the stop mode, press and hold the STOP button (H) for more than 2 seconds to start playback. or / button. If one of the disc will be repeated in the stop mode, press the CLEAR button to be played repeatedly. All the tracks of the following buttons is changed...
... OPEN/CLOSE, POWER, FM/AM, PHONO/TAPE/AUX, STOP in the stop mode Remote control FM/AM, PHONO/AUX, STOP in the stop mode, press and hold the STOP button (H) for more than 2 seconds to start playback. or / button. If one of the disc will be repeated in the stop mode, press the CLEAR button to be played repeatedly. All the tracks of the following buttons is changed...
LP-R450 Manual
Page 22
... recordable time of the disc c Tuner display (only when the Tuner function is selected) 22 If you press the / button during programmed playback. A track cannot be replayed during shuffle playback. < Shuffle playback does not work during shuffle playback, next track will be played randomly. button, the currently played track will be cancelled: In record pause mode Main unit OPEN/CLOSE, POWER, FM/AM, PHONO/TAPE/AUX Remote control...
... recordable time of the disc c Tuner display (only when the Tuner function is selected) 22 If you press the / button during programmed playback. A track cannot be replayed during shuffle playback. < Shuffle playback does not work during shuffle playback, next track will be played randomly. button, the currently played track will be cancelled: In record pause mode Main unit OPEN/CLOSE, POWER, FM/AM, PHONO/TAPE/AUX Remote control...
LP-R450 Manual
Page 25
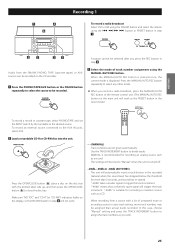
.../TAPE and set the INPUT switch by the turntable to divide tracks. Make sure "NO TOC" and "CD-R" (or "CD-RW") indicators lights on the display, or the RECORD button in step 4 will automatically insert a track division in auto track setting, more than actual tracks recorded. "-20db" takes a louder signal to the AUX IN jacks, select AUX. 2 Load a recordable CD-R or CD-RW disc into the unit. - - (MANUAL) Track numbers...
.../TAPE and set the INPUT switch by the turntable to divide tracks. Make sure "NO TOC" and "CD-R" (or "CD-RW") indicators lights on the display, or the RECORD button in step 4 will automatically insert a track division in auto track setting, more than actual tracks recorded. "-20db" takes a louder signal to the AUX IN jacks, select AUX. 2 Load a recordable CD-R or CD-RW disc into the unit. - - (MANUAL) Track numbers...
LP-R450 Manual
Page 26
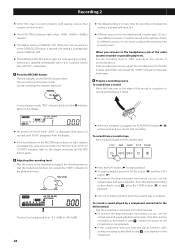
... tape is 0. PHONO < No button will not work and you connect to start playback. < If the component does not have different volumes. Switch after a disc is row, adjust the recording level so that the loudest sound does not exceed the "OVER" indicator on the display, and press the RECORD button again. < While the turntable is MANUAL (off ). < The MANUAL/AUTO REC button does not work while "bUSY" is displayed...
... tape is 0. PHONO < No button will not work and you connect to start playback. < If the component does not have different volumes. Switch after a disc is row, adjust the recording level so that the loudest sound does not exceed the "OVER" indicator on the display, and press the RECORD button again. < While the turntable is MANUAL (off ). < The MANUAL/AUTO REC button does not work while "bUSY" is displayed...
LP-R450 Manual
Page 27
..., press the PLAY/PAUSE button (y/J). < You cannot restart recording while "bUSY" is displayed. < Remember that every time recording is not possible to record in two "stages" within 10 seconds after recording has started. 7 Press the PLAY/PAUSE button (y/J) to stop recording. ENGLISH When the playback of the source finishes, press the STOP button (H) to make a track of the MANUAL/AUTO REC setting. < You...
..., press the PLAY/PAUSE button (y/J). < You cannot restart recording while "bUSY" is displayed. < Remember that every time recording is not possible to record in two "stages" within 10 seconds after recording has started. 7 Press the PLAY/PAUSE button (y/J) to stop recording. ENGLISH When the playback of the source finishes, press the STOP button (H) to make a track of the MANUAL/AUTO REC setting. < You...
LP-R450 Manual
Page 30
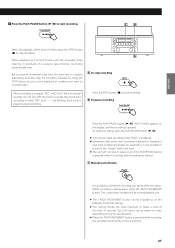
... radio or other equipment connected to the AUX IN jacks, select AUX. 2 Load a recordable CD-R or CD-RW disc into the unit. < The time set will be memorized and will be displayed the next time you will not work when the unit records from the display. 4 Press the RECORD button again. The red indicator on the RECORD button blinks and J appears on the display, or the RECORD button will use the PLAY...
... radio or other equipment connected to the AUX IN jacks, select AUX. 2 Load a recordable CD-R or CD-RW disc into the unit. < The time set will be memorized and will be displayed the next time you will not work when the unit records from the display. 4 Press the RECORD button again. The red indicator on the RECORD button blinks and J appears on the display, or the RECORD button will use the PLAY...
LP-R450 Manual
Page 31
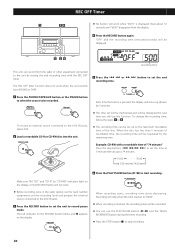
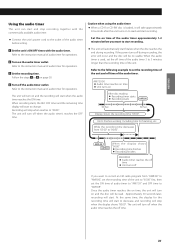
... change. When recording starts, the REC OFF timer and the remaining time display will start when the audio timer reaches the ON time. Unit's finishes working: Including time for operations. 3 Set the recording time. Approximately 30 seconds later, recording will start to the instruction manual of audio timer for the recording time will start . The unit will turn off during recording. Caution when using the audio timer < When a CD-R or CD-RW disc is used, set the off time of the audio timer...
... change. When recording starts, the REC OFF timer and the remaining time display will start when the audio timer reaches the ON time. Unit's finishes working: Including time for operations. 3 Set the recording time. Approximately 30 seconds later, recording will start to the instruction manual of audio timer for the recording time will start . The unit will turn off during recording. Caution when using the audio timer < When a CD-R or CD-RW disc is used, set the off time of the audio timer...
LP-R450 Manual
Page 32
... tape used after operation buttons are dead, change , there is too low. Make sure there is worn-out, change the stylus. e Adjust the volume. Remote control does not work even after a sudden temperature change the batteries. e Press the POWER switch of the disc. e Clear obstacles that a cassette tape has been set a cassette tape. e If the stylus is power to the AC outlet by plugging another disc. e Select the correct playback speed. Sound skips. Cassette tape...
... tape used after operation buttons are dead, change , there is too low. Make sure there is worn-out, change the stylus. e Adjust the volume. Remote control does not work even after a sudden temperature change the batteries. e Press the POWER switch of the disc. e Clear obstacles that a cassette tape has been set a cassette tape. e If the stylus is power to the AC outlet by plugging another disc. e Select the correct playback speed. Sound skips. Cassette tape...
LP-R450 Manual
Page 33
... CD-RW disc. Error Messages DISCFULL There is reading the disc. OPEN Open the tray. - - - -:- The unit is variable.) Amplifier Section Output power 3.5 W + 3.5 W Frequency response 50 Hz to 20 kHz Audio input sensitivity/Impedance AUX: (0.5 V)/20 kΩ CD Recorder Section Media type CD-RW and CD-R for recording 45 RPM adaptor Remote control unit (RC-1258) Battery (AA, alkaline or MN) x 2 FM antenna AM antenna Turntable cover Stereo RCA pin cable Hinge x 2 < Design and specifications...
... CD-RW disc. Error Messages DISCFULL There is reading the disc. OPEN Open the tray. - - - -:- The unit is variable.) Amplifier Section Output power 3.5 W + 3.5 W Frequency response 50 Hz to 20 kHz Audio input sensitivity/Impedance AUX: (0.5 V)/20 kΩ CD Recorder Section Media type CD-RW and CD-R for recording 45 RPM adaptor Remote control unit (RC-1258) Battery (AA, alkaline or MN) x 2 FM antenna AM antenna Turntable cover Stereo RCA pin cable Hinge x 2 < Design and specifications...


