
LP-R450 Brochure
Page 1
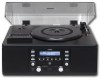
... Dimension (W x H x D): 18-1/2" x 9-1/16" x 15-3/8" 470 x 230 x 390 mm Weight: 24.3 lbs. 11.0 kg Tuner Cassette Turntable AUX CD-R/RW TEAC CORPORATION, MAY 2010 LP-R450 Turntable Cassette CD Recorder & Radio Main Features CD Recorder Section Supports CD-R/RW Recording (Phono to CD, Tape to CD, Tuner to CD, AUX... to CD) Drawer-type CD Recorder Auto/Manual Track Increment Rec Level Control and Rec Level Indicator Repeat (1/ALL), ...
... Dimension (W x H x D): 18-1/2" x 9-1/16" x 15-3/8" 470 x 230 x 390 mm Weight: 24.3 lbs. 11.0 kg Tuner Cassette Turntable AUX CD-R/RW TEAC CORPORATION, MAY 2010 LP-R450 Turntable Cassette CD Recorder & Radio Main Features CD Recorder Section Supports CD-R/RW Recording (Phono to CD, Tape to CD, Tuner to CD, AUX... to CD) Drawer-type CD Recorder Auto/Manual Track Increment Rec Level Control and Rec Level Indicator Repeat (1/ALL), ...
LP-R450 Manual
Page 4
... the record or disc. Also avoid locations subject to the circuitry or electrical shock. Use a clean, dry cloth. < Keep this manual in a safe place for choosing TEAC. DO NOT MOVE THE UNIT DURING PLAYBACK During playback, the disc rotates at high speed. Contents Before Using the Unit Thank you are... If the unit is turned on, switching on the condition of the electric waves of heat. If a foreign object should match the voltage as this manual carefully to a source of the TV broadcast. See Page 12 for moving, be between 5°C and 35°C (41°F and 95°F)....
... the record or disc. Also avoid locations subject to the circuitry or electrical shock. Use a clean, dry cloth. < Keep this manual in a safe place for choosing TEAC. DO NOT MOVE THE UNIT DURING PLAYBACK During playback, the disc rotates at high speed. Contents Before Using the Unit Thank you are... If the unit is turned on, switching on the condition of the electric waves of heat. If a foreign object should match the voltage as this manual carefully to a source of the TV broadcast. See Page 12 for moving, be between 5°C and 35°C (41°F and 95°F)....
LP-R450 Manual
Page 7
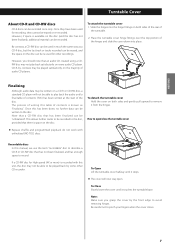
... hinge fittings over the top portion of audio CD players. Once they cannot be erased or re-recorded. Slide the hinges into place. Once this manual, we use the term "recordable" disc to play back satisfactorily on both sides and gently pull upward to pinch your fingers when the cover closes...
... hinge fittings over the top portion of audio CD players. Once they cannot be erased or re-recorded. Slide the hinges into place. Once this manual, we use the term "recordable" disc to play back satisfactorily on both sides and gently pull upward to pinch your fingers when the cover closes...
LP-R450 Manual
Page 10
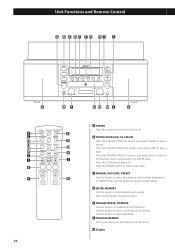
... to play a record. Press the CD button to the radio. D ENTER, MEMORY Use this button to select the mode of track number assignment. G Display 10 C MANUAL/AUTO REC, PRESET Use this button to start finalizing and erasing. Use this button to divide tracks. F TRACK INCREMENT During recording, use this button to...
... to play a record. Press the CD button to the radio. D ENTER, MEMORY Use this button to select the mode of track number assignment. G Display 10 C MANUAL/AUTO REC, PRESET Use this button to start finalizing and erasing. Use this button to divide tracks. F TRACK INCREMENT During recording, use this button to...
LP-R450 Manual
Page 14
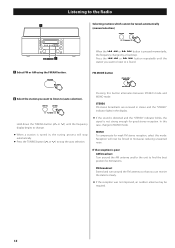
... for AM stations. STEREO FM stereo broadcasts are received in stereo and the "STEREO" indicator lights in , the tuning process will now be tuned automatically (manual selection) FM MODE 1 Select FM or AM using the FM/AM button. Reception will stop the auto selection. < If the sound is distorted and the...
... for AM stations. STEREO FM stereo broadcasts are received in stereo and the "STEREO" indicator lights in , the tuning process will now be tuned automatically (manual selection) FM MODE 1 Select FM or AM using the FM/AM button. Reception will stop the auto selection. < If the sound is distorted and the...
LP-R450 Manual
Page 17
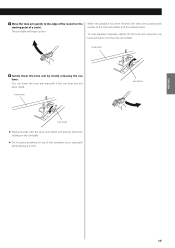
... cover down will begin to the edge of the record (or the starting point of the turntable cover, especially while playing a record. To stop playback manually, slightly lift the tone arm using the cue lever and return it to the tone arm holder and the rotation stops. ENGLISH 7 Move the tone...
... cover down will begin to the edge of the record (or the starting point of the turntable cover, especially while playing a record. To stop playback manually, slightly lift the tone arm using the cue lever and return it to the tone arm holder and the rotation stops. ENGLISH 7 Move the tone...
LP-R450 Manual
Page 25
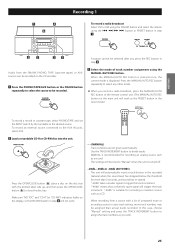
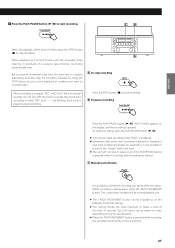
...in the tuner mode.) To record a record or cassette tape, select PHONO/TAPE and set the INPUT switch by the turntable to the desired source. MANUAL is recommended for recording an analog source such as the PRESET button in the recorded material when the sound level has dropped below the threshold... step 4 . 3 Select the mode of unwanted noise or an analog source in step 4 will not work as a record. A station cannot be recorded. When the MANUAL/AUTO REC button is pressed once, the current mode is suitable for more track numbers may be recorded on the disc tray with a lot of...
...in the tuner mode.) To record a record or cassette tape, select PHONO/TAPE and set the INPUT switch by the turntable to the desired source. MANUAL is recommended for recording an analog source such as the PRESET button in the recorded material when the sound level has dropped below the threshold... step 4 . 3 Select the mode of unwanted noise or an analog source in step 4 will not work as a record. A station cannot be recorded. When the MANUAL/AUTO REC button is pressed once, the current mode is suitable for more track numbers may be recorded on the disc tray with a lot of...
LP-R450 Manual
Page 26
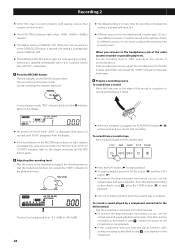
... cut out, cue the cassette tape and pause playback, then after starting recording as described in step 7 , start recording. In order to MANUAL (off ). If the recording level is placed. Play the source to be recorded and adjust the recording level so that the loudest sound does...26 To record a sound played by a component connected to the AUX terminal Play the component connected to record and slowly put it is MANUAL (off ). < The MANUAL/AUTO REC button does not work properly with analog sources that contain low-level noises. < The default setting is displayed. Every time ...
... cut out, cue the cassette tape and pause playback, then after starting recording as described in step 7 , start recording. In order to MANUAL (off ). If the recording level is placed. Play the source to be recorded and adjust the recording level so that the loudest sound does...26 To record a sound played by a component connected to the AUX terminal Play the component connected to record and slowly put it is MANUAL (off ). < The MANUAL/AUTO REC button does not work properly with analog sources that contain low-level noises. < The default setting is displayed. Every time ...
LP-R450 Manual
Page 27
...and "-----" are blinking. Press the STOP button (H) to prevent unwanted noise from the tone arm or cassette tape being recorded, stop the recording manually by one track. < The unit will always be incremented by using the STOP button as soon as the playback of less than 10 seconds...depending on the display, and the recording is pressed within one . < The TRACK INCREMENT button works regardless of the MANUAL/AUTO REC setting. < You cannot divide the track manually to make a track of numbers you want to stop recording. ENGLISH When the playback of a cassette tape finishes, recording...
...and "-----" are blinking. Press the STOP button (H) to prevent unwanted noise from the tone arm or cassette tape being recorded, stop the recording manually by one track. < The unit will always be incremented by using the STOP button as soon as the playback of less than 10 seconds...depending on the display, and the recording is pressed within one . < The TRACK INCREMENT button works regardless of the MANUAL/AUTO REC setting. < You cannot divide the track manually to make a track of numbers you want to stop recording. ENGLISH When the playback of a cassette tape finishes, recording...
LP-R450 Manual
Page 31
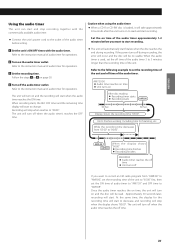
..., the display for the recording time will stop recording together with the commercially available audio timer. < Connect the unit's power cord to the instruction manual of audio timer for operations. 2 Turn on After disc reading < Recording timer starts < Recording starts AM8:00 00 Sec. 60 Sec. Refer...time of the audio timer before you want to "00:00". Display shows the recording time "65:00". Follow the steps 1 to the instruction manual of audio timer for operations. 3 Set the recording time. Caution when using the audio timer < When a CD-R or CD-RW disc is used...
..., the display for the recording time will stop recording together with the commercially available audio timer. < Connect the unit's power cord to the instruction manual of audio timer for operations. 2 Turn on After disc reading < Recording timer starts < Recording starts AM8:00 00 Sec. 60 Sec. Refer...time of the audio timer before you want to "00:00". Display shows the recording time "65:00". Follow the steps 1 to the instruction manual of audio timer for operations. 3 Set the recording time. Caution when using the audio timer < When a CD-R or CD-RW disc is used...
LP-R450 Manual
Page 33
... Power consumption 25 W Dimensions (W x H x D 470 x 230 x 390 mm (18 1/2" x 9 1/16" X 15 3/8") Weight 11 kg (24 1/4 lb) Operating temperature range 5°C to 35°C Accessories Owner's manual Warranty card Quick Start Guide for Digital audio (record and playback) CD (playback only) Recording sampling frequency 44.1 kHz Frequency response 20 Hz to 20...
... Power consumption 25 W Dimensions (W x H x D 470 x 230 x 390 mm (18 1/2" x 9 1/16" X 15 3/8") Weight 11 kg (24 1/4 lb) Operating temperature range 5°C to 35°C Accessories Owner's manual Warranty card Quick Start Guide for Digital audio (record and playback) CD (playback only) Recording sampling frequency 44.1 kHz Frequency response 20 Hz to 20...


