
Owners Manual
Page 1
Z 9A10358001 GF-350 Multi music player / CD recorder OWNER'S MANUAL
Z 9A10358001 GF-350 Multi music player / CD recorder OWNER'S MANUAL

Owners Manual
Page 3
Contents Thank you for choosing TEAC. Read this manual carefully to a CD 15 Time Display 16 Repeat Playback 17 Shuffle Playback 17 Programmed Playback 18 Before Recording 19 Recording 20 Finalize 23 Erase or ... THAN THOSE SPECIFIED HEREIN MAY RESULT IN HAZARDOUS RADIATION EXPOSURE. NO USER SERVICEABLE PARTS ARE WITHIN! < IF YOU ARE EXPERIENCING PROBLEMS WITH THIS PRODUCT, CONTACT TEAC FOR A SERVICE REFERRAL. Before using the unit 4 How to Replace the Stylus 5 Handling Records 5 Discs 6 Remote Control Unit 7 Connections 8 Parts of the Turntable 9 Unit Functions...
Contents Thank you for choosing TEAC. Read this manual carefully to a CD 15 Time Display 16 Repeat Playback 17 Shuffle Playback 17 Programmed Playback 18 Before Recording 19 Recording 20 Finalize 23 Erase or ... THAN THOSE SPECIFIED HEREIN MAY RESULT IN HAZARDOUS RADIATION EXPOSURE. NO USER SERVICEABLE PARTS ARE WITHIN! < IF YOU ARE EXPERIENCING PROBLEMS WITH THIS PRODUCT, CONTACT TEAC FOR A SERVICE REFERRAL. Before using the unit 4 How to Replace the Stylus 5 Handling Records 5 Discs 6 Remote Control Unit 7 Connections 8 Parts of the Turntable 9 Unit Functions...
Owners Manual
Page 4
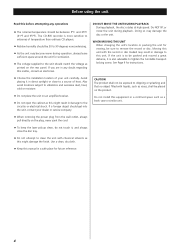
... product shall not be sure to the circuitry or electrical shock. Avoid placing it in a safe place for instructions. Use a clean, dry cloth. < Keep this manual in direct sunlight or close the disc tray. < Do not attempt to a source of heat. Do not install this equipment in any operations < The nominal...
... product shall not be sure to the circuitry or electrical shock. Avoid placing it in a safe place for instructions. Use a clean, dry cloth. < Keep this manual in direct sunlight or close the disc tray. < Do not attempt to a source of heat. Do not install this equipment in any operations < The nominal...
Owners Manual
Page 6
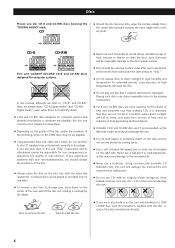
... the outer edge) with a soft, dry cloth: CD-R CD-RW This unit CANNOT RECORD CD-R and CD-RW discs designed for computer systems. In this manual, although we refer to "CD-R" and CD-RW" discs, we always mean "CD-R Digital Audio" and "CD-RW Digital Audio", even when this is warped... shaped, business card size, etc.). If you should be returned to their cases after use any disc that they are not stored in this unit, TEAC Corporation and its storage case, press down on the center of heat and ultraviolet rays than ordinary CDs. It is important that is not explicitly...
... the outer edge) with a soft, dry cloth: CD-R CD-RW This unit CANNOT RECORD CD-R and CD-RW discs designed for computer systems. In this manual, although we refer to "CD-R" and CD-RW" discs, we always mean "CD-R Digital Audio" and "CD-RW Digital Audio", even when this is warped... shaped, business card size, etc.). If you should be returned to their cases after use any disc that they are not stored in this unit, TEAC Corporation and its storage case, press down on the center of heat and ultraviolet rays than ordinary CDs. It is important that is not explicitly...
Owners Manual
Page 7
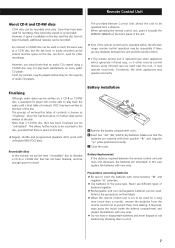
..., the batteries are used . Refer to the precautions on the disc. < Repeat, shuffle and programmed playback don't work with unfinalized (NO TOC) discs. Once this manual, we use different types of the disc. If they cannot be used near other appliances which generate infrared rays, or if other remote control devices...
..., the batteries are used . Refer to the precautions on the disc. < Repeat, shuffle and programmed playback don't work with unfinalized (NO TOC) discs. Once this manual, we use different types of the disc. If they cannot be used near other appliances which generate infrared rays, or if other remote control devices...
Owners Manual
Page 11
...this button for a part of CD. G Display H TUNED indicator Lights when a station is on the front panel only. I Speakers (stereo) A MANUAL/AUTO REC Use this button to start playback, recording, finalizing and erasing. PLAY (y) Use this button to select the mode of track number assignment. Associated...knob to tune in a station. The equipment draws a nominal amount of power from the AC outlet even with its POWER switch in this manual refer to search for shuffle playback. C Remote Sensor When operating the remote control unit, point it towards the REMOTE SENSOR. D Display ...
...this button for a part of CD. G Display H TUNED indicator Lights when a station is on the front panel only. I Speakers (stereo) A MANUAL/AUTO REC Use this button to start playback, recording, finalizing and erasing. PLAY (y) Use this button to select the mode of track number assignment. Associated...knob to tune in a station. The equipment draws a nominal amount of power from the AC outlet even with its POWER switch in this manual refer to search for shuffle playback. C Remote Sensor When operating the remote control unit, point it towards the REMOTE SENSOR. D Display ...
Owners Manual
Page 14
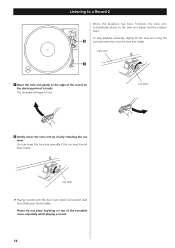
tone arm 7 7 Move the tone arm gently to turn. You can lower the tone arm manually if the cue lever has not been raised. The turntable will prevent dust from settling on top of a track). cue lever < Playing records with the ... record (or the starting point of the turntable cover, especially while playing a record. 14 Please do not place anything on the turntable. To stop playback manually, slightly lift the tone arm using the 8 cue lever and return it to the tone arm holder and the rotation stops. cue lever 8 Gently lower...
tone arm 7 7 Move the tone arm gently to turn. You can lower the tone arm manually if the cue lever has not been raised. The turntable will prevent dust from settling on top of a track). cue lever < Playing records with the ... record (or the starting point of the turntable cover, especially while playing a record. 14 Please do not place anything on the turntable. To stop playback manually, slightly lift the tone arm using the 8 cue lever and return it to the tone arm holder and the rotation stops. cue lever 8 Gently lower...

Owners Manual
Page 20
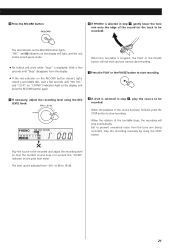
...the setting is displayed. "-40db" is suitable for more than 2 seconds, and sound has restarted. To record a record, select PHONO. Press the MANUAL/AUTO REC button repeatedly to divide tracks. Press the OPEN/CLOSE button (L), place a disc on the CD recorder. 3 Select the mode of track... insert a track division in step 4 will trigger the track increment. To record an external source connected to trigger the track increment. MANUAL is MANUAL (off ). < The MANUAL/AUTO REC button doesn't work during recording or in the record pause mode. 20 Recording 1 1 47 5 22 Audio from the...
...the setting is displayed. "-40db" is suitable for more than 2 seconds, and sound has restarted. To record a record, select PHONO. Press the MANUAL/AUTO REC button repeatedly to divide tracks. Press the OPEN/CLOSE button (L), place a disc on the CD recorder. 3 Select the mode of track... insert a track division in step 4 will trigger the track increment. To record an external source connected to trigger the track increment. MANUAL is MANUAL (off ). < The MANUAL/AUTO REC button doesn't work during recording or in the record pause mode. 20 Recording 1 1 47 5 22 Audio from the...
Owners Manual
Page 21
... is selected in step 1 , play the source to be recorded. Play the source to be adjusted from the tone arm being recorded, stop the recording manually by using the REC LEVEL knob. 8 If AUX is stopped, the PLAY or the PAUSE button will stop recording. When the turntable is selected in...
... is selected in step 1 , play the source to be recorded. Play the source to be adjusted from the tone arm being recorded, stop the recording manually by using the REC LEVEL knob. 8 If AUX is stopped, the PLAY or the PAUSE button will stop recording. When the turntable is selected in...
Owners Manual
Page 22
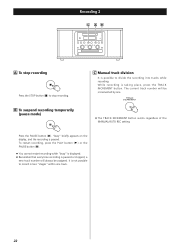
... It is possible to record in two "stages" within one . B To suspend recording temporarily (pause mode) < The TRACK INCREMENT button works regardless of the MANUAL/AUTO REC setting. "busy" briefly appears on the display, and the recording is taking place, press the TRACK INCREMENT button. While recording is paused. To ...
... It is possible to record in two "stages" within one . B To suspend recording temporarily (pause mode) < The TRACK INCREMENT button works regardless of the MANUAL/AUTO REC setting. "busy" briefly appears on the display, and the recording is taking place, press the TRACK INCREMENT button. While recording is paused. To ...
Owners Manual
Page 27
... and dimensions are approximate. < Illustrations may differ slightly from production models. AUX: -6dBV (0.5V) / 20kΩ Maximum iutput level AUX: +6dBV (2.0V) Standard Accessories Owner's manual x 1 Warranty card x 1 45 RPM adaptor x 1 Remote control unit (RC-992) x 1 Battery (AA, R6, SUM-3) x 2 CD Recorder Section Media type CD (playback only) CD-RW and...
... and dimensions are approximate. < Illustrations may differ slightly from production models. AUX: -6dBV (0.5V) / 20kΩ Maximum iutput level AUX: +6dBV (2.0V) Standard Accessories Owner's manual x 1 Warranty card x 1 45 RPM adaptor x 1 Remote control unit (RC-992) x 1 Battery (AA, R6, SUM-3) x 2 CD Recorder Section Media type CD (playback only) CD-RW and...

