
DM-3200 with Digital Performer
Page 2
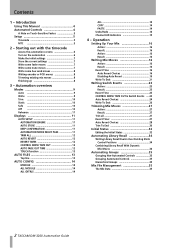
LCD screen ...4 4. Top panel buttons ...5 5.1 Selection of Send 1-4 ...5 6. Summary ...3 2. Setting up the DM-3200...3 2.1 Setting up the Mac ...3 2.1.1 Audio MIDI settings...3 2.1.2 Control Surface Setup ...4 3. Channel Strip...5 5. Transport ...6 6.1 Slow Mode for Rewind/Fast Forward ...6 DM-3200 DP 2/6 DM-3200 DP 1.
LCD screen ...4 4. Top panel buttons ...5 5.1 Selection of Send 1-4 ...5 6. Summary ...3 2. Setting up the DM-3200...3 2.1 Setting up the Mac ...3 2.1.1 Audio MIDI settings...3 2.1.2 Control Surface Setup ...4 3. Channel Strip...5 5. Transport ...6 6.1 Slow Mode for Rewind/Fast Forward ...6 DM-3200 DP 2/6 DM-3200 DP 1.

DM-3200 with Digital Performer
Page 3
... Add Device to control DP's transport functions. 2.1 Setting up a Mackie Control Exp device. Similarly, establish a connection between the DM-3200's Port 5 Input/Output and the Mackie Control's Input/Output. Similarly, add one "MC for DP" devices. CTRL screen. ...DM-3200 DP 3/6 Summary This manual describes using the DM-3200's control surface features with Digital Performer 4.x. 2. In a similar way, add and set up the Mac 2.1.1 Audio MIDI settings Open the Audio MIDI Setup window from within DP or from the Mac Finder. DM-3200 DP 1. Establish a connection between the DM-3200...
... Add Device to control DP's transport functions. 2.1 Setting up a Mackie Control Exp device. Similarly, establish a connection between the DM-3200's Port 5 Input/Output and the Mackie Control's Input/Output. Similarly, add one "MC for DP" devices. CTRL screen. ...DM-3200 DP 3/6 Summary This manual describes using the DM-3200's control surface features with Digital Performer 4.x. 2. In a similar way, add and set up the Mac 2.1.1 Audio MIDI settings Open the Audio MIDI Setup window from within DP or from the Mac Finder. DM-3200 DP 1. Establish a connection between the DM-3200...

DM-3200 with Digital Performer
Page 4
DM-3200 DP 2.1.2 Control Surface Setup Select DP Setup > Control Surface Setup to open the Control Surface window and make the settings as shown.: The setup is now completed. 3. LCD screen The DP 4.x-ready Mackie Control screen looks like this: DM-3200 DP 4/6
DM-3200 DP 2.1.2 Control Surface Setup Select DP Setup > Control Surface Setup to open the Control Surface window and make the settings as shown.: The setup is now completed. 3. LCD screen The DP 4.x-ready Mackie Control screen looks like this: DM-3200 DP 4/6

DM-3200 with Sonar
Page 5
Click the Press Again When Done button in SONAR and close the window. Touch any fader on channels 9-16 and the CH:09-16 screen is displayed in the upper left and select Track9-16 with Vpot1 (CH1 LED Ring Encoder). DM-3200 SONAR 5/8 The setup has been completed. DM-3200 SONAR Check to see that CH:01-08 is displayed in the upper left and select Track1-8 with Vpot1 (CH9 LED Ring Encoder).
Click the Press Again When Done button in SONAR and close the window. Touch any fader on channels 9-16 and the CH:09-16 screen is displayed in the upper left and select Track9-16 with Vpot1 (CH1 LED Ring Encoder). DM-3200 SONAR 5/8 The setup has been completed. DM-3200 SONAR Check to see that CH:01-08 is displayed in the upper left and select Track1-8 with Vpot1 (CH9 LED Ring Encoder).

DM-3200 with Sonar
Page 8
... The table below provides an overview of 16 tracks. Moves control target tracks leftwards in groups of 16 tracks. DM-3200 Rewind Fast forward Modifier Stop Play Record F1-8 CTRL SONAR function Rewind Fast forward Stop Play Record < BANK BANK...Activates the Play function. Activates the Stop function. Activates the Record function. Moves control target tracks rightwards track by one track. DM-3200 SONAR 6. SONAR setup screen DM-3200 SONAR 8/8 Click SONAR Tools > Mackie Control and the Mackie Control screen opens where you to use functions assigned to the F1-8...
... The table below provides an overview of 16 tracks. Moves control target tracks leftwards in groups of 16 tracks. DM-3200 Rewind Fast forward Modifier Stop Play Record F1-8 CTRL SONAR function Rewind Fast forward Stop Play Record < BANK BANK...Activates the Play function. Activates the Stop function. Activates the Record function. Moves control target tracks rightwards track by one track. DM-3200 SONAR 6. SONAR setup screen DM-3200 SONAR 8/8 Click SONAR Tools > Mackie Control and the Mackie Control screen opens where you to use functions assigned to the F1-8...

DM-3200 with Pro Tools
Page 3
...able to find the HUI device. Select a HUI device for #1 and #2. Similarly, assign the MIDI Receive and Send of #2 to the DM-3200's Port 5. DM-3200 Pro Tools 3/8 It should look like the screen below. Similarly, add one "HUI Emulate" device in Pro Tools, select Peripherals and click on... if it is assigned then the DM-3200 is necessary to check the TRA radio button here in order to operate the DM-3200's HUI emulation with Pro Tools (Pro Tools 6.9.2 tested). 1.1 Setting up Pro Tools From the Setups menu in the REMOTE > MACHINE. DM-3200 Pro Tools 1. Summary This manual describes...
...able to find the HUI device. Select a HUI device for #1 and #2. Similarly, assign the MIDI Receive and Send of #2 to the DM-3200's Port 5. DM-3200 Pro Tools 3/8 It should look like the screen below. Similarly, add one "HUI Emulate" device in Pro Tools, select Peripherals and click on... if it is assigned then the DM-3200 is necessary to check the TRA radio button here in order to operate the DM-3200's HUI emulation with Pro Tools (Pro Tools 6.9.2 tested). 1.1 Setting up Pro Tools From the Setups menu in the REMOTE > MACHINE. DM-3200 Pro Tools 1. Summary This manual describes...

DM-3200 with Logic
Page 3
...Control Expander. When the device is now completed. The setup is added, the screen looks like as shown above. Summary This manual describes using the DM-3200's control surface features with Logic 7.x. 2. Setting up the DM-3200 At the DM-3200's REMOTE > EXT.CTRL screen, add two MC for... upper left of this device to Port 5. DM-3200 Logic 3/6 DM-3200 Logic 1. It is shown from which to control Logic's transport functions. 2.1 Logic settings Open the control surface Setup window by clicking Logic Pro > Preferences > Control Surfaces > Setup. Click on the newly added device to highlight...
...Control Expander. When the device is now completed. The setup is added, the screen looks like as shown above. Summary This manual describes using the DM-3200's control surface features with Logic 7.x. 2. Setting up the DM-3200 At the DM-3200's REMOTE > EXT.CTRL screen, add two MC for... upper left of this device to Port 5. DM-3200 Logic 3/6 DM-3200 Logic 1. It is shown from which to control Logic's transport functions. 2.1 Logic settings Open the control surface Setup window by clicking Logic Pro > Preferences > Control Surfaces > Setup. Click on the newly added device to highlight...

DM-3200 with Cubase & Nuendo
Page 3
...Setup and the device setting window opens. DM-3200 Steinberg 3/7 DM-3200 Steinberg 1. Set up with Steinberg apps Cubase SX 2.2 & higher and Nuendo 2.2 and higher. Similarly, add one MC Steinberg device at the REMOTE > MACHINE CTRL. 2.1 Setting up the DM-3200 Add two MC Steinberg devices at the DM-3200... REMOTE > EXT.CTRL screen. Summary This manual describes using the DM-3200's control surface features with Nuendo is compatible with both Cubase SX 2.2 & higher ...
...Setup and the device setting window opens. DM-3200 Steinberg 3/7 DM-3200 Steinberg 1. Set up with Steinberg apps Cubase SX 2.2 & higher and Nuendo 2.2 and higher. Similarly, add one MC Steinberg device at the REMOTE > MACHINE CTRL. 2.1 Setting up the DM-3200 Add two MC Steinberg devices at the DM-3200... REMOTE > EXT.CTRL screen. Summary This manual describes using the DM-3200's control surface features with Nuendo is compatible with both Cubase SX 2.2 & higher ...

DM-3200 with Cubase & Nuendo
Page 7
... down the CTRL key and pressing the F1-8 keys allows you can set up functions to assign to those keys. DM-3200 Steinberg 7/7 DM-3200 Steinberg 6. Activates the Fast Forward function. The same settings must be made for Mackie Control and Mackie Control 2 for correct operation.... DM-3200 Rewind Fast forward Stop Play Record F1-8 Modifier CTRL Steinberg function Rewind Fast forward Stop Play Record < BANK BANK> F1-8 Note Activates the Rewind function. Activates the Record function. Cubase SX setup screen !! At the resulting screen you ...
... down the CTRL key and pressing the F1-8 keys allows you can set up functions to assign to those keys. DM-3200 Steinberg 7/7 DM-3200 Steinberg 6. Activates the Fast Forward function. The same settings must be made for Mackie Control and Mackie Control 2 for correct operation.... DM-3200 Rewind Fast forward Stop Play Record F1-8 Modifier CTRL Steinberg function Rewind Fast forward Stop Play Record < BANK BANK> F1-8 Note Activates the Rewind function. Activates the Record function. Cubase SX setup screen !! At the resulting screen you ...

TASCAM Mixer Companion 1.60 software guide
Page 4
... the standard OS X Installer program. Introduction and installation : Installation (Mac OS X) Repairing and uninstalling TMCompanion To uninstall the software, run the SETUP.EXE program from the TASCAM Web site, it will see a program called TMCompanion in the Applications folder. • If you will be attached... package to the Trash (or press Command-Delete). Macintosh, Mac OS, and Mac OS X are trademarks of Apple Computer. 4 TASCAM DM TMCompanion software guide 1 - Open this option also allows reinstallation of a disk image (.dmg) file, which should be in the usual way.
... the standard OS X Installer program. Introduction and installation : Installation (Mac OS X) Repairing and uninstalling TMCompanion To uninstall the software, run the SETUP.EXE program from the TASCAM Web site, it will see a program called TMCompanion in the Applications folder. • If you will be attached... package to the Trash (or press Command-Delete). Macintosh, Mac OS, and Mac OS X are trademarks of Apple Computer. 4 TASCAM DM TMCompanion software guide 1 - Open this option also allows reinstallation of a disk image (.dmg) file, which should be in the usual way.
DM-3200 Automation Manual
Page 2
... existing mix moves 8 Finishing up 8 3 - Automation overview Modes 9 Auto 9 Write 9 Trim 10 Static 10 Safe 10 Off 10 Rehearse 11 Displays 11 AUTO SETUP 11 AUTOMATION ENGINE 11 AUTO STORE 11 KEEP CONFIRMATION 11 AUTOMATION MODE MULTI PASS 11 TRIM ALL 12 AUTO REVERT 12 REVERT TIMES 12 CONTROL... 35 Grouping Non-Automated Controls 35 Grouping Automated Controls 35 Hierarchical Groups 35 Mix File Management 35 The Mix Data 35 2 TASCAM DM-3200 Automation Guide Contents 1 - Starting out with the timecode Access the automation screens 6 Turn on Touch-Sensitive Faders...
... existing mix moves 8 Finishing up 8 3 - Automation overview Modes 9 Auto 9 Write 9 Trim 10 Static 10 Safe 10 Off 10 Rehearse 11 Displays 11 AUTO SETUP 11 AUTOMATION ENGINE 11 AUTO STORE 11 KEEP CONFIRMATION 11 AUTOMATION MODE MULTI PASS 11 TRIM ALL 12 AUTO REVERT 12 REVERT TIMES 12 CONTROL... 35 Grouping Non-Automated Controls 35 Grouping Automated Controls 35 Hierarchical Groups 35 Mix File Management 35 The Mix Data 35 2 TASCAM DM-3200 Automation Guide Contents 1 - Starting out with the timecode Access the automation screens 6 Turn on Touch-Sensitive Faders...
DM-3200 Automation Manual
Page 3
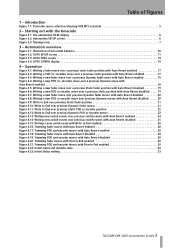
Table of trim mode behavior 10 Figure 3.2: AUTO SETUP screen 11 Figure 3.3: AUTO FILES screen 13 Figure 3.4: AUTO CONFIG display 14 4 - Automation overview Figure 3.1: Illustration of Figures 1 - Introduction Figure 1.1: Timecode source selection (showing USB ... 4.20: Trimming fader moves with Trim to End enabled 30 Figure 4.22: Initial status and dynamic data 32 Figure 4.23: Initial Status editing 33 TASCAM DM-3200 Automation Guide 3 Starting out with Trim to End enabled 30 Figure 4.21: Trimming POD and encoder moves with the timecode Figure 2.1: The automation FILES display...
Table of trim mode behavior 10 Figure 3.2: AUTO SETUP screen 11 Figure 3.3: AUTO FILES screen 13 Figure 3.4: AUTO CONFIG display 14 4 - Automation overview Figure 3.1: Illustration of Figures 1 - Introduction Figure 1.1: Timecode source selection (showing USB ... 4.20: Trimming fader moves with Trim to End enabled 30 Figure 4.22: Initial status and dynamic data 32 Figure 4.23: Initial Status editing 33 TASCAM DM-3200 Automation Guide 3 Starting out with Trim to End enabled 30 Figure 4.21: Trimming POD and encoder moves with the timecode Figure 2.1: The automation FILES display...
DM-3200 Automation Manual
Page 4
...; Digital trim • Effect settings • Buss assignments • Analog TRIM • Control Room monitor switching 4 TASCAM DM-3200 Automation Guide • LCD navigation • Transport control • Fader layer switching • Global mixer setup parameters Moves for on the mixer's control surface. This work done by intelligently switching automation modes transparently on...
...; Digital trim • Effect settings • Buss assignments • Analog TRIM • Control Room monitor switching 4 TASCAM DM-3200 Automation Guide • LCD navigation • Transport control • Fader layer switching • Global mixer setup parameters Moves for on the mixer's control surface. This work done by intelligently switching automation modes transparently on...

DM-3200 Automation Manual
Page 5
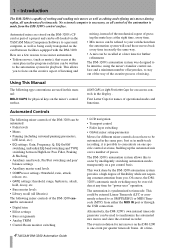
A Note on the back of the DM-3200 which the DM-3200's automation can lock. Both are equal in automation, you have available...timecode. Figure 1.1: Timecode source selection (showing USB MTC selected) MTC This refers to select SETUP from the popup menu. Use the AUTOMATION SETUP screen to select either MTC (USB) or MTC (MIDI IN), depending on what you ...shown below: 1 - Introduction : Setup even your situation. code rate of MTC. or Setup There are listed here: If you use the POD 1 encoder and ENTER key to MIDI Timecode being received at the DM-3200's MIDI IN or through the USB...
A Note on the back of the DM-3200 which the DM-3200's automation can lock. Both are equal in automation, you have available...timecode. Figure 1.1: Timecode source selection (showing USB MTC selected) MTC This refers to select SETUP from the popup menu. Use the AUTOMATION SETUP screen to select either MTC (USB) or MTC (MIDI IN), depending on what you ...shown below: 1 - Introduction : Setup even your situation. code rate of MTC. or Setup There are listed here: If you use the POD 1 encoder and ENTER key to MIDI Timecode being received at the DM-3200's MIDI IN or through the USB...
DM-3200 Automation Manual
Page 6
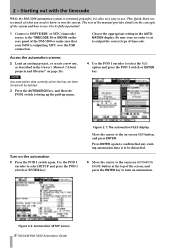
... the Owner's Manual ("About projects and libraries" on -screen NEW button, and press ENTER. Figure 2.2: Automation SETUP screen 6 TASCAM DM-3200 Automation Guide Use the POD 1 encoder to select SETUP and press the POD 1 switch or ENTER key: Figure 2.1: The automation FILES display Move the cursor to run...screens 2 Load an existing project, or create a new one, as described in the AUTOMATION display. Starting out with the timecode While the DM-3200 automation system is extremely powerful, it to its fullest potential. 1 Connect a SMPTE/EBU or MTC (timecode) source to the TIMECODE IN ...
... the Owner's Manual ("About projects and libraries" on -screen NEW button, and press ENTER. Figure 2.2: Automation SETUP screen 6 TASCAM DM-3200 Automation Guide Use the POD 1 encoder to select SETUP and press the POD 1 switch or ENTER key: Figure 2.1: The automation FILES display Move the cursor to run...screens 2 Load an existing project, or create a new one, as described in the AUTOMATION display. Starting out with the timecode While the DM-3200 automation system is extremely powerful, it to its fullest potential. 1 Connect a SMPTE/EBU or MTC (timecode) source to the TIMECODE IN ...

DM-3200 Automation Manual
Page 7
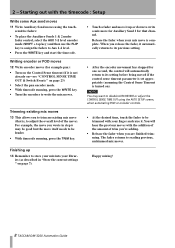
...; Press some fader moves: • With timecode running, press the WRITE key. • Touch a fader with the incoming timecode). The DM-3200 plays back the moves you change in other words, the MUTE indicators and status will be time-stamped for further details of the current project... the POD 2 switch (STORE AS). When you have the mix basically set - The DM-3200 plays back the Switch Events you normally would during a mix. Starting out with the timecode : Setup Make the initial settings 7 Operate your mix move it automatically returns to write new mix moves...
...; Press some fader moves: • With timecode running, press the WRITE key. • Touch a fader with the incoming timecode). The DM-3200 plays back the moves you change in other words, the MUTE indicators and status will be time-stamped for further details of the current project... the POD 2 switch (STORE AS). When you have the mix basically set - The DM-3200 plays back the Switch Events you normally would during a mix. Starting out with the timecode : Setup Make the initial settings 7 Operate your mix move it automatically returns to write new mix moves...
DM-3200 Automation Manual
Page 8
... before being moved if the control sense timeout parameter is set appropriately (assuming the Control Sense Timeout is complete. Happy mixing! 8 TASCAM DM-3200 Automation Guide NOTE You may be good but the move itself needs to be louder. • With timecode running , press the WRITE key...for Auxiliary Send 1 for one second, the control will hear the previous moves with the timecode : Setup Write some Aux send moves 11 Write Auxiliary Send moves using the AUTO SETUP screen, when automating POD or encoder controls. Trimming existing mix moves 13 This allows you are finished ...
... before being moved if the control sense timeout parameter is set appropriately (assuming the Control Sense Timeout is complete. Happy mixing! 8 TASCAM DM-3200 Automation Guide NOTE You may be good but the move itself needs to be louder. • With timecode running , press the WRITE key...for Auxiliary Send 1 for one second, the control will hear the previous moves with the timecode : Setup Write some Aux send moves 11 Write Auxiliary Send moves using the AUTO SETUP screen, when automating POD or encoder controls. Trimming existing mix moves 13 This allows you are finished ...

DM-3200 Automation Manual
Page 11
...box and pressing the ENTER key. The default value of the display with the wheel then pressing the ENTER key. AUTO SETUP Figure 3.2: AUTO SETUP screen Check boxes are entered by using the cursor keys, located to practice or experiment with the ENTER key. Repeatedly ... in Global Write or Global Trim mode until confirmed with mix moves without recording them. When turned on -screen button enables/disables the DM-3200's automation system. Automation overview : Displays Rehearse Rehearse is no longer receiving timecode. KEEP CONFIRMATION When enabled, a pop-up box will...
...box and pressing the ENTER key. The default value of the display with the wheel then pressing the ENTER key. AUTO SETUP Figure 3.2: AUTO SETUP screen Check boxes are entered by using the cursor keys, located to practice or experiment with the ENTER key. Repeatedly ... in Global Write or Global Trim mode until confirmed with mix moves without recording them. When turned on -screen button enables/disables the DM-3200's automation system. Automation overview : Displays Rehearse Rehearse is no longer receiving timecode. KEEP CONFIRMATION When enabled, a pop-up box will...

DM-3200 Automation Manual
Page 13
...at the point where you want the fade to begin . Below this fade is enabled. The other libraries, allowing deletion, protection, etc. TASCAM DM-3200 Automation Guide 13 3 - The amount of an Auto Fade to change its time value after an Auto Fade has been performed. TIP A ...ready to the internal timecode generator. AUTO FILES Figure 3.3: AUTO FILES screen Top line The word AUTO appears beside the selected channel in the SETUP screen. DELETE permanently erases the contents of stored entries. This could be repeated as often as for this : • Press WRITE. •...
...at the point where you want the fade to begin . Below this fade is enabled. The other libraries, allowing deletion, protection, etc. TASCAM DM-3200 Automation Guide 13 3 - The amount of an Auto Fade to change its time value after an Auto Fade has been performed. TIP A ...ready to the internal timecode generator. AUTO FILES Figure 3.3: AUTO FILES screen Top line The word AUTO appears beside the selected channel in the SETUP screen. DELETE permanently erases the contents of stored entries. This could be repeated as often as for this : • Press WRITE. •...
DM-3200 Automation Manual
Page 16
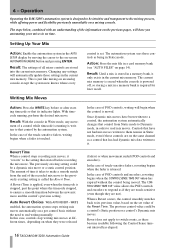
... system in Static mode. This is set value of the information on a per control basis without the control being in the AUTO SETUP display by the automation system. Result: With the console in no time. Once dynamic mix moves have you automating your mixes in ...automation system sees these become readable following the Control Sense timeout interval has elapsed. Auto Revert Choices With AUTO REVERT - Operation Operating the DM-3200's automation system is released. WRITE enabled, the automation system stops writing mix moves automatically on the previous pages, will begin when the...
... system in Static mode. This is set value of the information on a per control basis without the control being in the AUTO SETUP display by the automation system. Result: With the console in no time. Once dynamic mix moves have you automating your mixes in ...automation system sees these become readable following the Control Sense timeout interval has elapsed. Auto Revert Choices With AUTO REVERT - Operation Operating the DM-3200's automation system is released. WRITE enabled, the automation system stops writing mix moves automatically on the previous pages, will begin when the...