TASCAM Pro Audio Brochure 2011
Page 3
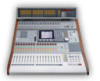
...-state recorder • Balanced stereo analog inputs/outputs on the HS-2 is recorded as a separate track. Like the HS-P82, the HS-8 uses a color touch-screen interface to solid state media. Audio is added through an option card, the SY-2, making it an ideal broadcast replacement for professional multitrack recording and...
...-state recorder • Balanced stereo analog inputs/outputs on the HS-2 is recorded as a separate track. Like the HS-P82, the HS-8 uses a color touch-screen interface to solid state media. Audio is added through an option card, the SY-2, making it an ideal broadcast replacement for professional multitrack recording and...

TASCAM Pro Audio Brochure 2011
Page 4
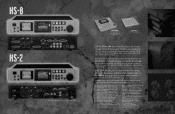
... to both recorders include on the HS-2000 & HS-4000 is used to change settings and view meters, making the GUI simple to use Touch screen interface with pull-up/pull- Recordings are captured on a reliable solid-state-based transport to recording and logging tasks, both for redundancy.
... to both recorders include on the HS-2000 & HS-4000 is used to change settings and view meters, making the GUI simple to use Touch screen interface with pull-up/pull- Recordings are captured on a reliable solid-state-based transport to recording and logging tasks, both for redundancy.

DM-3200 with Digital Performer
Page 2
Channel Strip...5 5. Summary ...3 2. Setting up the DM-3200...3 2.1 Setting up the Mac ...3 2.1.1 Audio MIDI settings...3 2.1.2 Control Surface Setup ...4 3. DM-3200 DP 1. LCD screen ...4 4. Transport ...6 6.1 Slow Mode for Rewind/Fast Forward ...6 DM-3200 DP 2/6 Top panel buttons ...5 5.1 Selection of Send 1-4 ...5 6.
Channel Strip...5 5. Summary ...3 2. Setting up the DM-3200...3 2.1 Setting up the Mac ...3 2.1.1 Audio MIDI settings...3 2.1.2 Control Surface Setup ...4 3. DM-3200 DP 1. LCD screen ...4 4. Transport ...6 6.1 Slow Mode for Rewind/Fast Forward ...6 DM-3200 DP 2/6 Top panel buttons ...5 5.1 Selection of Send 1-4 ...5 6.

DM-3200 with Digital Performer
Page 3
... 3/6 Similarly, add one "MC for Product Name ...click Apply. CTRL screen. In a similar way, add and set up the DM-3200 At the DM-3200's REMOTE > EXT.CTRL screen, add two "MC for DP" devices. DM-3200 DP 1. Setting up a Mackie Control Exp device. Establish a connection between the DM-3200's Port 6 and the Mackie Control's Input/Output. Similarly, establish a connection...
... 3/6 Similarly, add one "MC for Product Name ...click Apply. CTRL screen. In a similar way, add and set up the DM-3200 At the DM-3200's REMOTE > EXT.CTRL screen, add two "MC for DP" devices. DM-3200 DP 1. Setting up a Mackie Control Exp device. Establish a connection between the DM-3200's Port 6 and the Mackie Control's Input/Output. Similarly, establish a connection...

DM-3200 with Digital Performer
Page 4
LCD screen The DP 4.x-ready Mackie Control screen looks like this: DM-3200 DP 4/6 DM-3200 DP 2.1.2 Control Surface Setup Select DP Setup > Control Surface Setup to open the Control Surface window and make the settings as shown.: The setup is now completed. 3.
LCD screen The DP 4.x-ready Mackie Control screen looks like this: DM-3200 DP 4/6 DM-3200 DP 2.1.2 Control Surface Setup Select DP Setup > Control Surface Setup to open the Control Surface window and make the settings as shown.: The setup is now completed. 3.

DM-3200 with Sonar
Page 3
...window. 2.2 Adding a Control Surface Click Options > Control Surfaces and the Control Surfaces window opens. Close Control Surfaces window. CTRL screen. DM-3200 SONAR 3/8 Similarly, click the Add new control surface icon and select Mackie Control XT for Control Surface and USB audio device [6] ... then click OK. Select USB audio device for SOANR devices. Summary This manual describes using the DM-3200's control surface features with SONAR 4.x. 2. Setting up the DM-3200 At the DM-3200's REMOTE > EXT.CTRL screen, add two MC for Inputs and Outputs and select USB devices [5]&[6].
...window. 2.2 Adding a Control Surface Click Options > Control Surfaces and the Control Surfaces window opens. Close Control Surfaces window. CTRL screen. DM-3200 SONAR 3/8 Similarly, click the Add new control surface icon and select Mackie Control XT for Control Surface and USB audio device [6] ... then click OK. Select USB audio device for SOANR devices. Summary This manual describes using the DM-3200's control surface features with SONAR 4.x. 2. Setting up the DM-3200 At the DM-3200's REMOTE > EXT.CTRL screen, add two MC for Inputs and Outputs and select USB devices [5]&[6].

DM-3200 with Sonar
Page 4
Click Tools > Mackie Control and the Mackie Control window opens. The Configure Layout button changes to assign channel numbers" and "1-8" is displayed on the 2nd line as control target tracks. DM-3200 SONAR 4/8 DM-3200 SONAR 2.3 Configuration SONAR must be configured so that the channel groups 1-8 and 9-16 are recognized. The first line in the Mackie Control display section in the DM-3200 LCD screen reads "Use VPot 1 to Press Again When Done. Click the Configure Layout button.
Click Tools > Mackie Control and the Mackie Control window opens. The Configure Layout button changes to assign channel numbers" and "1-8" is displayed on the 2nd line as control target tracks. DM-3200 SONAR 4/8 DM-3200 SONAR 2.3 Configuration SONAR must be configured so that the channel groups 1-8 and 9-16 are recognized. The first line in the Mackie Control display section in the DM-3200 LCD screen reads "Use VPot 1 to Press Again When Done. Click the Configure Layout button.

DM-3200 with Sonar
Page 5
Touch any fader on channels 9-16 and the CH:09-16 screen is displayed in the upper left and select Track9-16 with Vpot1 (CH1 LED Ring Encoder). The setup has been completed. DM-3200 SONAR 5/8 Click the Press Again When Done button in the upper left and select Track1-8 with Vpot1 (CH9 LED Ring Encoder). DM-3200 SONAR Check to see that CH:01-08 is displayed in SONAR and close the window.
Touch any fader on channels 9-16 and the CH:09-16 screen is displayed in the upper left and select Track9-16 with Vpot1 (CH1 LED Ring Encoder). The setup has been completed. DM-3200 SONAR 5/8 Click the Press Again When Done button in the upper left and select Track1-8 with Vpot1 (CH9 LED Ring Encoder). DM-3200 SONAR Check to see that CH:01-08 is displayed in SONAR and close the window.

DM-3200 with Sonar
Page 6
...on and off . Switches the track mute between channel groups 1-8 and 9-16 is not available for recording). LCD screen The SONAR-ready Mackie Control screen looks like this: DM-3200 SONAR 4. DM-3200 Ring encoder Ring LED Select Solo Mute Track fader touch Track fader Master fader touch Master fader Modifier Rec SONAR function... out a touch-sense Master track message. Controls the Master fader. 4.1 SEL key limitation With SONAR, the SEL key is possible on the DM-3200 LCD screen. Switching between on the LED according to data sent by SONAR in response to Ring encoder operation.
...on and off . Switches the track mute between channel groups 1-8 and 9-16 is not available for recording). LCD screen The SONAR-ready Mackie Control screen looks like this: DM-3200 SONAR 4. DM-3200 Ring encoder Ring LED Select Solo Mute Track fader touch Track fader Master fader touch Master fader Modifier Rec SONAR function... out a touch-sense Master track message. Controls the Master fader. 4.1 SEL key limitation With SONAR, the SEL key is possible on the DM-3200 LCD screen. Switching between on the LED according to data sent by SONAR in response to Ring encoder operation.

DM-3200 with Sonar
Page 8
.... Moves control target tracks rightwards track by one track. Click SONAR Tools > Mackie Control and the Mackie Control screen opens where you to use functions assigned to the SONAR's F-8 keys. SONAR setup screen DM-3200 SONAR 8/8 Moves control target tracks leftwards in groups of 16 tracks. Transport The table below provides an overview of...
.... Moves control target tracks rightwards track by one track. Click SONAR Tools > Mackie Control and the Mackie Control screen opens where you to use functions assigned to the SONAR's F-8 keys. SONAR setup screen DM-3200 SONAR 8/8 Moves control target tracks leftwards in groups of 16 tracks. Transport The table below provides an overview of...
DM-3200 with Pro Tools
Page 2
Transport ...8 DM-3200 Pro Tools 2/8 LCD Screen...4 2.1 Switching between Ch1-8 and 9-16 screens 4 3. Summary ...3 1.1 Setting up the DM-3200 ...3 1.2 Setting up Pro Tools ...3 2. Top panel Buttons ...6 4.1 LCD...7 5. Channel strips...5 3.1 Encoder ...5 3.2 Ring LED 15-dot display ...5 3.3 Rec function ...6 3.4 Solo and Mute keys...6 3.5 Fader touch, Fader...6 3.5.1 Stereo fader operation...6 4. DM-3200 Pro Tools 1.
Transport ...8 DM-3200 Pro Tools 2/8 LCD Screen...4 2.1 Switching between Ch1-8 and 9-16 screens 4 3. Summary ...3 1.1 Setting up the DM-3200 ...3 1.2 Setting up Pro Tools ...3 2. Top panel Buttons ...6 4.1 LCD...7 5. Channel strips...5 3.1 Encoder ...5 3.2 Ring LED 15-dot display ...5 3.3 Rec function ...6 3.4 Solo and Mute keys...6 3.5 Fader touch, Fader...6 3.5.1 Stereo fader operation...6 4. DM-3200 Pro Tools 1.

DM-3200 with Pro Tools
Page 3
...Similarly, assign the MIDI Receive and Send of #1 to control the transport functions of Pro Tools. 1.2 Setting up the DM-3200 At the DM-3200's REMOTE > EXT.CTRL screen, add two "HUI Emulate" devices. Note that if this is not properly assigned, or if it is assigned then ...and click on the MIDI Controllers tab. DM-3200 Pro Tools 3/8 CTRL screen. Select a HUI device for #1 and #2. Summary This manual describes how to the DM-3200's Port 6. It should look like the screen below. Assign the MIDI Receive and Send of #2 to operate the DM-3200's HUI emulation with Pro Tools (Pro Tools...
...Similarly, assign the MIDI Receive and Send of #1 to control the transport functions of Pro Tools. 1.2 Setting up the DM-3200 At the DM-3200's REMOTE > EXT.CTRL screen, add two "HUI Emulate" devices. Note that if this is not properly assigned, or if it is assigned then ...and click on the MIDI Controllers tab. DM-3200 Pro Tools 3/8 CTRL screen. Select a HUI device for #1 and #2. Summary This manual describes how to the DM-3200's Port 6. It should look like the screen below. Assign the MIDI Receive and Send of #2 to operate the DM-3200's HUI emulation with Pro Tools (Pro Tools...

DM-3200 with Pro Tools
Page 4
... the channels 1-8 and 9-16 are made as follows: - DM-3200 Pro Tools 4/8 Switching between Ch1-8 and 9-16 screens The HUI emulate screen is switched on the OPTION > PREFERENCE screen. Switching at the REMOTE screen Select the target channel's HUI emulate screen using parameters By operating the following parameters, the screen is check marked on a 8-channel basis. Switching using...
... the channels 1-8 and 9-16 are made as follows: - DM-3200 Pro Tools 4/8 Switching between Ch1-8 and 9-16 screens The HUI emulate screen is switched on the OPTION > PREFERENCE screen. Switching at the REMOTE screen Select the target channel's HUI emulate screen using parameters By operating the following parameters, the screen is check marked on a 8-channel basis. Switching using...

DM-3200 with Pro Tools
Page 5
... Relationships between the two are selected using Top panel Encoder mode. Note Controls operations such as shown below: HUI V pot LED DM-3200 Ring LED HUI V pot LED DM-3200 Ring LED Information displayed here comes in messages sent by Pro Tools in the HUI protocol. 3.1 Encoders Target control parameters are as... Pan and Aux Send Turns on the LCD screen. N/A as there is made up of an array of Pro Tools can be ...
... Relationships between the two are selected using Top panel Encoder mode. Note Controls operations such as shown below: HUI V pot LED DM-3200 Ring LED HUI V pot LED DM-3200 Ring LED Information displayed here comes in messages sent by Pro Tools in the HUI protocol. 3.1 Encoders Target control parameters are as... Pan and Aux Send Turns on the LCD screen. N/A as there is made up of an array of Pro Tools can be ...

DM-3200 with Logic
Page 2
Channel Strip...4 5. LCD screen ...4 4. Setting up the DM-3200...3 2.1 Logic settings ...3 3. Transport ...5 6.1 Function keys ...6 6.1.1 CTRL + F1-8 ...6 DM-3200 Logic 2/6 Top panel buttons ...5 5.1 Single sends control ...5 5.2 Selection of Send 1-8 ...5 6. Summary ...3 2. DM-3200 Logic 1.
Channel Strip...4 5. LCD screen ...4 4. Setting up the DM-3200...3 2.1 Logic settings ...3 3. Transport ...5 6.1 Function keys ...6 6.1.1 CTRL + F1-8 ...6 DM-3200 Logic 2/6 Top panel buttons ...5 5.1 Single sends control ...5 5.2 Selection of Send 1-8 ...5 6. Summary ...3 2. DM-3200 Logic 1.

DM-3200 with Logic
Page 3
...control surface Setup window by clicking Logic Pro > Preferences > Control Surfaces > Setup. DM-3200 Logic 1. Summary This manual describes using the DM-3200's control surface features with Logic 7.x. 2. It is added, the screen looks like as shown above. DM-3200 Logic 3/6 Click on the newly added device to highlight it and set the MIDI ... add one MC for Logic devices. Set the MIDI Out and In ports of the window and then click Install. Setting up the DM-3200 At the DM-3200's REMOTE > EXT.CTRL screen, add two MC for Logic device in the upper left of this device to Port 5.
...control surface Setup window by clicking Logic Pro > Preferences > Control Surfaces > Setup. DM-3200 Logic 1. Summary This manual describes using the DM-3200's control surface features with Logic 7.x. 2. It is added, the screen looks like as shown above. DM-3200 Logic 3/6 Click on the newly added device to highlight it and set the MIDI ... add one MC for Logic devices. Set the MIDI Out and In ports of the window and then click Install. Setting up the DM-3200 At the DM-3200's REMOTE > EXT.CTRL screen, add two MC for Logic device in the upper left of this device to Port 5.

DM-3200 with Logic
Page 4
Channel Strip The channel strip-related Logic-ready functions as follows: DM-3200 Ring encoder Ring LED Select Select Solo Mute Track fader touch Track fader Master fader touch Master fader Modifier Rec Logic function Encoder Ring LED ... LED turns on and off . Selects tracks. The SOLO LED turns on when a track is soloed. DM-3200 Logic 4/6 Sends out a touch-sense Track fader message. LCD screen The Logic-ready Mackie Control screen looks like this: DM-3200 Logic 4. The MUTE LED turns on when a track is muted. Switches the track solo on and off...
Channel Strip The channel strip-related Logic-ready functions as follows: DM-3200 Ring encoder Ring LED Select Select Solo Mute Track fader touch Track fader Master fader touch Master fader Modifier Rec Logic function Encoder Ring LED ... LED turns on and off . Selects tracks. The SOLO LED turns on when a track is soloed. DM-3200 Logic 4/6 Sends out a touch-sense Track fader message. LCD screen The Logic-ready Mackie Control screen looks like this: DM-3200 Logic 4. The MUTE LED turns on when a track is muted. Switches the track solo on and off...

DM-3200 with Logic
Page 5
...-8 SHIFT + F1-8 Note Activates the Rewind function. Activates the Record function. Moves control target tracks rightwards in the LCD screen is displayed inverted. 5.1 Single sends control The send level controls on the individual tracks. Moves control target tracks leftwards by ...of the transport-related Logic-ready functions. Controls functions assigned to the F1-8 keys. Controls functions assigned to the Shifted F1-8 keys. DM-3200 Pan Aux Flip Arrow up Arrow down keys. 6. Activates the Shuttle function. Relationships between a parameter value assigned to be controlled by...
...-8 SHIFT + F1-8 Note Activates the Rewind function. Activates the Record function. Moves control target tracks rightwards in the LCD screen is displayed inverted. 5.1 Single sends control The send level controls on the individual tracks. Moves control target tracks leftwards by ...of the transport-related Logic-ready functions. Controls functions assigned to the F1-8 keys. Controls functions assigned to the Shifted F1-8 keys. DM-3200 Pan Aux Flip Arrow up Arrow down keys. 6. Activates the Shuttle function. Relationships between a parameter value assigned to be controlled by...

DM-3200 with Cubase & Nuendo
Page 2
Top panel buttons ...6 Ch sends ...6 5.1 ...6 5.2 EQ control ...6 5.2.1 EQ parameters ...6 6. Transport ...7 6.1 F1-8 ...7 DM-3200 Steinberg 2/7 DM-3200 Steinberg 1. LCD screen ...5 4. Summary ...3 2. Channel Strip...5 5. Setting up the DM-3200...3 2.1 Setting up the Steinberg app...3 3.
Top panel buttons ...6 Ch sends ...6 5.1 ...6 5.2 EQ control ...6 5.2.1 EQ parameters ...6 6. Transport ...7 6.1 F1-8 ...7 DM-3200 Steinberg 2/7 DM-3200 Steinberg 1. LCD screen ...5 4. Summary ...3 2. Channel Strip...5 5. Setting up the DM-3200...3 2.1 Setting up the Steinberg app...3 3.

DM-3200 with Cubase & Nuendo
Page 3
... the Steinberg app Click Cubase SX3 > Device Setup and the device setting window opens. Similarly, add one MC Steinberg device at the DM-3200 REMOTE > EXT.CTRL screen. Setting up the DM-3200 Add two MC Steinberg devices at the REMOTE > MACHINE CTRL. 2.1 Setting up with Nuendo is compatible with Steinberg apps Cubase SX 2.2 & higher...
... the Steinberg app Click Cubase SX3 > Device Setup and the device setting window opens. Similarly, add one MC Steinberg device at the DM-3200 REMOTE > EXT.CTRL screen. Setting up the DM-3200 Add two MC Steinberg devices at the REMOTE > MACHINE CTRL. 2.1 Setting up with Nuendo is compatible with Steinberg apps Cubase SX 2.2 & higher...