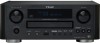
Owners Manual
Page 2
... the power cord plug at any time. < The mains plug is intended to alert the user to the presence of the polarized or grounding-type plug. When a cart is intended to alert the user to qualified service personnel. REFER SERVICING TO QUALIFIED SERVICE PERSONNEL. IMPORTANT SAFETY INSTRUCTIONS 1) Read these instructions. 2) Keep these instructions. 3) Heed all warnings. 4) Follow all servicing to the presence of important operating and maintenance (servicing) instructions...
... the power cord plug at any time. < The mains plug is intended to alert the user to the presence of the polarized or grounding-type plug. When a cart is intended to alert the user to qualified service personnel. REFER SERVICING TO QUALIFIED SERVICE PERSONNEL. IMPORTANT SAFETY INSTRUCTIONS 1) Read these instructions. 2) Keep these instructions. 3) Heed all warnings. 4) Follow all servicing to the presence of important operating and maintenance (servicing) instructions...
Owners Manual
Page 3
... pickup : Type : SF-P101VF Manufacturer : Sanyo Electric Co., Ltd Laser output : Less than 1mW on the Radiation Control for help. This product is completely confined in the United States and/or other countries. and other content distribution systems (pay-audio or audio-on-demand applications and the like) or on physical media (compact discs, digital versatile discs, semiconductor chips, hard drives, memory cards and the...
... pickup : Type : SF-P101VF Manufacturer : Sanyo Electric Co., Ltd Laser output : Less than 1mW on the Radiation Control for help. This product is completely confined in the United States and/or other countries. and other content distribution systems (pay-audio or audio-on-demand applications and the like) or on physical media (compact discs, digital versatile discs, semiconductor chips, hard drives, memory cards and the...
Owners Manual
Page 4
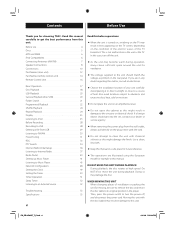
.... Before Use 4 Discs 5 MP3 and WMA 6 iPod Compatibility 6 Connecting Antennas (AM/FM 7 Speaker Connections 8 Connections 10 Part Names (main unit 12 Part Names (remote control unit 14 Remote Control Unit 16 Basic Operation 17 Disc Playback 18 USB Playback 20 General Playback (disc/USB 20 Folder Search 21 Programmed Playback 22 Shuffle Playback 24 Repeat Playback 24 Display 25 Listening to iPod 25 Before Recording 28 Recording to USB 28 Deleting a file from USB 29 Listening to FM/AM 30 Preset Tuning 31 RDS 33 PTY Search 34 Internet Radio Initial Setup 36...
.... Before Use 4 Discs 5 MP3 and WMA 6 iPod Compatibility 6 Connecting Antennas (AM/FM 7 Speaker Connections 8 Connections 10 Part Names (main unit 12 Part Names (remote control unit 14 Remote Control Unit 16 Basic Operation 17 Disc Playback 18 USB Playback 20 General Playback (disc/USB 20 Folder Search 21 Programmed Playback 22 Shuffle Playback 24 Repeat Playback 24 Display 25 Listening to iPod 25 Before Recording 28 Recording to USB 28 Deleting a file from USB 29 Listening to FM/AM 30 Preset Tuning 31 RDS 33 PTY Search 34 Internet Radio Initial Setup 36...
Owners Manual
Page 6
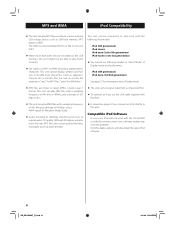
... work with the CR-H500NT or with the remote control unit, software update may solve the problem. Although this port. MP3 and WMA iPod Compatibility < This unit can play MP3 files recorded in "Direct Mode" of 192 kbps or less. This unit can play MP3 files with a sampling frequency of 44.1 kHz or 48 kHz, and a bit-rate of 320 kbps or less. < This unit cannot output video from a connected iPod. < To connect an iPod, use...
... work with the CR-H500NT or with the remote control unit, software update may solve the problem. Although this port. MP3 and WMA iPod Compatibility < This unit can play MP3 files recorded in "Direct Mode" of 192 kbps or less. This unit can play MP3 files with a sampling frequency of 44.1 kHz or 48 kHz, and a bit-rate of 320 kbps or less. < This unit cannot output video from a connected iPod. < To connect an iPod, use...
Owners Manual
Page 7
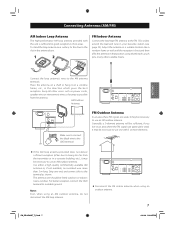
... FM indoor antenna when using thumb tacks, push pins or any other wires such as power cords, speaker wires or interconnect wires as far away as shown. To stand the loop antenna on a window frame, etc., in an area where the FM signals are weak, it on a surface, fix the claw to the terminal as possible from the transmitter or...
... FM indoor antenna when using thumb tacks, push pins or any other wires such as power cords, speaker wires or interconnect wires as far away as shown. To stand the loop antenna on a window frame, etc., in an area where the FM signals are weak, it on a surface, fix the claw to the terminal as possible from the transmitter or...
Owners Manual
Page 9
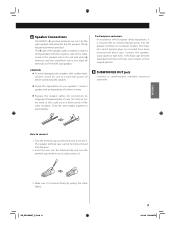
... become separated from the negative side of the speaker cable is marked to make it . Turn the terminal cap counter-clockwise to securely connect it: 3. ENGLISH A Speaker Connections CR-H500NT's + (positive) terminals are red ( for the right speaker) and white (for connection by pulling the cable lightly. The + side of the cable. B SUBWOOFER OUT jack Connect a commercially available powered subwoofer. Insert the wire into the terminal fully and...
... become separated from the negative side of the speaker cable is marked to make it . Turn the terminal cap counter-clockwise to securely connect it: 3. ENGLISH A Speaker Connections CR-H500NT's + (positive) terminals are red ( for the right speaker) and white (for connection by pulling the cable lightly. The + side of the cable. B SUBWOOFER OUT jack Connect a commercially available powered subwoofer. Insert the wire into the terminal fully and...
Owners Manual
Page 10
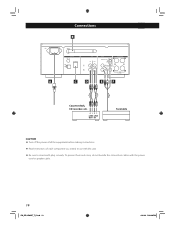
RLRL LINE LINE OUT IN Turntable CAUTION < Turn off the power of all the equipment before making connections. < Read instructions of each component you intend to use with the power cord or speaker cable. 10 EN_CR-H500NT_T_C.indb 10 09.10.6 5:31:26 PM Connections B A C D E F Cassette deck, CD recorder, etc. To prevent hum and noise, do not bundle the connection cables with this unit. < Be sure to insert each plug securely.
RLRL LINE LINE OUT IN Turntable CAUTION < Turn off the power of all the equipment before making connections. < Read instructions of each component you intend to use with the power cord or speaker cable. 10 EN_CR-H500NT_T_C.indb 10 09.10.6 5:31:26 PM Connections B A C D E F Cassette deck, CD recorder, etc. To prevent hum and noise, do not bundle the connection cables with this unit. < Be sure to insert each plug securely.
Owners Manual
Page 11
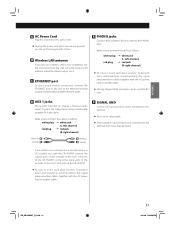
... to use a wired Internet connection, connect the ETHERNET port of time. To prevent noise and humming, avoid bundling the signal interconnection cables together with the AC power cord or speaker cables. < Moving Magnet (MM) cartridges can use a wireless LAN in your installation site, the unit connects to the LAN using the wireless LAN antenna. B Wireless LAN antenna If you can be heard. E PHONO jacks Connect the turntable's RCA pin cable to use a recorder (ex. Connect the components using...
... to use a wired Internet connection, connect the ETHERNET port of time. To prevent noise and humming, avoid bundling the signal interconnection cables together with the AC power cord or speaker cables. < Moving Magnet (MM) cartridges can use a wireless LAN in your installation site, the unit connects to the LAN using the wireless LAN antenna. B Wireless LAN antenna If you can be heard. E PHONO jacks Connect the turntable's RCA pin cable to use a recorder (ex. Connect the components using...
Owners Manual
Page 13
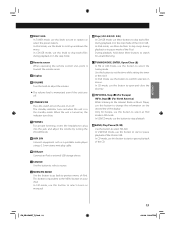
... iPod. In CD/USB mode, use this button to the MENU button on the second line of the iPod. B Remote sensor When operating the remote control unit, point it towards the remote sensor. C Display D VOLUME Turn this knob to stop mode. E STANDBY/ON Press this button to turn the unit on , the indicator turns blue. F PHONES For private listening, insert the headphones plug into this button to select FM, AM. G AUX 2 IN Connect equipment such as a portable audio player using a 3.5 mm stereo mini plug cable. L TUNING MODE...
... iPod. In CD/USB mode, use this button to the MENU button on the second line of the iPod. B Remote sensor When operating the remote control unit, point it towards the remote sensor. C Display D VOLUME Turn this knob to stop mode. E STANDBY/ON Press this button to turn the unit on , the indicator turns blue. F PHONES For private listening, insert the headphones plug into this button to select FM, AM. G AUX 2 IN Connect equipment such as a portable audio player using a 3.5 mm stereo mini plug cable. L TUNING MODE...
Owners Manual
Page 14
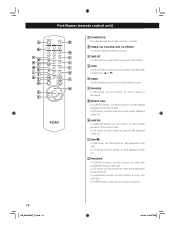
... playback of the iPod or USB. j PROGRAM In USB/iPod mode, use this button to turn the unit on or off the timer function. r c TIME SET Use this button to enter the programme mode of the USB. g REPEAT 1/ALL In USB/iPod mode, use this button to start shuffle playback of the iPod or USB. In CD mode, use this button to preset stations. 14 EN_CR-H500NT_T_C.indb 14 09.10.6 5:31:27 PM In TUNER mode, use this button to enter the selection. i Stop (H) In USB mode, use this button...
... playback of the iPod or USB. j PROGRAM In USB/iPod mode, use this button to turn the unit on or off the timer function. r c TIME SET Use this button to enter the programme mode of the USB. g REPEAT 1/ALL In USB/iPod mode, use this button to start shuffle playback of the iPod or USB. In CD mode, use this button to preset stations. 14 EN_CR-H500NT_T_C.indb 14 09.10.6 5:31:27 PM In TUNER mode, use this button to enter the selection. i Stop (H) In USB mode, use this button...
Owners Manual
Page 15
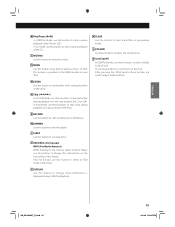
... tracks/files in the stop mode of the iPod or USB. u CLEAR Use this button to mute the sound. r SLEEP Use this button to change what information is equivalent to the MENU button on the second line of iPod. s INFO/RDS, (For Europe) INFO (For North America) While listening to the Internet Radio or Music Player, use this button to set the time while setting the timer or the clock. q DIMMER Use this button to start recording to an USB device. ENGLISH k Play...
... tracks/files in the stop mode of the iPod or USB. u CLEAR Use this button to mute the sound. r SLEEP Use this button to change what information is equivalent to the MENU button on the second line of iPod. s INFO/RDS, (For Europe) INFO (For North America) While listening to the Internet Radio or Music Player, use this button to set the time while setting the timer or the clock. q DIMMER Use this button to start recording to an USB device. ENGLISH k Play...
Owners Manual
Page 17
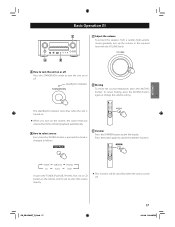
... Or press the TUNER, iPod/USB, PHONO, AUX 1/2 or CD button on or off Press the STANDBY/ON switch to turn up the volume to the required level with the VOLUME knob. To cancel muting, press the MUTING button again or change the volume setting. Basic Operation (1) C C Adjust the volume To protect the speakers from a sudden high-volume sound, gradually turn the unit on the remote control unit to select the source directly. < This function will start playback automatically.
... Or press the TUNER, iPod/USB, PHONO, AUX 1/2 or CD button on or off Press the STANDBY/ON switch to turn up the volume to the required level with the VOLUME knob. To cancel muting, press the MUTING button again or change the volume setting. Basic Operation (1) C C Adjust the volume To protect the speakers from a sudden high-volume sound, gradually turn the unit on the remote control unit to select the source directly. < This function will start playback automatically.
Owners Manual
Page 20
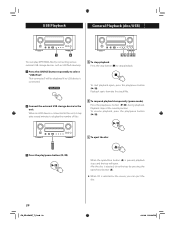
..., playback stops and the tray will be displayed if no USB device is connected to this unit, it may take several minutes to select "USB/iPod". "Not connected" will open /close button (L) is selected as the source, you can play /pause button (y/J) during playback. B To suspend playback temporarily (pause mode) Press the play MP3/WMA files by connecting various external USB storage devices such as USB flash memory. 1 Press the SOURCE button repeatedly to display the number of files.
..., playback stops and the tray will be displayed if no USB device is connected to this unit, it may take several minutes to select "USB/iPod". "Not connected" will open /close button (L) is selected as the source, you can play /pause button (y/J) during playback. B To suspend playback temporarily (pause mode) Press the play MP3/WMA files by connecting various external USB storage devices such as USB flash memory. 1 Press the SOURCE button repeatedly to display the number of files.
Owners Manual
Page 25
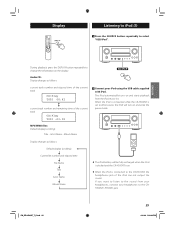
.../Play T003 00:42 current track number and remaining time of the iPod can not output the sound. Display Listening to iPod (1) 1 Press the SOURCE button repeatedly to change the information on and starts playback from your headphones, connect your iPod using the USB cable supplied with iPod. The iPod automatically turns on the display. If you want to listen to the CRH500NT's PHONES jack. MP3/WMA files: Default display (scrolling): Title - Artist Name - Audio CD: Display changes as follows: Default display...
.../Play T003 00:42 current track number and remaining time of the iPod can not output the sound. Display Listening to iPod (1) 1 Press the SOURCE button repeatedly to change the information on and starts playback from your headphones, connect your iPod using the USB cable supplied with iPod. The iPod automatically turns on the display. If you want to listen to the CRH500NT's PHONES jack. MP3/WMA files: Default display (scrolling): Title - Artist Name - Audio CD: Display changes as follows: Default display...
Owners Manual
Page 28
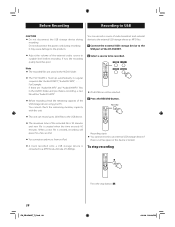
... device using your PC. For Example: If there are saved in the AUDIO folder, and you make a recording, a new file will pause for a few second. < You cannot record music from an iPod. < A track recorded onto a USB storage device is locked. If not, the recording quality becomes poor. 2 Select a source to be selected. 3 Press the RECORD button. < This unit can record a source of radio broadcast and external device to the external USB storage device as MP3 files. 1 Connect the external USB...
... device using your PC. For Example: If there are saved in the AUDIO folder, and you make a recording, a new file will pause for a few second. < You cannot record music from an iPod. < A track recorded onto a USB storage device is locked. If not, the recording quality becomes poor. 2 Select a source to be selected. 3 Press the RECORD button. < This unit can record a source of radio broadcast and external device to the external USB storage device as MP3 files. 1 Connect the external USB...
Owners Manual
Page 48
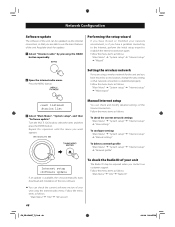
... unit The Radio ID may be updated via the Internet connection, so that network connection is available, the unit automatically starts download and installation of the Internet connection. Press the MENU button. Follow the menu items as follows: To check the current network settings "Main Menu" w "System setup" w "Internet setup" w "View settings" To configure settings "Main Menu" w "System setup" w "Internet setup" w "Manual settings" To delete a network profile "Main Menu" w "System setup" w "Internet setup" w "Network profile" Internet setup ›Software update If an update...
... unit The Radio ID may be updated via the Internet connection, so that network connection is available, the unit automatically starts download and installation of the Internet connection. Press the MENU button. Follow the menu items as follows: To check the current network settings "Main Menu" w "System setup" w "Internet setup" w "View settings" To configure settings "Main Menu" w "System setup" w "Internet setup" w "Manual settings" To delete a network profile "Main Menu" w "System setup" w "Internet setup" w "Network profile" Internet setup ›Software update If an update...
Owners Manual
Page 51
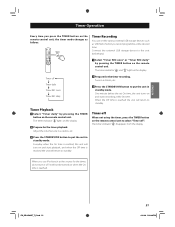
... reached, the unit will not be turned on the remote control unit, the timer mode changes as follows. One minute before the set the various external USB storage devices such as USB flash memory to put the unit in a station, etc. The timer indicator " " and " " light on and starts recording at the desired time. ENGLISH Timer Operation Every time you use iPod touch as the source for the timer recording. Timer Recording You can set On time, the unit turns on the display.
... reached, the unit will not be turned on the remote control unit, the timer mode changes as follows. One minute before the set the various external USB storage devices such as USB flash memory to put the unit in a station, etc. The timer indicator " " and " " light on and starts recording at the desired time. ENGLISH Timer Operation Every time you use iPod touch as the source for the timer recording. Timer Recording You can set On time, the unit turns on the display.
Owners Manual
Page 53
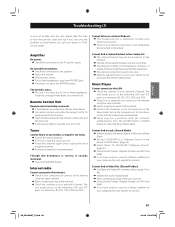
... out of date. e Pull out the headphones plug from speakers. e The allowed number of simulataneous listeners of station/Podcast might have antivirus security software enabled on your own station list by accessing the internet radio portal. e Tune in the station list. e An external antenna is too slow. Playable formats are exhausted, change the batteries. e Check if your dealer or TEAC service center. Remote Control Unit Remote control unit does not work. e If a fluorescent light is...
... out of date. e Pull out the headphones plug from speakers. e The allowed number of simulataneous listeners of station/Podcast might have antivirus security software enabled on your own station list by accessing the internet radio portal. e Tune in the station list. e An external antenna is too slow. Playable formats are exhausted, change the batteries. e Check if your dealer or TEAC service center. Remote Control Unit Remote control unit does not work. e If a fluorescent light is...
Owners Manual
Page 54
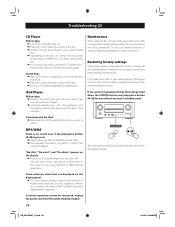
... iPod. If normal operation cannot be recovered, unplug the power cord from the USB jack, wait a few seconds, and insert it may not be turned on the disc, etc. e If the disc is pressed. Load a prerecorded disc. Restoring factory settings If the power supply is no sound even if the play back CD-R/RW discs. MP3/WMA There is no ID3 tag information for the memory backup function...
... iPod. If normal operation cannot be recovered, unplug the power cord from the USB jack, wait a few seconds, and insert it may not be turned on the disc, etc. e If the disc is pressed. Load a prerecorded disc. Restoring factory settings If the power supply is no sound even if the play back CD-R/RW discs. MP3/WMA There is no ID3 tag information for the memory backup function...
Owners Manual
Page 55
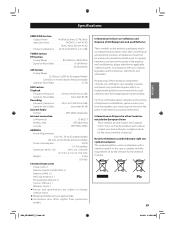
...-T Wireless LAN IEEE 802.11b/g Security WEP, WPA, WPA2 GENERAL Power Requirements 230 V AC, 50 Hz (European Model) 120 V AC, 60 Hz (North American Model) Power Consumption 100 W 0.5 W (standby) Dimension (W x H x D 290 x 113 x 340 mm (11-7/16 x 4-1/2 x 13-7/16 inch) Weight 5.6 kg (12.4 lbs) Standard Accessories Power Cord x 1 Remote Control Unit (RC-1225) x 1 Batteries (AAA) x 2 AM Loop Antenna x 1 FM Lead-type Antenna x 1 Owner's Manual x 1 Warranty Card x 1 < Design and specifications are...
...-T Wireless LAN IEEE 802.11b/g Security WEP, WPA, WPA2 GENERAL Power Requirements 230 V AC, 50 Hz (European Model) 120 V AC, 60 Hz (North American Model) Power Consumption 100 W 0.5 W (standby) Dimension (W x H x D 290 x 113 x 340 mm (11-7/16 x 4-1/2 x 13-7/16 inch) Weight 5.6 kg (12.4 lbs) Standard Accessories Power Cord x 1 Remote Control Unit (RC-1225) x 1 Batteries (AAA) x 2 AM Loop Antenna x 1 FM Lead-type Antenna x 1 Owner's Manual x 1 Warranty Card x 1 < Design and specifications are...


