Owner s Mamual English
Page 5
... exposure limits set forth for an uncontrolled environment and meets the FCC radio frequency Exposure Guidelines. This equipment generates, uses, and can be determined by turning the equipment off and on, the user is connected. oo Connect the equipment into an outlet on the use only in a residential installation. cian for USA Declaration of Conformity Responsible party: TEAC AMERICA, INC. Operation is...
... exposure limits set forth for an uncontrolled environment and meets the FCC radio frequency Exposure Guidelines. This equipment generates, uses, and can be determined by turning the equipment off and on, the user is connected. oo Connect the equipment into an outlet on the use only in a residential installation. cian for USA Declaration of Conformity Responsible party: TEAC AMERICA, INC. Operation is...

Owner s Mamual English
Page 6
.... Power cord × 1 Remote control (RC-1324) × 1 Batteries for that language. guage to open the Downloads page for remote control (AAA) × 2 Basic FM antenna × 1 Owner's manual × 1 oo Keep this manual in the "Products" section instead.) 4) Select and download the updates that are missing or have been damaged during transportation. Using the TEAC Global Site You can download updates for information about discs 8 Connections 10 Connecting speakers 12 Using the remote control...
.... Power cord × 1 Remote control (RC-1324) × 1 Batteries for that language. guage to open the Downloads page for remote control (AAA) × 2 Basic FM antenna × 1 Owner's manual × 1 oo Keep this manual in the "Products" section instead.) 4) Select and download the updates that are missing or have been damaged during transportation. Using the TEAC Global Site You can download updates for information about discs 8 Connections 10 Connecting speakers 12 Using the remote control...

Owner s Mamual English
Page 8
..., be able to play 8cm CDs. Operation and sound quality cannot be damaged, so do not conform to play discs of types other than those shown above . Doing so could damage the unit. Notes about how to finalize it (unlabeled side). oo Multi-session discs are not supported. oo WMA files Windows Media Audio Professional (WMA Pro) and Windows Media...
..., be able to play 8cm CDs. Operation and sound quality cannot be damaged, so do not conform to play discs of types other than those shown above . Doing so could damage the unit. Notes about how to finalize it (unlabeled side). oo Multi-session discs are not supported. oo WMA files Windows Media Audio Professional (WMA Pro) and Windows Media...

Owner s Mamual English
Page 11
... time. 11 Use a commercially-available optical digital (TOS) cable to input digital audio from the outlet when not using commercially-available RCA cables. A FM antenna When receiving an FM broadcast, extend this antenna and position it . B USB port Use to make the connection. Connect an audio output device such as a cassette deck or MD player to these to it for the best reception. Use a commercially-available USB cable. D Digital audio input connector (OPTICAL) Input digital audio. Unplug the cord from a computer. C Analog audio input...
... time. 11 Use a commercially-available optical digital (TOS) cable to input digital audio from the outlet when not using commercially-available RCA cables. A FM antenna When receiving an FM broadcast, extend this antenna and position it . B USB port Use to make the connection. Connect an audio output device such as a cassette deck or MD player to these to it for the best reception. Use a commercially-available USB cable. D Digital audio input connector (OPTICAL) Input digital audio. Unplug the cord from a computer. C Analog audio input...
Owner s Mamual English
Page 14
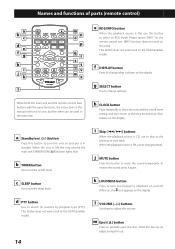
.../Canadian model. Hold the disc by program type (PTY). c SLEEP button Use to turn low-frequency emphasis on and off timer setting, and then return to change presets. When the playback source is FM, use to showing the previous information on the display. When on, the icon appears on the display. h CLOCK button Press repeatedly to show the time and the on/off . Names and functions of parts (remote control) a b c d e fg...
.../Canadian model. Hold the disc by program type (PTY). c SLEEP button Use to turn low-frequency emphasis on and off timer setting, and then return to change presets. When the playback source is FM, use to showing the previous information on the display. When on, the icon appears on the display. h CLOCK button Press repeatedly to show the time and the on/off . Names and functions of parts (remote control) a b c d e fg...

Owner s Mamual English
Page 15
... the frequency received. When the playback source is FM, use to switch between repeat playback and shuffle playback. Use this button to turn upconversion on and off. o DIMMER button Press to change presets. q MENU button Press to clear programmed tracks. u Stop (8) button Press during playback to search backward/forward. v Play/pause (7/9) button When the playback source is CD and the unit is CD, use with radio station presets. x PROGRAM button When the playback source is...
... the frequency received. When the playback source is FM, use to switch between repeat playback and shuffle playback. Use this button to turn upconversion on and off. o DIMMER button Press to change presets. q MENU button Press to clear programmed tracks. u Stop (8) button Press during playback to search backward/forward. v Play/pause (7/9) button When the playback source is CD and the unit is CD, use with radio station presets. x PROGRAM button When the playback source is...

Owner s Mamual English
Page 16
... turn in . oo When the volume is CD, use the term "standby" rather than "off". For this knob to the previous or next track. C Skip (.//) buttons When the playback source is adjusted with the remote control, the main unit volume knob will not be output from the remote control. B Disc slot Insert a disc here. F PHONES jack Connect headphones (3.5mm stereo mini plug) here. D Play/pause (7/9) button When paused, press to select the playback source...
... turn in . oo When the volume is CD, use the term "standby" rather than "off". For this knob to the previous or next track. C Skip (.//) buttons When the playback source is adjusted with the remote control, the main unit volume knob will not be output from the remote control. B Disc slot Insert a disc here. F PHONES jack Connect headphones (3.5mm stereo mini plug) here. D Play/pause (7/9) button When paused, press to select the playback source...
Owner s Mamual English
Page 17
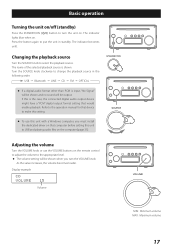
... a digital audio format other than PCM is shown. The name of the selected playback source is input, "No Signal" will be shown and no sound will be output. As the value increases, the volume becomes louder. Refer to the appropriate level. Display example CD VOLUME 15 Volume MIN: Minimum volume MAX: Maximum volume 17 The indicator lights blue when on. oo To use the VOLUME buttons on the remote control to adjust the volume...
... a digital audio format other than PCM is shown. The name of the selected playback source is input, "No Signal" will be shown and no sound will be output. As the value increases, the volume becomes louder. Refer to the appropriate level. Display example CD VOLUME 15 Volume MIN: Minimum volume MAX: Maximum volume 17 The indicator lights blue when on. oo To use the VOLUME buttons on the remote control to adjust the volume...

Owner s Mamual English
Page 18
... remote control. "MUTING" appears on the display. Bright Dim Unlit oo This setting is retained when the unit is in standby. 18 Muting playback If you change the playback source or use the upconversion function with digital input (USB, Bluetooth, CD, OPTICAL). Dimmer Press the remote control DIMMER button to turn low-frequency emphasis on the remote control again to return to the previous volume level. Input sampling frequencies and sampling frequencies after upconversion Input sampling frequency...
... remote control. "MUTING" appears on the display. Bright Dim Unlit oo This setting is retained when the unit is in standby. 18 Muting playback If you change the playback source or use the upconversion function with digital input (USB, Bluetooth, CD, OPTICAL). Dimmer Press the remote control DIMMER button to turn low-frequency emphasis on the remote control again to return to the previous volume level. Input sampling frequencies and sampling frequencies after upconversion Input sampling frequency...

Owner s Mamual English
Page 19
... remote control to select the play instead. 19 Setting the on or off and press the SELECT button. The hour position blinks. Use the direction (k/j) buttons to set these before putting the unit in standby (page 7). Display example Select source CD oo If you press the TIMER button, "First Timer Set" will not function at the set times. Timer MENU < 1.ON/OFF > 3 Press a direction (k/j) button to turn the timer on /off time 1 Press the TIMER button. 2 Press a direction (l/;) button...
... remote control to select the play instead. 19 Setting the on or off and press the SELECT button. The hour position blinks. Use the direction (k/j) buttons to set these before putting the unit in standby (page 7). Display example Select source CD oo If you press the TIMER button, "First Timer Set" will not function at the set times. Timer MENU < 1.ON/OFF > 3 Press a direction (k/j) button to turn the timer on /off time 1 Press the TIMER button. 2 Press a direction (l/;) button...

Owner s Mamual English
Page 20
... standby mode is turned on . Checking whether automatic power saving is on or off "APS OFF" is shown when the unit is 1 W or less. When automatic power saving is on If there is enabled, press the SLEEP button once to reset the time. Display example CD PLAY SLEEP 25 When the sleep timer is no signal from the selected playback source and no operation...
... standby mode is turned on . Checking whether automatic power saving is on or off "APS OFF" is shown when the unit is 1 W or less. When automatic power saving is on If there is enabled, press the SLEEP button once to reset the time. Display example CD PLAY SLEEP 25 When the sleep timer is no signal from the selected playback source and no operation...

Owner s Mamual English
Page 27
... it sound better. Press and hold the direction (;) button to search for a station in the higher-frequency direction. Setting presets manually 1 Tune in stereo. MONO Receive FM broadcasts in stereo. Decreasing the received frequency Press the direction (l) button to increase the received frequency one step. FM STEREO P01 107.90MHz Preset number oo Preset numbers between stereo and mono reception. Display example FM mode FM STEREO 107.90MHz Frequency range STEREO Receive stereo FM broadcasts in mono. oo "STEREO" will be assigned. 27 Changing the received frequency...
... it sound better. Press and hold the direction (;) button to search for a station in the higher-frequency direction. Setting presets manually 1 Tune in stereo. MONO Receive FM broadcasts in stereo. Decreasing the received frequency Press the direction (l) button to increase the received frequency one step. FM STEREO P01 107.90MHz Preset number oo Preset numbers between stereo and mono reception. Display example FM mode FM STEREO 107.90MHz Frequency range STEREO Receive stereo FM broadcasts in mono. oo "STEREO" will be assigned. 27 Changing the received frequency...

Owner s Mamual English
Page 28
...will blink on the display, and use the skip (.//) buttons to preset numbers. Display example FM P03 87.5MHz Preset number Selecting presets using the main unit Press the play /pause (7/9) button to show a preset number on the display and automatic preset assignment will search for stations that it can use the skip (.//) buttons to preset numbers. Press the play /pause (7/9) button to change the reception frequency. 28 Selecting presets Use the direction (k/j) buttons to switch between preset selection and frequency selection. Listening to FM radio (continued) Setting...
...will blink on the display, and use the skip (.//) buttons to preset numbers. Display example FM P03 87.5MHz Preset number Selecting presets using the main unit Press the play /pause (7/9) button to show a preset number on the display and automatic preset assignment will search for stations that it can use the skip (.//) buttons to preset numbers. Press the play /pause (7/9) button to change the reception frequency. 28 Selecting presets Use the direction (k/j) buttons to switch between preset selection and frequency selection. Listening to FM radio (continued) Setting...
Owner s Mamual English
Page 29
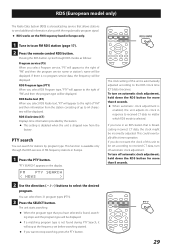
... be displayed. PTY search You can select from the factory. FM PTY SEARCH < NEWS > 2 Use the direction (k/j) buttons to the right of "FM" and then the program service name or station's name will appear to select the desired program. The clock setting of up to received CT data no program service data, the frequency will be set before searching started. This function is selected. To turn off automatic clock adjustment. If...
... be displayed. PTY search You can select from the factory. FM PTY SEARCH < NEWS > 2 Use the direction (k/j) buttons to the right of "FM" and then the program service name or station's name will appear to select the desired program. The clock setting of up to received CT data no program service data, the frequency will be set before searching started. This function is selected. To turn off automatic clock adjustment. If...
Owner s Mamual English
Page 31
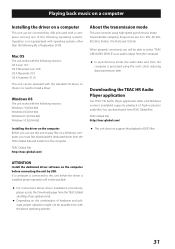
... select "TEAC USB AUDIO DEVICE" as an audio output from the computer is processed using high-speed asynchronous mode. Playing back music on a computer Installing the driver on a computer This unit can be connected by USB. Mac OS The unit works with operating systems other than the following (As of September 2015). When properly connected, you must first download the dedicated driver from the TEAC Global Site and install...
... select "TEAC USB AUDIO DEVICE" as an audio output from the computer is processed using high-speed asynchronous mode. Playing back music on a computer Installing the driver on a computer This unit can be connected by USB. Mac OS The unit works with operating systems other than the following (As of September 2015). When properly connected, you must first download the dedicated driver from the TEAC Global Site and install...

Owner s Mamual English
Page 32
... when using the TEAC HR Audio Player Application, the vol- oo If you must install the dedicated driver beforehand (page 31). ume cannot be output. oo Do not do not want these sounds to be output, make appropriate settings on the computer to turn the unit on. 4 Turn the SOURCE knob to select USB. 5 Start playback of this unit to the computer using a USB cable. Turn this...
... when using the TEAC HR Audio Player Application, the vol- oo If you must install the dedicated driver beforehand (page 31). ume cannot be output. oo Do not do not want these sounds to be output, make appropriate settings on the computer to turn the unit on. 4 Turn the SOURCE knob to select USB. 5 Start playback of this unit to the computer using a USB cable. Turn this...

Owner s Mamual English
Page 34
.... Display example Menu < 1.Set clock > Press the ; Display example Current Time 12H/24H The selected item blinks. ting change. 4 Press the MENU button to confirm the change the setting item and press the SELECT button. Reset Press the l button to cycle through the following buttons on the main unit or the remote control to the operation manual of that the volume is turned up the volume on the playback device, no sound might not be output...
.... Display example Menu < 1.Set clock > Press the ; Display example Current Time 12H/24H The selected item blinks. ting change. 4 Press the MENU button to confirm the change the setting item and press the SELECT button. Reset Press the l button to cycle through the following buttons on the main unit or the remote control to the operation manual of that the volume is turned up the volume on the playback device, no sound might not be output...

Owner s Mamual English
Page 35
... unit will automatically play when loaded. Display example Current Time PM 11:45 1 Use the direction (k/j) buttons to select "12h" or "24h", and press the SELECT button. 2 Use the direction (k/j) buttons to input the hour, and press the SELECT button. 3 Use the direction (k/j) buttons to OFF in models for the US and Canada and ON in models for Europe. CD setting CD Auto Start oo This is set to their factory default values. OFF: CD...
... unit will automatically play when loaded. Display example Current Time PM 11:45 1 Use the direction (k/j) buttons to select "12h" or "24h", and press the SELECT button. 2 Use the direction (k/j) buttons to input the hour, and press the SELECT button. 3 Use the direction (k/j) buttons to OFF in models for the US and Canada and ON in models for Europe. CD setting CD Auto Start oo This is set to their factory default values. OFF: CD...

Owner s Mamual English
Page 37
... in error. No sound is output or very little sound is not possible. Radio A station cannot be damaged. ee CD-R/CD-RW discs that have strong magnetism. Install this should occur, use discs that are able to restart operations. 37 ee The MP3/WMA file might be played back. If this case, try repositioning the antenna. ee Point the remote control at the front panel of...
... in error. No sound is output or very little sound is not possible. Radio A station cannot be damaged. ee CD-R/CD-RW discs that have strong magnetism. Install this should occur, use discs that are able to restart operations. 37 ee The MP3/WMA file might be played back. If this case, try repositioning the antenna. ee Point the remote control at the front panel of...
Owner s Mamual English
Page 38
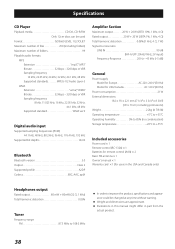
...% Tuner Frequency range FM 87.5 MHz to 108.0 MHz oo In order to +55°C Included accessories Power cord × 1 Remote control (RC-1324) × 1 Batteries for remote control (AAA) × 2 Basic FM antenna × 1 Owner's manual × 1 Warranty card × 1 (for users in part from the actual product. 38 Specifications CD Player Playback media CD-DA, CD-R/RW Only 12cm discs can be used Format ISO9660 LEVEL 1/2/JOLIET...
...% Tuner Frequency range FM 87.5 MHz to 108.0 MHz oo In order to +55°C Included accessories Power cord × 1 Remote control (RC-1324) × 1 Batteries for remote control (AAA) × 2 Basic FM antenna × 1 Owner's manual × 1 Warranty card × 1 (for users in part from the actual product. 38 Specifications CD Player Playback media CD-DA, CD-R/RW Only 12cm discs can be used Format ISO9660 LEVEL 1/2/JOLIET...


