
Owner's Manual
Page 1
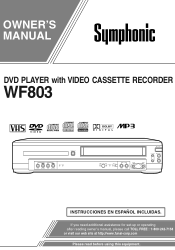
If you need additional assistance for set-up or operating after reading owner's manual, please call TOLL FREE : 1-800-242-7158 or visit our web site at http://www.funai-corp.com Please read before using this equipment. OWNER'S MANUAL DVD PLAYER with VIDEO CASSETTE RECORDER WF803 ReWritable Recordable OPEN/CLOSE DVD STOP SKIP/REV PLAY FWD/SKIP PLAY DISC IN OUTPUT DVD VCR TIMER/REC REC VCR REW F.FWD VIDEO POWER AUDIO CHANNEL STOP/EJECT PLAY INSTRUCCIONES EN ESPAÑOL INCLUIDAS.
If you need additional assistance for set-up or operating after reading owner's manual, please call TOLL FREE : 1-800-242-7158 or visit our web site at http://www.funai-corp.com Please read before using this equipment. OWNER'S MANUAL DVD PLAYER with VIDEO CASSETTE RECORDER WF803 ReWritable Recordable OPEN/CLOSE DVD STOP SKIP/REV PLAY FWD/SKIP PLAY DISC IN OUTPUT DVD VCR TIMER/REC REC VCR REW F.FWD VIDEO POWER AUDIO CHANNEL STOP/EJECT PLAY INSTRUCCIONES EN ESPAÑOL INCLUIDAS.

Owner's Manual
Page 4
...(NA220UD) (NA270UD) (approx. 3 feet (100 cm) long) (WPZ0102TM015) (WPZ0901TM002) (0VMN03747) SYMBOLS USED IN THIS MANUAL The following meanings VCR : Description refers to be found on file. QUICK : Description refers to the items to playback of your local recycling regulations. Use of this ...manual, with your purchase to playback of the DVD/VCR COMBINATION UNIT. A NOTE ABOUT RECYCLING This product's packaging materials are prohibited. Batteries should record the number and other vital ...
...(NA220UD) (NA270UD) (approx. 3 feet (100 cm) long) (WPZ0102TM015) (WPZ0901TM002) (0VMN03747) SYMBOLS USED IN THIS MANUAL The following meanings VCR : Description refers to be found on file. QUICK : Description refers to the items to playback of your local recycling regulations. Use of this ...manual, with your purchase to playback of the DVD/VCR COMBINATION UNIT. A NOTE ABOUT RECYCLING This product's packaging materials are prohibited. Batteries should record the number and other vital ...

Owner's Manual
Page 6
... Daily and Weekly Timer Recording) ¡OTR (One Touch Recording) PRECAUTIONS INSTALLATION LOCATION For safety and optimum performance of your DVD/VCR COMBINATION UNIT: • Install the DVD/VCR COMBINATION UNIT in a hor- Avoid places with direct station call (A cable converter box may occur inside is dry. -6-... lock ¡Automatic detection of discs This player automatically detects if the loaded disc is spilled on the sides of the DVD/VCR COMBINATION UNIT. Avoid locations subject to confirm the currently active functions (such as program playback), on the TV screen using the...
... Daily and Weekly Timer Recording) ¡OTR (One Touch Recording) PRECAUTIONS INSTALLATION LOCATION For safety and optimum performance of your DVD/VCR COMBINATION UNIT: • Install the DVD/VCR COMBINATION UNIT in a hor- Avoid places with direct station call (A cable converter box may occur inside is dry. -6-... lock ¡Automatic detection of discs This player automatically detects if the loaded disc is spilled on the sides of the DVD/VCR COMBINATION UNIT. Avoid locations subject to confirm the currently active functions (such as program playback), on the TV screen using the...

Owner's Manual
Page 7
... on the types or the writing method of the medium some DVD video discs, and these playback conditions take priority over user operations on this DVD/VCR COMBINATION UNIT. ¡DVD with region codes other than 1 or ALL. ¡DVD-ROM ¡DVD-RAM (Never play back, otherwise malfunction may result.) ¡... back, otherwise malfunction may result.) ¡Video CD (Never play discs recorded in a specific region format can not be played back on DVD/VCR COMBINATION UNIT with the same region code. EN 1L25 We recommend always to use . This player conforms to the NTSC color system. You ...
... on the types or the writing method of the medium some DVD video discs, and these playback conditions take priority over user operations on this DVD/VCR COMBINATION UNIT. ¡DVD with region codes other than 1 or ALL. ¡DVD-ROM ¡DVD-RAM (Never play back, otherwise malfunction may result.) ¡... back, otherwise malfunction may result.) ¡Video CD (Never play discs recorded in a specific region format can not be played back on DVD/VCR COMBINATION UNIT with the same region code. EN 1L25 We recommend always to use . This player conforms to the NTSC color system. You ...

Owner's Manual
Page 8
...panel. 4. VIDEO In Jack [page 21] Connect a video cable coming from the tray. 3. TIMER REC Light [page 20] This light appears when the DVD/VCR is in standby mode for a timer recording, but there is no tape in reverse during a One-Touch Recording. OPERATING CONTROLS AND FUNCTIONS FRONT PANEL 1 2... 34 5 67 8 OPEN/CLOSE DVD STOP SKIP/REV PLAY FWD/SKIP PLAY DISC IN OUTPUT DVD VCR TIMER/REC REC VCR REW F.FWD VIDEO POWER AUDIO CHANNEL STOP/EJECT PLAY 24 22 20 25 23 21 19 18 16 14...
...panel. 4. VIDEO In Jack [page 21] Connect a video cable coming from the tray. 3. TIMER REC Light [page 20] This light appears when the DVD/VCR is in standby mode for a timer recording, but there is no tape in reverse during a One-Touch Recording. OPERATING CONTROLS AND FUNCTIONS FRONT PANEL 1 2... 34 5 67 8 OPEN/CLOSE DVD STOP SKIP/REV PLAY FWD/SKIP PLAY DISC IN OUTPUT DVD VCR TIMER/REC REC VCR REW F.FWD VIDEO POWER AUDIO CHANNEL STOP/EJECT PLAY 24 22 20 25 23 21 19 18 16 14...

Owner's Manual
Page 10
...during still mode. 52. Press to reselect the corresponding mode by pressing DVD or VCR on the VCR. 55. VCR/TV Button [page 19] Use to select VCR mode for the remote control. REAR VIEW 56 57 58 59 60 DVD/VCR AUDIO OUT VCR ANT-IN L R ANT-OUT VIDEO OUT AUDIO IN VIDEO IN...Connect an optional coaxial digital audio cable here and to the DVD/VCR COMBINATION UNIT. G VCR mode [page 19] While recording, press to the component Video In jacks of a television or other DVD's operation buttons. Press this button to advance the DVD picture step by step (or one frame at a time...
...during still mode. 52. Press to reselect the corresponding mode by pressing DVD or VCR on the VCR. 55. VCR/TV Button [page 19] Use to select VCR mode for the remote control. REAR VIEW 56 57 58 59 60 DVD/VCR AUDIO OUT VCR ANT-IN L R ANT-OUT VIDEO OUT AUDIO IN VIDEO IN...Connect an optional coaxial digital audio cable here and to the DVD/VCR COMBINATION UNIT. G VCR mode [page 19] While recording, press to the component Video In jacks of a television or other DVD's operation buttons. Press this button to advance the DVD picture step by step (or one frame at a time...

Owner's Manual
Page 11
... Jack Connect a cable coming from the video out jack of the jacks on your TV. Caution: Do not touch the inner pins of a camcorder, another VCR, or an audio-visual source (laser disc player, video disc player, etc.) here. 65. LOADING THE BATTERIES 1. Insert two AA batteries, with each one oriented... the rear panel. Open the battery compartment cover. 2. S-VIDEO OUT Jack Connect an optional S-Video cable here and to the TV's Video In jack. 66. DVD/VCR VIDEO OUT Jack Connect the yellow video cable (supplied) here and to the SVideo In jack of a television or other audio equipment...
... Jack Connect a cable coming from the video out jack of the jacks on your TV. Caution: Do not touch the inner pins of a camcorder, another VCR, or an audio-visual source (laser disc player, video disc player, etc.) here. 65. LOADING THE BATTERIES 1. Insert two AA batteries, with each one oriented... the rear panel. Open the battery compartment cover. 2. S-VIDEO OUT Jack Connect an optional S-Video cable here and to the TV's Video In jack. 66. DVD/VCR VIDEO OUT Jack Connect the yellow video cable (supplied) here and to the SVideo In jack of a television or other audio equipment...

Owner's Manual
Page 12
... AUDIO CHANNEL STOP/EJECT PLAY OUTPUT DVD button DVD OUTPUT Light VCR button DVD VCR TIM VCR OUTPUT Light OUTPUT button POWER SPEED AUDIO 1 2 4 5 7 8 0 DISPLAY DVD 3 6 9 +10 VCR SKIP/CH. EN 1L25 VCR MODE Press VCR on the remote control. (Verify that the VCR OUTPUT Light is lit.) DVD MODE Press DVD on the remote control too. VCR/DVD SWITCHING Because this product is lit...
... AUDIO CHANNEL STOP/EJECT PLAY OUTPUT DVD button DVD OUTPUT Light VCR button DVD VCR TIM VCR OUTPUT Light OUTPUT button POWER SPEED AUDIO 1 2 4 5 7 8 0 DISPLAY DVD 3 6 9 +10 VCR SKIP/CH. EN 1L25 VCR MODE Press VCR on the remote control. (Verify that the VCR OUTPUT Light is lit.) DVD MODE Press DVD on the remote control too. VCR/DVD SWITCHING Because this product is lit...

Owner's Manual
Page 13
... antenna] combination antenna] OR [Cable box or satellite box] OR From Cable or Satellite Company IN OUT [Back of the DVD/VCR] [Back of the UHF/VHF combination TV] DVD/VCR AUDIO OUT VCR ANT-IN L RF cable (supplied) UHF/VHF R ANT-OUT VIDEO OUT AUDIO IN VIDEO IN RF OUTPUT CHANNEL for... AC outlet. 2. Plug the AC power cords of the jacks and plugs match up when using VIDEO/AUDIO cables. ¡Be sure to keep the DVD/VCR COMBINATION UNIT connection cables separate from the TV antenna cable when you adjust tracking using CHANNEL ( ) ). Select channel 3 on your TV. 3. IN of ...
... antenna] combination antenna] OR [Cable box or satellite box] OR From Cable or Satellite Company IN OUT [Back of the DVD/VCR] [Back of the UHF/VHF combination TV] DVD/VCR AUDIO OUT VCR ANT-IN L RF cable (supplied) UHF/VHF R ANT-OUT VIDEO OUT AUDIO IN VIDEO IN RF OUTPUT CHANNEL for... AC outlet. 2. Plug the AC power cords of the jacks and plugs match up when using VIDEO/AUDIO cables. ¡Be sure to keep the DVD/VCR COMBINATION UNIT connection cables separate from the TV antenna cable when you adjust tracking using CHANNEL ( ) ). Select channel 3 on your TV. 3. IN of ...

Owner's Manual
Page 14
...generate noise distortion, and may also damage the speakers. (See page 29 to either connect the RF cable between the ANT-OUT jack of the DVD/VCR COMBINATION UNIT and the TV's Antenna In jack, or connect the yellow video cable as MD Deck or DAT Deck. (Stereo Receiver) Amplifier ...OUT Cb L COAXIAL Cr R To COAXIAL DIGITAL AUDIO INPUT jack To COAXIAL DIGITAL AUDIO OUT jack [Fig. 4] Notes ¡The audio source on the DVD/VCR COMBINATION UNIT, you still need to an amplifier equipped with digital input jacks, MD deck, DAT deck, etc. CONNECTING TO A TV THAT HAS AN S-VIDEO...
...generate noise distortion, and may also damage the speakers. (See page 29 to either connect the RF cable between the ANT-OUT jack of the DVD/VCR COMBINATION UNIT and the TV's Antenna In jack, or connect the yellow video cable as MD Deck or DAT Deck. (Stereo Receiver) Amplifier ...OUT Cb L COAXIAL Cr R To COAXIAL DIGITAL AUDIO INPUT jack To COAXIAL DIGITAL AUDIO OUT jack [Fig. 4] Notes ¡The audio source on the DVD/VCR COMBINATION UNIT, you still need to an amplifier equipped with digital input jacks, MD deck, DAT deck, etc. CONNECTING TO A TV THAT HAS AN S-VIDEO...

Owner's Manual
Page 15
...and may also damage the speakers. Playing a DVD using this DVD/VCR COMBINATION UNIT to play a DVD disc in 5.1 channel Dolby Digital surround, the DVD/VCR COMBINATION UNIT outputs a Dolby Digital data stream from Dolby Laboratories. By hooking the DVD/VCR COMBINATION UNIT up to a Dolby Digital receiver,...more convincing, realistic ambience with Dolby Digital Decoder Surround speaker (left ) Center speaker DVD/VCR AUDIO OUT VCR ANT-IN L R ANT-OUT VIDEO OUT AUDIO IN VIDEO IN Front speaker (right) DVD S-VIDEO COMPONENT AUDIO OUT VIDEO OUT OUT Y DIGITAL AUDIO OUT Cb L COAXIAL Cr...
...and may also damage the speakers. Playing a DVD using this DVD/VCR COMBINATION UNIT to play a DVD disc in 5.1 channel Dolby Digital surround, the DVD/VCR COMBINATION UNIT outputs a Dolby Digital data stream from Dolby Laboratories. By hooking the DVD/VCR COMBINATION UNIT up to a Dolby Digital receiver,...more convincing, realistic ambience with Dolby Digital Decoder Surround speaker (left ) Center speaker DVD/VCR AUDIO OUT VCR ANT-IN L R ANT-OUT VIDEO OUT AUDIO IN VIDEO IN Front speaker (right) DVD S-VIDEO COMPONENT AUDIO OUT VIDEO OUT OUT Y DIGITAL AUDIO OUT Cb L COAXIAL Cr...

Owner's Manual
Page 16
...memorizes all active channels in your TV. EN 1L25 Repeat only if there is a power failure or if the VCR is NOT needed when you can cancel it by pressing POWER. Then select the same channel (CH4) on your... 1 You need to connect the antenna or cable to press it once. Then, connect the DVD /VCR power plug to a standard AC outlet. 2 Turn on your area. TO SELECT A DESIRED CHANNEL... selected at the cable box or satellite box. ¡If noise appears, change the RF output channel of the VCR to TV mode. ¡If "AUTO SET UP" appears on the TV screen again, check the cable connections....
...memorizes all active channels in your TV. EN 1L25 Repeat only if there is a power failure or if the VCR is NOT needed when you can cancel it by pressing POWER. Then select the same channel (CH4) on your... 1 You need to connect the antenna or cable to press it once. Then, connect the DVD /VCR power plug to a standard AC outlet. 2 Turn on your area. TO SELECT A DESIRED CHANNEL... selected at the cable box or satellite box. ¡If noise appears, change the RF output channel of the VCR to TV mode. ¡If "AUTO SET UP" appears on the TV screen again, check the cable connections....
Owner's Manual
Page 19
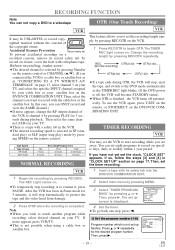
...TO A TV WITHOUT A/V TERMINALS" on page 13, select channel 3 on a recorded cassette, remove its safety tab into the DVD/VCR COMBINATION UNIT. 2 Select main menu by pressing REC/OTR on the DVD/VCR COMBINATION UNIT. dard play) or SLP (super long play) mode by pressing K or L. REC OTR(0:30) (Normal recording)... days, daily or weekly within 1 year period. Tape Speed Type of the copyright owner. The REC Light comes on . After the VCR has been in "CLOCK SET UP" section on the DVD/VCR COMBINATION UNIT. Note ¡When you have not yet set up flashes. If noise appears press...
...TO A TV WITHOUT A/V TERMINALS" on page 13, select channel 3 on a recorded cassette, remove its safety tab into the DVD/VCR COMBINATION UNIT. 2 Select main menu by pressing REC/OTR on the DVD/VCR COMBINATION UNIT. dard play) or SLP (super long play) mode by pressing K or L. REC OTR(0:30) (Normal recording)... days, daily or weekly within 1 year period. Tape Speed Type of the copyright owner. The REC Light comes on . After the VCR has been in "CLOCK SET UP" section on the DVD/VCR COMBINATION UNIT. Note ¡When you have not yet set up flashes. If noise appears press...

Owner's Manual
Page 20
... want to record with the other features as described in this manual. TO STOP AN AUTOMATIC TIMER PROGRAM ALREADY STARTED Press STOP/EJECT on the DVD/VCR COMBI- Then, press B. 6 Press T-SET to set another program, repeat step [4]. PROGRAM NUMBER 4 ONCE DAILY WEEKLY 3) Set the date First... AM or PM. REC SPEED - - then, press K or L for the minute. Then, press B. 5) Set the end time Follow the instructions of the DVD/VCR. REC SPEED - - 6) Set the channel number Press K or L repeatedly for the recording, press T-SET so that TIMER REC light disappears. Then, ONE TIME...
... want to record with the other features as described in this manual. TO STOP AN AUTOMATIC TIMER PROGRAM ALREADY STARTED Press STOP/EJECT on the DVD/VCR COMBI- Then, press B. 6 Press T-SET to set another program, repeat step [4]. PROGRAM NUMBER 4 ONCE DAILY WEEKLY 3) Set the date First... AM or PM. REC SPEED - - then, press K or L for the minute. Then, press B. 5) Set the end time Follow the instructions of the DVD/VCR. REC SPEED - - 6) Set the channel number Press K or L repeatedly for the recording, press T-SET so that TIMER REC light disappears. Then, ONE TIME...

Owner's Manual
Page 21
.../VIDEO input jacks on the front panel of the DVD/VCR instead of using the jacks on the back. [Recording VCR] (this unit), the playing VCR (another source) 1 Insert a pre-recorded tape into the recording VCR. 3 Press SPEED on the recording VCR to a videotape. You can use a video disc... player, satellite receiver, or other audio/video component with a safety tab into the playing VCR. 2 Insert a tape with A/V outputs in place of the DVD/VCR, select "L1" position by pressing [0], [0], [1] on the remote control or the CHANNEL buttons (o/p). ¡When you use...
.../VIDEO input jacks on the front panel of the DVD/VCR instead of using the jacks on the back. [Recording VCR] (this unit), the playing VCR (another source) 1 Insert a pre-recorded tape into the recording VCR. 3 Press SPEED on the recording VCR to a videotape. You can use a video disc... player, satellite receiver, or other audio/video component with a safety tab into the playing VCR. 2 Insert a tape with A/V outputs in place of the DVD/VCR, select "L1" position by pressing [0], [0], [1] on the remote control or the CHANNEL buttons (o/p). ¡When you use...
Owner's Manual
Page 24
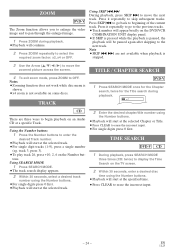
... tracks. ¡Track number will appear briefly on the DVD/VCR COMBINATION UNIT display panel. ¡If SKIP is pressed while the playback is paused, the playback will be paused again after skipping to the next track. TRACK TITLE / CHAPTER SEARCH DVD-V 1 Press SEARCH MODE once for the Chapter search, ... Using SKIP H G During playback, press SKIP G to move the zoomed picture across the screen. 4 To exit zoom mode, press ZOOM to OFF. ZOOM DVD-V The Zoom function allows you to enlarge the video image and to pan through the enlarged image. 1 Press ZOOM during playback. /2 CD There are not...
... tracks. ¡Track number will appear briefly on the DVD/VCR COMBINATION UNIT display panel. ¡If SKIP is pressed while the playback is paused, the playback will be paused again after skipping to the next track. TRACK TITLE / CHAPTER SEARCH DVD-V 1 Press SEARCH MODE once for the Chapter search, ... Using SKIP H G During playback, press SKIP G to move the zoomed picture across the screen. 4 To exit zoom mode, press ZOOM to OFF. ZOOM DVD-V The Zoom function allows you to enlarge the video image and to pan through the enlarged image. 1 Press ZOOM during playback. /2 CD There are not...

Owner's Manual
Page 26
... from the beginning of tracks is selected, press B or ENTER to start playing. Note ¡If you like to repeat the current track in the DVD/VCR, the MP3 menu will appear on to be created. Press Arrow (K/L) to the next hierarchy. ¡Press s when you 've just chosen the subsequent tracks...
... from the beginning of tracks is selected, press B or ENTER to start playing. Note ¡If you like to repeat the current track in the DVD/VCR, the MP3 menu will appear on to be created. Press Arrow (K/L) to the next hierarchy. ¡Press s when you 've just chosen the subsequent tracks...
Owner's Manual
Page 27
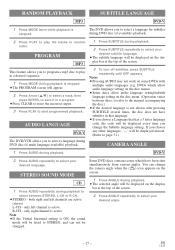
... so refer to select your desired language. If you choose any other languages, '---' will be displayed instead. (Refer to page 31.) The DVD/VCR allows you choose a Language that has a 3 letter language code, the code will be fixed to STEREO, and can change the Subtitle language setting... setting on the disc menu. (Operation varies between STEREO, L-CH or R-CH. ¡STEREO - STEREO SOUND MODE CD 1 Press AUDIO repeatedly during DVD disc (if multi language available) playback. MP3 play the tracks in that language. ¡If you to select a language during playback to select your...
... so refer to select your desired language. If you choose any other languages, '---' will be displayed instead. (Refer to page 31.) The DVD/VCR allows you choose a Language that has a 3 letter language code, the code will be fixed to STEREO, and can change the Subtitle language setting... setting on the disc menu. (Operation varies between STEREO, L-CH or R-CH. ¡STEREO - STEREO SOUND MODE CD 1 Press AUDIO repeatedly during DVD disc (if multi language available) playback. MP3 play the tracks in that language. ¡If you to select a language during playback to select your...

Owner's Manual
Page 30
... ENTER. ¡Select 4:3 LETTER BOX for a full height picture with both sides trimmed. ¡Select 16:9 WIDE if a wide-screen TV is connected to the DVD/VCR. ¡The default setting is heard select lower level, or OFF. 4 Press Arrow (K/L) to select the below items, then press ENTER. EN 1L25 Notes ¡... existing stereo system. 1 Press MODE twice (CD/MP3: once) during playback. 1 Press SETUP in STOP mode. ANGLE ICON: ¡Press ENTER repeatedly to turn the DVD/VCR to off ON or OFF. ¡The default setting is ON and it will not be effective if the sound mode is set the mode...
... ENTER. ¡Select 4:3 LETTER BOX for a full height picture with both sides trimmed. ¡Select 16:9 WIDE if a wide-screen TV is connected to the DVD/VCR. ¡The default setting is heard select lower level, or OFF. 4 Press Arrow (K/L) to select the below items, then press ENTER. EN 1L25 Notes ¡... existing stereo system. 1 Press MODE twice (CD/MP3: once) during playback. 1 Press SETUP in STOP mode. ANGLE ICON: ¡Press ENTER repeatedly to turn the DVD/VCR to off ON or OFF. ¡The default setting is ON and it will not be effective if the sound mode is set the mode...

Owner's Manual
Page 32
... • Check the batteries in and out • You cannot copy a copyrighted video tape. C • Make sure the VCR clock is lit. Press VCR on the remote control so that plays on the DVD/VCR COMBINATION UNIT. Then select the same channel on the audio component. changed • The... functions are some cases where pictures may stop for details on . "Prohibited icon" appears on the remote control. TROUBLESHOOTING GUIDE If the DVD/VCR COMBINATION UNIT does not perform properly when operated as instructed in this is not a malfunction. R Cannot go into Record mode. •...
... • Check the batteries in and out • You cannot copy a copyrighted video tape. C • Make sure the VCR clock is lit. Press VCR on the remote control so that plays on the DVD/VCR COMBINATION UNIT. Then select the same channel on the audio component. changed • The... functions are some cases where pictures may stop for details on . "Prohibited icon" appears on the remote control. TROUBLESHOOTING GUIDE If the DVD/VCR COMBINATION UNIT does not perform properly when operated as instructed in this is not a malfunction. R Cannot go into Record mode. •...


