

Owner's Manual
Page 1
32 inch Digital / Analog LCD TV Owner's Manual WF32L6 POWER INPUT SLEEP SELECT 12 45 78 -0 SETUP 3 6 AUDIO 9 STILL SCREEN MODE ENTER BACK INFO CH RETURN VOL. MUTE CH HIGH-DEFINITION TELEVISION TO RECEIVE DIGITAL/ANALOG SIGNAL, YOU MUST CONNECT ANTENNA. IF YOU NEED ADDITIONAL ASSISTANCE WITH SET-UP OR OPERATING AFTER READING OWNER'S MANUAL, PLEASE CALL TOLL FREE 1-800-605-8453, OR VISIT OUR WEB SITE AT http://www.Symphonic.us
32 inch Digital / Analog LCD TV Owner's Manual WF32L6 POWER INPUT SLEEP SELECT 12 45 78 -0 SETUP 3 6 AUDIO 9 STILL SCREEN MODE ENTER BACK INFO CH RETURN VOL. MUTE CH HIGH-DEFINITION TELEVISION TO RECEIVE DIGITAL/ANALOG SIGNAL, YOU MUST CONNECT ANTENNA. IF YOU NEED ADDITIONAL ASSISTANCE WITH SET-UP OR OPERATING AFTER READING OWNER'S MANUAL, PLEASE CALL TOLL FREE 1-800-605-8453, OR VISIT OUR WEB SITE AT http://www.Symphonic.us
Owner's Manual
Page 4
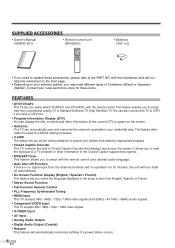
... • Program Information Display (DTV) You can automatically scan and memorize the channels receivable in Closed Caption Decoder that displays text across the screen. Contact your antenna system, you may need to replace these items. FEATURES • DTV/TV/CATV This TV lets you select the language... information of the current DTV program on your local electronics store for 15 minutes, the unit will turn itself off automatically. • On-Screen Function Display (English / Spanish / French) This feature lets you easily switch TV(NTSC) and DTV(ATSC) with the remote control your ...
... • Program Information Display (DTV) You can automatically scan and memorize the channels receivable in Closed Caption Decoder that displays text across the screen. Contact your antenna system, you may need to replace these items. FEATURES • DTV/TV/CATV This TV lets you select the language... information of the current DTV program on your local electronics store for 15 minutes, the unit will turn itself off automatically. • On-Screen Function Display (English / Spanish / French) This feature lets you easily switch TV(NTSC) and DTV(ATSC) with the remote control your ...
Owner's Manual
Page 5
... 18 CHANNEL SELECTION 18 VOLUME ADJUSTMENT 18 STILL MODE 19 SWITCHING AUDIO 19 SWITCHING EXTERNAL INPUT 20 CHANGING THE SCREEN DISPLAY MODE 21 SCREEN INFORMATION 22 SLEEP TIMER 23 OPTIONAL SETTINGS 23 SETUP SCREEN 23 PICTURE ADJUSTMENT 24 CLOSED CAPTION 25 DTV CLOSED CAPTION 26 CLOSED CAPTION STYLE 26 V-CHIP 28 HDMI AUDIO...
... 18 CHANNEL SELECTION 18 VOLUME ADJUSTMENT 18 STILL MODE 19 SWITCHING AUDIO 19 SWITCHING EXTERNAL INPUT 20 CHANGING THE SCREEN DISPLAY MODE 21 SCREEN INFORMATION 22 SLEEP TIMER 23 OPTIONAL SETTINGS 23 SETUP SCREEN 23 PICTURE ADJUSTMENT 24 CLOSED CAPTION 25 DTV CLOSED CAPTION 26 CLOSED CAPTION STYLE 26 V-CHIP 28 HDMI AUDIO...
Owner's Manual
Page 6
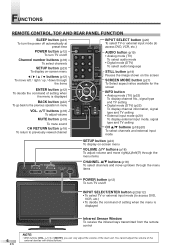
... automatically at preset time POWER button (p12) To turn TV on/off Channel number buttons (p18) To select channels SETUP button (p23) To display on-screen menu s / B / K / L buttons (p12) To move left (Y) through the menu items CHANNEL K/L buttons (p18) To select channels and move up / down through the... menu items POWER button (p12) To turn TV on -screen menu VOLUME X/Y buttons (p18) To adjust volume and move right(X)/left / right / up /down through the items ENTER button (p12) To decide the ...
... automatically at preset time POWER button (p12) To turn TV on/off Channel number buttons (p18) To select channels SETUP button (p23) To display on-screen menu s / B / K / L buttons (p12) To move left (Y) through the menu items CHANNEL K/L buttons (p18) To select channels and move up / down through the... menu items POWER button (p12) To turn TV on -screen menu VOLUME X/Y buttons (p18) To adjust volume and move right(X)/left / right / up /down through the items ENTER button (p12) To decide the ...

Owner's Manual
Page 12
... scanned and memorized. Initial Setup Now the system is connected to page 13.) • If you can select the menu language displayed on the screen among English, Spanish and French. • AUTOSCAN (TV/DTV) (Select "Air" when using [K/L], press [ENTER]. When you turn on page... 17 to "LANGUAGE SELECTION" on the power, the following screen is used will start automatically. Contacter numero d'urgence dans manuel ou arrière appareil. 12 EN • Support hotline is not completed, Helpful...
... scanned and memorized. Initial Setup Now the system is connected to page 13.) • If you can select the menu language displayed on the screen among English, Spanish and French. • AUTOSCAN (TV/DTV) (Select "Air" when using [K/L], press [ENTER]. When you turn on page... 17 to "LANGUAGE SELECTION" on the power, the following screen is used will start automatically. Contacter numero d'urgence dans manuel ou arrière appareil. 12 EN • Support hotline is not completed, Helpful...
Owner's Manual
Page 13
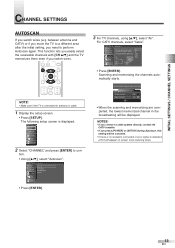
...For TV channels, using [K/L], select "Air". Scanning and memorizing the channels automatically starts. The following setup screen is displayed. 2 Select "CHANNEL" and press [ENTER] to antenna or cable. 1 Display the setup screen. • Press [SETUP]. between antenna and CATV) or if you move the TV to complete. ...SETUP] during Autoscan, this setting will be displayed. MUTE CH NOTE: • Make sure if the TV is detected, a Hint will appear on screen once scanning stops. • Press [ENTER]. 13 EN Air Back Air Cable Cable 1hour Cable Or ANT IN • Press [ENTER]. Now the...
...For TV channels, using [K/L], select "Air". Scanning and memorizing the channels automatically starts. The following setup screen is displayed. 2 Select "CHANNEL" and press [ENTER] to antenna or cable. 1 Display the setup screen. • Press [SETUP]. between antenna and CATV) or if you move the TV to complete. ...SETUP] during Autoscan, this setting will be displayed. MUTE CH NOTE: • Make sure if the TV is detected, a Hint will appear on screen once scanning stops. • Press [ENTER]. 13 EN Air Back Air Cable Cable 1hour Cable Or ANT IN • Press [ENTER]. Now the...

Owner's Manual
Page 14
... select the channel set as skip. • If you skip the unnecessary channels from the Channel registration list. -0 SETUP STILL SCREEN MODE ENTER BACK INFO CH RETURN VOL. The following setup screen is NTSC. 4 To exit the setup, press [SETUP]. • Press [ENTER]. 14 EN CHANNEL LIST The Channel List function lets... is ATSC, otherwise the channel is displayed. 2 Select "CHANNEL" and press [ENTER] to con- firm. • Using [K/L], select "Channel List". MUTE CH 1 Display the setup screen. • Press [SETUP].
... select the channel set as skip. • If you skip the unnecessary channels from the Channel registration list. -0 SETUP STILL SCREEN MODE ENTER BACK INFO CH RETURN VOL. The following setup screen is NTSC. 4 To exit the setup, press [SETUP]. • Press [ENTER]. 14 EN CHANNEL LIST The Channel List function lets... is ATSC, otherwise the channel is displayed. 2 Select "CHANNEL" and press [ENTER] to con- firm. • Using [K/L], select "Channel List". MUTE CH 1 Display the setup screen. • Press [SETUP].
Owner's Manual
Page 15
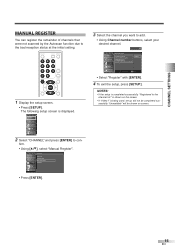
...function. Register Ch Change BACK Back • Select "Register" with [ENTER]. 4 To exit the setup, press [SETUP]. is shown on the screen. • If "Video1" is being used, set up will be completed successfully. For Digital channels, you want to add. • Using ... Manual Register For Analog channels, select a channel to con- "Unavailable" will not be shown on screen. 2 Select "CHANNEL" and press [ENTER] to register using number keys. The following setup screen is completed successfully, "Registered to the bad reception status at the initial setting. firm. • ...
...function. Register Ch Change BACK Back • Select "Register" with [ENTER]. 4 To exit the setup, press [SETUP]. is shown on the screen. • If "Video1" is being used, set up will be completed successfully. For Digital channels, you want to add. • Using ... Manual Register For Analog channels, select a channel to con- "Unavailable" will not be shown on screen. 2 Select "CHANNEL" and press [ENTER] to register using number keys. The following setup screen is completed successfully, "Registered to the bad reception status at the initial setting. firm. • ...
Owner's Manual
Page 16
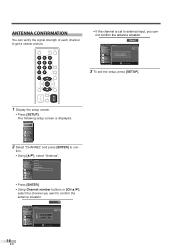
The following setup screen is displayed. • If the channel is available for antenna signal only. firm. • Using [K/L], select "Antenna". ANTENNA CONFIRMATION You can verify the signal strength ... Antenna • Press [ENTER]. • Using Channel number buttons or [CH K/L], select the channel you cannot confirm the antenna situation. MUTE CH 1 Display the setup screen. • Press [SETUP]. CH Ch Change 3 To exit the setup, press [SETUP]. 2 Select "CHANNEL" and press [ENTER] to get a clearer picture. POWER INPUT SLEEP SELECT...
The following setup screen is displayed. • If the channel is available for antenna signal only. firm. • Using [K/L], select "Antenna". ANTENNA CONFIRMATION You can verify the signal strength ... Antenna • Press [ENTER]. • Using Channel number buttons or [CH K/L], select the channel you cannot confirm the antenna situation. MUTE CH 1 Display the setup screen. • Press [SETUP]. CH Ch Change 3 To exit the setup, press [SETUP]. 2 Select "CHANNEL" and press [ENTER] to get a clearer picture. POWER INPUT SLEEP SELECT...
Owner's Manual
Page 17
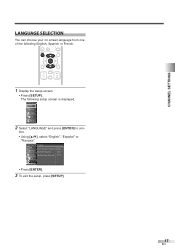
...; Press [ENTER]. 3 To exit the setup, press [SETUP]. 17 EN CHANNEL SETTINGS LANGUAGE SELECTION You can choose your on screen language from one of the following setup screen is displayed. 2 Select "LANGUAGE" and press [ENTER] to con- Español Sélectionner langue écran config.... The following English, Spanish or French. -0 SETUP STILL SCREEN MODE ENTER BACK INFO CH RETURN VOL. Language Select the language for ...
...; Press [ENTER]. 3 To exit the setup, press [SETUP]. 17 EN CHANNEL SETTINGS LANGUAGE SELECTION You can choose your on screen language from one of the following setup screen is displayed. 2 Select "LANGUAGE" and press [ENTER] to con- Español Sélectionner langue écran config.... The following English, Spanish or French. -0 SETUP STILL SCREEN MODE ENTER BACK INFO CH RETURN VOL. Language Select the language for ...
Owner's Manual
Page 18
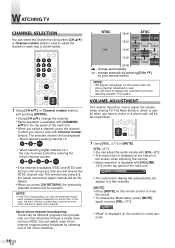
... press [CH RETURN], the previously selected channel will be displayed. - X/Y]. POWER INPUT SLEEP SELECT 12 45 78 -0 SETUP 3 6 AUDIO 9 STILL SCREEN MODE ENTER BACK INFO CH RETURN VOL. X/Y] or [MUTE]. [VOL. Volume 20 • The volume bar display will automatically disappear in each minorchannel... You can select the channel by pressing [CH / ] on your remote control NOTE: • "No Signal" will appear on the screen after the minor-channel broadcast is available with Channel number buttons. VOLUME ADJUSTMENT This section describes how to mute the sound. • To ...
... press [CH RETURN], the previously selected channel will be displayed. - X/Y]. POWER INPUT SLEEP SELECT 12 45 78 -0 SETUP 3 6 AUDIO 9 STILL SCREEN MODE ENTER BACK INFO CH RETURN VOL. X/Y] or [MUTE]. [VOL. Volume 20 • The volume bar display will automatically disappear in each minorchannel... You can select the channel by pressing [CH / ] on your remote control NOTE: • "No Signal" will appear on the screen after the minor-channel broadcast is available with Channel number buttons. VOLUME ADJUSTMENT This section describes how to mute the sound. • To ...
Owner's Manual
Page 19
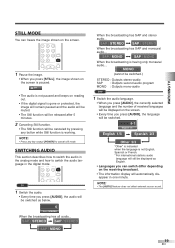
...be displayed on the receiving broadcast. • The information display will automatically disappear in the digital mode. 78 -0 SETUP AUDIO 9 STILL SCREEN MODE TV 1 Switch the audio. • Every time you press [AUDIO], the language will be canceled by pressing any button while Still...minutes. 2 Canceling Still function. • The Still function will be switched as English. • Languages you can switch differ depending on the screen. • Every time you press [AUDIO], the audio will be switched. 6-1 English 1/3 English 1/3 Spanish 2/3 Other 3/3 "Other" is indicated when ...
...be displayed on the receiving broadcast. • The information display will automatically disappear in the digital mode. 78 -0 SETUP AUDIO 9 STILL SCREEN MODE TV 1 Switch the audio. • Every time you press [AUDIO], the language will be canceled by pressing any button while Still...minutes. 2 Canceling Still function. • The Still function will be switched as English. • Languages you can switch differ depending on the screen. • Every time you press [AUDIO], the audio will be switched. 6-1 English 1/3 English 1/3 Spanish 2/3 Other 3/3 "Other" is indicated when ...
Owner's Manual
Page 20
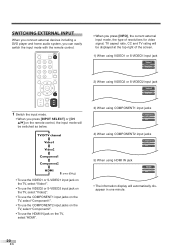
... input mode, the type of resolutions for video signal, TV aspect ratio, CC and TV rating will be displayed at the top-right of the screen. 1) When using VIDEO1 or S-VIDEO1 input jack Video1 480i SD TV-PG DLSV CC 2) When using VIDEO2 or S-VIDEO2 input jack Video2 480i SD TV... jack HDMI 1080i HD 16:9 NONE • The information display will be switched as below. POWER INPUT SLEEP SELECT 12 45 78 -0 SETUP 3 6 AUDIO 9 STILL SCREEN MODE ENTER BACK INFO CH RETURN VOL.
... input mode, the type of resolutions for video signal, TV aspect ratio, CC and TV rating will be displayed at the top-right of the screen. 1) When using VIDEO1 or S-VIDEO1 input jack Video1 480i SD TV-PG DLSV CC 2) When using VIDEO2 or S-VIDEO2 input jack Video2 480i SD TV... jack HDMI 1080i HD 16:9 NONE • The information display will be switched as below. POWER INPUT SLEEP SELECT 12 45 78 -0 SETUP 3 6 AUDIO 9 STILL SCREEN MODE ENTER BACK INFO CH RETURN VOL.
Owner's Manual
Page 21
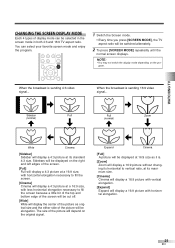
...elongation. [Expand] Expand will be elongation. Sidebars will display a 16:9 picture without changing its horizontal to fill the screen because a little bit of the top and bottom edge of the screen will be cut off. [Wide] Wide will display the center of the picture as it is. [Zoom] Zoom ...will be switched alternately. 2 To press [SCREEN MODE] repeatedly until the normal screen displays. The size of the picture will be displayed on the program. You can be displayed at its maximum size. [Cinema] Cinema will...
...elongation. [Expand] Expand will be elongation. Sidebars will display a 16:9 picture without changing its horizontal to fill the screen because a little bit of the top and bottom edge of the screen will be cut off. [Wide] Wide will display the center of the picture as it is. [Zoom] Zoom ...will be switched alternately. 2 To press [SCREEN MODE] repeatedly until the normal screen displays. The size of the picture will be displayed on the program. You can be displayed at its maximum size. [Cinema] Cinema will...
Owner's Manual
Page 22
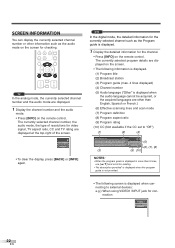
... (1) (2) (4) Buffy Vampire Slayer HDTV A quarter-century ago,which may now qualify as the audio mode on the screen for the channel. • Press [INFO] on the remote control. SCREEN INFORMATION You can display the currently selected channel number or other than English, Spanish or French.) (6) Effective scanning lines...external devices: e.g.) When using VIDEO1 INPUT jack for video signal, TV aspect ratio, CC and TV rating are displayed at the top-right of the screen. 6 SAP / STEREO 448800ii SSDD 44::33 TV-PG DLSV CCCC • To clear the display, press [BACK] or [INFO] again. ...
... (1) (2) (4) Buffy Vampire Slayer HDTV A quarter-century ago,which may now qualify as the audio mode on the screen for the channel. • Press [INFO] on the remote control. SCREEN INFORMATION You can display the currently selected channel number or other than English, Spanish or French.) (6) Effective scanning lines...external devices: e.g.) When using VIDEO1 INPUT jack for video signal, TV aspect ratio, CC and TV rating are displayed at the top-right of the screen. 6 SAP / STEREO 448800ii SSDD 44::33 TV-PG DLSV CCCC • To clear the display, press [BACK] or [INFO] again. ...
Owner's Manual
Page 23
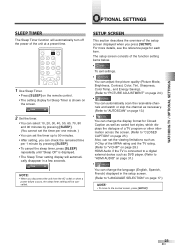
...the unit from the AC outlet or when a power failure occurs, the sleep timer setting will automatically disappear in the setup screen. (Refer to "LANGUAGE SELECTION" on the screen. For more details, see the reference page for Closed Caption as well as varied font styles, which displays the dialogue of...player. (Refer to "HDMI AUDIO" on page 31.) • You can change the display format for each item. SETUP SCREEN This section describes the overview of the setup screen displayed when you can check the remained time per 1 minute by pressing [SLEEP]. (You cannot set the timer per one minute...
...the unit from the AC outlet or when a power failure occurs, the sleep timer setting will automatically disappear in the setup screen. (Refer to "LANGUAGE SELECTION" on the screen. For more details, see the reference page for Closed Caption as well as varied font styles, which displays the dialogue of...player. (Refer to "HDMI AUDIO" on page 31.) • You can change the display format for each item. SETUP SCREEN This section describes the overview of the setup screen displayed when you can check the remained time per 1 minute by pressing [SLEEP]. (You cannot set the timer per one minute...
Owner's Manual
Page 24
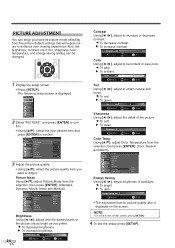
... Color Temp. s: To soft B: To clear Sharpness 0 Adjust Move ENTER Enter Color Temp. NOTE: • To move to the normal screen, press [SETUP]. 4 To exit the setup, press [SETUP]. Picture Picture Mode Brightness Contrast Color Tint Sharpness Color Temp. s: To red ...ENTER Enter Color Using [s / B], adjust to be changed. PICTURE ADJUSTMENT You can be brilliant or pale color. SETUP SCREEN MODE ENTER BACK INFO 1 Display the setup screen. • Press [SETUP]. Using [K/L], adjust Color Temperature from the selection, then press [ENTER]. (Standard, Dynamic, Movie...
... Color Temp. s: To soft B: To clear Sharpness 0 Adjust Move ENTER Enter Color Temp. NOTE: • To move to the normal screen, press [SETUP]. 4 To exit the setup, press [SETUP]. Picture Picture Mode Brightness Contrast Color Tint Sharpness Color Temp. s: To red ...ENTER Enter Color Using [s / B], adjust to be changed. PICTURE ADJUSTMENT You can be brilliant or pale color. SETUP SCREEN MODE ENTER BACK INFO 1 Display the setup screen. • Press [SETUP]. Using [K/L], adjust Color Temperature from the selection, then press [ENTER]. (Standard, Dynamic, Movie...
Owner's Manual
Page 25
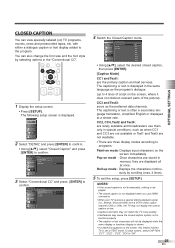
...The caption or text characters will not be displayed while the menu display or functions display is shown. • If a black box appears on the screen, where it does not obstruct relevant parts of the picture). Detail Closed Caption V-chip HDMI Audio Auto 3 Select "Conventional CC" and press [ENTER]... to 4 lines of script on the screen, this means that the TV is displayed in the same language as the preferred data channels. CC3 and Text3: serve as the program's dialogue (...
...The caption or text characters will not be displayed while the menu display or functions display is shown. • If a black box appears on the screen, where it does not obstruct relevant parts of the picture). Detail Closed Caption V-chip HDMI Audio Auto 3 Select "Conventional CC" and press [ENTER]... to 4 lines of script on the screen, this means that the TV is displayed in the same language as the preferred data channels. CC3 and Text3: serve as the program's dialogue (...

Owner's Manual
Page 26
...style. • Using [K/L], select "User Setting". • Press [ENTER] and set "User Setting" to confirm. CLOSED CAPTION STYLE 1 Display the setup screen. • Press [SETUP]. This is displayed. Detail Closed Caption V-chip HDMI Audio Auto 3 Select "CC Style" and press [ENTER] to Service 6: Select... captions called DTV CC. Closed Caption Conventional CC Off DTV CC Off CC Style 4 Switch the Closed Caption Style. The following setup screen is the default. Detail Closed Caption V-chip HDMI Audio Auto 3 Select "DTV CC" and press [ENTER] to confirm. Closed Caption...
...style. • Using [K/L], select "User Setting". • Press [ENTER] and set "User Setting" to confirm. CLOSED CAPTION STYLE 1 Display the setup screen. • Press [SETUP]. This is displayed. Detail Closed Caption V-chip HDMI Audio Auto 3 Select "CC Style" and press [ENTER] to Service 6: Select... captions called DTV CC. Closed Caption Conventional CC Off DTV CC Off CC Style 4 Switch the Closed Caption Style. The following setup screen is the default. Detail Closed Caption V-chip HDMI Audio Auto 3 Select "DTV CC" and press [ENTER] to confirm. Closed Caption...
Owner's Manual
Page 28
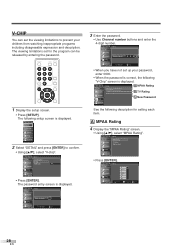
...press [ENTER] to prevent your password, enter 0000. • When the password is correct, the following "V-Chip" screen is displayed. A MPAA Rating 4 Display the "MPAA Rating" screen. • Using [K/L], select "MPAA Rating". The following description for the program can set the viewing limitations to confirm... B TV Rating C New Password See the following setup screen is displayed. V-Chip Enter password. POWER INPUT SLEEP SELECT 12 45 78 -0 SETUP 3 6 AUDIO 9 STILL SCREEN MODE ENTER BACK INFO 1 Display the setup screen. • Press [SETUP]. PIN Code BACK Back &#...
...press [ENTER] to prevent your password, enter 0000. • When the password is correct, the following "V-Chip" screen is displayed. A MPAA Rating 4 Display the "MPAA Rating" screen. • Using [K/L], select "MPAA Rating". The following description for the program can set the viewing limitations to confirm... B TV Rating C New Password See the following setup screen is displayed. V-Chip Enter password. POWER INPUT SLEEP SELECT 12 45 78 -0 SETUP 3 6 AUDIO 9 STILL SCREEN MODE ENTER BACK INFO 1 Display the setup screen. • Press [SETUP]. PIN Code BACK Back &#...


