
Owner's Manual
Page 2
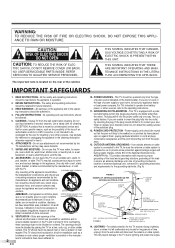
... the manufacturer. This is operated. 2. Power-supply cords should be routed so that for exam- A) FIGURE A EXAMPLE OF ANTENNA GROUNDING AS PER NATIONAL ELECTRICAL CODE GROUND CLAMP ANTENNA LEAD IN WIRE ELECTRIC SERVICE EQUIPMENT NEC - Do not use a mounting accessory recommended by the TV manufacturer as a bookcase or rack unless proper ventilation is located on the rear of the appliance should...
... the manufacturer. This is operated. 2. Power-supply cords should be routed so that for exam- A) FIGURE A EXAMPLE OF ANTENNA GROUNDING AS PER NATIONAL ELECTRICAL CODE GROUND CLAMP ANTENNA LEAD IN WIRE ELECTRIC SERVICE EQUIPMENT NEC - Do not use a mounting accessory recommended by the TV manufacturer as a bookcase or rack unless proper ventilation is located on the rear of the appliance should...
Owner's Manual
Page 3
... power supply cord or plug is in damage and will often require extensive work by following conditions: a. c. CAUTION: TO PREVENT ELECTRIC SHOCK, MATCH WIDE BLADE OF PLUG TO WIDE SLOT, FULLY INSERT. No others have the same serial number as heat registers or direct sunlight. • Do not place your TV set . Please dispose of in the owner's manual. OVERLOADING - DAMAGE REQUIRING SERVICE...
... power supply cord or plug is in damage and will often require extensive work by following conditions: a. c. CAUTION: TO PREVENT ELECTRIC SHOCK, MATCH WIDE BLADE OF PLUG TO WIDE SLOT, FULLY INSERT. No others have the same serial number as heat registers or direct sunlight. • Do not place your TV set . Please dispose of in the owner's manual. OVERLOADING - DAMAGE REQUIRING SERVICE...
Owner's Manual
Page 4
... audio signals. • Component VIDEO Input This TV accepts 480i / 480p / 720p / 1080i video signals. • S-VIDEO Input • AV Input • Analog Audio Output • Digital Audio Output (Coaxial) • Resume This feature will turn itself off automatically. • On-Screen Function Display (English / Spanish / French) This feature lets you select the language displayed in the Closed Caption-supported programs. • MTS/SAP Tuner This feature allows you to select with the remote control your antenna system, you may need to replace these...
... audio signals. • Component VIDEO Input This TV accepts 480i / 480p / 720p / 1080i video signals. • S-VIDEO Input • AV Input • Analog Audio Output • Digital Audio Output (Coaxial) • Resume This feature will turn itself off automatically. • On-Screen Function Display (English / Spanish / French) This feature lets you select the language displayed in the Closed Caption-supported programs. • MTS/SAP Tuner This feature allows you to select with the remote control your antenna system, you may need to replace these...
Owner's Manual
Page 5
... BOX 8 EXTERNAL CONNECTION 9 HDMI CONNECTION 9 COMPONENT CONNECTION 10 S-VIDEO CONNECTION 10 ANALOG AUDIO/VIDEO CONNECTION 11 AUDIO OUTPUT CONNECTION 11 INITIAL SETTINGS 12 INITIAL SETTINGS 12 CHANNEL SETTINGS 13 AUTOSCAN 13 CHANNEL LIST 14 MANUAL REGISTER 15 ANTENNA CONFIRMATION 16 LANGUAGE SELECTION 17 WATCHING TV 18 CHANNEL SELECTION 18 VOLUME ADJUSTMENT 18 STILL MODE 19 SWITCHING AUDIO 19 SWITCHING EXTERNAL INPUT 20 CHANGING THE SCREEN DISPLAY MODE 21 SCREEN INFORMATION 22 SLEEP TIMER 23 OPTIONAL SETTINGS 23 SETUP SCREEN 23 PICTURE ADJUSTMENT 24 CLOSED CAPTION...
... BOX 8 EXTERNAL CONNECTION 9 HDMI CONNECTION 9 COMPONENT CONNECTION 10 S-VIDEO CONNECTION 10 ANALOG AUDIO/VIDEO CONNECTION 11 AUDIO OUTPUT CONNECTION 11 INITIAL SETTINGS 12 INITIAL SETTINGS 12 CHANNEL SETTINGS 13 AUTOSCAN 13 CHANNEL LIST 14 MANUAL REGISTER 15 ANTENNA CONFIRMATION 16 LANGUAGE SELECTION 17 WATCHING TV 18 CHANNEL SELECTION 18 VOLUME ADJUSTMENT 18 STILL MODE 19 SWITCHING AUDIO 19 SWITCHING EXTERNAL INPUT 20 CHANGING THE SCREEN DISPLAY MODE 21 SCREEN INFORMATION 22 SLEEP TIMER 23 OPTIONAL SETTINGS 23 SETUP SCREEN 23 PICTURE ADJUSTMENT 24 CLOSED CAPTION...
Owner's Manual
Page 6
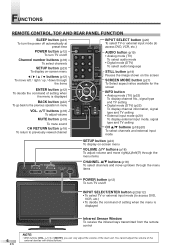
... external input mode (to access DVD, VCR, etc.) • To decide the command of setting when the menu is displayed BACK button (p22) To go back to previously viewed channel POWER INPUT SLEEP SELECT 12 45 78 -0 SETUP 3 6 AUDIO 9 STILL SCREEN MODE ENTER BACK INFO CH RETURN VOL. You cannot adjust the volume of the main unit. FUNCTIONS REMOTE CONTROL, TOP AND REAR PANEL FUNCTION SLEEP button (p23) To turn the power off automatically at preset time POWER button (p12) To turn TV on -screen menu s / B / K / L buttons...
... external input mode (to access DVD, VCR, etc.) • To decide the command of setting when the menu is displayed BACK button (p22) To go back to previously viewed channel POWER INPUT SLEEP SELECT 12 45 78 -0 SETUP 3 6 AUDIO 9 STILL SCREEN MODE ENTER BACK INFO CH RETURN VOL. You cannot adjust the volume of the main unit. FUNCTIONS REMOTE CONTROL, TOP AND REAR PANEL FUNCTION SLEEP button (p23) To turn the power off automatically at preset time POWER button (p12) To turn TV on -screen menu s / B / K / L buttons...
Owner's Manual
Page 7
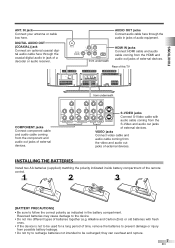
... in jacks of batteries together (e.g. IN jack Connect your antenna or cable box here. IN DIGITAL AUDIO OUT (COAXIAL) L L AUDIO OUT AUDIO R R HDMI IN HDMI from underneath HDMI IN jacks Connect HDMI cable and audio cable coming from the component and audio out jacks of external devices. FUNCTIONS ANT. VIDEO jacks Connect video cable and audio cable coming from the S-Video and audio out jacks of external devices. they can overheat and rupture. 7 EN AUDIO OUT jacks Connect audio cable here through the coaxial digital audio in jack of the remote control. [BATTERY...
... in jacks of batteries together (e.g. IN jack Connect your antenna or cable box here. IN DIGITAL AUDIO OUT (COAXIAL) L L AUDIO OUT AUDIO R R HDMI IN HDMI from underneath HDMI IN jacks Connect HDMI cable and audio cable coming from the component and audio out jacks of external devices. FUNCTIONS ANT. VIDEO jacks Connect video cable and audio cable coming from the S-Video and audio out jacks of external devices. they can overheat and rupture. 7 EN AUDIO OUT jacks Connect audio cable here through the coaxial digital audio in jack of the remote control. [BATTERY...
Owner's Manual
Page 8
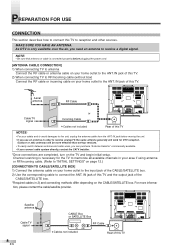
... connect the ANT. Channel scanning is necessary for DTV reception. MAKE SURE YOU HAVE AN ANTENNA. NOTE: • Be sure that antenna or cable is only available over the air, you connect cable system directly, contact the CATV installer. *Once connections are completed, turn on your home outlet to receive a digital signal. IN DIGITAL AUDIO OUT (COAXIAL) L L AUDIO OUT AUDIO R R HDMI IN HDMI Y Y VIDEO VIDEO L Pb AUDIO R Pr COMPONENT2 INNER JACKS L Pb AUDIO R Pr COMPONENT1 L AUDIO R VIDEO2 L AUDIO...
... connect the ANT. Channel scanning is necessary for DTV reception. MAKE SURE YOU HAVE AN ANTENNA. NOTE: • Be sure that antenna or cable is only available over the air, you connect cable system directly, contact the CATV installer. *Once connections are completed, turn on your home outlet to receive a digital signal. IN DIGITAL AUDIO OUT (COAXIAL) L L AUDIO OUT AUDIO R R HDMI IN HDMI Y Y VIDEO VIDEO L Pb AUDIO R Pr COMPONENT2 INNER JACKS L Pb AUDIO R Pr COMPONENT1 L AUDIO R VIDEO2 L AUDIO...
Owner's Manual
Page 9
... converted to select "PCM" for connection. It can minimize the deterioration of this TV NOTES: • This TV accepts 480i / 480p / 720p / 1080i video signals, and 32kHz / 44.1kHz / 48kHz audio signals. • This TV accepts only 2 channel audio signal (LPCM). • You need to an analog signal from DVI output jack (commercially available) for connection as DVD play- To DVI output jack DVI OUT To HDMI IN jack Cable Box or Satellite Box with the HDMI output jack, such...
... converted to select "PCM" for connection. It can minimize the deterioration of this TV NOTES: • This TV accepts 480i / 480p / 720p / 1080i video signals, and 32kHz / 44.1kHz / 48kHz audio signals. • This TV accepts only 2 channel audio signal (LPCM). • You need to an analog signal from DVI output jack (commercially available) for connection as DVD play- To DVI output jack DVI OUT To HDMI IN jack Cable Box or Satellite Box with the HDMI output jack, such...
Owner's Manual
Page 10
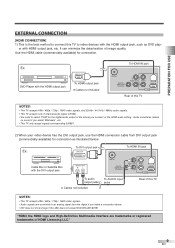
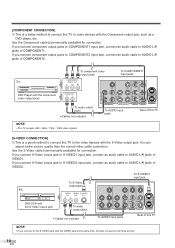
... To AUDIO input jacks Rear of this TV [S-VIDEO CONNECTION] 1) This is a better method to connect this TV to video devices with the Component output jack, such as a DVD player, etc. If you connect component output jacks to COMPONENT1 input jack, connect an audio cable to AUDIO L/R jacks of VIDEO2. To S-Video output jack To S-VIDEO1 input jack Y Y VIDEO VIDEO DVD/VCR with the component video output jacks To audio output jacks Cables not included NOTE: • This TV accepts 480i / 480p / 720p / 1080i video signals. If you connect S-Video output jack to S-VIDEO2 input jack...
... To AUDIO input jacks Rear of this TV [S-VIDEO CONNECTION] 1) This is a better method to connect this TV to video devices with the Component output jack, such as a DVD player, etc. If you connect component output jacks to COMPONENT1 input jack, connect an audio cable to AUDIO L/R jacks of VIDEO2. To S-Video output jack To S-VIDEO1 input jack Y Y VIDEO VIDEO DVD/VCR with the component video output jacks To audio output jacks Cables not included NOTE: • This TV accepts 480i / 480p / 720p / 1080i video signals. If you connect S-Video output jack to S-VIDEO2 input jack...

Owner's Manual
Page 12
... manual o atrás de TV. Initial Setup Make sure the antenna is used will be displayed every time you connect cable system directly, contact the CATV installer. • When the scanning is registered. Contact support hotline provided on the power. Only the receivable channels in CATV are automatically scanned and memorized. Sélectionner langue écran config. Select the destination of unit. When you change the connection (Air/Cable), set...
... manual o atrás de TV. Initial Setup Make sure the antenna is used will be displayed every time you connect cable system directly, contact the CATV installer. • When the scanning is registered. Contact support hotline provided on the power. Only the receivable channels in CATV are automatically scanned and memorized. Sélectionner langue écran config. Select the destination of unit. When you change the connection (Air/Cable), set...
Owner's Manual
Page 15
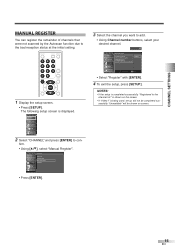
... the initial setting. For Digital channels, you want to add. • Using Channel number buttons, select your desired channel. 11 Manual Register For Analog channels, select a channel to con- is shown on screen. 2 Select "CHANNEL" and press [ENTER] to register using number keys. Channel Autoscan Channel List Manual Register Antenna • Press [ENTER]. 15 EN Register Ch Change BACK Back • Select "Register" with [ENTER]. 4 To exit the setup, press [SETUP]. NOTES: • If the setup is being used, set up...
... the initial setting. For Digital channels, you want to add. • Using Channel number buttons, select your desired channel. 11 Manual Register For Analog channels, select a channel to con- is shown on screen. 2 Select "CHANNEL" and press [ENTER] to register using number keys. Channel Autoscan Channel List Manual Register Antenna • Press [ENTER]. 15 EN Register Ch Change BACK Back • Select "Register" with [ENTER]. 4 To exit the setup, press [SETUP]. NOTES: • If the setup is being used, set up...
Owner's Manual
Page 22
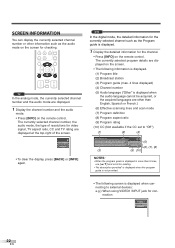
The currently selected program details are other information such as the audio mode on the remote control. The currently selected channel number, the audio mode, the type of resolutions for video signal, TV aspect ratio, CC and TV rating are displayed. 1 Display the channel number and the audio mode. • Press [INFO] on the screen for checking. 78 -0 SETUP AUDIO 9 STILL SCREEN MODE ENTER BACK INFO CH RETURN VOL. DTV In the digital mode, the detailed information for the currently selected channel such...
The currently selected program details are other information such as the audio mode on the remote control. The currently selected channel number, the audio mode, the type of resolutions for video signal, TV aspect ratio, CC and TV rating are displayed. 1 Display the channel number and the audio mode. • Press [INFO] on the screen for checking. 78 -0 SETUP AUDIO 9 STILL SCREEN MODE ENTER BACK INFO CH RETURN VOL. DTV In the digital mode, the detailed information for the currently selected channel such...
Owner's Manual
Page 23
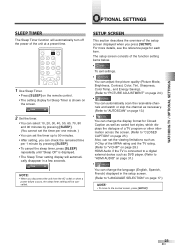
POWER INPUT SLEEP SELECT 12 45 78 -0 SETUP 3 6 AUDIO 9 STILL SCREEN MODE ENTER 1 Use Sleep Timer. • Press [SLEEP] on the remote control. • The setting display for Sleep Timer is displayed. • The Sleep Timer setting display will automatically disappear in the setup screen. (Refer to "LANGUAGE SELECTION" on page 13.) • You can change the language (English, Spanish, French) displayed in a few seconds. The setup screen consists of the function setting items below. • To exit settings. • You can adjust the picture quality...
POWER INPUT SLEEP SELECT 12 45 78 -0 SETUP 3 6 AUDIO 9 STILL SCREEN MODE ENTER 1 Use Sleep Timer. • Press [SLEEP] on the remote control. • The setting display for Sleep Timer is displayed. • The Sleep Timer setting display will automatically disappear in the setup screen. (Refer to "LANGUAGE SELECTION" on page 13.) • You can change the language (English, Spanish, French) displayed in a few seconds. The setup screen consists of the function setting items below. • To exit settings. • You can adjust the picture quality...
Owner's Manual
Page 24
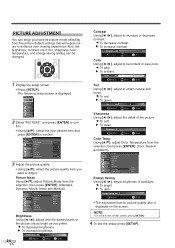
... News Manual Brightness Using [s / B], adjust until the darkest parts of the picture are as bright as you want to obtain natural skin tones. PICTURE ADJUSTMENT You can be brilliant or pale color. s: To bright B: To dark Energy Saving Off Adjust ENTER Enter • The adjustment bar for picture quality item is displayed. 2 Select "PICTURE", and press [ENTER] to be changed. SETUP SCREEN MODE ENTER BACK INFO 1 Display the setup screen. • Press [SETUP].
... News Manual Brightness Using [s / B], adjust until the darkest parts of the picture are as bright as you want to obtain natural skin tones. PICTURE ADJUSTMENT You can be brilliant or pale color. s: To bright B: To dark Energy Saving Off Adjust ENTER Enter • The adjustment bar for picture quality item is displayed. 2 Select "PICTURE", and press [ENTER] to be changed. SETUP SCREEN MODE ENTER BACK INFO 1 Display the setup screen. • Press [SETUP].
Owner's Manual
Page 25
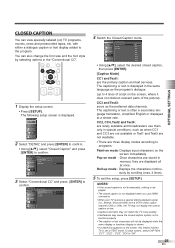
... CC4 Text1 Text2 Text3 Text4 • Using [K/L], select the desired closed caption, then press [ENTER]. [Caption Mode] CC1 and Text1: are rarely available and broadcasters use HDMI connection. • When your TV receives a special effects playback signal (i.e., Search, Slow and Still) from a VCR's video output channel (CH3 or CH4), the TV may not display the correct caption or text. • Captions and texts may not match the...
... CC4 Text1 Text2 Text3 Text4 • Using [K/L], select the desired closed caption, then press [ENTER]. [Caption Mode] CC1 and Text1: are rarely available and broadcasters use HDMI connection. • When your TV receives a special effects playback signal (i.e., Search, Slow and Still) from a VCR's video output channel (CH3 or CH4), the TV may not display the correct caption or text. • Captions and texts may not match the...

Owner's Manual
Page 26
... User Setting Font Style Font Size Font Color Font Opacity Back Color Back Opacity Edge Color Edge Type Off Font0 Middle White Solid Black Solid Black None • Using [K/L], select the desired Closed Caption Style. 5 Use "User Setting". • The "User Setting" function lets you do not want DTV CC. The following setup screen is the default. Off: Select if you change the settings for DTV CC. 1 Display the setup screen. • Press [SETUP]. Service 1 to confirm. Detail Closed Caption V-chip HDMI Audio Auto 3 Select...
... User Setting Font Style Font Size Font Color Font Opacity Back Color Back Opacity Edge Color Edge Type Off Font0 Middle White Solid Black Solid Black None • Using [K/L], select the desired Closed Caption Style. 5 Use "User Setting". • The "User Setting" function lets you do not want DTV CC. The following setup screen is the default. Off: Select if you change the settings for DTV CC. 1 Display the setup screen. • Press [SETUP]. Service 1 to confirm. Detail Closed Caption V-chip HDMI Audio Auto 3 Select...
Owner's Manual
Page 28
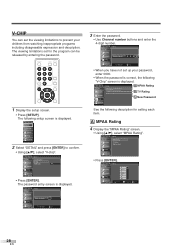
... Closed Caption V-chip HDMI Audio Auto • Press [ENTER]. V-Chip MPAA Rating TV Rating New Password • Press [ENTER]. The following "V-Chip" screen is displayed. V-Chip Enter password. V-Chip X NC-17 R PG-13 PG G NR Select BACK ENTER View/Block Back 28 EN V-CHIP You can be released by entering the password. POWER INPUT SLEEP SELECT 12 45 78 -0 SETUP 3 6 AUDIO 9 STILL SCREEN MODE ENTER BACK INFO 1 Display the setup screen. • Press [SETUP...
... Closed Caption V-chip HDMI Audio Auto • Press [ENTER]. V-Chip MPAA Rating TV Rating New Password • Press [ENTER]. The following "V-Chip" screen is displayed. V-Chip Enter password. V-Chip X NC-17 R PG-13 PG G NR Select BACK ENTER View/Block Back 28 EN V-CHIP You can be released by entering the password. POWER INPUT SLEEP SELECT 12 45 78 -0 SETUP 3 6 AUDIO 9 STILL SCREEN MODE ENTER BACK INFO 1 Display the setup screen. • Press [SETUP...
Owner's Manual
Page 31
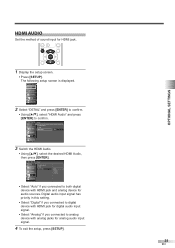
...confirm. • Using [K/L], select "HDMI Audio" and press [ENTER] to both digital device with analog jacks for audio sources. Detail Closed Caption V-chip HDMI Audio Auto 3 Switch the HDMI Audio. • Using [K/L], select the desired HDMI Audio, then press [ENTER]. HDMI AUDIO Set the method of sound input for digital audio input signal. • Select "Analog" if you connected to confirm. Digital audio input signal has priority in this setting. • Select "Digital" if you connected to digital device with HDMI jack for HDMI jack. -0 SETUP STILL SCREEN MODE ENTER BACK...
...confirm. • Using [K/L], select "HDMI Audio" and press [ENTER] to both digital device with analog jacks for audio sources. Detail Closed Caption V-chip HDMI Audio Auto 3 Switch the HDMI Audio. • Using [K/L], select the desired HDMI Audio, then press [ENTER]. HDMI AUDIO Set the method of sound input for digital audio input signal. • Select "Analog" if you connected to confirm. Digital audio input signal has priority in this setting. • Select "Digital" if you connected to digital device with HDMI jack for HDMI jack. -0 SETUP STILL SCREEN MODE ENTER BACK...
Owner's Manual
Page 33
... outside antenna is used, check the wire condition and connection. • Electric waves may be interfered due to be read the information of the shortened program. Remote control doesn't work • Check the antenna or cable connection to complete Autoscan in a live broadcasts. No caption is displayed in the LCD screen. 33 EN The LCD panel is manufactured to insert the advertisement. It may be the problem...
... outside antenna is used, check the wire condition and connection. • Electric waves may be interfered due to be read the information of the shortened program. Remote control doesn't work • Check the antenna or cable connection to complete Autoscan in a live broadcasts. No caption is displayed in the LCD screen. 33 EN The LCD panel is manufactured to insert the advertisement. It may be the problem...
Owner's Manual
Page 34
... TV (HDTV) Ultimate digital format that supports all uncompressed, digital audio/video formats including set-top box, DVD player or digital television, over a single cable. The format samples and captures analog signals and transforms them into digital signals without compressing the sound data. S-Video It delivers independently each of three principal colors of light (red, blue and green) through digital camera, the remote control unit is . LCD CLEANING Wipe the LCD of the TV with no user serviceable parts inside. If infrared light appears...
... TV (HDTV) Ultimate digital format that supports all uncompressed, digital audio/video formats including set-top box, DVD player or digital television, over a single cable. The format samples and captures analog signals and transforms them into digital signals without compressing the sound data. S-Video It delivers independently each of three principal colors of light (red, blue and green) through digital camera, the remote control unit is . LCD CLEANING Wipe the LCD of the TV with no user serviceable parts inside. If infrared light appears...


