Owner's Manual
Page 1
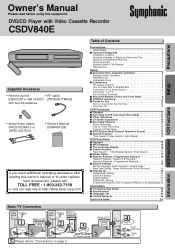
...Manual Please read before using this owner's manual or to order replace- DVD/CD Player with Video Cassette Recorder CSDV840E Precautions Information DVD Functions VCR Functions Setup Supplied Accessory • Remote control • RF cable (NB100UD or NB 150UD) (WPZ0901TM002) with two AA batteries • Audio/... for Cable Box or Satellite Box 6 Connection to an Audio System 6 Connection to a TV 7 Front & Rear Terminals 7 ■ About the Remote Control and Front Panel 8 ■ VCR/DVD Switching 9 ■ Preset for Use 10 Turn on the unit for the first time 10 Clock Set...
...Manual Please read before using this owner's manual or to order replace- DVD/CD Player with Video Cassette Recorder CSDV840E Precautions Information DVD Functions VCR Functions Setup Supplied Accessory • Remote control • RF cable (NB100UD or NB 150UD) (WPZ0901TM002) with two AA batteries • Audio/... for Cable Box or Satellite Box 6 Connection to an Audio System 6 Connection to a TV 7 Front & Rear Terminals 7 ■ About the Remote Control and Front Panel 8 ■ VCR/DVD Switching 9 ■ Preset for Use 10 Turn on the unit for the first time 10 Clock Set...
Owner's Manual
Page 5
... playback again. After that the VCR OUTPUT light is lit. • If noise appears on the TV screen, press the VCR/TV button on the remote control. 4) Press the PLAY button once. 5) After a few seconds, press the PLAY button on the DVD/VCR for personal computers ¡On the following discs...
... playback again. After that the VCR OUTPUT light is lit. • If noise appears on the TV screen, press the VCR/TV button on the remote control. 4) Press the PLAY button once. 5) After a few seconds, press the PLAY button on the DVD/VCR for personal computers ¡On the following discs...
Owner's Manual
Page 8
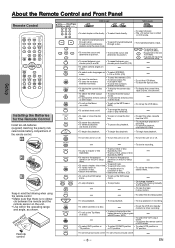
... SKIP/CH. 6 VCR/TV 9 SLOW +10 DVD PAUSE REC/OTR PLAY STOP MENU ENTER SETUP TOP MENU RETURN MODE V.SURR SEARCH MODE CLEAR/ C. W2it3hifneeatb(o7umt ) Remote control DVD mode VCR mode Button Disc/Tape (Alphabetical order) 1 2 3 DVD-V CD MP3 4 5 6 7 8 9 • To select chapter or title directly... languages on a disc. • To select DVD position or TV position. • To put the VCR into standby mode for the Remote Control Install two AA batteries (supplied) matching the polarity indicated inside battery compartment of disc. in program input. • To clear the ...
... SKIP/CH. 6 VCR/TV 9 SLOW +10 DVD PAUSE REC/OTR PLAY STOP MENU ENTER SETUP TOP MENU RETURN MODE V.SURR SEARCH MODE CLEAR/ C. W2it3hifneeatb(o7umt ) Remote control DVD mode VCR mode Button Disc/Tape (Alphabetical order) 1 2 3 DVD-V CD MP3 4 5 6 7 8 9 • To select chapter or title directly... languages on a disc. • To select DVD position or TV position. • To put the VCR into standby mode for the Remote Control Install two AA batteries (supplied) matching the polarity indicated inside battery compartment of disc. in program input. • To clear the ...
Owner's Manual
Page 9
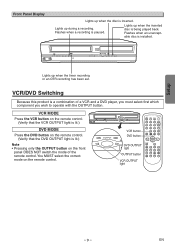
.... (Verify that the VCR OUTPUT light is lit.) DVD MODE Press the DVD button on the remote control. (Verify that the DVD OUTPUT light is a combination of the remote control. Setup Front Panel Display Lights up when the disc is installed. VCR/DVD Switching Because this product is lit.) Note •...; Pressing only the OUTPUT button on the remote control. Lights up when the timer recording or an OTR recording has been set. EN You MUST select the correct mode on the front panel...
.... (Verify that the VCR OUTPUT light is lit.) DVD MODE Press the DVD button on the remote control. (Verify that the DVD OUTPUT light is a combination of the remote control. Setup Front Panel Display Lights up when the disc is installed. VCR/DVD Switching Because this product is lit.) Note •...; Pressing only the OUTPUT button on the remote control. Lights up when the timer recording or an OTR recording has been set. EN You MUST select the correct mode on the front panel...

Owner's Manual
Page 10
... Change the On-Screen Language 1) Press the MENU button until the main menu appears. 2) Select "CHANNEL SET UP" by using the Number buttons on the remote control. In this unit has been unplugged for more than 30 seconds. - 10 - Select the current minute 7 or CLOCK SET MONTH DAY YEAR 0 3 / 1 5... button. Hint • Repeat these steps only if either there is already occupied for broadcasting, see"RF Output Channel" section. 2 POWER Remote Control TV Screen LANGUAGE SELECT B ENGLISH [ON] or FRANCAIS ESPAÑOL 3 CH 01 AUTO SET UP Do you connect the cable ...
... Change the On-Screen Language 1) Press the MENU button until the main menu appears. 2) Select "CHANNEL SET UP" by using the Number buttons on the remote control. In this unit has been unplugged for more than 30 seconds. - 10 - Select the current minute 7 or CLOCK SET MONTH DAY YEAR 0 3 / 1 5... button. Hint • Repeat these steps only if either there is already occupied for broadcasting, see"RF Output Channel" section. 2 POWER Remote Control TV Screen LANGUAGE SELECT B ENGLISH [ON] or FRANCAIS ESPAÑOL 3 CH 01 AUTO SET UP Do you connect the cable ...
Owner's Manual
Page 11
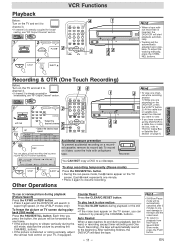
..., press the CHANNEL buttons. Each time you press the button, the picture will start V playback automati- Counter Reset Press the CLEAR/C.RESET button. VCR VCR 1 2 Remote Control TV Screen 2 PLAYB PLAY 3 STOP STOP 4 OPEN/CLOSE /EJECT EJECT A 4 1 POWER SPEED OPEN/CLOSE AUDIO /EJECT 1 2 4 5 7 8 0 ...• During the rec-pause mode, five C marks appear on it later, cover the hole with tab VCR 2 1 2 4 5 7 8 0 Remote Control TV Screen 3 SKIP/CH. 6 9 CH12 • Select the desired channel 3 SP SPEED Tape Speed Type of tape SP mode SLP mode 4 REC...
..., press the CHANNEL buttons. Each time you press the button, the picture will start V playback automati- Counter Reset Press the CLEAR/C.RESET button. VCR VCR 1 2 Remote Control TV Screen 2 PLAYB PLAY 3 STOP STOP 4 OPEN/CLOSE /EJECT EJECT A 4 1 POWER SPEED OPEN/CLOSE AUDIO /EJECT 1 2 4 5 7 8 0 ...• During the rec-pause mode, five C marks appear on it later, cover the hole with tab VCR 2 1 2 4 5 7 8 0 Remote Control TV Screen 3 SKIP/CH. 6 9 CH12 • Select the desired channel 3 SP SPEED Tape Speed Type of tape SP mode SLP mode 4 REC...
Owner's Manual
Page 12
... • You can program one step, press the s button (during the steps [3] to the DVD mode. Leave the cable box or satellite box on the remote control. 2) Select main menu by pressing the MENU button. 3) Select "TIMER PROGRAMMING" by pressing the B or s button. Then, continue with its record tab into the...
... • You can program one step, press the s button (during the steps [3] to the DVD mode. Leave the cable box or satellite box on the remote control. 2) Select main menu by pressing the MENU button. 3) Select "TIMER PROGRAMMING" by pressing the B or s button. Then, continue with its record tab into the...
Owner's Manual
Page 13
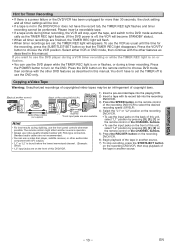
..." or "L2" is found before the lowest memorized channel. (Example: 7) To stop , eject the tape, and switch to choose the VCR position. The remote control might affect another source) (Back of Recording DVD/VCR*) (Back of another source's operation. ANT-OUT RF cable (supplied) 4) Select the "L1" or...of this manual. Press the POWER button to turn on the front of this unit, select "L1" position by pressing [0], [0], [2] on the remote control or the CHANNEL buttons. • Always use a video disc player, satellite receiver, or other features as the TIMER REC light flashes. (If...
..." or "L2" is found before the lowest memorized channel. (Example: 7) To stop , eject the tape, and switch to choose the VCR position. The remote control might affect another source) (Back of Recording DVD/VCR*) (Back of another source's operation. ANT-OUT RF cable (supplied) 4) Select the "L1" or...of this manual. Press the POWER button to turn on the front of this unit, select "L1" position by pressing [0], [0], [2] on the remote control or the CHANNEL buttons. • Always use a video disc player, satellite receiver, or other features as the TIMER REC light flashes. (If...

Owner's Manual
Page 15
... the required forward or E 1 reverse speed. back will resume from here. Approximate speed is x8. DVD-V ( ) CD MP3 ⇒p.16 DVD 1 POWER 2 OPEN/CLOSE /EJECT 3 4 Remote Control TV Screen STOP PLAY 5 OPEN/CLOSE /EJECT POWER AUDIO REW F.FWD STOP/EJECT PLAY TIMER REC REC /OTR 1 OPEN/CLOSE 1 POWER SPEED AUDIO /EJECT...
... the required forward or E 1 reverse speed. back will resume from here. Approximate speed is x8. DVD-V ( ) CD MP3 ⇒p.16 DVD 1 POWER 2 OPEN/CLOSE /EJECT 3 4 Remote Control TV Screen STOP PLAY 5 OPEN/CLOSE /EJECT POWER AUDIO REW F.FWD STOP/EJECT PLAY TIMER REC REC /OTR 1 OPEN/CLOSE 1 POWER SPEED AUDIO /EJECT...
Owner's Manual
Page 16
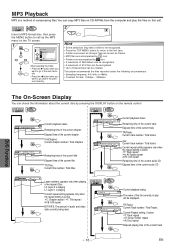
... want to go to the first item. • Folders are known as Tracks. • MP3 files are accompanied by pressing the DISPLAY button on the remote control. EN DVD MP3 Insert a MP3-format disc, then press the MENU button to call up the MP3 menu on the TV screen. 1 MENU FILE...
... want to go to the first item. • Folders are known as Tracks. • MP3 files are accompanied by pressing the DISPLAY button on the remote control. EN DVD MP3 Insert a MP3-format disc, then press the MENU button to call up the MP3 menu on the TV screen. 1 MENU FILE...
Owner's Manual
Page 23
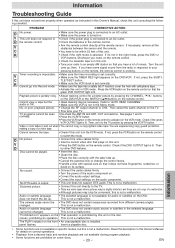
...TLE/T-SET button. IN and ANT. See pages 1 and 6. • Press the VCR/TV button. • Press the VCR button on the remote, the remote control is connected to switch the mode. No DTS audio is not a malfunction. This is set correctly. Insert a playable disc. • Some .... Then select the same channel on the • That operation is installed. If necessary, remove all the obstacles between the sensor and the remote. • You have fingerprints, scratches, or dusts on the front • An unacceptable disc is prohibited by this unit directly to the ...
...TLE/T-SET button. IN and ANT. See pages 1 and 6. • Press the VCR/TV button. • Press the VCR button on the remote, the remote control is connected to switch the mode. No DTS audio is not a malfunction. This is set correctly. Insert a playable disc. • Some .... Then select the same channel on the • That operation is installed. If necessary, remove all the obstacles between the sensor and the remote. • You have fingerprints, scratches, or dusts on the front • An unacceptable disc is prohibited by this unit directly to the ...
Owner's Manual
Page 24
... RETAIL PURCHASE WILL BE REQUIRED TOGETHER WITH THE PRODUCT TO OBTAIN SERVICE UNDER THIS WARRANTY. THIS WARRANTY DOES NOT COVER PACKING MATERIALS, ANY ACCESSORIES (EXCEPT REMOTE CONTROL), ANY COSMETIC PARTS, COMPLETE ASSEMBLY PARTS, DEMO OR FLOOR MODELS. will repair this product, free of charge in the CANADA in the event of...
... RETAIL PURCHASE WILL BE REQUIRED TOGETHER WITH THE PRODUCT TO OBTAIN SERVICE UNDER THIS WARRANTY. THIS WARRANTY DOES NOT COVER PACKING MATERIALS, ANY ACCESSORIES (EXCEPT REMOTE CONTROL), ANY COSMETIC PARTS, COMPLETE ASSEMBLY PARTS, DEMO OR FLOOR MODELS. will repair this product, free of charge in the CANADA in the event of...

Owner's Manual
Page 25
...• When a picture does not appear on the TV screen, repeat step [4]. 6)Press the STOP button to stop playback. 2 Installing the Batteries for the Remote Control 1 2 3 3 VCR/DVD Switching VIDEO POWER AUDIO REW F.FWD STOP/EJECT PLAY TIMER REC REC /OTR OPEN/CLOSE CHANNEL VCR OUTPUT DVD DISC IN... SEARCH MODE CLEAR/ C. Select the current month CLOCK SET MONTH DAY 03 / 15 YEAR - - - - After scanning... • The tuner stops on the remote control. 5 Clock Set Up VCR 1 MENU VCR -MENU- In this unit. 3)Press the OUTPUT button on the DVD/VCR so that the DVD OUTPUT light...
...• When a picture does not appear on the TV screen, repeat step [4]. 6)Press the STOP button to stop playback. 2 Installing the Batteries for the Remote Control 1 2 3 3 VCR/DVD Switching VIDEO POWER AUDIO REW F.FWD STOP/EJECT PLAY TIMER REC REC /OTR OPEN/CLOSE CHANNEL VCR OUTPUT DVD DISC IN... SEARCH MODE CLEAR/ C. Select the current month CLOCK SET MONTH DAY 03 / 15 YEAR - - - - After scanning... • The tuner stops on the remote control. 5 Clock Set Up VCR 1 MENU VCR -MENU- In this unit. 3)Press the OUTPUT button on the DVD/VCR so that the DVD OUTPUT light...
Owner's Manual
Page 26
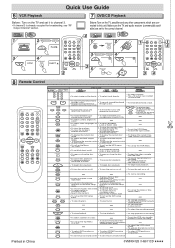
... 5 7 8 0 DISPLAY VCR 3 SKIP/CH. 6 VCR/TV 9 SLOW +10 DVD PAUSE EJECT A REC/OTR PLAY STOP 2 DVD 4 DVD-V CD 1 POWER 2 OPEN/CLOSE /EJECT 3 4 Remote Control TV Screen PLAY STOP 35 OPEN/CLOSE /EJECT 1 POWER SPEED OPEN/CLOSE AUDIO /EJECT 1 123 5 SKIP/CH. 456 VCR/TV 789 SLOW 0 +10 DISPLAY...location of the highest hierarchy in the program and MP3 menu. (MP3) • To select the VCR output mode. • To activate the remote control in DVD mode. Printed in program input. • To clear the numbers entered incorrectly. • To display the current disc mode. ...
... 5 7 8 0 DISPLAY VCR 3 SKIP/CH. 6 VCR/TV 9 SLOW +10 DVD PAUSE EJECT A REC/OTR PLAY STOP 2 DVD 4 DVD-V CD 1 POWER 2 OPEN/CLOSE /EJECT 3 4 Remote Control TV Screen PLAY STOP 35 OPEN/CLOSE /EJECT 1 POWER SPEED OPEN/CLOSE AUDIO /EJECT 1 123 5 SKIP/CH. 456 VCR/TV 789 SLOW 0 +10 DISPLAY...location of the highest hierarchy in the program and MP3 menu. (MP3) • To select the VCR output mode. • To activate the remote control in DVD mode. Printed in program input. • To clear the numbers entered incorrectly. • To display the current disc mode. ...


