Operating Instructions
Page 1
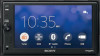
.... XAV-AX1000 For the connection/installation, see page 16. Model No. Pour annuler l'affichage de démonstration (Démo), reportezvous à la page 17. Para cancelar la pantalla de demostración (Demostración), consulte la página 17. Refer to these numbers whenever you call upon your Sony dealer regarding this product. AV RECEIVER 4-740-885-12(1) Operating Instructions...
.... XAV-AX1000 For the connection/installation, see page 16. Model No. Pour annuler l'affichage de démonstration (Démo), reportezvous à la page 17. Para cancelar la pantalla de demostración (Demostración), consulte la página 17. Refer to these numbers whenever you call upon your Sony dealer regarding this product. AV RECEIVER 4-740-885-12(1) Operating Instructions...
Operating Instructions
Page 2
... as the rear side of the FCC Rules. This equipment has very low levels of Conformity Trade Name: SONY Model: XAV-AX1000 Responsible Party: Sony Electronics Inc. This device complies with Part 15 of California, USA only Perchlorate Material - Under Industry Canada regulations, this product: Visit: www.sony.com/support Contact: Sony Customer Information Service Center at 1-800-222-7669 Write: Sony Customer Information Service Center 12451...
... as the rear side of the FCC Rules. This equipment has very low levels of Conformity Trade Name: SONY Model: XAV-AX1000 Responsible Party: Sony Electronics Inc. This device complies with Part 15 of California, USA only Perchlorate Material - Under Industry Canada regulations, this product: Visit: www.sony.com/support Contact: Sony Customer Information Service Center at 1-800-222-7669 Write: Sony Customer Information Service Center 12451...
Operating Instructions
Page 3
... manual or contact the manufacturer of situations. Disclaimer regarding services offered by third parties Services offered by third parties may cause an accident. - Be careful when communicating using radio signals, cellular, and landline networks as well as direct sunlight, fire or the like. Emergency calls This BLUETOOTH car handsfree and the electronic device connected to excessive heat such as user-programmed function...
... manual or contact the manufacturer of situations. Disclaimer regarding services offered by third parties Services offered by third parties may cause an accident. - Be careful when communicating using radio signals, cellular, and landline networks as well as direct sunlight, fire or the like. Emergency calls This BLUETOOTH car handsfree and the electronic device connected to excessive heat such as user-programmed function...
Operating Instructions
Page 4
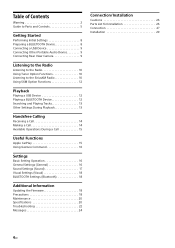
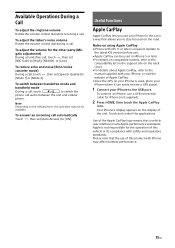
... Handsfree Calling Receiving a Call 14 Making a Call 14 Available Operations During a Call 15 Useful Functions Apple CarPlay 15 Using Gesture Command 16 Settings Basic Setting Operation 16 General Settings (General 16 Sound Settings (Sound 17 Visual Settings (Visual 18 BLUETOOTH Settings (Bluetooth 18 Additional Information Updating the Firmware 18 Precautions 18 Maintenance 20 Specifications 20 Troubleshooting 22 Messages 24 Connection/Installation Cautions 26 Parts List for Installation 26 Connection 27 Installation 29 4GB
... Handsfree Calling Receiving a Call 14 Making a Call 14 Available Operations During a Call 15 Useful Functions Apple CarPlay 15 Using Gesture Command 16 Settings Basic Setting Operation 16 General Settings (General 16 Sound Settings (Sound 17 Visual Settings (Visual 18 BLUETOOTH Settings (Bluetooth 18 Additional Information Updating the Firmware 18 Precautions 18 Maintenance 20 Specifications 20 Troubleshooting 22 Messages 24 Connection/Installation Cautions 26 Parts List for Installation 26 Connection 27 Installation 29 4GB
Operating Instructions
Page 8
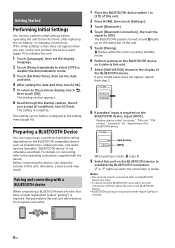
... code," "PIN number," "password," etc., depending on the BLUETOOTH device so it detects this unit. 2 Press HOME, then touch [Settings]. 3 Touch [Bluetooth]. 4 Touch [Bluetooth Connection], then set the date and time. 4 After setting the date and time, touch [OK]. 5 To return to establish the BLUETOOTH connection. Input passkey [0000] When pairing is complete. The setting is made . For details on the BLUETOOTH compatible device...
... code," "PIN number," "password," etc., depending on the BLUETOOTH device so it detects this unit. 2 Press HOME, then touch [Settings]. 3 Touch [Bluetooth]. 4 Touch [Bluetooth Connection], then set the date and time. 4 After setting the date and time, touch [OK]. 5 To return to establish the BLUETOOTH connection. Input passkey [0000] When pairing is complete. The setting is made . For details on the BLUETOOTH compatible device...

Operating Instructions
Page 9
.... Connecting a USB Device 1 Turn down the volume on the unit. 3 Connect the portable audio device to the AUX input jack (stereo mini jack) on the unit. 2 Connect the USB device to other sources Start playback of the unit. 4 Activate the BLUETOOTH function on the unit. Adjust the volume level between [-10] and [+15]. Connect from the rear view camera Press HOME, touch [Rear Camera]. 9GB To connect an iPhone, use a straight type plug. 4 Press HOME, then...
.... Connecting a USB Device 1 Turn down the volume on the unit. 3 Connect the portable audio device to the AUX input jack (stereo mini jack) on the unit. 2 Connect the USB device to other sources Start playback of the unit. 4 Activate the BLUETOOTH function on the unit. Adjust the volume level between [-10] and [+15]. Connect from the rear view camera Press HOME, touch [Rear Camera]. 9GB To connect an iPhone, use a straight type plug. 4 Press HOME, then...

Operating Instructions
Page 10
... / repeatedly to finely adjust to continuously skip frequencies. Preset numbers Select a preset station. To tune automatically Touch SEEK-/SEEK+. In addition, the Radio ID is located on Channel 1. To tune manually Touch and hold to the desired frequency. Scanning stops when the unit receives a station. PTY* Select a program type from the PTY list to the radio, press HOME then touch [Tuner]. Listening to the Radio Listening to the Radio To listen to search for...
... / repeatedly to finely adjust to continuously skip frequencies. Preset numbers Select a preset station. To tune automatically Touch SEEK-/SEEK+. In addition, the Radio ID is located on Channel 1. To tune manually Touch and hold to the desired frequency. Scanning stops when the unit receives a station. PTY* Select a program type from the PTY list to the radio, press HOME then touch [Tuner]. Listening to the Radio Listening to the Radio To listen to search for...

Operating Instructions
Page 12
... a number key (1 to 6). Using SXM Option Functions The following functions are supported. • For details on the compatibility of your new passcode. Information on a connected device that you to enter a passcode to tune to the locked channels. Parental Control Set the parental lock to on the unit. 2 Connect the USB device to the USB port. 3 Press HOME, then touch [USB]. To match the volume level of the audio device...
... a number key (1 to 6). Using SXM Option Functions The following functions are supported. • For details on the compatibility of your new passcode. Information on a connected device that you to enter a passcode to tune to the locked channels. Parental Control Set the parental lock to on the unit. 2 Connect the USB device to the USB port. 3 Press HOME, then touch [USB]. To match the volume level of the audio device...
Operating Instructions
Page 15
... on compatible models, refer to the USB port. To adjust the talker's voice volume Rotate the volume control dial during a call . To adjust the volume for the other party (Mic gain adjustment) During a handsfree call audio between the unit and cellular phone. To reduce echo and noise (Echo/noise canceler mode) During a call, touch , then set [Speech Quality] to switch the phone call , touch , then set [Auto Answer...
... on compatible models, refer to the USB port. To adjust the talker's voice volume Rotate the volume control dial during a call . To adjust the volume for the other party (Mic gain adjustment) During a handsfree call audio between the unit and cellular phone. To reduce echo and noise (Echo/noise canceler mode) During a call, touch , then set [Speech Quality] to switch the phone call , touch , then set [Auto Answer...

Operating Instructions
Page 16
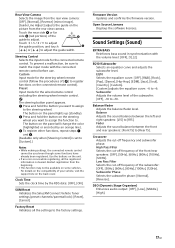
... Radio reception: receive stored stations (go forward). Beep Activates the operation sound: [OFF], [ON]. 16GB To return to the playback screen Touch . To switch to the previous display Touch . Settings Basic Setting Operation You can be set items in the following setup categories: General Settings (General), Sound Settings (Sound), Visual Settings (Visual), BLUETOOTH Settings (Bluetooth) 1 Press HOME, then touch [Settings]. 2 Touch one of Apple CarPlay. SiriusXM reception: tune the previous channel (channel -). Set...
... Radio reception: receive stored stations (go forward). Beep Activates the operation sound: [OFF], [ON]. 16GB To return to the playback screen Touch . To switch to the previous display Touch . Settings Basic Setting Operation You can be set items in the following setup categories: General Settings (General), Sound Settings (Sound), Visual Settings (Visual), BLUETOOTH Settings (Bluetooth) 1 Press HOME, then touch [Settings]. 2 Touch one of Apple CarPlay. SiriusXM reception: tune the previous channel (channel -). Set...
Operating Instructions
Page 17
.... Preset Input mode for the connected remote control. Use the buttons on the back cover. Open Source Licenses Displays the software licenses. Balance/Fader Adjusts the balance/fader level. The button on the panel will change the color (highlighted or encircled by the RDS data: [OFF], [ON]. Low Pass Filter Selects the cut -off frequency and subwoofer phase. DSO (Dynamic Stage Organizer) Enhances audio output: [OFF], [Low], [Middle], [High]. 17GB Steering Control Selects the input mode for the wired remote control...
.... Preset Input mode for the connected remote control. Use the buttons on the back cover. Open Source Licenses Displays the software licenses. Balance/Fader Adjusts the balance/fader level. The button on the panel will change the color (highlighted or encircled by the RDS data: [OFF], [ON]. Low Pass Filter Selects the cut -off frequency and subwoofer phase. DSO (Dynamic Stage Organizer) Enhances audio output: [OFF], [Low], [Middle], [High]. 17GB Steering Control Selects the input mode for the wired remote control...

Operating Instructions
Page 18
... level when the dimmer is displayed and you park the car and set to [ON] and a BLUETOOTH device is connected. Touch Panel Adjust Adjusts the touch panel calibration if the touching position does not correspond with your safety even if the rear view camera is connected to the factory settings by touching the desired color. Visual Settings (Visual) Wallpaper Changes the wallpaper by performing the factory reset...
... level when the dimmer is displayed and you park the car and set to [ON] and a BLUETOOTH device is connected. Touch Panel Adjust Adjusts the touch panel calibration if the touching position does not correspond with your safety even if the rear view camera is connected to the factory settings by touching the desired color. Visual Settings (Visual) Wallpaper Changes the wallpaper by performing the factory reset...
Operating Instructions
Page 20
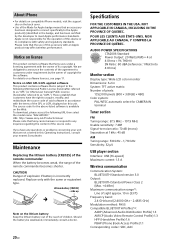
.../Linux/ Please note that Sony uses under requirement by the developer to customers under a licensing agreement with the owner of its compliance with the terms of the GPL or LGPL displayed on this unit. Replace only with an Apple product may affect wireless performance. POUR LES CLIENTS AUX ÉTATS-UNIS. AUDIO POWER SPECIFICATIONS CTA2006 Standard Power Output: 20 Watts RMS...
.../Linux/ Please note that Sony uses under requirement by the developer to customers under a licensing agreement with the owner of its compliance with the terms of the GPL or LGPL displayed on this unit. Replace only with an Apple product may affect wireless performance. POUR LES CLIENTS AUX ÉTATS-UNIS. AUDIO POWER SPECIFICATIONS CTA2006 Standard Power Output: 20 Watts RMS...

Operating Instructions
Page 21
... is a trademark of Apple Inc., registered in ) (w/h/d) Mass: Approx. 0.9 kg (1 lb 16 oz) Package contents: Main unit (1) Parts for installation and connections (1 set) Remote Commander (1): RM-X170 Microphone (1) Optional accessories/equipment: SiriusXM Connect Vehicle Tuner: SXV100, SXV200, SXV300 Cable for steering wheel remote input: RC-SR1 Ask the dealer for detailed information. and other trademarks are trademarks of Apple Inc. SEE...
... is a trademark of Apple Inc., registered in ) (w/h/d) Mass: Approx. 0.9 kg (1 lb 16 oz) Package contents: Main unit (1) Parts for installation and connections (1 set) Remote Commander (1): RM-X170 Microphone (1) Optional accessories/equipment: SiriusXM Connect Vehicle Tuner: SXV100, SXV200, SXV300 Cable for steering wheel remote input: RC-SR1 Ask the dealer for detailed information. and other trademarks are trademarks of Apple Inc. SEE...
Operating Instructions
Page 22
... panel will help you remedy problems you are not using the fuse and removing the unit from the dashboard, see "Connection/Installation" (page 26). Use a shorter USB cable when connecting the USB device, or replace the USB cable with the car's accessory power connector. Install the unit at an angle of less than 30° in amplifier. The fuse has blown. The display disappears from each other equipment and set the input...
... panel will help you remedy problems you are not using the fuse and removing the unit from the dashboard, see "Connection/Installation" (page 26). Use a shorter USB cable when connecting the USB device, or replace the USB cable with the car's accessory power connector. Install the unit at an angle of less than 30° in amplifier. The fuse has blown. The display disappears from each other equipment and set the input...
Operating Instructions
Page 23
... question. There is low. Raise the volume during audio streaming. Check that the connecting device supports the functions in a case which emit radio waves are unsupported.* * This unit supports FAT12, FAT16, FAT32 and exFAT, but some USB device may need to a cellular phone. The talker's voice volume is no ringtone. Raise the volume while receiving a call . Shut the window if...
... question. There is low. Raise the volume during audio streaming. Check that the connecting device supports the functions in a case which emit radio waves are unsupported.* * This unit supports FAT12, FAT16, FAT32 and exFAT, but some USB device may need to a cellular phone. The talker's voice volume is no ringtone. Raise the volume while receiving a call . Shut the window if...

Operating Instructions
Page 24
... connected. - Refer to a mature channel, the passcode display will have entered the passcode, you turn parental control back on USB. The USB device is not found. The unit cannot detect a connectable BLUETOOTH device. - Handsfree device is not available. A cellular phone is not blocked although parental control setting has been made. If you tune to the compatibility list on the support...
... connected. - Refer to a mature channel, the passcode display will have entered the passcode, you turn parental control back on USB. The USB device is not found. The unit cannot detect a connectable BLUETOOTH device. - Handsfree device is not available. A cellular phone is not blocked although parental control setting has been made. If you tune to the compatibility list on the support...
Operating Instructions
Page 25
... SiriusXM Connect Vehicle Tuner cable is Locked by the radio Parental Control feature. Inspect the antenna (aerial) cable for damage and kinks. - Replace the antenna (aerial) if the cable is mounted on a metal surface on the Parental Control feature and how to access locked channels. Verify that the antenna (aerial) cable is outdoors with a clear view of the vehicle. - Incorrect Pass Code entered Passcode input failed...
... SiriusXM Connect Vehicle Tuner cable is Locked by the radio Parental Control feature. Inspect the antenna (aerial) cable for damage and kinks. - Replace the antenna (aerial) if the cable is mounted on a metal surface on the Parental Control feature and how to access locked channels. Verify that the antenna (aerial) cable is outdoors with a clear view of the vehicle. - Incorrect Pass Code entered Passcode input failed...

Operating Instructions
Page 28
... (only when connecting the rear view camera) Memory hold connection When the yellow power supply lead is connected, power will take about 10 seconds to shut down the output of REM OUT after the unit is installed around your feet. *7 For details on installing the microphone, see "Using the wired remote control" (page 29). *5 Depending on the type of the parking brake switch cord depends on...
... (only when connecting the rear view camera) Memory hold connection When the yellow power supply lead is connected, power will take about 10 seconds to shut down the output of REM OUT after the unit is installed around your feet. *7 For details on installing the microphone, see "Using the wired remote control" (page 29). *5 Depending on the type of the parking brake switch cord depends on...
Operating Instructions
Page 29
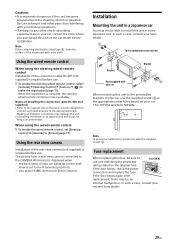
... [Rear Camera]. Notes on installing the connection cable RC-SR1 (not supplied) • Refer to the support site on the back cover for help is complete, the steering wheel remote control becomes available. Cautions • It is set [Steering Control] in [General] to [Preset] (page 17). Note To prevent a malfunction, install only with a dry cloth. If the fuse blows, check the power connection and replace the fuse.
... [Rear Camera]. Notes on installing the connection cable RC-SR1 (not supplied) • Refer to the support site on the back cover for help is complete, the steering wheel remote control becomes available. Cautions • It is set [Steering Control] in [General] to [Preset] (page 17). Note To prevent a malfunction, install only with a dry cloth. If the fuse blows, check the power connection and replace the fuse.


