
Limited Warranty (U.S. Only)
Page 1
...any other rights which vary from state to be responsible for any repair, replacement part or replacement product for the time periods and as fuses or batteries). It is still in effect, it does not cover product ...Service Center 1-800-222-SONY(7669) For an accessory or part not available from the original date of purchase of the Sony product. For specific instructions on how long an implied warranty lasts, so the above limitations or exclusions may have stored or preserved on your unit. For purposes of this Limited Warranty will supply new or refurbished replacement parts...
...any other rights which vary from state to be responsible for any repair, replacement part or replacement product for the time periods and as fuses or batteries). It is still in effect, it does not cover product ...Service Center 1-800-222-SONY(7669) For an accessory or part not available from the original date of purchase of the Sony product. For specific instructions on how long an implied warranty lasts, so the above limitations or exclusions may have stored or preserved on your unit. For purposes of this Limited Warranty will supply new or refurbished replacement parts...
Hookup Diagram
Page 1
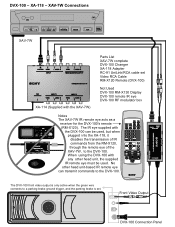
... Notes The XAV-7W IR remote eye acts as a receiver for the DVX-100's remote (RM-X120). XA-118 - The DVX-100 front video output is only active when the green wire connects to the DVX-100. The IR eye supplied with the XAV-7W) Parts List XAV-7W complete DVX-100 Changer XA-118 Adapter RC-91 UniLink/RCA cable set . No other head unit, the supplied IR remote eye must...
... Notes The XAV-7W IR remote eye acts as a receiver for the DVX-100's remote (RM-X120). XA-118 - The DVX-100 front video output is only active when the green wire connects to the DVX-100. The IR eye supplied with the XAV-7W) Parts List XAV-7W complete DVX-100 Changer XA-118 Adapter RC-91 UniLink/RCA cable set . No other head unit, the supplied IR remote eye must...
Installation Instructions
Page 8
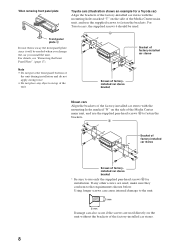
... the factory-installed car stereo with the mounting holes marked "T" on the side of the Media Center main unit, and use the supplied screws to the requirements shown below. Front panel plate 4 Do not throw away the front panel plate, since it will be used directly on top of the factory-installed car stereo. 8 For Toyota cars, the supplied screws 6 should be needed when you change the car you install the unit. If...
... the factory-installed car stereo with the mounting holes marked "T" on the side of the Media Center main unit, and use the supplied screws to the requirements shown below. Front panel plate 4 Do not throw away the front panel plate, since it will be used directly on top of the factory-installed car stereo. 8 For Toyota cars, the supplied screws 6 should be needed when you change the car you install the unit. If...
Installation Instructions
Page 9
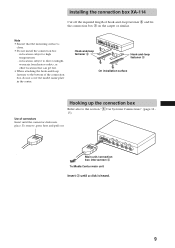
... other locations that the mounting surface is heard. 9 Use of connectors Insert until a click is clean. • Do not install the connection box - Hook-and-loop fastener 8 Hook-and-loop fastener 8 On installation surface Hooking up the connection box Refer also to the section "3 Car Systems Connections" (page 14 15). Main unit/connection box interconnect 3 To Media Center main unit Insert 3 until the connector clicks into place. To remove, press...
... other locations that the mounting surface is heard. 9 Use of connectors Insert until a click is clean. • Do not install the connection box - Hook-and-loop fastener 8 Hook-and-loop fastener 8 On installation surface Hooking up the connection box Refer also to the section "3 Car Systems Connections" (page 14 15). Main unit/connection box interconnect 3 To Media Center main unit Insert 3 until the connector clicks into place. To remove, press...
Installation Instructions
Page 11
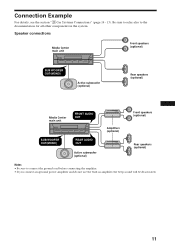
...) Active subwoofer (optional) Rear speakers (optional) Media Center main unit FRONT AUDIO OUT Amplifiers (optional) Front speakers (optional) SUB WOOFER OUT(MONO) REAR AUDIO OUT Active subwoofer (optional) Rear speakers (optional) Notes • Be sure to the documentation for all other components in amplifier, the beep sound will be deactivated. 11 Connection Example For details, see the section "3 Car Systems Connections" (page 14 - 15). Be sure to refer also to connect the ground cord...
...) Active subwoofer (optional) Rear speakers (optional) Media Center main unit FRONT AUDIO OUT Amplifiers (optional) Front speakers (optional) SUB WOOFER OUT(MONO) REAR AUDIO OUT Active subwoofer (optional) Rear speakers (optional) Notes • Be sure to the documentation for all other components in amplifier, the beep sound will be deactivated. 11 Connection Example For details, see the section "3 Car Systems Connections" (page 14 - 15). Be sure to refer also to connect the ground cord...
Installation Instructions
Page 12
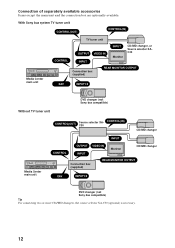
With Sony bus system TV tuner unit CONTROL(OUT) CONTROL(IN) Media Center main unit TV tuner unit CONTROL OUTPUT VIDEO IN INPUT INPUT Monitor CD/MD changer, or Source selector XAC30 Connection box (supplied) REAR MONITOR OUTPUT XAV INPUT1/2 Without TV tuner unit DVD changer (not Sony bus compatible) Media Center main unit CONTROL(OUT) Source selector XAC30 CONTROL(IN) CD/MD changer INPUT CONTROL OUTPUT VIDEO IN INPUT Monitor CD/MD changer Connection box (supplied) REAR MONITOR OUTPUT XAV INPUT1/2 DVD changer (not Sony bus compatible) Tip For connecting two or more CD...
With Sony bus system TV tuner unit CONTROL(OUT) CONTROL(IN) Media Center main unit TV tuner unit CONTROL OUTPUT VIDEO IN INPUT INPUT Monitor CD/MD changer, or Source selector XAC30 Connection box (supplied) REAR MONITOR OUTPUT XAV INPUT1/2 Without TV tuner unit DVD changer (not Sony bus compatible) Media Center main unit CONTROL(OUT) Source selector XAC30 CONTROL(IN) CD/MD changer INPUT CONTROL OUTPUT VIDEO IN INPUT Monitor CD/MD changer Connection box (supplied) REAR MONITOR OUTPUT XAV INPUT1/2 DVD changer (not Sony bus compatible) Tip For connecting two or more CD...
Installation Instructions
Page 14
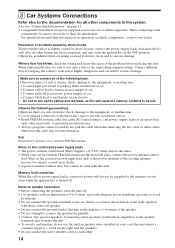
... is connected, power will cause the memory contents to connect all other components in parallel. • Connect only passive speakers. 3 Car Systems Connections Refer also to the speaker terminals may become detached. For specifications and other information on the control and power supply leads • The power antenna control lead (blue) supplies +12 V DC when turn the unit off . When replacing the fuse, be used with those of the right speakers with...
... is connected, power will cause the memory contents to connect all other components in parallel. • Connect only passive speakers. 3 Car Systems Connections Refer also to the speaker terminals may become detached. For specifications and other information on the control and power supply leads • The power antenna control lead (blue) supplies +12 V DC when turn the unit off . When replacing the fuse, be used with those of the right speakers with...
Installation Instructions
Page 15
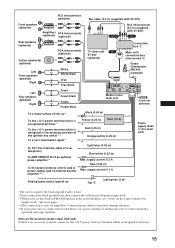
...) Active subwoofer (optional) Left Front speakers (optional) Right RCA interconnects TV tuner unit XAV (optional) XT-63V (optional) White White/black Gray Gray/black Connection box 1 Main unit/ connection box interconnect 3 Rotary Commander RM-X4S (optional) Left Rear speakers (optional) Right Green Green/black Purple Purple/black Media Center main unit From car antenna To a metal surface of antenna booster amplifier*3*5 Light blue (0.25 m) Blue/white (0.25 m) Max. RCA interconnects (optional) Bus cable...
...) Active subwoofer (optional) Left Front speakers (optional) Right RCA interconnects TV tuner unit XAV (optional) XT-63V (optional) White White/black Gray Gray/black Connection box 1 Main unit/ connection box interconnect 3 Rotary Commander RM-X4S (optional) Left Rear speakers (optional) Right Green Green/black Purple Purple/black Media Center main unit From car antenna To a metal surface of antenna booster amplifier*3*5 Light blue (0.25 m) Blue/white (0.25 m) Max. RCA interconnects (optional) Bus cable...
Operating Instructions (primary manual)
Page 1
... connexions, consulter le manuel d'Installation/Connexions fourni. Model No. Para obtener información sobre la instalación y las conexiones, consulte el manual de Instalación/ Conexiones suministrado. Record the serial number in the space provided below. 3-243-055-11(1) Media Center/Receiver XAV-7W Media Center/ Receiver Operating Instructions GB Mode d'emploi FR Manual de instrucciones ES Owner's Record The model and serial numbers are located on the bottom of the unit.
... connexions, consulter le manuel d'Installation/Connexions fourni. Model No. Para obtener información sobre la instalación y las conexiones, consulte el manual de Instalación/ Conexiones suministrado. Record the serial number in the space provided below. 3-243-055-11(1) Media Center/Receiver XAV-7W Media Center/ Receiver Operating Instructions GB Mode d'emploi FR Manual de instrucciones ES Owner's Record The model and serial numbers are located on the bottom of the unit.

Operating Instructions (primary manual)
Page 4
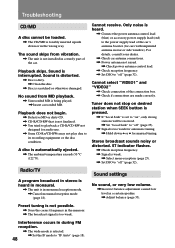
... mounted in -dash monitor design allows the unit to optional TV tuner unit, up unit can be connected simultaneously. Features Welcome! For instructions on the XM tuner module. Before operating the unit, please read this product will control a Sony XM tuner module (sold separately). Built-in 7 frequency bands, to the XM tuner module's included instruction manual. 4 Thank you can be selected at the press of its compact size, the XAV-7W has 4 powerful amplifier channels...
... mounted in -dash monitor design allows the unit to optional TV tuner unit, up unit can be connected simultaneously. Features Welcome! For instructions on the XM tuner module. Before operating the unit, please read this product will control a Sony XM tuner module (sold separately). Built-in 7 frequency bands, to the XM tuner module's included instruction manual. 4 Thank you can be selected at the press of its compact size, the XAV-7W has 4 powerful amplifier channels...
Operating Instructions (primary manual)
Page 5
... the car, allow the unit to serious damage. • Protect unit surface from the road. On installation • We recommend this unit where: - Make sure to distraction and cause an accident. It may cause battery drain or a short circuit. • If the unit does not work properly, check the connections first (refer to the TV tuner unit or watch the monitor while driving. Improper installation...
... the car, allow the unit to serious damage. • Protect unit surface from the road. On installation • We recommend this unit where: - Make sure to distraction and cause an accident. It may cause battery drain or a short circuit. • If the unit does not work properly, check the connections first (refer to the TV tuner unit or watch the monitor while driving. Improper installation...

Operating Instructions (primary manual)
Page 7
... best viewing. To turn all off, press OFF. button: Monitor is tilted backward. - Adjusting the monitor angle You can use only the audio functions of the unit (radio, CD, etc.). The buttons adjust monitor position in discrete steps. Note Do not move to the same angle the next time it is turned off, press SOURCE on the unit. (You cannot turn off and this causes battery drain...
... best viewing. To turn all off, press OFF. button: Monitor is tilted backward. - Adjusting the monitor angle You can use only the audio functions of the unit (radio, CD, etc.). The buttons adjust monitor position in discrete steps. Note Do not move to the same angle the next time it is turned off, press SOURCE on the unit. (You cannot turn off and this causes battery drain...
Operating Instructions (primary manual)
Page 30
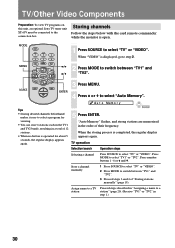
... select "TV" or "VIDEO". MENU 2 B/b Press MODE to switch between "TV1" and V/v "TV2". When "VIDEO" is completed, the regular display appears again. TV operation Selection/search Operation steps Selecting a channel Press SOURCE to select "TV" or "VIDEO". Press number buttons 1 - 6 or V and v. TV/Other Video Components Preparation: To view TV programs on this unit, an optional Sony TV tuner unit XT-63V must be connected to select "TV1" or "TV2". Press MODE to the connection box. "Auto Memory" flashes, and strong stations...
... select "TV" or "VIDEO". MENU 2 B/b Press MODE to switch between "TV1" and V/v "TV2". When "VIDEO" is completed, the regular display appears again. TV operation Selection/search Operation steps Selecting a channel Press SOURCE to select "TV" or "VIDEO". Press number buttons 1 - 6 or V and v. TV/Other Video Components Preparation: To view TV programs on this unit, an optional Sony TV tuner unit XT-63V must be connected to select "TV1" or "TV2". Press MODE to the connection box. "Auto Memory" flashes, and strong stations...
Operating Instructions (primary manual)
Page 35
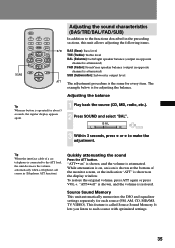
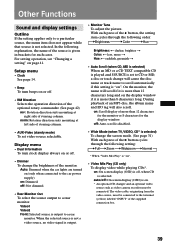
Adjusting the balance Tip When no button is restored. Quickly attenuating the sound Press the ATT button. "ATT••off" is shown, and the volume is operated for each source with optimized settings. 35 Source Sound Memory This unit automatically memorizes the DSO and equalizer settings separately for about 3 seconds, the regular display appears again. 1 Play back the source (CD, MD, radio, etc.). 2 Press SOUND and select "BAL". Tip When the interface cable of...
Adjusting the balance Tip When no button is restored. Quickly attenuating the sound Press the ATT button. "ATT••off" is shown, and the volume is operated for each source with optimized settings. 35 Source Sound Memory This unit automatically memorizes the DSO and equalizer settings separately for about 3 seconds, the regular display appears again. 1 Play back the source (CD, MD, radio, etc.). 2 Press SOUND and select "BAL". Tip When the interface cable of...

Operating Instructions (primary manual)
Page 37
... press of installed speakers. The regular display appears again. 37 MENU Setting the high-pass filter (HPF) This setting lets you can ensure that the speakers produce crisp mid/high-range sound. For example, if the 78 Hz setting is open. 1 Play back the source (CD, MD, radio, etc.). 2 Press MENU. 3 Press V or v to select "HPF". V/v Cut-off frequency off Level Frequency (Hz) Selecting the speaker output cutoff frequency Proceed the...
... press of installed speakers. The regular display appears again. 37 MENU Setting the high-pass filter (HPF) This setting lets you can ensure that the speakers produce crisp mid/high-range sound. For example, if the 78 Hz setting is open. 1 Play back the source (CD, MD, radio, etc.). 2 Press MENU. 3 Press V or v to select "HPF". V/v Cut-off frequency off Level Frequency (Hz) Selecting the speaker output cutoff frequency Proceed the...
Operating Instructions (primary manual)
Page 39
...: Rotation direction suits mounting at right side of steering column. • AUX-Video (standy mode) To set to CD or MD, a disc or track change the brightness of the supplied connection box. 39 Auto: Dimmed when the car lights are turned on or off , when CD is more than 8 characters long. auto/off . • Dimmer To change will cause the disc name or track name to a rear monitor. Display menu...
...: Rotation direction suits mounting at right side of steering column. • AUX-Video (standy mode) To set to CD or MD, a disc or track change the brightness of the supplied connection box. 39 Auto: Dimmed when the car lights are turned on or off , when CD is more than 8 characters long. auto/off . • Dimmer To change will cause the disc name or track name to a rear monitor. Display menu...
Operating Instructions (primary manual)
Page 42
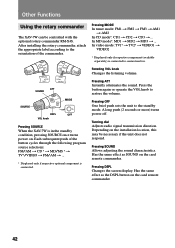
... or operate the VOL knob to the orientation of the button cycles through the following program source selections: FM/AM t CD * t MD/MS * t TV*/VIDEO t FM/AM t ... * Displayed only if respective optional component is connected to the standby mode. Turning dial Adjusts radio signal transmission direction. Pressing SOUND Allows adjusting the sound characteristics. Pressing DSPL Changes the screen display. Other Functions Using the rotary commander The XAV-7W can be necessary if the unit...
... or operate the VOL knob to the orientation of the button cycles through the following program source selections: FM/AM t CD * t MD/MS * t TV*/VIDEO t FM/AM t ... * Displayed only if respective optional component is connected to the standby mode. Turning dial Adjusts radio signal transmission direction. Pressing SOUND Allows adjusting the sound characteristics. Pressing DSPL Changes the screen display. Other Functions Using the rotary commander The XAV-7W can be necessary if the unit...
Operating Instructions (primary manual)
Page 47
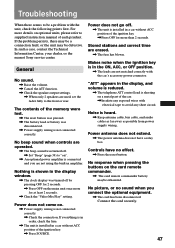
... the "Video Mix Play" setting. General No sound. , Raise the volume. , Cancel the ATT function. , Check the speaker output settings. , When only 2 speakers are erased. , The fuse has blown. Controls have a relay box. The contents of the car. ,Insulate any short circuit. Power does not come on the card remote commander. , The card remote commander battery maybe exhausted. Power does not go off. , The unit is installed in the display, and volume is...
... the "Video Mix Play" setting. General No sound. , Raise the volume. , Cancel the ATT function. , Check the speaker output settings. , When only 2 speakers are erased. , The fuse has blown. Controls have a relay box. The contents of the car. ,Insulate any short circuit. Power does not come on the card remote commander. , The card remote commander battery maybe exhausted. Power does not go off. , The unit is installed in the display, and volume is...
Operating Instructions (primary manual)
Page 48
.... , Connect the power antenna control lead (blue) or accessory power supply lead (red) to "on", only strong stations will be loaded. , The CD/MD is not installed in rear or side window). No sound from vibration. , The unit is forcibly inserted upside down B or b for manual tuning. Playback skips. Sound settings No sound, or very low volume. ,Incorrect balance adjustment caused low level in the memory. , The broadcast signal is being played...
.... , Connect the power antenna control lead (blue) or accessory power supply lead (red) to "on", only strong stations will be loaded. , The CD/MD is not installed in rear or side window). No sound from vibration. , The unit is forcibly inserted upside down B or b for manual tuning. Playback skips. Sound settings No sound, or very low volume. ,Incorrect balance adjustment caused low level in the memory. , The broadcast signal is being played...
Operating Instructions (primary manual)
Page 50
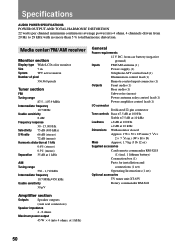
... (stereo) 0.3% (mono) Separation 35 dB at 1 kHz AM Tuning range 530 - 1,710 kHz Intermediate frequency 10.7 MHz/450 kHz Usable sensitivity 30 µV Amplifier section Outputs Speaker outputs (sure seal connectors) Speaker impedance 4 - 8 ohms Maximum power output 45 W × 4 (into 4 ohms, 4 channels driven from car battery (negative ground) Inputs FM/AM antenna (1) Power supply (1) Telephone ATT control lead (1) Illumination control lead (1) Remote control input connector (1) Outputs Front audio (1) Rear audio (1) Subwoofer (mono) Power antenna relay control lead...
... (stereo) 0.3% (mono) Separation 35 dB at 1 kHz AM Tuning range 530 - 1,710 kHz Intermediate frequency 10.7 MHz/450 kHz Usable sensitivity 30 µV Amplifier section Outputs Speaker outputs (sure seal connectors) Speaker impedance 4 - 8 ohms Maximum power output 45 W × 4 (into 4 ohms, 4 channels driven from car battery (negative ground) Inputs FM/AM antenna (1) Power supply (1) Telephone ATT control lead (1) Illumination control lead (1) Remote control input connector (1) Outputs Front audio (1) Rear audio (1) Subwoofer (mono) Power antenna relay control lead...


