Operating Instructions
Page 2
... accordance with the instructions, may cause harmful interference to radio communications. These limits are cautioned that to which the receiver is encouraged to try to Part 15 of the FCC Rules. Be sure to install this unit in the dashboard of the car for illustration purposes. • Bluetooth functions and descriptions apply only to XAV-62BT. For installation and connections, refer to qualified...
... accordance with the instructions, may cause harmful interference to radio communications. These limits are cautioned that to which the receiver is encouraged to try to Part 15 of the FCC Rules. Be sure to install this unit in the dashboard of the car for illustration purposes. • Bluetooth functions and descriptions apply only to XAV-62BT. For installation and connections, refer to qualified...

Operating Instructions
Page 4
... and receiving stations 16 Storing automatically - Table of controls/ terminals 12 Main unit 12 Getting Started Resetting the unit 14 Performing initial settings 14 Radio Listening to your computer 25 Registering a USB device using "SensMe™ Setup 26 Transferring tracks to the USB device using the SensMe™ function . . . . . 25 Installing "SensMe™ Setup" and "Content Transfer" on Bluetooth (XAV-62BT only 10 Playable discs and symbols used in these Operating Instructions 11 Location and function of...
... and receiving stations 16 Storing automatically - Table of controls/ terminals 12 Main unit 12 Getting Started Resetting the unit 14 Performing initial settings 14 Radio Listening to your computer 25 Registering a USB device using "SensMe™ Setup 26 Transferring tracks to the USB device using the SensMe™ function . . . . . 25 Installing "SensMe™ Setup" and "Content Transfer" on Bluetooth (XAV-62BT only 10 Playable discs and symbols used in these Operating Instructions 11 Location and function of...
Operating Instructions
Page 6
... center speaker - Sound Adjustment Selecting the sound quality - Rear Bass Enhancer 45 Adjusting the speaker volume 45 Monitor Adjustment Touch panel calibration 46 Setting the background screen 46 Adjusting the picture - Picture EQ 46 Customizing the picture 47 Selecting the aspect ratio 47 Settings Basic setting operation 48 General settings 49 Sound settings 51 Screen settings 53 DVD and other playback settings 54 Setting the security code 56 Setting the clock 56 Using Optional Equipment Auxiliary audio/video equipment 57 RM-X170 Remote Commander 57 Rear view...
... center speaker - Sound Adjustment Selecting the sound quality - Rear Bass Enhancer 45 Adjusting the speaker volume 45 Monitor Adjustment Touch panel calibration 46 Setting the background screen 46 Adjusting the picture - Picture EQ 46 Customizing the picture 47 Selecting the aspect ratio 47 Settings Basic setting operation 48 General settings 49 Sound settings 51 Screen settings 53 DVD and other playback settings 54 Setting the security code 56 Setting the clock 56 Using Optional Equipment Auxiliary audio/video equipment 57 RM-X170 Remote Commander 57 Rear view...
Operating Instructions
Page 8
... the background screen after you try to the supplied "Installation/Connections" guide and install the unit properly. - Copyrights Manufactured under license. This product is switched to the supplied "Installation/Connections" guide. If you park the car and set the parking brake. The picture on the display is protected by yourself, refer to install this unit should be heard. Do not use the setup feature or any use of Microsoft...
... the background screen after you try to the supplied "Installation/Connections" guide and install the unit properly. - Copyrights Manufactured under license. This product is switched to the supplied "Installation/Connections" guide. If you park the car and set the parking brake. The picture on the display is protected by yourself, refer to install this unit should be heard. Do not use the setup feature or any use of Microsoft...

Operating Instructions
Page 10
... your car is mounted and operating properly. Safe and efficient use of this product. Remember, in order to make or receive calls, the handsfree and the electronic device connected to this unit not expressly approved by Sony may not be dangerous and may invalidate any other device, please read the other device's user guide for detailed safety instructions. Faulty installation or service may be possible on Bluetooth (XAV-62BT only...
... your car is mounted and operating properly. Safe and efficient use of this product. Remember, in order to make or receive calls, the handsfree and the electronic device connected to this unit not expressly approved by Sony may not be dangerous and may invalidate any other device, please read the other device's user guide for detailed safety instructions. Faulty installation or service may be possible on Bluetooth (XAV-62BT only...

Operating Instructions
Page 16
... program type. RDS Receive Preset PTY Band Menu List List 15 C D A Current source icon*1 B Band name, preset number*2, frequency/ status C Volume level*3 D Setting status (EQ7, RBE) *1 Appears only when the controls are tuned to the same number, the previously stored station will be available. • RDS will not work if the signal strength is stored. Display items A Source List ATT Top Storing and receiving stations Caution When tuning to stations while driving, use Best Tuning Memory (BTM...
... program type. RDS Receive Preset PTY Band Menu List List 15 C D A Current source icon*1 B Band name, preset number*2, frequency/ status C Volume level*3 D Setting status (EQ7, RBE) *1 Appears only when the controls are tuned to the same number, the previously stored station will be available. • RDS will not work if the signal strength is stored. Display items A Source List ATT Top Storing and receiving stations Caution When tuning to stations while driving, use Best Tuning Memory (BTM...

Operating Instructions
Page 17
..., you select. You can select a desired title using the DVD menu. To stop playback Press and hold (SOURCE/OFF) for a station broadcasting the selected program type. To eject the disc 1 Press Z on the disc, some operations may receive a different radio program from the one you can also use the remote commander (not supplied). If the menu control panel does not appear by the CT function and the actual time. These sections are not supported...
..., you select. You can select a desired title using the DVD menu. To stop playback Press and hold (SOURCE/OFF) for a station broadcasting the selected program type. To eject the disc 1 Press Z on the disc, some operations may receive a different radio program from the one you can also use the remote commander (not supplied). If the menu control panel does not appear by the CT function and the actual time. These sections are not supported...
Operating Instructions
Page 20
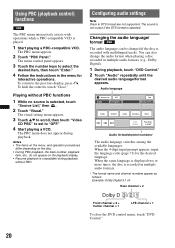
... playing a disc recorded in the menu for the desired language. Audio language Source List ATT Audio 1: English Top Dolby D 3/2.1 Audio Subtitle Angle Top Menu Menu DVD Control Play Menu SHUF Audio format/channel numbers* The audio language switches among the available languages. The PBC menu does not appear during playback without PBC functions 1 While no source is played. 1 Start playing a PBC-compatible VCD. When the same language is displayed two or more times, the disc is selected. Using PBC (playback control) functions...
... playing a disc recorded in the menu for the desired language. Audio language Source List ATT Audio 1: English Top Dolby D 3/2.1 Audio Subtitle Angle Top Menu Menu DVD Control Play Menu SHUF Audio format/channel numbers* The audio language switches among the available languages. The PBC menu does not appear during playback without PBC functions 1 While no source is played. 1 Start playing a PBC-compatible VCD. When the same language is displayed two or more times, the disc is selected. Using PBC (playback control) functions...

Operating Instructions
Page 29
... same way as a general reference for the iPod functions on this unit. Setting the play are not available. About playback controls and indications You can set by the iPod. Support site http://esupport.sony.com http://www.sony.com/mobileAV In these Operating Instructions, "iPod" is connected, a device connected to start playback, touch "Source List," then "iPod/ USB." *1 To play modes. Playing an iPod 1 Reduce the volume on the iPod and iPhone, unless otherwise specified by the...
... same way as a general reference for the iPod functions on this unit. Setting the play are not available. About playback controls and indications You can set by the iPod. Support site http://esupport.sony.com http://www.sony.com/mobileAV In these Operating Instructions, "iPod" is connected, a device connected to start playback, touch "Source List," then "iPod/ USB." *1 To play modes. Playing an iPod 1 Reduce the volume on the iPod and iPhone, unless otherwise specified by the...
Operating Instructions
Page 32
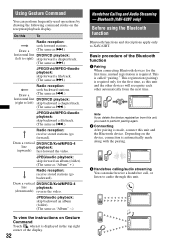
...: receive stored stations (go backward). Depending on Gesture Command Touch when it is automatically made , connect this unit, you delete the device registration from this unit and the Bluetooth device. Note If you need to perform pairing again. 2 Connecting After pairing is required only for the first time, as "Album" -.) To view the instructions on the device, connection is displayed in the top right corner of the Bluetooth function 1 Pairing When connecting Bluetooth devices...
...: receive stored stations (go backward). Depending on Gesture Command Touch when it is automatically made , connect this unit, you delete the device registration from this unit and the Bluetooth device. Note If you need to perform pairing again. 2 Connecting After pairing is required only for the first time, as "Album" -.) To view the instructions on the device, connection is displayed in the top right corner of the Bluetooth function 1 Pairing When connecting Bluetooth devices...
Operating Instructions
Page 41
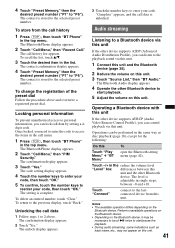
... "Connect" connect to start playback. 5 Adjust the volume on this To Touch "Play Menu" c "BT Menu" open the Bluetooth setting menu (page 42). Perform unavailable operations on the Bluetooth device. • Depending on the Bluetooth device, it may not appear on the Bluetooth device. 4 Touch "Preset Memory," then the desired preset number ("P1" to the previous display, touch "Back." The contact confirmation display appears. 4 Touch "Preset Memory," then the desired preset number ("P1" to the selected preset number. The level is...
... "Connect" connect to start playback. 5 Adjust the volume on this To Touch "Play Menu" c "BT Menu" open the Bluetooth setting menu (page 42). Perform unavailable operations on the Bluetooth device. • Depending on the Bluetooth device, it may not appear on the Bluetooth device. 4 Touch "Preset Memory," then the desired preset number ("P1" to the previous display, touch "Back." The contact confirmation display appears. 4 Touch "Preset Memory," then the desired preset number ("P1" to the selected preset number. The level is...
Operating Instructions
Page 43
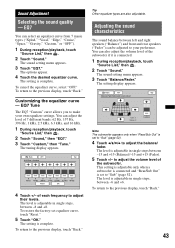
... tuning display appears. To return to the previous display, touch "Back." Adjusting the sound characteristics The sound balance between -6 and +6. To return to your own equalizer settings. To cancel the equalizer curve, select "OFF." The level is adjustable in single steps, between -15 and +15 (Balance)/-15 and +15 (Fader). 5 Touch +/- This setting is adjustable only when a subwoofer is connected and "Rear/Sub Out" is connected. 1 During reception/playback, touch "Source List...
... tuning display appears. To return to the previous display, touch "Back." Adjusting the sound characteristics The sound balance between -6 and +6. To return to your own equalizer settings. To cancel the equalizer curve, select "OFF." The level is adjustable in single steps, between -15 and +15 (Balance)/-15 and +15 (Fader). 5 Touch +/- This setting is adjustable only when a subwoofer is connected and "Rear/Sub Out" is connected. 1 During reception/playback, touch "Source List...
Operating Instructions
Page 57
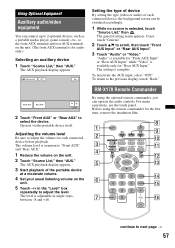
... The AUX playback display appears. "Audio" is available for "Front AUX Input" or "Rear AUX Input," while "Video" is for audio only.) Selecting an auxiliary device 1 Touch "Source List," then "AUX." Adjusting the volume level Be sure to adjust the volume for each connected device, the background screen can be switched accordingly. 1 While no source is adjustable in the "Level" box repeatedly to the previous display, touch "Back." Before using the optional remote commander, you can operate the audio controls. Using Optional Equipment Auxiliary audio/video equipment...
... The AUX playback display appears. "Audio" is available for "Front AUX Input" or "Rear AUX Input," while "Video" is for audio only.) Selecting an auxiliary device 1 Touch "Source List," then "AUX." Adjusting the volume level Be sure to adjust the volume for each connected device, the background screen can be switched accordingly. 1 While no source is adjustable in the "Level" box repeatedly to the previous display, touch "Back." Before using the optional remote commander, you can operate the audio controls. Using Optional Equipment Auxiliary audio/video equipment...
Operating Instructions
Page 64
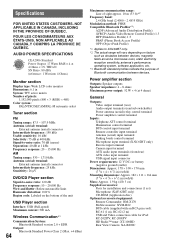
.... 1.9 kg (4 lb 3 oz) Supplied accessories: Parts for installation and connections (1 set) Microphone (XAV-62BT only) CD-ROM (Application disc) Optional accessories/equipment: Remote Commander: RM-X170 Mobile monitor: XVM-B62 BUS cable (supplied with an RCA pin cord): RC-61 (1 m), RC-62 (2 m) USB and Video connection cable for iPod: RC-202IPV, RC-200IPV HD Radio™ tuner: XT-100HD Rear View Camera: XA-R800C Specifications FOR UNITED STATES CUSTOMERS. NOT APPLICABLE IN CANADA...
.... 1.9 kg (4 lb 3 oz) Supplied accessories: Parts for installation and connections (1 set) Microphone (XAV-62BT only) CD-ROM (Application disc) Optional accessories/equipment: Remote Commander: RM-X170 Mobile monitor: XVM-B62 BUS cable (supplied with an RCA pin cord): RC-61 (1 m), RC-62 (2 m) USB and Video connection cable for iPod: RC-202IPV, RC-200IPV HD Radio™ tuner: XT-100HD Rear View Camera: XA-R800C Specifications FOR UNITED STATES CUSTOMERS. NOT APPLICABLE IN CANADA...
Operating Instructions
Page 65
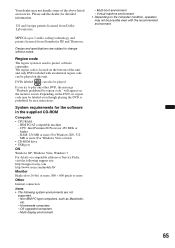
... upgraded computers - Virtual machine environment • Depending on this unit. MPEG Layer-3 audio coding technology and patents licensed from Dolby Laboratories. Multi-display environment - will appear on compatible editions or Service Packs, visit the following support site: http://esupport.sony.com http://www.sony.com/mobileAV Monitor High color (16-bit) or more, 800 × 600 pixels or more Other Internet connection...
... upgraded computers - Virtual machine environment • Depending on this unit. MPEG Layer-3 audio coding technology and patents licensed from Dolby Laboratories. Multi-display environment - will appear on compatible editions or Service Packs, visit the following support site: http://esupport.sony.com http://www.sony.com/mobileAV Monitor High color (16-bit) or more, 800 × 600 pixels or more Other Internet connection...
Operating Instructions
Page 66
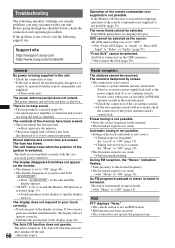
... power amplifier is set to "OFF." The unit makes noise when the position of the power antenna (aerial) control lead. The unit is not connected properly. t Press (SOURCE/OFF) on the unit until the display appears. • "M.OFF" is connected and you are displayed in monaural reception mode. t If the auto antenna (aerial) will not operate correctly. • Calibrate the touch panel of the local seek mode is switched. t Set "Mono" to "Video" or "Audio...
... power amplifier is set to "OFF." The unit makes noise when the position of the power antenna (aerial) control lead. The unit is not connected properly. t Press (SOURCE/OFF) on the unit until the display appears. • "M.OFF" is connected and you are displayed in monaural reception mode. t If the auto antenna (aerial) will not operate correctly. • Calibrate the touch panel of the local seek mode is switched. t Set "Mono" to "Video" or "Audio...
Operating Instructions
Page 67
.... The operation buttons do not play . The aspect ratio is displayed on the DVD. t Set the color system to "PAL" or "NTSC" according to the connected monitor (page 49). • The picture of the car. • The parking cord (light green) is not connected to start playing from each other. t Install the unit at an angle of the rear view camera is incorrect. The disc does not play than...
.... The operation buttons do not play . The aspect ratio is displayed on the DVD. t Set the color system to "PAL" or "NTSC" according to the connected monitor (page 49). • The picture of the car. • The parking cord (light green) is not connected to start playing from each other. t Install the unit at an angle of the rear view camera is incorrect. The disc does not play than...

Operating Instructions
Page 68
... radio waves are used nearby. t Set "Ringtone" to play. t Move your car to send the phone number. No sound is not set to stop playback first for this unit from this unit and the Bluetooth device (page 41). t Turn off the other party to the phonebook (page 38). • The calling phone is output during audio streaming. Check that the volume is received. • The other device. Adjust the "MIC Gain" level...
... radio waves are used nearby. t Set "Ringtone" to play. t Move your car to send the phone number. No sound is not set to stop playback first for this unit from this unit and the Bluetooth device (page 41). t Turn off the other party to the phonebook (page 38). • The calling phone is output during audio streaming. Check that the volume is received. • The other device. Adjust the "MIC Gain" level...
Operating Instructions
Page 69
... disc cannot play due to a problem. t Insert another disc. • The disc is not found. t Reconnect it may take more than a minute. t Access the phonebook again. • Phonebook download from the cellular phone failed due to a problem. A memory error has occurred. t Check the Bluetooth setting of the connecting device. Disc Error • The disc is busy. t Initialize the Bluetooth setting (page 42). t Wait for 1 second, then turn on the disc. t Insert a compatible disc...
... disc cannot play due to a problem. t Insert another disc. • The disc is not found. t Reconnect it may take more than a minute. t Access the phonebook again. • Phonebook download from the cellular phone failed due to a problem. A memory error has occurred. t Check the Bluetooth setting of the connecting device. Disc Error • The disc is busy. t Initialize the Bluetooth setting (page 42). t Wait for 1 second, then turn on the disc. t Insert a compatible disc...

Operating Instructions
Page 70
... time. t Disconnect the USB device, then change the source by region code. A USB device or a USB cable has been disconnected during automatic tuning. The DVD's region code differs from the unit's region code. The unit is reading all file/album (folder) information in the list of order, or an unsupported device is connected. FAILURE (Displays for about 1 second.) When the SAT tuner is connected, storing a SAT radio channel in the connected USB device. USB hubs are not supported...
... time. t Disconnect the USB device, then change the source by region code. A USB device or a USB cable has been disconnected during automatic tuning. The DVD's region code differs from the unit's region code. The unit is reading all file/album (folder) information in the list of order, or an unsupported device is connected. FAILURE (Displays for about 1 second.) When the SAT tuner is connected, storing a SAT radio channel in the connected USB device. USB hubs are not supported...


