

Operating Instructions
Page 6
Message Lists 61 Replacing the Lamp 63 Cleaning the Air Filter 66 Replacing the Air Filter 67 Specifications 69 Preset Signals 71 Input Signals and Adjustable/ Setting Items 74 Ceiling Installation 76 When Using the PSS-H10 Projector Suspension Support ......... 77 When Using the PSS-610 Projector Suspension Support ......... 80 Making Fine Adjustments to the Horizontal Picture Position 83 Index 86 6 GB Table of Contents
Message Lists 61 Replacing the Lamp 63 Cleaning the Air Filter 66 Replacing the Air Filter 67 Specifications 69 Preset Signals 71 Input Signals and Adjustable/ Setting Items 74 Ceiling Installation 76 When Using the PSS-H10 Projector Suspension Support ......... 77 When Using the PSS-610 Projector Suspension Support ......... 80 Making Fine Adjustments to the Horizontal Picture Position 83 Index 86 6 GB Table of Contents

Operating Instructions
Page 7
... or objects near these holes, or internal heat build-up may occur, causing picture degradation or damage to the projector. Do not block or place anything near the ventilation holes. Caution The projector is equipped with the I/1 (on . • Do not place your unit as it out by the plug. On repacking... your unit is identical with the voltage of your local power supply. • Should any liquid or solid object fall into the lens while the lamp is on /standby) switch, do not disconnect the unit from the wall outlet if it is not to be near the unit and easily accessible...
... or objects near these holes, or internal heat build-up may occur, causing picture degradation or damage to the projector. Do not block or place anything near the ventilation holes. Caution The projector is equipped with the I/1 (on . • Do not place your unit as it out by the plug. On repacking... your unit is identical with the voltage of your local power supply. • Should any liquid or solid object fall into the lens while the lamp is on /standby) switch, do not disconnect the unit from the wall outlet if it is not to be near the unit and easily accessible...

Operating Instructions
Page 8
LENS button (1 page 23) M/m/ Location of Controls Front/Right Side You can use the buttons on the control panel with the same names as those on the remote control to operate the projector. Ventilation holes (intake) (1 page 14) Remote control detector (1 page 22) ON/STANDBY indicator (1 page 23) POWER SAVING indicator (1 page 50) LAMP/COVER indicator (1 page 60) TEMP/FAN Indicator (1 page 60) Open the cover by pushing it.
LENS button (1 page 23) M/m/ Location of Controls Front/Right Side You can use the buttons on the control panel with the same names as those on the remote control to operate the projector. Ventilation holes (intake) (1 page 14) Remote control detector (1 page 22) ON/STANDBY indicator (1 page 23) POWER SAVING indicator (1 page 50) LAMP/COVER indicator (1 page 60) TEMP/FAN Indicator (1 page 60) Open the cover by pushing it.
Operating Instructions
Page 55
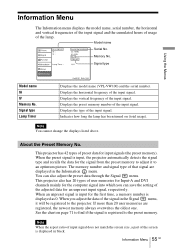
...of usage of the input signal. Signal type Using the Menus Model name fH fV Memory No. Displays the preset memory number of the lamp. This projector has 42 types of the input signal. Displays the vertical frequency of preset data for the signal from the preset memory to adjust it...the oldest one. Memory No. Note You cannot change the displays listed above. Indicates how long the lamp has been turned on page 71 to find if the signal is input, the projector automatically detects the signal type and recalls the data for input signals (the preset memory). The memory ...
...of usage of the input signal. Signal type Using the Menus Model name fH fV Memory No. Displays the preset memory number of the lamp. This projector has 42 types of the input signal. Displays the vertical frequency of preset data for the signal from the preset memory to adjust it...the oldest one. Memory No. Note You cannot change the displays listed above. Indicates how long the lamp has been turned on page 71 to find if the signal is input, the projector automatically detects the signal type and recalls the data for input signals (the preset memory). The memory ...
Operating Instructions
Page 59
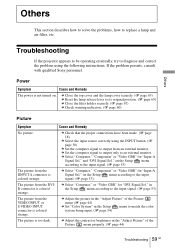
Others Troubleshooting If the projector appears to be operating erratically, try to its original position. (1 page 65) c Close the filter holder securely. (1 page 67) c Check warning indicators. (1 page 60) Picture ... INPUT or S VIDEO INPUT connector is too dark. If the problem persists, consult with qualified Sony personnel. on . c Select "Computer," or "Video GBR" for "DVI Signal Sel." c Set the computer signal to output only to replace a lamp and air filter, etc. Others This section describes how to solve the problems, how to...
Others Troubleshooting If the projector appears to be operating erratically, try to its original position. (1 page 65) c Close the filter holder securely. (1 page 67) c Check warning indicators. (1 page 60) Picture ... INPUT or S VIDEO INPUT connector is too dark. If the problem persists, consult with qualified Sony personnel. on . c Select "Computer," or "Video GBR" for "DVI Signal Sel." c Set the computer signal to output only to replace a lamp and air filter, etc. Others This section describes how to solve the problems, how to...
Operating Instructions
Page 60
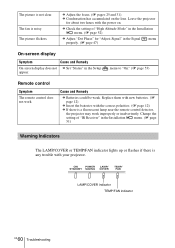
Cause and Remedy c Batteries could be weak. ON/ POWER LAMP/ STANDBY SAVING COVER TEMP/ FAN LAMP/COVER indicator TEMP/FAN indicator GB 60 Troubleshooting The picture flickers. Leave the projector for "Adjust Signal" in the Signal properly. (1 page 47) menu On-screen display Symptom Cause and Remedy On-screen... menu to "On." (1 page 53) Remote control Symptom The remote control does not work improperly or inadvertently. The fan is a fluorescent lamp near the remote control detector, the projector may work . The picture is any trouble with the power on the lens.
Cause and Remedy c Batteries could be weak. ON/ POWER LAMP/ STANDBY SAVING COVER TEMP/ FAN LAMP/COVER indicator TEMP/FAN indicator GB 60 Troubleshooting The picture flickers. Leave the projector for "Adjust Signal" in the Signal properly. (1 page 47) menu On-screen display Symptom Cause and Remedy On-screen... menu to "On." (1 page 53) Remote control Symptom The remote control does not work improperly or inadvertently. The fan is a fluorescent lamp near the remote control detector, the projector may work . The picture is any trouble with the power on the lens.
Operating Instructions
Page 61
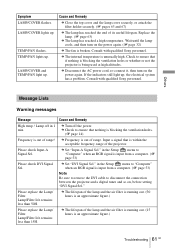
... Setup menu to disconnect the connection between the projector and a digital tuner and so on, before setting "DVI Signal Sel." c Set "Input-A Signal Sel." Please replace the Lamp/ Filter. Lamp/Filter life remains less than 15H. LAMP/COVER and TEMP/FAN light up . Consult with qualified Sony personnel. c Frequency is input from a computer. (1 page 53...
... Setup menu to disconnect the connection between the projector and a digital tuner and so on, before setting "DVI Signal Sel." c Set "Input-A Signal Sel." Please replace the Lamp/ Filter. Lamp/Filter life remains less than 15H. LAMP/COVER and TEMP/FAN light up . Consult with qualified Sony personnel. c Frequency is input from a computer. (1 page 53...

Operating Instructions
Page 62
..." to set to replace the lamp. c Invalid values, such as a blank, are entered in 1 min. Lamp off in the Network Setting window. Have you replace the lamp and filter, the lamp replacement process is displayed when using the projector at an altitude of Lamp/Filter life. Probably use in ...the selected input. Replace the lamp. (1 page 63) c Also, replace...
..." to set to replace the lamp. c Invalid values, such as a blank, are entered in 1 min. Lamp off in the Network Setting window. Have you replace the lamp and filter, the lamp replacement process is displayed when using the projector at an altitude of Lamp/Filter life. Probably use in ...the selected input. Replace the lamp. (1 page 63) c Also, replace...

Operating Instructions
Page 63
... release lever 4 Loosen the screw on the screen, the lamp may burn your fingers. Use an LMP-H400 Projector Lamp as the replacement lamp. appears on the lamp cover with the LMP-H400 Projector Lamp. When the lamp dims, the color balance of Lamp/Filter life. If you replace the lamp, it stops. End of the picture becomes strange, or...
... release lever 4 Loosen the screw on the screen, the lamp may burn your fingers. Use an LMP-H400 Projector Lamp as the replacement lamp. appears on the lamp cover with the LMP-H400 Projector Lamp. When the lamp dims, the color balance of Lamp/Filter life. If you replace the lamp, it stops. End of the picture becomes strange, or...

Operating Instructions
Page 64
... gas is heavy (approx. 2.9 kg (6 lb 6 oz)). Lamp release lever Note Hold the lamp unit tightly so that you drop the lamp or strike it is encapsulated under high pressure inside of the projector. Note Turn the gas releasing valve clockwise until a hissing sound comes out from the valve. However, if ...you do not drop it, because it without releasing gas, the lamp may burst. This may result in an injury. Dropping the lamp may result in an ...
... gas is heavy (approx. 2.9 kg (6 lb 6 oz)). Lamp release lever Note Hold the lamp unit tightly so that you drop the lamp or strike it is encapsulated under high pressure inside of the projector. Note Turn the gas releasing valve clockwise until a hissing sound comes out from the valve. However, if ...you do not drop it, because it without releasing gas, the lamp may burst. This may result in an injury. Dropping the lamp may result in an ...
Operating Instructions
Page 65
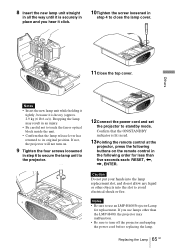
...in place and you hear it is lit in red. 13Pointing the remote control at the projector, press the following order for less than five seconds each: RESET, Notes • Insert the new lamp unit while holding it tightly, because it click. 10Tighten the screw loosened in step 4 to... standby mode. Others 11Close the top cover. Dropping the lamp may result in step 6 to secure the lamp unit to the projector. 12Connect the power cord and set the projector to close the lamp cover. Confirm that the lamp release lever has returned to its original position.
...in place and you hear it is lit in red. 13Pointing the remote control at the projector, press the following order for less than five seconds each: RESET, Notes • Insert the new lamp unit while holding it tightly, because it click. 10Tighten the screw loosened in step 4 to... standby mode. Others 11Close the top cover. Dropping the lamp may result in step 6 to secure the lamp unit to the projector. 12Connect the power cord and set the projector to close the lamp cover. Confirm that the lamp release lever has returned to its original position.

Operating Instructions
Page 66
...the filter holder. Yes V No v" appears on unless the top cover and the lamp cover are approximate. 1 Turn the power off and unplug the power cord. 2 Place a protective sheet (cloth) beneath the projector and turn on the screen, you finished? The air filter should clean the air ...(supplied) has been attached because the projector is installed on the air filter cover, see "To attach the supplied air filter cover for ceiling installation" (1 page 76). 4 Remove dust with a vacuum cleaner. • The projector will not turn on unless the lamp is securely installed in the vacuum cleaner...
...the filter holder. Yes V No v" appears on unless the top cover and the lamp cover are approximate. 1 Turn the power off and unplug the power cord. 2 Place a protective sheet (cloth) beneath the projector and turn on the screen, you finished? The air filter should clean the air ...(supplied) has been attached because the projector is installed on the air filter cover, see "To attach the supplied air filter cover for ceiling installation" (1 page 76). 4 Remove dust with a vacuum cleaner. • The projector will not turn on unless the lamp is securely installed in the vacuum cleaner...

Operating Instructions
Page 67
...the replacement message appears on the ceiling, remove this air filter cover before removing the filter holder. Note The projector will not turn the projector over. 3 Remove the filter holder. Lamp off in a shaded place. 7 Attach the air filter so that no dust or object gets into the ...positions) on the screen, it becomes difficult to remove the dust from the projector, be replaced periodically. Claws 6 Wash the air filter with a vacuum cleaner, go to maintain the high efficiency of Lamp/Filter life. For detailed information on unless the filter holder is very important...
...the replacement message appears on the ceiling, remove this air filter cover before removing the filter holder. Note The projector will not turn the projector over. 3 Remove the filter holder. Lamp off in a shaded place. 7 Attach the air filter so that no dust or object gets into the ...positions) on the screen, it becomes difficult to remove the dust from the projector, be replaced periodically. Claws 6 Wash the air filter with a vacuum cleaner, go to maintain the high efficiency of Lamp/Filter life. For detailed information on unless the filter holder is very important...

Operating Instructions
Page 69
...pixels (2,073,600 pixels × 3) Lens 1.8 times zoom lens (electric) f18.7 to 33.7 mm/F2.54 to 3.53 Lamp 400 W xenon lamp Projection picture size 40 to 300 inches (measured diagonally) Color system NTSC3.58/PAL/SECAM/NTSC4.43/ PAL-M/PAL-N/PAL60 system, switched...terminated) G with sync/Y: 1 Vp-p±2 dB sync negative (75 ohms terminated) B/CB (PB): 0.7 Vp-p±2 dB (75 ohms terminated) SYNC/HD: Composite sync input: TTL level, positive/ negative Horizontal sync input: TTL level, positive/negative VD: Vertical sync input: TTL level, positive/ negative TRIGGER ...
...pixels (2,073,600 pixels × 3) Lens 1.8 times zoom lens (electric) f18.7 to 33.7 mm/F2.54 to 3.53 Lamp 400 W xenon lamp Projection picture size 40 to 300 inches (measured diagonally) Color system NTSC3.58/PAL/SECAM/NTSC4.43/ PAL-M/PAL-N/PAL60 system, switched...terminated) G with sync/Y: 1 Vp-p±2 dB sync negative (75 ohms terminated) B/CB (PB): 0.7 Vp-p±2 dB (75 ohms terminated) SYNC/HD: Composite sync input: TTL level, positive/ negative Horizontal sync input: TTL level, positive/negative VD: Vertical sync input: TTL level, positive/ negative TRIGGER ...

Operating Instructions
Page 70
Storage humidity 10% to 90% Supplied accessories Remote control RM-PJVW100 (1) Size AA (R6) batteries (2) AC power cord (1) Plug holder (1) Operating Instructions (1) CD-ROM (ImageDirector2) (1) Air filter cover (1) Design and specifications are subject to change without notice. Safe regulations UL60950, CSA No. 950, FCC class B, IC class B, EN60950 (NEMKO), CE, C-Tick Optional accessories Projector Lamp LMP-H400 (for replacement) Projector Suspension Support PSS-H10, PSS-610 GB 70 Specifications
Storage humidity 10% to 90% Supplied accessories Remote control RM-PJVW100 (1) Size AA (R6) batteries (2) AC power cord (1) Plug holder (1) Operating Instructions (1) CD-ROM (ImageDirector2) (1) Air filter cover (1) Design and specifications are subject to change without notice. Safe regulations UL60950, CSA No. 950, FCC class B, IC class B, EN60950 (NEMKO), CE, C-Tick Optional accessories Projector Lamp LMP-H400 (for replacement) Projector Suspension Support PSS-H10, PSS-610 GB 70 Specifications

Operating Instructions
Page 86
... 19 High Altitude Mode 52 I Illumination 51 Image Flip 51 Information menu 55 Input-A Signal Sel 53 Installation menu 51 Installing the Projector and a Screen 15, 76 IR Receiver 51 L Lamp Timer 55 Language 53 Lens Control 51 Location of Controls Front/Right side 8 Rear/Bottom 10 Right side 9 M Menu clearing 43...
... 19 High Altitude Mode 52 I Illumination 51 Image Flip 51 Information menu 55 Input-A Signal Sel 53 Installation menu 51 Installing the Projector and a Screen 15, 76 IR Receiver 51 L Lamp Timer 55 Language 53 Lens Control 51 Location of Controls Front/Right side 8 Rear/Bottom 10 Right side 9 M Menu clearing 43...

Operating Instructions
Page 87
... Signals 71 Projection 29 R RCP (Real Color Processing 46 Real Color Processing 39 Remote control inserting the batteries 12 location of controls 11 Replacing the Lamp 63 Reset resettable items 43 resetting the items 43 S Screen Area 49 Selecting the menu language 27 Setup menu 53 Signal menu 47 Standby Mode... Status 53 Supplied accessories 12 T Title Area 48 Troubleshooting 59 V V Keystone 51 V Position 48 Ventilation holes 14 W Warning Indicators 60 WIDE MODE 33 Wide Mode Full 47 Normal 47 Subtitle 47 Wide Zoom 47 Zoom 47 Index 87 GB Others
... Signals 71 Projection 29 R RCP (Real Color Processing 46 Real Color Processing 39 Remote control inserting the batteries 12 location of controls 11 Replacing the Lamp 63 Reset resettable items 43 resetting the items 43 S Screen Area 49 Selecting the menu language 27 Setup menu 53 Signal menu 47 Standby Mode... Status 53 Supplied accessories 12 T Title Area 48 Troubleshooting 59 V V Keystone 51 V Position 48 Ventilation holes 14 W Warning Indicators 60 WIDE MODE 33 Wide Mode Full 47 Normal 47 Subtitle 47 Wide Zoom 47 Zoom 47 Index 87 GB Others


