

Operating Instructions
Page 5
... Color Processing 39 Using the Menus Operation through the Menus .......... 41 Picture Menu 44 Signal Menu 47 Function menu 50 Installation Menu 51 Setup Menu 53 Information Menu 55 About the Preset Memory No. ... 55 Operating the Projector from a Computer Accessing the Projector from a Computer 56 Checking the Status of the Projector 56 Controlling the Projector from a Computer 57 Setting up the Projector 57 Projecting Projecting the Picture on the Screen 29 Turning Off the Power 32 Others Troubleshooting 59 Warning Indicators...
... Color Processing 39 Using the Menus Operation through the Menus .......... 41 Picture Menu 44 Signal Menu 47 Function menu 50 Installation Menu 51 Setup Menu 53 Information Menu 55 About the Preset Memory No. ... 55 Operating the Projector from a Computer Accessing the Projector from a Computer 56 Checking the Status of the Projector 56 Controlling the Projector from a Computer 57 Setting up the Projector 57 Projecting Projecting the Picture on the Screen 29 Turning Off the Power 32 Others Troubleshooting 59 Warning Indicators...

Operating Instructions
Page 23
... projector. The ON/STANDBY indicator flashes in green, and then lights in green. 3 Turn on the screen. Press the LENS button repeatedly until the Lens Shift adjustment window (test pattern) appears. Each time you press the button, the input indication and equipment to be projected change. (1 page 30) INPUT Video Tip When "Auto Input Search" is set to "On" in the Function menu, the channel of the connected equipment. 4 Press INPUT to project the picture on the equipment connected to the operating instructions...
... projector. The ON/STANDBY indicator flashes in green, and then lights in green. 3 Turn on the screen. Press the LENS button repeatedly until the Lens Shift adjustment window (test pattern) appears. Each time you press the button, the input indication and equipment to be projected change. (1 page 30) INPUT Video Tip When "Auto Input Search" is set to "On" in the Function menu, the channel of the connected equipment. 4 Press INPUT to project the picture on the equipment connected to the operating instructions...
Operating Instructions
Page 27
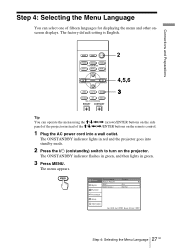
LIGHT INPUT DYNAMIC STANDARD CINEMA PICTURE MODE USER 1 USER 2 USER 3 ENTER LENS ADJ PIC MENU WIDE MODE RCP RESET REAL COLOR PROCESSING BRIGHT CONTRAST 2 4,5,6 3 Tip You can select one of fifteen languages for displaying the menu and other onscreen displays. Connections and Preparations Step 4: Selecting the Menu Language You can operate the menu using the M/m/ The factory default setting is English.
LIGHT INPUT DYNAMIC STANDARD CINEMA PICTURE MODE USER 1 USER 2 USER 3 ENTER LENS ADJ PIC MENU WIDE MODE RCP RESET REAL COLOR PROCESSING BRIGHT CONTRAST 2 4,5,6 3 Tip You can select one of fifteen languages for displaying the menu and other onscreen displays. Connections and Preparations Step 4: Selecting the Menu Language You can operate the menu using the M/m/ The factory default setting is English.

Operating Instructions
Page 29
... red. 29 Projecting the Picture on the Screen Projecting Remote control detector ON/STANDBY indicator 4 LIGHT INPUT DYNAMIC STANDARD CINEMA PICTURE MODE USER 1 USER 2 USER 3 2 5,6 ENTER LENS ADJ PIC MENU 1 Plug the AC power cord into standby mode. Projecting the Picture on the Screen GB ON/ STANDBY Lights in red and the projector goes into a wall outlet. It also describes how to adjust the quality of the picture to the projector. Projecting This section describes how to operate the projector to view the picture from the equipment connected...
... red. 29 Projecting the Picture on the Screen Projecting Remote control detector ON/STANDBY indicator 4 LIGHT INPUT DYNAMIC STANDARD CINEMA PICTURE MODE USER 1 USER 2 USER 3 2 5,6 ENTER LENS ADJ PIC MENU 1 Plug the AC power cord into standby mode. Projecting the Picture on the Screen GB ON/ STANDBY Lights in red and the projector goes into a wall outlet. It also describes how to adjust the quality of the picture to the projector. Projecting This section describes how to operate the projector to view the picture from the equipment connected...
Operating Instructions
Page 30
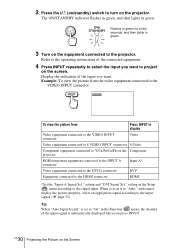
... the ?/1 (on/standby) switch to the HDMI connector HDMI *Set the "Input-A Signal Sel." Refer to the operating instructions of the connected equipment. 4 Press INPUT repeatedly to project on the screen. INPUT Video To view the picture from the video equipment connected to the signal input. setting in the Setup menu according to the VIDEO INPUT connector. Example: To view the picture from Press INPUT to display Video equipment connected to the VIDEO INPUT connector Video Video equipment connected to S VIDEO INPUT connector S-Video Component equipment connected to Y/CB/PB...
... the ?/1 (on/standby) switch to the HDMI connector HDMI *Set the "Input-A Signal Sel." Refer to the operating instructions of the connected equipment. 4 Press INPUT repeatedly to project on the screen. INPUT Video To view the picture from the video equipment connected to the signal input. setting in the Setup menu according to the VIDEO INPUT connector. Example: To view the picture from Press INPUT to display Video equipment connected to the VIDEO INPUT connector Video Video equipment connected to S VIDEO INPUT connector S-Video Component equipment connected to Y/CB/PB...

Operating Instructions
Page 47
... 16:9 screen. You can adjust the input signal. A 4:3 aspect ratio picture is compressed and displayed at the appropriate ratio to fill the vertical screen height. A 4:3 aspect ratio picture is enlarged vertically and horizontally at the lower part of the picture, and select wide screen mode, etc. . Use < or , to adjust the vertical position. Use M or m to adjust the horizontal position. Adjust Signal menu Picture Signal Function Adjust Signal Dot Phase : H Size : Shift : Installation Setup Information Sel: Set: 24...
... 16:9 screen. You can adjust the input signal. A 4:3 aspect ratio picture is compressed and displayed at the appropriate ratio to fill the vertical screen height. A 4:3 aspect ratio picture is enlarged vertically and horizontally at the lower part of the picture, and select wide screen mode, etc. . Use < or , to adjust the vertical position. Use M or m to adjust the horizontal position. Adjust Signal menu Picture Signal Function Adjust Signal Dot Phase : H Size : Shift : Installation Setup Information Sel: Set: 24...

Operating Instructions
Page 50
... used when adjusting the lens with "Lens Focus," "Lens Zoom," and "Lens Shift," or correcting the screen proportions with no signal is input for changing the settings of the various functions of the projector. When set to "On," the projector goes into power saving mode if no input signal, or you do not want to set to "On," a test pattern appears on the screen to switch the channel manually. At that time, the POWER SAVING indicator lights in standby mode. Set...
... used when adjusting the lens with "Lens Focus," "Lens Zoom," and "Lens Shift," or correcting the screen proportions with no signal is input for changing the settings of the various functions of the projector. When set to "On," the projector goes into power saving mode if no input signal, or you do not want to set to "On," a test pattern appears on the screen to switch the channel manually. At that time, the POWER SAVING indicator lights in standby mode. Set...

Operating Instructions
Page 51
... the picture may change from the original or picture distortion may occur with the lens shift feature, the aspect ratio of the projector. Selects the remote control detectors (IR Receiver) on the screen horizontally and/or vertically. H: Flips the picture horizontally. You can adjust the projection lens using "Lens Focus," "Lens Zoom," and "Lens Shift." When set this item to "Off" to "Off." Picture Signal Function Installation Setup V Keystone : Image Flip : Background : Lens Control : IR Receiver : Illumination : High Altitude Mode : Network Setting... 0 Off Blue...
... the picture may change from the original or picture distortion may occur with the lens shift feature, the aspect ratio of the projector. Selects the remote control detectors (IR Receiver) on the screen horizontally and/or vertically. H: Flips the picture horizontally. You can adjust the projection lens using "Lens Focus," "Lens Zoom," and "Lens Shift." When set this item to "Off" to "Off." Picture Signal Function Installation Setup V Keystone : Image Flip : Background : Lens Control : IR Receiver : Illumination : High Altitude Mode : Network Setting... 0 Off Blue...
Operating Instructions
Page 55
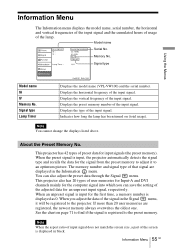
... the preset signal is input for input signals (the preset memory). Information Menu 55 GB Signal type Lamp Timer Displays the model name (VPL-VW100) and the serial number. If more than 20 user memories are displayed in black. Note When the aspect ratio of input signal does not match the screen size, a part of the input signal. Signal type Using the Menus Model name fH fV Memory No. Indicates how long the lamp has been turned on...
... the preset signal is input for input signals (the preset memory). Information Menu 55 GB Signal type Lamp Timer Displays the model name (VPL-VW100) and the serial number. If more than 20 user memories are displayed in black. Note When the aspect ratio of input signal does not match the screen size, a part of the input signal. Signal type Using the Menus Model name fH fV Memory No. Indicates how long the lamp has been turned on...

Operating Instructions
Page 56
... the projector is displayed. Information The present status of the Projector Click "Information." You can check the IP address of the projector on a computer display. You can check the information and present status of the projector using the Installation menu. (1 page 52) Enter the IP address here. Menu The present settings of the projector are connected to the router/hub with the LAN cables, then turn on the projector, computer and router/hub. 1 Start...
... the projector is displayed. Information The present status of the Projector Click "Information." You can check the IP address of the projector on a computer display. You can check the information and present status of the projector using the Installation menu. (1 page 52) Enter the IP address here. Menu The present settings of the projector are connected to the router/hub with the LAN cables, then turn on the projector, computer and router/hub. 1 Start...
Operating Instructions
Page 59
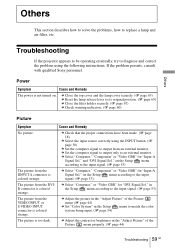
... dark. on . c Check that the proper connections have been made. (1 page 18) c Select the input source correctly using the following instructions. c Set the computer signal to output only to match the color system being input. (1 page 54) The picture is colored strange. in the "Adjust Picture" of the Picture menu properly. (1 page 44) Troubleshooting 59 GB and "DVI Signal Sel." Others Troubleshooting If the projector appears to be operating erratically, try...
... dark. on . c Check that the proper connections have been made. (1 page 18) c Select the input source correctly using the following instructions. c Set the computer signal to output only to match the color system being input. (1 page 54) The picture is colored strange. in the "Adjust Picture" of the Picture menu properly. (1 page 44) Troubleshooting 59 GB and "DVI Signal Sel." Others Troubleshooting If the projector appears to be operating erratically, try...
Operating Instructions
Page 60
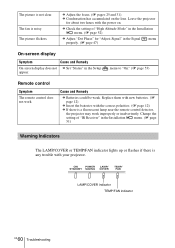
... POWER LAMP/ STANDBY SAVING COVER TEMP/ FAN LAMP/COVER indicator TEMP/FAN indicator GB 60 Troubleshooting The picture is noisy. Leave the projector for "Adjust Signal" in the Signal properly. (1 page 47) menu On-screen display Symptom Cause and Remedy On-screen display does not c Set "Status" in the Installation menu. (1 page 51) Warning Indicators The LAMP/COVER or TEMP/FAN indicator lights up or flashes if there is a fluorescent lamp near the remote control detector, the projector may work . Change the setting of "High Altitude Mode" in the Installation menu. (1 page...
... POWER LAMP/ STANDBY SAVING COVER TEMP/ FAN LAMP/COVER indicator TEMP/FAN indicator GB 60 Troubleshooting The picture is noisy. Leave the projector for "Adjust Signal" in the Signal properly. (1 page 47) menu On-screen display Symptom Cause and Remedy On-screen display does not c Set "Status" in the Installation menu. (1 page 51) Warning Indicators The LAMP/COVER or TEMP/FAN indicator lights up or flashes if there is a fluorescent lamp near the remote control detector, the projector may work . Change the setting of "High Altitude Mode" in the Installation menu. (1 page...
Operating Instructions
Page 61
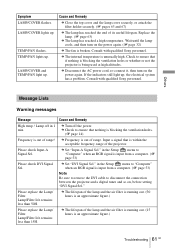
... the air filter is running out. (50 hours is input from a computer. (1 page 53) Please check DVI Signal Sel. c Set "Input-A Signal Sel." Lamp/Filter life remains less than 50H. TEMP/FAN flashes. Check to disconnect the connection between the projector and a digital tuner and so on the power again. Consult with qualified Sony personnel. Input a signal that if nothing is blocking the ventilation holes. (1 page 14) Frequency is unusually high. Please replace the Lamp/ Filter. Symptom LAMP/COVER flashes. TEMP/FAN lights...
... the air filter is running out. (50 hours is input from a computer. (1 page 53) Please check DVI Signal Sel. c Set "Input-A Signal Sel." Lamp/Filter life remains less than 50H. TEMP/FAN flashes. Check to disconnect the connection between the projector and a digital tuner and so on the power again. Consult with qualified Sony personnel. Input a signal that if nothing is blocking the ventilation holes. (1 page 14) Frequency is unusually high. Please replace the Lamp/ Filter. Symptom LAMP/COVER flashes. TEMP/FAN lights...

Operating Instructions
Page 63
... using the projector Turn off the projector, then unplug the power cord. Note Be sure that the projector is turned off the fingerprints with the LMP-H400 Projector Lamp. Note Be sure to use a Philips screwdriver with a new one . Wait for at least an hour for the lamp to replace the air filter. Replace the lamp with a shaft length of the lens. The air filter is also time to cool. Whenever you replace the lamp...
... using the projector Turn off the projector, then unplug the power cord. Note Be sure that the projector is turned off the fingerprints with the LMP-H400 Projector Lamp. Note Be sure to use a Philips screwdriver with a new one . Wait for at least an hour for the lamp to replace the air filter. Replace the lamp with a shaft length of the lens. The air filter is also time to cool. Whenever you replace the lamp...
Operating Instructions
Page 65
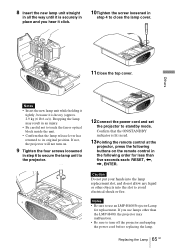
... it is lit in red. 13Pointing the remote control at the projector, press the following buttons on . 9 Tighten the four screws loosened in step 6 to secure the lamp unit to the projector. 12Connect the power cord and set the projector to its original position. Dropping the lamp may result in an injury. • Be careful not to touch the fan or optical block inside...
... it is lit in red. 13Pointing the remote control at the projector, press the following buttons on . 9 Tighten the four screws loosened in step 6 to secure the lamp unit to the projector. 12Connect the power cord and set the projector to its original position. Dropping the lamp may result in an injury. • Be careful not to touch the fan or optical block inside...

Operating Instructions
Page 69
... Specifications System Projection system SXRD panel, 1 lens, projection system LCD panel 0.61-inch SXRD panel with micro-lens array, 6,220,800 pixels (2,073,600 pixels × 3) Lens 1.8 times zoom lens (electric) f18.7 to 33.7 mm/F2.54 to 3.53 Lamp 400 W xenon lamp Projection picture size 40 to 300 inches (measured diagonally) Color system NTSC3.58/PAL/SECAM/NTSC4.43/ PAL-M/PAL-N/PAL60 system, switched automatically/ manually (PAL60 system not switched manually) Acceptable video signals...
... Specifications System Projection system SXRD panel, 1 lens, projection system LCD panel 0.61-inch SXRD panel with micro-lens array, 6,220,800 pixels (2,073,600 pixels × 3) Lens 1.8 times zoom lens (electric) f18.7 to 33.7 mm/F2.54 to 3.53 Lamp 400 W xenon lamp Projection picture size 40 to 300 inches (measured diagonally) Color system NTSC3.58/PAL/SECAM/NTSC4.43/ PAL-M/PAL-N/PAL60 system, switched automatically/ manually (PAL60 system not switched manually) Acceptable video signals...

Operating Instructions
Page 70
Safe regulations UL60950, CSA No. 950, FCC class B, IC class B, EN60950 (NEMKO), CE, C-Tick Optional accessories Projector Lamp LMP-H400 (for replacement) Projector Suspension Support PSS-H10, PSS-610 GB 70 Specifications Storage humidity 10% to 90% Supplied accessories Remote control RM-PJVW100 (1) Size AA (R6) batteries (2) AC power cord (1) Plug holder (1) Operating Instructions (1) CD-ROM (ImageDirector2) (1) Air filter cover (1) Design and specifications are subject to change without notice.
Safe regulations UL60950, CSA No. 950, FCC class B, IC class B, EN60950 (NEMKO), CE, C-Tick Optional accessories Projector Lamp LMP-H400 (for replacement) Projector Suspension Support PSS-H10, PSS-610 GB 70 Specifications Storage humidity 10% to 90% Supplied accessories Remote control RM-PJVW100 (1) Size AA (R6) batteries (2) AC power cord (1) Plug holder (1) Operating Instructions (1) CD-ROM (ImageDirector2) (1) Air filter cover (1) Design and specifications are subject to change without notice.
Operating Instructions
Page 81
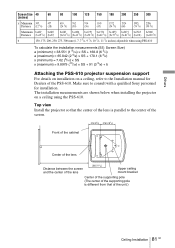
... mm (6, 7, 7 7/8, 9 7/8, 10 7/8, 11 7/8 inches) adjustable when using the PSS-610. Make sure to consult with a qualified Sony personnel for Dealers of the unit.) Ceiling Installation 81 GB Top view Install the projector so that of the PSS-610. The installation measurements are shown below when installing the projector on a ceiling using PSS-610 To calculate the installation measurements (SS: Screen Size) a (minimum) = 38.551 (1 9/16) ×...
... mm (6, 7, 7 7/8, 9 7/8, 10 7/8, 11 7/8 inches) adjustable when using the PSS-610. Make sure to consult with a qualified Sony personnel for Dealers of the unit.) Ceiling Installation 81 GB Top view Install the projector so that of the PSS-610. The installation measurements are shown below when installing the projector on a ceiling using PSS-610 To calculate the installation measurements (SS: Screen Size) a (minimum) = 38.551 (1 9/16) ×...

Operating Instructions
Page 86
... Index H HDMI output 19 High Altitude Mode 52 I Illumination 51 Image Flip 51 Information menu 55 Input-A Signal Sel 53 Installation menu 51 Installing the Projector and a Screen 15, 76 IR Receiver 51 L Lamp Timer 55 Language 53 Lens Control 51 Location of Controls Front/Right side 8 Rear/Bottom 10 Right side 9 M Menu clearing 43 Function menu 50 Information menu 55 Installation menu 51 picture 44 Setup menu 53 Signal menu 47 Using the menu 41 Messages Caution 62 Warning 61 N Network Setting 52 O Over...
... Index H HDMI output 19 High Altitude Mode 52 I Illumination 51 Image Flip 51 Information menu 55 Input-A Signal Sel 53 Installation menu 51 Installing the Projector and a Screen 15, 76 IR Receiver 51 L Lamp Timer 55 Language 53 Lens Control 51 Location of Controls Front/Right side 8 Rear/Bottom 10 Right side 9 M Menu clearing 43 Function menu 50 Information menu 55 Installation menu 51 picture 44 Setup menu 53 Signal menu 47 Using the menu 41 Messages Caution 62 Warning 61 N Network Setting 52 O Over...

Operating Instructions
Page 87
... Real Color Processing 39 Remote control inserting the batteries 12 location of controls 11 Replacing the Lamp 63 Reset resettable items 43 resetting the items 43 S Screen Area 49 Selecting the menu language 27 Setup menu 53 Signal menu 47 Standby Mode 50 Status 53 Supplied accessories 12 T Title Area 48 Troubleshooting 59 V V Keystone 51 V Position 48 Ventilation holes 14 W Warning Indicators 60 WIDE MODE 33 Wide Mode Full 47 Normal 47 Subtitle 47 Wide Zoom 47 Zoom...
... Real Color Processing 39 Remote control inserting the batteries 12 location of controls 11 Replacing the Lamp 63 Reset resettable items 43 resetting the items 43 S Screen Area 49 Selecting the menu language 27 Setup menu 53 Signal menu 47 Standby Mode 50 Status 53 Supplied accessories 12 T Title Area 48 Troubleshooting 59 V V Keystone 51 V Position 48 Ventilation holes 14 W Warning Indicators 60 WIDE MODE 33 Wide Mode Full 47 Normal 47 Subtitle 47 Wide Zoom 47 Zoom...


