
Operating Instructions
Page 3
...Digital Camera Mode 41 Viewing the Pictures 44 Viewing the Pictures in Sequence - Startup 51 Registering a Still Picture as the Startup Picture 51 Setting the Startup Picture 52 Deleting a Picture 53 Sorting the Pictures 55 Displaying Either of Contents Precautions 5 Connections and Preparations Unpacking 6 Step 1: Installing the Projector 7 Before Setting Up the Projector... 7 Using the Optional Conversion Lens 8 Installing the Projector and a Screen - Ceiling Installation 11 Step 2: Connecting the Projector 13 ...
...Digital Camera Mode 41 Viewing the Pictures 44 Viewing the Pictures in Sequence - Startup 51 Registering a Still Picture as the Startup Picture 51 Setting the Startup Picture 52 Deleting a Picture 53 Sorting the Pictures 55 Displaying Either of Contents Precautions 5 Connections and Preparations Unpacking 6 Step 1: Installing the Projector 7 Before Setting Up the Projector... 7 Using the Optional Conversion Lens 8 Installing the Projector and a Screen - Ceiling Installation 11 Step 2: Connecting the Projector 13 ...
Operating Instructions
Page 7
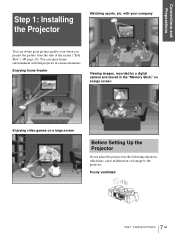
... 10). Enjoying home theater Viewing images, recorded by a digital camera and stored in the "Memory Stick," on a large screen Enjoying video games on a large screen Before Setting Up the Projector Do not place the projector in various situations. Poorly ventilated 7 Step 1: Installing the Projector GB with your company You can enjoy home entertainment with this projector in the following...
... 10). Enjoying home theater Viewing images, recorded by a digital camera and stored in the "Memory Stick," on a large screen Enjoying video games on a large screen Before Setting Up the Projector Do not place the projector in various situations. Poorly ventilated 7 Step 1: Installing the Projector GB with your company You can enjoy home entertainment with this projector in the following...
Operating Instructions
Page 8
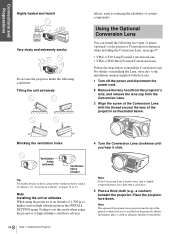
... a cloth of adequate thickness beneath the 8 GB Step 1: Installing the Projector For projection distances when installing the Conversion Lens, see "Location of Controls" on pages 74 to set this mode when using the projector at high altitudes could have adverse Note If the Conversion Lens is installed ...on the projector. Note Installing the unit at altitudes When using the projector at an altitude of 1,500 m or higher,...
... a cloth of adequate thickness beneath the 8 GB Step 1: Installing the Projector For projection distances when installing the Conversion Lens, see "Location of Controls" on pages 74 to set this mode when using the projector at high altitudes could have adverse Note If the Conversion Lens is installed ...on the projector. Note Installing the unit at altitudes When using the projector at an altitude of 1,500 m or higher,...

Operating Instructions
Page 9
...malfunction if it receives too much pressure from the weight of the projector. 6 Fasten the end of the safety wire of the Conversion Lens to the bottom of the projector using "V Keystone" or "Side Shot" in the INSTALL SETTING menu with the floor or a desk top. Floor Installation The ...installation distance between the screen and the center of the projector's lens when you place the projector on the surface of the lens ...
...malfunction if it receives too much pressure from the weight of the projector. 6 Fasten the end of the safety wire of the Conversion Lens to the bottom of the projector using "V Keystone" or "Side Shot" in the INSTALL SETTING menu with the floor or a desk top. Floor Installation The ...installation distance between the screen and the center of the projector's lens when you place the projector on the surface of the lens ...

Operating Instructions
Page 10
... to "Manual," and adjust the level to the center of the projector's lens when you place the projector on page 66. Note If you project the picture using "Side Shot" only, set "V Keystone" in the table. 10 GB Step 1: Installing the Projector Screen size (inches) a b c d e f 40 1.6 (5.2) 1.8 (5.9) -0.1 (-0.3) 0 (0.0) 0.3 (1.0) 0.4 (1.6) 60 2.4 (7.9) 2.8 (9.2) -0.1 (-0.3) 0 (0.0) 0.5 (2.0) 0.6 (2.0) 80 3.2 (10.5) 3.7 (12.1) -0.2 (-0.6) 0 (0.0) 0.7 (2.3) 0.8 (2.6) Unit: m (feet) 100 120...
... to "Manual," and adjust the level to the center of the projector's lens when you place the projector on page 66. Note If you project the picture using "Side Shot" only, set "V Keystone" in the table. 10 GB Step 1: Installing the Projector Screen size (inches) a b c d e f 40 1.6 (5.2) 1.8 (5.9) -0.1 (-0.3) 0 (0.0) 0.3 (1.0) 0.4 (1.6) 60 2.4 (7.9) 2.8 (9.2) -0.1 (-0.3) 0 (0.0) 0.5 (2.0) 0.6 (2.0) 80 3.2 (10.5) 3.7 (12.1) -0.2 (-0.6) 0 (0.0) 0.7 (2.3) 0.8 (2.6) Unit: m (feet) 100 120...

Operating Instructions
Page 13
... or "DVI Signal Sel." setting in the SET SETTING menu. (1 page 34) Note Before you connect your projector to PJ MULTI or DVI connector, select the input signal with the "Input-A Signal Sel." When pulling out a cable, be sure to do the following: • Turn off the digital tuner, etc. HDMI, HDMI logo and High...
... or "DVI Signal Sel." setting in the SET SETTING menu. (1 page 34) Note Before you connect your projector to PJ MULTI or DVI connector, select the input signal with the "Input-A Signal Sel." When pulling out a cable, be sure to do the following: • Turn off the digital tuner, etc. HDMI, HDMI logo and High...

Operating Instructions
Page 20
...the maximum. 1 Set "V Keystone" in the INSTALL SETTING menu to "Manual", press ENTER, then M, m or RESET to set the level to "0." If you want to make adjustments using the current input signal, set to "Auto," the correction capacity of "Side Shot" is reduced. 2 Position the projector so that the bottom...parallel to the bottom side of the screen. Note If "V Keystone" is set "Test Pattern" in test pattern is projected on the screen. The adjuster is reset. To adjust vertically Lift the projector while pressing the adjuster adjustment button, then lock the adjuster by turning the ...
...the maximum. 1 Set "V Keystone" in the INSTALL SETTING menu to "Manual", press ENTER, then M, m or RESET to set the level to "0." If you want to make adjustments using the current input signal, set to "Auto," the correction capacity of "Side Shot" is reduced. 2 Position the projector so that the bottom...parallel to the bottom side of the screen. Note If "V Keystone" is set "Test Pattern" in test pattern is projected on the screen. The adjuster is reset. To adjust vertically Lift the projector while pressing the adjuster adjustment button, then lock the adjuster by turning the ...

Operating Instructions
Page 21
..."V Keystone" in the INSTALL SETTING menu is set to "Auto" in the INSTALL SETTING menu is longer than the left inside of the screen frame. In this case, set to "Auto." Connections and Preparations "Installing the Projector and a Screen" (1 page 9). 3 Move the projector vertically so that the upper ...side of the picture becomes parallel to the bottom side. If the left side is set manually by value adjustment. ...
..."V Keystone" in the INSTALL SETTING menu is set to "Auto" in the INSTALL SETTING menu is longer than the left inside of the screen frame. In this case, set to "Auto." Connections and Preparations "Installing the Projector and a Screen" (1 page 9). 3 Move the projector vertically so that the upper ...side of the picture becomes parallel to the bottom side. If the left side is set manually by value adjustment. ...

Operating Instructions
Page 22
... overlap on the room temperature or the screen angle. If the right side is longer than the left side is set to "Auto," the vertical distortion of the projector and screen referring to correct horizontal trapezoidal distortion using "Side Shot", four sides of a picture may not correct trapezoidal... the right side, press SIDE SHOT -. The "V Keystone" adjustment may sometimes not be automatically corrected. In this case, set manually by value adjustment. 2 Position the projector so that the left side of the picture fits the left and right sides of the picture are parallel to the both...
... overlap on the room temperature or the screen angle. If the right side is longer than the left side is set to "Auto," the vertical distortion of the projector and screen referring to correct horizontal trapezoidal distortion using "Side Shot", four sides of a picture may not correct trapezoidal... the right side, press SIDE SHOT -. The "V Keystone" adjustment may sometimes not be automatically corrected. In this case, set manually by value adjustment. 2 Position the projector so that the left side of the picture fits the left and right sides of the picture are parallel to the both...
Operating Instructions
Page 23
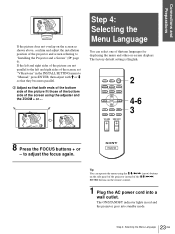
...becomes parallel. 3 Adjust so that both ends of the bottom side of the picture fit those of the bottom side of the screen, set "V Keystone" in the INSTALL SETTING menu to adjust the focus again. LIGHT INPUT DYNAMIC STANDARD CINEMA PICTURE MODE USER 1 USER 2 USER 3 ENTER APA MS SLIDE MENU... operate the menu using the adjuster and the ZOOM + or -. Tip You can select one of the projector and screen referring to "Installing the Projector and a Screen" (1 page 9). The factory default setting is English. If the left and right sides of the picture are not parallel to the left and right...
...becomes parallel. 3 Adjust so that both ends of the bottom side of the picture fit those of the bottom side of the screen, set "V Keystone" in the INSTALL SETTING menu to adjust the focus again. LIGHT INPUT DYNAMIC STANDARD CINEMA PICTURE MODE USER 1 USER 2 USER 3 ENTER APA MS SLIDE MENU... operate the menu using the adjuster and the ZOOM + or -. Tip You can select one of the projector and screen referring to "Installing the Projector and a Screen" (1 page 9). The factory default setting is English. If the left and right sides of the picture are not parallel to the left and right...
Operating Instructions
Page 24
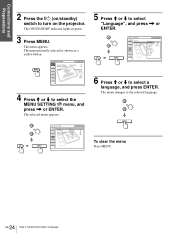
Connections and Preparations 2 Press the [/1 (on the projector. MENU PICTURE SETTING Picture Mode Standard Adjust Picture... The ON/STANDBY indicator lights in green. 3 Press MENU. ENTER To clear the menu Press MENU. 24 GB Step 4: Selecting .... The selected menu appears. : : : : Input A or ENTER 5 Press M or m to select "Language", and press , or ENTER. : : : : Input A or ENTER 6 Press M or m to select the MENU SETTING menu, and press , or ENTER.
Connections and Preparations 2 Press the [/1 (on the projector. MENU PICTURE SETTING Picture Mode Standard Adjust Picture... The ON/STANDBY indicator lights in green. 3 Press MENU. ENTER To clear the menu Press MENU. 24 GB Step 4: Selecting .... The selected menu appears. : : : : Input A or ENTER 5 Press M or m to select "Language", and press , or ENTER. : : : : Input A or ENTER 6 Press M or m to select the MENU SETTING menu, and press , or ENTER.
Operating Instructions
Page 26
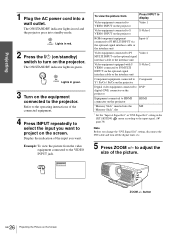
... 2 Component equipment connected to Component Y / PB/CB / PR/CR on the projector Digital video equipment connected to DVI* digital (DVI) connector on the projector Equipment connected to the input signal. (1 page 34) Note Before you want . The ON/STANDBY indicator lights in the SET SETTING menu according to HDMI connector on the screen. button 26 GB...
... 2 Component equipment connected to Component Y / PB/CB / PR/CR on the projector Digital video equipment connected to DVI* digital (DVI) connector on the projector Equipment connected to the input signal. (1 page 34) Note Before you want . The ON/STANDBY indicator lights in the SET SETTING menu according to HDMI connector on the screen. button 26 GB...
Operating Instructions
Page 27
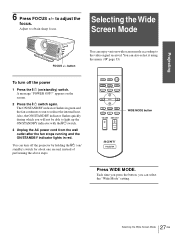
Adjust to adjust the focus. You can turn off the projector by holding the [/1 (on /standby) switch. A message "POWER OFF?" LIGHT INPUT DYNAMIC STANDARD CINEMA PICTURE MODE USER 1 USER 2 USER 3 ENTER APA MS SLIDE MENU WIDE ... 6 Press FOCUS +/- Each time you press the button, you will not be able to reduce the internal heat. button You can select the "Wide Mode" setting. 27 Selecting the Wide Screen Mode GB appears on the screen. 2 Press the [/1 switch again.
Adjust to adjust the focus. You can turn off the projector by holding the [/1 (on /standby) switch. A message "POWER OFF?" LIGHT INPUT DYNAMIC STANDARD CINEMA PICTURE MODE USER 1 USER 2 USER 3 ENTER APA MS SLIDE MENU WIDE ... 6 Press FOCUS +/- Each time you press the button, you will not be able to reduce the internal heat. button You can select the "Wide Mode" setting. 27 Selecting the Wide Screen Mode GB appears on the screen. 2 Press the [/1 switch again.

Operating Instructions
Page 28
...the wide screen mode taking into account that changing the aspect ratio of the original picture will provide a different look from that if the projector is used for profit or for viewing a wide-format movie. Subtitle The subtitle area is compressed and displayed in the center of authors or... the screen to view a movie with subtitles. Notes • You can adjust the vertical position of the picture with "V Position" in the INPUT SETTING menu only when "Zoom" or "Subtitle" is selected. • You can adjust the position of the subtitles with the correct aspect ratio. Tip Squeezed...
...the wide screen mode taking into account that changing the aspect ratio of the original picture will provide a different look from that if the projector is used for profit or for viewing a wide-format movie. Subtitle The subtitle area is compressed and displayed in the center of authors or... the screen to view a movie with subtitles. Notes • You can adjust the vertical position of the picture with "V Position" in the INPUT SETTING menu only when "Zoom" or "Subtitle" is selected. • You can adjust the position of the subtitles with the correct aspect ratio. Tip Squeezed...
Operating Instructions
Page 29
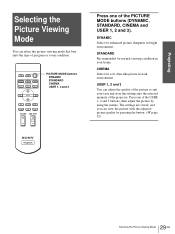
... MENU WIDE MODE LENS RESET VOLUME SIDE SHOT ++ -- DYNAMIC Select for normal viewing condition in your taste and store the settings into the selected memory of the picture to suit your home. STANDARD Recommended for enhanced picture sharpness in dark environment. Projecting Selecting the Picture Viewing Mode You can select the picture... with the adjusted picture quality by using the menus. PICTURE MODE buttons DYNAMIC STANDARD CINEMA USER 1, 2 and 3 Press one of program or room condition. The settings are stored, and you can adjust the quality of the projector.
... MENU WIDE MODE LENS RESET VOLUME SIDE SHOT ++ -- DYNAMIC Select for normal viewing condition in your taste and store the settings into the selected memory of the picture to suit your home. STANDARD Recommended for enhanced picture sharpness in dark environment. Projecting Selecting the Picture Viewing Mode You can select the picture... with the adjusted picture quality by using the menus. PICTURE MODE buttons DYNAMIC STANDARD CINEMA USER 1, 2 and 3 Press one of program or room condition. The settings are stored, and you can adjust the quality of the projector.
Operating Instructions
Page 30
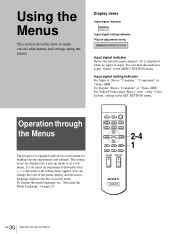
For Digital : Shows "Computer" or "Video GBR." If you select an item name followed by dots (...), a sub menu with an on page 23. To change the tone of the menu display and the menu language displayed in the MENU SETTING menu. LIGHT INPUT DYNAMIC STANDARD CINEMA PICTURE MODE... Operation through the Menus The projector is input. For Video/S Video input: Shows "Auto" or the "Color System" setting in a sub menu. x is displayed when no signal is equipped with setting items appear. The setting items are displayed in a pop-up menu or in the SET SETTING menu. You can change the...
For Digital : Shows "Computer" or "Video GBR." If you select an item name followed by dots (...), a sub menu with an on page 23. To change the tone of the menu display and the menu language displayed in the MENU SETTING menu. LIGHT INPUT DYNAMIC STANDARD CINEMA PICTURE MODE... Operation through the Menus The projector is input. For Video/S Video input: Shows "Auto" or the "Color System" setting in a sub menu. x is displayed when no signal is equipped with setting items appear. The setting items are displayed in a pop-up menu or in the SET SETTING menu. You can change the...
Operating Instructions
Page 31
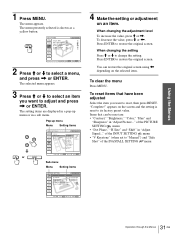
... Auto Input Search: Off Input-A Signal Sel.: Computer Color System: Auto Power Saving: Off Illumination: Off 2 Press M or m to adjust and press , or ENTER. The setting items are displayed in a sub menu. To decrease the value, press m or The menu appears. When changing the adjustment level To increase the value, press...
... Auto Input Search: Off Input-A Signal Sel.: Computer Color System: Auto Power Saving: Off Illumination: Off 2 Press M or m to adjust and press , or ENTER. The setting items are displayed in a sub menu. To decrease the value, press m or The menu appears. When changing the adjustment level To increase the value, press...

Operating Instructions
Page 32
... of the input signal and the used for adjusting the picture. MENU SETTING menu The MENU SETTING menu is used to change the display position, intensity of the background picture, etc., of the projector. INFORMATION menu The INFORMATION menu is used time of picture or the ...greenish the picture becomes. Dynamic: Select for normal viewing condition. Once the settings are limited according to the factory setting, press RESET. Adjust Picture... Using the Menus Menu Lists Menu Configurations The projector is played. You can also adjust the volume (available only for soft...
... of the input signal and the used for adjusting the picture. MENU SETTING menu The MENU SETTING menu is used to change the display position, intensity of the background picture, etc., of the projector. INFORMATION menu The INFORMATION menu is used time of picture or the ...greenish the picture becomes. Dynamic: Select for normal viewing condition. Once the settings are limited according to the factory setting, press RESET. Adjust Picture... Using the Menus Menu Lists Menu Configurations The projector is played. You can also adjust the volume (available only for soft...

Operating Instructions
Page 33
... picture after it is turned on a squeezed 16:9 picture. High: Gives the white colors a blue tint. Custom1, Custom2, Custom3: Can adjust, set and store the favorite tone using the specified controller "ImageDirector" (*1). Low: Gives the white colors a red tint. Film: Normally, select this feature...input signal source. High: Normal wattage. UK: http://www.sony.co.uk Canada: http://www.sonystyle.ca/productsupport South-east Asia: http://www.css.ap.sony.com South America: http://www.sony-latin.com/WEGA INPUT SETTING Item Adjust Signal... DDE (Dynamic Detail Enhancer) Cinema Black ...
... picture after it is turned on a squeezed 16:9 picture. High: Gives the white colors a blue tint. Custom1, Custom2, Custom3: Can adjust, set and store the favorite tone using the specified controller "ImageDirector" (*1). Low: Gives the white colors a red tint. Film: Normally, select this feature...input signal source. High: Normal wattage. UK: http://www.sony.co.uk Canada: http://www.sonystyle.ca/productsupport South-east Asia: http://www.css.ap.sony.com South America: http://www.sony-latin.com/WEGA INPUT SETTING Item Adjust Signal... DDE (Dynamic Detail Enhancer) Cinema Black ...
Operating Instructions
Page 34
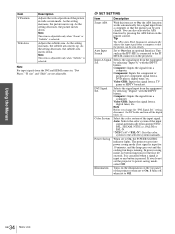
...the first 60 seconds. The projector goes into power saving mode if no button functions for 10 minutes, and the lamp goes out and the cooling fan keeps running. It turns off the digital tuner, etc. SET SETTING Item Description Smart APA With this item set to the PJ MULTI connector ...on the remote control. You can be seen clearly. by pressing the APA button on the projector. Note Before you do not set to On, the POWER SAVING ...
...the first 60 seconds. The projector goes into power saving mode if no button functions for 10 minutes, and the lamp goes out and the cooling fan keeps running. It turns off the digital tuner, etc. SET SETTING Item Description Smart APA With this item set to the PJ MULTI connector ...on the remote control. You can be seen clearly. by pressing the APA button on the projector. Note Before you do not set to On, the POWER SAVING ...

