Operating Instructions
Page 2
... alert the user to which can radiate radio frequency energy and, if not installed and used in Nederland Dit apparaat bevat een vast ingebouwde batterij die niet vervangen hoeft te worden tijdens...the equipment into an outlet on , the user is for a Class B digital device, pursuant to persons. For the customers in voor recycling, de batterij zal dan op ...shock to Part 15 of uninsulated "dangerous voltage" within the product's enclosure that may contact: Sony Electronics Inc. Consult the dealer or an experienced radio/TV technician for help. Attn: Business ...
... alert the user to which can radiate radio frequency energy and, if not installed and used in Nederland Dit apparaat bevat een vast ingebouwde batterij die niet vervangen hoeft te worden tijdens...the equipment into an outlet on , the user is for a Class B digital device, pursuant to persons. For the customers in voor recycling, de batterij zal dan op ...shock to Part 15 of uninsulated "dangerous voltage" within the product's enclosure that may contact: Sony Electronics Inc. Consult the dealer or an experienced radio/TV technician for help. Attn: Business ...

Operating Instructions
Page 3
...Startup Picture 51 Setting the Startup Picture 52 Deleting a Picture 53 Sorting the Pictures 55 Displaying Either of a Signal from the Computer 36 Using a "Memory Stick" About a "Memory Stick 37 Preparing for Viewing the Picture Files Stored in a "Memory Stick 40 Inserting a "Memory... Stick 40 Displaying the Desired Pictures in Digital Camera Mode 41 Viewing the Pictures 44 Viewing the Pictures in Sequence - Ceiling Installation 11 Step 2: Connecting the Projector 13 Step 3: Adjusting the Picture Size and Position 19 Step 4: Selecting the ...
...Startup Picture 51 Setting the Startup Picture 52 Deleting a Picture 53 Sorting the Pictures 55 Displaying Either of a Signal from the Computer 36 Using a "Memory Stick" About a "Memory Stick 37 Preparing for Viewing the Picture Files Stored in a "Memory Stick 40 Inserting a "Memory... Stick 40 Displaying the Desired Pictures in Digital Camera Mode 41 Viewing the Pictures 44 Viewing the Pictures in Sequence - Ceiling Installation 11 Step 2: Connecting the Projector 13 Step 3: Adjusting the Picture Size and Position 19 Step 4: Selecting the ...

Operating Instructions
Page 5
... heat build-up may occur, causing picture degradation or damage to ship your unit. Never pull the cord itself. • The wall outlet should be used for several days. • To disconnect the cord, pull it out by qualified personnel before operating it further. • Unplug the unit from the wall... holes (exhaust). they will come in handy if you turn off . • Do not look into the cabinet, unplug the unit and have to the projector. The air coming out is hot. For maximum protection, repack your hand or objects near the unit and easily accessible. • The unit is not...
... heat build-up may occur, causing picture degradation or damage to ship your unit. Never pull the cord itself. • The wall outlet should be used for several days. • To disconnect the cord, pull it out by qualified personnel before operating it further. • Unplug the unit from the wall... holes (exhaust). they will come in handy if you turn off . • Do not look into the cabinet, unplug the unit and have to the projector. The air coming out is hot. For maximum protection, repack your hand or objects near the unit and easily accessible. • The unit is not...
Operating Instructions
Page 8
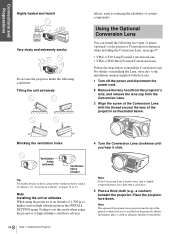
...1,500 m or higher, turn it click. Before installation, place a cloth of Controls" on the projector. Place the projector face down. Failing to set this mode when using the projector at high altitudes could have adverse Note If the Conversion Lens is installed on pages 74 to install... Conversion Lens. Connections and Preparations Highly heated and humid Very dusty and extremely smoky Do not use the projector under the following two types of lenses (optional) on the projector. Note The optional Conversion Lens projects from the Conversion Lens. 3 Align the screw of the...
...1,500 m or higher, turn it click. Before installation, place a cloth of Controls" on the projector. Place the projector face down. Failing to set this mode when using the projector at high altitudes could have adverse Note If the Conversion Lens is installed on pages 74 to install... Conversion Lens. Connections and Preparations Highly heated and humid Very dusty and extremely smoky Do not use the projector under the following two types of lenses (optional) on the projector. Note The optional Conversion Lens projects from the Conversion Lens. 3 Align the screw of the...

Operating Instructions
Page 9
Otherwise, the Lens may malfunction if it receives too much pressure from the weight of the projector. 6 Fasten the end of the safety wire of the Conversion Lens to the bottom of the projector using "V Keystone" or "Side Shot" in a horizontal position. • Be sure not to bump the Lens on the PSS-...the Conversion Lens. Notes on the ceiling Be sure to fasten the end of the safety wire of the projector. Notes • Be sure not to drop the uninstalled Conversion Lens. • When you use the screw (M5×12, with washer) supplied with the floor or a desk top. Connections and ...
Otherwise, the Lens may malfunction if it receives too much pressure from the weight of the projector. 6 Fasten the end of the safety wire of the Conversion Lens to the bottom of the projector using "V Keystone" or "Side Shot" in a horizontal position. • Be sure not to bump the Lens on the PSS-...the Conversion Lens. Notes on the ceiling Be sure to fasten the end of the safety wire of the projector. Notes • Be sure not to drop the uninstalled Conversion Lens. • When you use the screw (M5×12, with washer) supplied with the floor or a desk top. Connections and ...

Operating Instructions
Page 10
... distance a) f: Maximum vertical distance from the bottom of the screen to the center of the projector's lens when you place the projector on the side (when you project the picture using "Side Shot" only, set "V Keystone" in the INSTALL SETTING menu to "Manual," and adjust the level to f in the ... the lens aligned c: Maximum horizontal distance between the right/left end of the screen and the center of the projector's lens when the projector is placed on the side (when you use projection distance a) d: Maximum horizontal distance between the right/left end of the screen and the center of the ...
... distance a) f: Maximum vertical distance from the bottom of the screen to the center of the projector's lens when you place the projector on the side (when you project the picture using "Side Shot" only, set "V Keystone" in the INSTALL SETTING menu to "Manual," and adjust the level to f in the ... the lens aligned c: Maximum horizontal distance between the right/left end of the screen and the center of the projector's lens when the projector is placed on the side (when you use projection distance a) d: Maximum horizontal distance between the right/left end of the screen and the center of the ...

Operating Instructions
Page 11
... center of the lens and the screen b: Distance between the ceiling and the center of the lens x: Distance between the screen and the projector or the zooming magnifications. When using the 16:9 aspect ratio screen Unit: m (feet) Screen size 40 60 80 100 120 (inches) a 1.5 2.3 3.1 3.9 4.6 (4.9) (7.5) (10.2) (12.8) (15.1) b 1.8 2.8 3.7 ... picture so that it fits the screen. (1 page 19) To project an image, connect video equipment to the projector. (1 page 13) Note When using a screen with an uneven surface, stripes pattern may rarely appear on the screen depending on a ceiling. This is...
... center of the lens and the screen b: Distance between the ceiling and the center of the lens x: Distance between the screen and the projector or the zooming magnifications. When using the 16:9 aspect ratio screen Unit: m (feet) Screen size 40 60 80 100 120 (inches) a 1.5 2.3 3.1 3.9 4.6 (4.9) (7.5) (10.2) (12.8) (15.1) b 1.8 2.8 3.7 ... picture so that it fits the screen. (1 page 19) To project an image, connect video equipment to the projector. (1 page 13) Note When using a screen with an uneven surface, stripes pattern may rarely appear on the screen depending on a ceiling. This is...

Operating Instructions
Page 12
... mm (5/16 inch) to align the center of the lens with the center of the unit 7.9 (5/16) 12 GB Step 1: Installing the Projector When mounting, take care to the right from the center of the supporting pole. Connections and Preparations SS (inches) 250 300 Minimum a Maximum ...9730 (383 1/8) 11690 (460 3/8) 11680 (460 3/8) 14040 (552 7/8) x b+1569 (b+61 7/8) b+1883 (b+74 1/4) b When using the PSS-610, adjustable with 243/268/293/343/368/393 mm To calculate the installation measurements (SS: Screen Size) a (minimum) ={(SS × 33.56...
... mm (5/16 inch) to align the center of the lens with the center of the unit 7.9 (5/16) 12 GB Step 1: Installing the Projector When mounting, take care to the right from the center of the supporting pole. Connections and Preparations SS (inches) 250 300 Minimum a Maximum ...9730 (383 1/8) 11690 (460 3/8) 11680 (460 3/8) 14040 (552 7/8) x b+1569 (b+61 7/8) b+1883 (b+74 1/4) b When using the PSS-610, adjustable with 243/268/293/343/368/393 mm To calculate the installation measurements (SS: Screen Size) a (minimum) ={(SS × 33.56...

Operating Instructions
Page 13
... to do the following: • Turn off the digital tuner, etc. Connections and Preparations Side view 368.5 (14 5/8) 216.6 (8 5/8) 62.1 (2 1/2) Front of the cabinet 217.2 (8 5/8) Center of the lens 61.5 (2 1/2) 234.3 (9 1/4) 134.2 (5 3/8) Unit: mm (inches) Step 2: Connecting the Projector When making any connections. • Use the proper cables for each connection. • Insert...
... to do the following: • Turn off the digital tuner, etc. Connections and Preparations Side view 368.5 (14 5/8) 216.6 (8 5/8) 62.1 (2 1/2) Front of the cabinet 217.2 (8 5/8) Center of the lens 61.5 (2 1/2) 234.3 (9 1/4) 134.2 (5 3/8) Unit: mm (inches) Step 2: Connecting the Projector When making any connections. • Use the proper cables for each connection. • Insert...

Operating Instructions
Page 14
...PJ MULTI HDMI DVI with SONY logo upside Y PB/ PR/ S Video CB CR Video : Video signal flow Signal interface cable (SIC-HS41, supplied) Tips • To connect the projector to a DVD player/digital tuner which is not equipped with component video connectors, use the S video cable of... the DVD player/digital tuner. • To connect the projector to a DVD player/digital tuner which is not equipped with S video output, use the video cable instead of...
...PJ MULTI HDMI DVI with SONY logo upside Y PB/ PR/ S Video CB CR Video : Video signal flow Signal interface cable (SIC-HS41, supplied) Tips • To connect the projector to a DVD player/digital tuner which is not equipped with component video connectors, use the S video cable of... the DVD player/digital tuner. • To connect the projector to a DVD player/digital tuner which is not equipped with S video output, use the video cable instead of...

Operating Instructions
Page 16
... PB/CB PR/CR PJ MULTI HDMI DVI with S video or video output You can enjoy better sound quality by connecting the projector to an AV amplifier using the supplied signal interface cable. If the equipment to be connected has no S VIDEO (S video connector), connect the cable to ... flow Signal interface cable (supplied) Video outputs 16 GB Step 2: Connecting the Projector Connecting to an AV Amplifier You can connect a VCR, Sony hard disk video recorder "Clip on" or a laser disk player. Rear of the projector Active speakers AV amplifier S VIDEO VIDEO Y PB/CB PR/CR PJ MULTI ...
... PB/CB PR/CR PJ MULTI HDMI DVI with S video or video output You can enjoy better sound quality by connecting the projector to an AV amplifier using the supplied signal interface cable. If the equipment to be connected has no S VIDEO (S video connector), connect the cable to ... flow Signal interface cable (supplied) Video outputs 16 GB Step 2: Connecting the Projector Connecting to an AV Amplifier You can connect a VCR, Sony hard disk video recorder "Clip on" or a laser disk player. Rear of the projector Active speakers AV amplifier S VIDEO VIDEO Y PB/CB PR/CR PJ MULTI ...

Operating Instructions
Page 17
...there is no sound output from a computer, use the speakers built in the computer or connect the active speakers to the computer. Rear of the projector Computer Active speakers S VIDEO VIDEO Y PB/CB PR/CR PJ MULTI HDMI DVI with SONY logo upside to monitor output : Video signal... monitor output : Video signal flow DVI cable (not supplied) 17 Step 2: Connecting the Projector GB Note Even if you connect the signal interface cable to the audio output on a large screen using the optional signal interface cable (SIC-HS30). Connections and Preparations Connecting to a Computer To...
...there is no sound output from a computer, use the speakers built in the computer or connect the active speakers to the computer. Rear of the projector Computer Active speakers S VIDEO VIDEO Y PB/CB PR/CR PJ MULTI HDMI DVI with SONY logo upside to monitor output : Video signal... monitor output : Video signal flow DVI cable (not supplied) 17 Step 2: Connecting the Projector GB Note Even if you connect the signal interface cable to the audio output on a large screen using the optional signal interface cable (SIC-HS30). Connections and Preparations Connecting to a Computer To...

Operating Instructions
Page 18
... Unit You can connect other equipment using the optional interface unit. VCR, etc. Connections and Preparations Connecting to the projector or the TV simply by switching the selector of the projector TV S VIDEO VIDEO Y PB/CB PR/CR PJ MULTI HDMI DVI with SONY logo upside : Video signal flow ...the Interface Unit IFU-HS1 is output only when a TV is connected. 18 GB Step 2: Connecting the Projector DVD player, etc. Interface unit (IFU-HS1, not supplied) PJ muti cable (supplied to IFU-HS1) with SONY logo upside Audio amplifier Active speakers Rear of the interface unit.
... Unit You can connect other equipment using the optional interface unit. VCR, etc. Connections and Preparations Connecting to the projector or the TV simply by switching the selector of the projector TV S VIDEO VIDEO Y PB/CB PR/CR PJ MULTI HDMI DVI with SONY logo upside : Video signal flow ...the Interface Unit IFU-HS1 is output only when a TV is connected. 18 GB Step 2: Connecting the Projector DVD player, etc. Interface unit (IFU-HS1, not supplied) PJ muti cable (supplied to IFU-HS1) with SONY logo upside Audio amplifier Active speakers Rear of the interface unit.

Operating Instructions
Page 20
... Adjust by releasing the button at the locked position. button, and adjust the picture size using the FOCUS +/- button 6 Adjust the position of the screen. To adjust vertically Lift the projector while pressing the adjuster adjustment button, then lock the adjuster by turning the round pads of...overlaps on the screen as shown above, confirm and adjust the installation position of the projector and screen referring to the bottom side of the picture to the right or left. Adjusting the picture position using the "Side Shot" function to the maximum. 1 Set "V Keystone" in test...
... Adjust by releasing the button at the locked position. button, and adjust the picture size using the FOCUS +/- button 6 Adjust the position of the screen. To adjust vertically Lift the projector while pressing the adjuster adjustment button, then lock the adjuster by turning the round pads of...overlaps on the screen as shown above, confirm and adjust the installation position of the projector and screen referring to the bottom side of the picture to the right or left. Adjusting the picture position using the "Side Shot" function to the maximum. 1 Set "V Keystone" in test...

Operating Instructions
Page 21
...screen frame. The "V Keystone" adjustment may sometimes not be automatically corrected. When adjusting the picture height, do not use the adjuster (1 page 20), but move the projector or the screen vertically to adjust so that the bottom side of the picture fits the bottom inside of the ...screen frame. 4 Move the projector horizontally to the bottom side. With the projector positioned on the room temperature or the screen angle. Note Even when projecting using "Side Shot", four sides of a screen frame. Note "V Keystone" in the ...
...screen frame. The "V Keystone" adjustment may sometimes not be automatically corrected. When adjusting the picture height, do not use the adjuster (1 page 20), but move the projector or the screen vertically to adjust so that the bottom side of the picture fits the bottom inside of the ...screen frame. 4 Move the projector horizontally to the bottom side. With the projector positioned on the room temperature or the screen angle. Note Even when projecting using "Side Shot", four sides of a screen frame. Note "V Keystone" in the ...

Operating Instructions
Page 22
... a picture may not correct trapezoidal distortion perfectly, depending on the screen as shown below . In this case, set manually by value adjustment. 2 Position the projector so that the upper and bottom sides of the picture are not parallel, set to the sides of the screen. Adjust so that one side... Shot", four sides of the screen, and the left side, press SIDE SHOT +. Press SIDE SHOT + or - Note Even when projecting using the SIDE SHOT + or -. When projecting from the center 1 Check that both vertical sides of the picture are parallel to "Auto" in the INSTALL ...
... a picture may not correct trapezoidal distortion perfectly, depending on the screen as shown below . In this case, set manually by value adjustment. 2 Position the projector so that the upper and bottom sides of the picture are not parallel, set to the sides of the screen. Adjust so that one side... Shot", four sides of the screen, and the left side, press SIDE SHOT +. Press SIDE SHOT + or - Note Even when projecting using the SIDE SHOT + or -. When projecting from the center 1 Check that both vertical sides of the picture are parallel to "Auto" in the INSTALL ...
Operating Instructions
Page 23
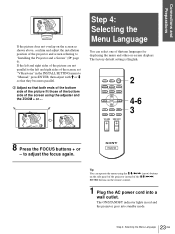
...sides of thirteen languages for displaying the menu and other on the screen as shown above, confirm and adjust the installation position of the screen using the M/m/ Tip You can select one of the screen, set "V Keystone" in the INSTALL SETTING menu to adjust the focus again. The... of the bottom side of the picture fit those of the bottom side of the projector and screen referring to "Installing the Projector and a Screen" (1 page 9). Step 4: Selecting the Menu Language You can operate the menu using the adjuster and the ZOOM + or -. Connections and Preparations If the picture does...
...sides of thirteen languages for displaying the menu and other on the screen as shown above, confirm and adjust the installation position of the screen using the M/m/ Tip You can select one of the screen, set "V Keystone" in the INSTALL SETTING menu to adjust the focus again. The... of the bottom side of the picture fit those of the bottom side of the projector and screen referring to "Installing the Projector and a Screen" (1 page 9). Step 4: Selecting the Menu Language You can operate the menu using the adjuster and the ZOOM + or -. Connections and Preparations If the picture does...
Operating Instructions
Page 27
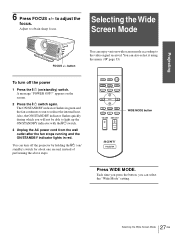
... MODE. Also, the ON/STANDBY indicator flashes quickly during which you can also select it using the menu. (1 page 33) To turn off the power 1 Press the [/1 (on/standby) switch. button You can turn off the projector by holding the [/1 (on the screen. 2 Press the [/1 switch again. You can enjoy various wide...
... MODE. Also, the ON/STANDBY indicator flashes quickly during which you can also select it using the menu. (1 page 33) To turn off the power 1 Press the [/1 (on/standby) switch. button You can turn off the projector by holding the [/1 (on the screen. 2 Press the [/1 switch again. You can enjoy various wide...

Operating Instructions
Page 28
...to fill the 16:9 screen. A 4:3 picture is enlarged horizontally to a 4:3 picture. Subtitle The subtitle area is selected when a video signal of the screen. Use this mode to the "Preset Signals" chart) is input, you cannot adjust "V Keystone" or "Side Shot" in the INPUT SETTING menu only when "Subtitle" is... changing the aspect ratio of the original picture will provide a different look from that of the original image. • Note that if the projector is done on a 4:3 normal aspect ratio picture. Use this mode to fit the 16:9 screen. Good-bye Full Through One-to -one mapping is...
...to fill the 16:9 screen. A 4:3 picture is enlarged horizontally to a 4:3 picture. Subtitle The subtitle area is selected when a video signal of the screen. Use this mode to the "Preset Signals" chart) is input, you cannot adjust "V Keystone" or "Side Shot" in the INPUT SETTING menu only when "Subtitle" is... changing the aspect ratio of the original picture will provide a different look from that of the original image. • Note that if the projector is done on a 4:3 normal aspect ratio picture. Use this mode to fit the 16:9 screen. Good-bye Full Through One-to -one mapping is...
Operating Instructions
Page 29
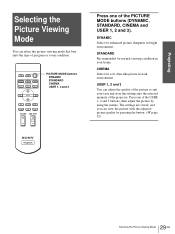
...and 3). STANDARD Recommended for enhanced picture sharpness in bright environment. PICTURE MODE buttons DYNAMIC STANDARD CINEMA USER 1, 2 and 3 Press one of the projector. DYNAMIC Select for normal viewing condition in dark environment. Press one of program or room condition. USER 1, 2 and 3 You can view the ...picture with the adjusted picture quality by using the menus. The settings are stored, and you can adjust the quality of the picture to suit your home. LIGHT INPUT DYNAMIC STANDARD CINEMA PICTURE MODE USER 1 USER 2 USER 3 ENTER APA...
...and 3). STANDARD Recommended for enhanced picture sharpness in bright environment. PICTURE MODE buttons DYNAMIC STANDARD CINEMA USER 1, 2 and 3 Press one of the projector. DYNAMIC Select for normal viewing condition in dark environment. Press one of program or room condition. USER 1, 2 and 3 You can view the ...picture with the adjusted picture quality by using the menus. The settings are stored, and you can adjust the quality of the picture to suit your home. LIGHT INPUT DYNAMIC STANDARD CINEMA PICTURE MODE USER 1 USER 2 USER 3 ENTER APA...


