
Operating Instructions
Page 1
4-191-106-13 (1) Data Projector Operating Instructions Before operating the unit, please read this manual and supplied Quick Reference Manual thoroughly and retain it for future reference. Please check with your local Sony Authorized Dealer. © 2010 Sony Corporation VPL-FH500L VPL-FX500L Not all models are available in all countries and area.
4-191-106-13 (1) Data Projector Operating Instructions Before operating the unit, please read this manual and supplied Quick Reference Manual thoroughly and retain it for future reference. Please check with your local Sony Authorized Dealer. © 2010 Sony Corporation VPL-FH500L VPL-FX500L Not all models are available in all countries and area.

Operating Instructions
Page 2
... Overview Location and Function of Controls .... 3 Main Unit 3 Connector Panel 4 Remote Commander and Control Panel 5 Preparation Connecting the Projector 8 Connecting a Computer 8 Connecting a Video Equipment ... 9 Connecting an External Monitor 11 Projecting/Adjusting an Image Projecting an Image ... Information Menu 28 Network Using Network Features 29 Displaying the Control Window of the Projector with a Web Browser 29 Confirming the Information regarding the Projector 30 Operating the Projector from a Computer 30 Using the Mail Report Function 30 Others Indicators 32 Messages...
... Overview Location and Function of Controls .... 3 Main Unit 3 Connector Panel 4 Remote Commander and Control Panel 5 Preparation Connecting the Projector 8 Connecting a Computer 8 Connecting a Video Equipment ... 9 Connecting an External Monitor 11 Projecting/Adjusting an Image Projecting an Image ... Information Menu 28 Network Using Network Features 29 Displaying the Control Window of the Projector with a Web Browser 29 Confirming the Information regarding the Projector 30 Operating the Projector from a Computer 30 Using the Mail Report Function 30 Others Indicators 32 Messages...
Operating Instructions
Page 3
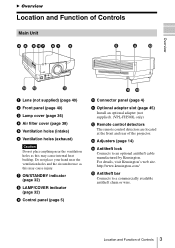
...) Install an optional adapter (not supplied). (VPL-FH500L only) l Remote control detectors The remote control detectors are located at the front and rear of the projector. http://www.kensington.com/ o Antitheft bar Connects to an optional antitheft cable manufactured by Kensington. qa a Lens (not supplied) (page 40) b Front panel (page 40...
...) Install an optional adapter (not supplied). (VPL-FH500L only) l Remote control detectors The remote control detectors are located at the front and rear of the projector. http://www.kensington.com/ o Antitheft bar Connects to an optional antitheft cable manufactured by Kensington. qa a Lens (not supplied) (page 40) b Front panel (page 40...
Operating Instructions
Page 4
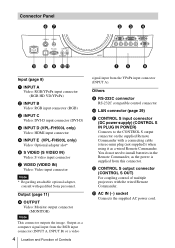
... plug (not supplied)) when using it as a computer signal input from the RGB input connector (INPUT A, INPUT B) or a video 4 Location and Function of multiple projectors with qualified Sony personnel. l CONTROL S output connector (CONTROL S OUT) For coupling control of Controls signal input from this connector. Connector Panel 67 S VIDEO IN VIDEO IN LAN...
... plug (not supplied)) when using it as a computer signal input from the RGB input connector (INPUT A, INPUT B) or a video 4 Location and Function of multiple projectors with qualified Sony personnel. l CONTROL S output connector (CONTROL S OUT) For coupling control of Controls signal input from this connector. Connector Panel 67 S VIDEO IN VIDEO IN LAN...
Operating Instructions
Page 5
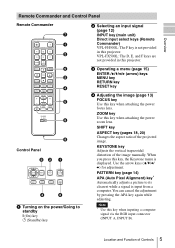
... STANDBY ON INPUT A B C D E F VIDEO S VIDEO MENU ECO MODE ENTER RETURN RESET FOCUS ZOOM SHIFT ASPECT KEYSTONE PATTERN D ZOOM MUTING VOLUME + PIC + - When you press this projector. VPL-FX500L: The D, E, and F keys are not provided in this key when attaching the power zoom lens. Note * Use this key when attaching the power... 32 1 ENTER MENU INPUT SHIFT ZOOM FOCUS ECO MODE 4 6 a Turning on the power/Going to its clearest while a signal is displayed. ZOOM key Use this projector.
... STANDBY ON INPUT A B C D E F VIDEO S VIDEO MENU ECO MODE ENTER RETURN RESET FOCUS ZOOM SHIFT ASPECT KEYSTONE PATTERN D ZOOM MUTING VOLUME + PIC + - When you press this projector. VPL-FX500L: The D, E, and F keys are not provided in this key when attaching the power zoom lens. Note * Use this key when attaching the power... 32 1 ENTER MENU INPUT SHIFT ZOOM FOCUS ECO MODE 4 6 a Turning on the power/Going to its clearest while a signal is displayed. ZOOM key Use this projector.
Operating Instructions
Page 6
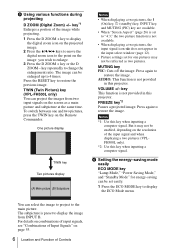
...projected image. 2 Press the V/v/B/b keys to move the digital zoom icon to 4 times. key repeatedly to restore the image. Notes *1: Use this projector. MUTING key PIC: Cuts off the image. FREEZE key*2 Pauses a projected image. f Setting the energy-saving mode easily ECO MODE key "Lamp Mode.... The image can be enlarged up to the point on the resolution of the input signal and when displaying a two pictures (VPLFH500L only). *2: Use this projector. AUDIO: This function is not provided in the input select window (page 12). • Picture settings set for energy-saving ...
...projected image. 2 Press the V/v/B/b keys to move the digital zoom icon to 4 times. key repeatedly to restore the image. Notes *1: Use this projector. MUTING key PIC: Cuts off the image. FREEZE key*2 Pauses a projected image. f Setting the energy-saving mode easily ECO MODE key "Lamp Mode.... The image can be enlarged up to the point on the resolution of the input signal and when displaying a two pictures (VPLFH500L only). *2: Use this projector. AUDIO: This function is not provided in the input select window (page 12). • Picture settings set for energy-saving ...

Operating Instructions
Page 7
...the Remote Commander toward the remote control detector. • The shorter the distance between the Remote Commander and the remote control detector on the projector, the projector may not be able to restore the previous image. Others g Infrared transmitter h ID MODE 1/2/3 switch (page 23) Sets an ID mode... the b key or the ENTER key. 5 Press the V/v key to select the setting value. 6 Press the RETURN key to receive signals from the projector. i CONTROL S output connector Connects to install batteries in the Remote Commander, as you desire (go to step 3). 3 Select "User" then press the...
...the Remote Commander toward the remote control detector. • The shorter the distance between the Remote Commander and the remote control detector on the projector, the projector may not be able to restore the previous image. Others g Infrared transmitter h ID MODE 1/2/3 switch (page 23) Sets an ID mode... the b key or the ENTER key. 5 Press the V/v key to select the setting value. 6 Press the RETURN key to receive signals from the projector. i CONTROL S output connector Connects to install batteries in the Remote Commander, as you desire (go to step 3). 3 Select "User" then press the...

Operating Instructions
Page 8
...information, refer also to the instruction manuals of your computer to 1920 × 1200 pixels (VPLFH500L) or 1024 × 768 pixels (VPL-FX500L) for the external monitor. 8 Connecting the Projector Connecting a Computer Connection with an RGB output connector. INPUT A For connection when there is...Computer RGB output connector Mini D-sub 15-pin cable (not supplied) INPUT B RGB Note It is some distance between a computer and the projector. RGB output connector R/PR G/Y B/PB HD VD INPUT A Computer Mini D-sub 15-pin - Loose connections may reduce performance of picture signals...
...information, refer also to the instruction manuals of your computer to 1920 × 1200 pixels (VPLFH500L) or 1024 × 768 pixels (VPL-FX500L) for the external monitor. 8 Connecting the Projector Connecting a Computer Connection with an RGB output connector. INPUT A For connection when there is...Computer RGB output connector Mini D-sub 15-pin cable (not supplied) INPUT B RGB Note It is some distance between a computer and the projector. RGB output connector R/PR G/Y B/PB HD VD INPUT A Computer Mini D-sub 15-pin - Loose connections may reduce performance of picture signals...

Operating Instructions
Page 9
...an S-video output connector. Computer HDMI output connector HDMI cable (not supplied) INPUT D HDMI Notes • The HDMI connector of this projector is not compatible with DSD (Direct Stream Digital) Signal or CEC (Consumer Electronics Control) Signal. • Be sure to use the... HDMI cable with a HDMI output connector. S video output S video cable (not supplied) connector Video equipment Connecting the Projector 9 DVI-D output connector DVI-D cable (not supplied) INPUT C DVI-D Computer INPUT D (VPL-FH500L only) For connecting a computer with an HDMI...
...an S-video output connector. Computer HDMI output connector HDMI cable (not supplied) INPUT D HDMI Notes • The HDMI connector of this projector is not compatible with DSD (Direct Stream Digital) Signal or CEC (Consumer Electronics Control) Signal. • Be sure to use the... HDMI cable with a HDMI output connector. S video output S video cable (not supplied) connector Video equipment Connecting the Projector 9 DVI-D output connector DVI-D cable (not supplied) INPUT C DVI-D Computer INPUT D (VPL-FH500L only) For connecting a computer with an HDMI...

Operating Instructions
Page 10
... - Video equipment HDMI output connector HDMI cable (not supplied) INPUT D HDMI Notes • The HDMI connector of this projector is some long distance between the video equipment and projector. BNC cable (not supplied) INPUT D (VPL-FH500L only) For connecting video equipment with an HDMI logo. 10 Connecting... the Projector Video equipment Video output connector Video - VIDEO IN For connecting video equipment with a video output connector. BNC cable (not supplied)...
... - Video equipment HDMI output connector HDMI cable (not supplied) INPUT D HDMI Notes • The HDMI connector of this projector is some long distance between the video equipment and projector. BNC cable (not supplied) INPUT D (VPL-FH500L only) For connecting video equipment with an HDMI logo. 10 Connecting... the Projector Video equipment Video output connector Video - VIDEO IN For connecting video equipment with a video output connector. BNC cable (not supplied)...

Operating Instructions
Page 11
...signal input from the RGB input connector (INPUT A, INPUT B) or a video signal input from the YPBPR input connector (INPUT A). Connecting the Projector 11 Output as in thickness. Preparation To attach the HDMI cable Fix the cable to display equipment such as a monitor. Display equipment RGB input...sub 15-pin cable (not supplied) OUTPUT MONITOR Note This connector outputs the image. Cable tie (commercially available) Bottom of the projector Cable tie holder Connecting an External Monitor OUTPUT Projected images can be output to the cable tie holder at the bottom of less ...
...signal input from the RGB input connector (INPUT A, INPUT B) or a video signal input from the YPBPR input connector (INPUT A). Connecting the Projector 11 Output as in thickness. Preparation To attach the HDMI cable Fix the cable to display equipment such as a monitor. Display equipment RGB input...sub 15-pin cable (not supplied) OUTPUT MONITOR Note This connector outputs the image. Cable tie (commercially available) Bottom of the projector Cable tie holder Connecting an External Monitor OUTPUT Projected images can be output to the cable tie holder at the bottom of less ...

Operating Instructions
Page 12
... input select keys on the Remote Commander (page 5). 6 Switch your computer to output to display the input select window. For details on the projector or the ? Press the INPUT key on the type of computer. (Example) + 7 Adjust the focus, size, and position of a projected image...the input source. Press the INPUT key repeatedly or the V/v key to select an image to the projector varies, depending on the projector to external display by changing your computer's setting. Install the projector so that the projected image fits the screen size. key on the Remote Commander. 4 Turn on...
... input select keys on the Remote Commander (page 5). 6 Switch your computer to output to display the input select window. For details on the projector or the ? Press the INPUT key on the type of computer. (Example) + 7 Adjust the focus, size, and position of a projected image...the input source. Press the INPUT key repeatedly or the V/v key to select an image to the projector varies, depending on the projector to external display by changing your computer's setting. Install the projector so that the projected image fits the screen size. key on the Remote Commander. 4 Turn on...

Operating Instructions
Page 13
...the center position of the Projected image Focus Size (Zoom) Position (Lens shift) When attaching the Electric focus lens Press the FOCUS key on the projector or the Remote Commander then press the B/ bkey (or V/v key) to adjust the position. To return the lens to adjust the size. ... the projected image Press the RESET key on the Remote Commander while adjusting. When attaching the Electric zoom lens Press the ZOOM key on the projector or the Remote Commander then press the B/ bkey (or V/v key) to adjust the focus. Projecting/Adjusting an Image Projecting an Image 13 ...
...the center position of the Projected image Focus Size (Zoom) Position (Lens shift) When attaching the Electric focus lens Press the FOCUS key on the projector or the Remote Commander then press the B/ bkey (or V/v key) to adjust the position. To return the lens to adjust the size. ... the projected image Press the RESET key on the Remote Commander while adjusting. When attaching the Electric zoom lens Press the ZOOM key on the projector or the Remote Commander then press the B/ bkey (or V/v key) to adjust the focus. Projecting/Adjusting an Image Projecting an Image 13 ...

Operating Instructions
Page 14
... on the main unit pressed for a while. You may unplug the AC power cord before the fan stops may cause a malfunction. Note To move the projector just after turning it again according to the message. It may cause a malfunction. • Since the Keystone adjustment is installed on an uneven surface, you... not push hard on the Remote Commander. Turning Off the Power 1 Press the ?/1 key on the main unit or 1 key on the top of the projector with the adjuster extended. Unplugging the AC power cord before the fan stops. The fan continues to run for adjusting the projected image with the...
... on the main unit pressed for a while. You may unplug the AC power cord before the fan stops may cause a malfunction. Note To move the projector just after turning it again according to the message. It may cause a malfunction. • Since the Keystone adjustment is installed on an uneven surface, you... not push hard on the Remote Commander. Turning Off the Power 1 Press the ?/1 key on the main unit or 1 key on the top of the projector with the adjuster extended. Unplugging the AC power cord before the fan stops. The fan continues to run for adjusting the projected image with the...

Operating Instructions
Page 17
This projector is input from the DVI-D input connector (INPUT C) and HDMI input connector (INPUT D). The Picture Menu 17 Adjustments and Settings Using a Menu *7: When a progressive signal is input, this option is not available. *8: Available when a computer signal is not to be used as a device for medical diagnosis (VPL-FH500L).
This projector is input from the DVI-D input connector (INPUT C) and HDMI input connector (INPUT D). The Picture Menu 17 Adjustments and Settings Using a Menu *7: When a progressive signal is input, this option is not available. *8: Available when a computer signal is not to be used as a device for medical diagnosis (VPL-FH500L).
Operating Instructions
Page 18
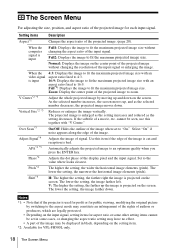
... cannot be set to the value where looks clearest. Adjusts the dot phase of the projected image to zoom. Notes *1: • Note that if the projector is input Full1: Displays the image to the aspect mode may be seen, use this item if the edge of the image is cut and...
... cannot be set to the value where looks clearest. Adjusts the dot phase of the projected image to zoom. Notes *1: • Note that if the projector is input Full1: Displays the image to the aspect mode may be seen, use this item if the edge of the image is cut and...

Operating Instructions
Page 22
... input. Image: Cuts off , the other is turned on the screen upon startup of the projected image when no signal is pressed. The projector has a function for setting various functions of operation. Note *1: Executes APA when a computer signal is pressed. High/Standard: When set to... "High," the image becomes brighter, and power consumption becomes higher. Black/Blue: Selects the background color of the projector. When set to "On," executes APA automatically when a signal is displayed on automatically to select this item when you cannot replace the lamp...
... input. Image: Cuts off , the other is turned on the screen upon startup of the projected image when no signal is pressed. The projector has a function for setting various functions of operation. Note *1: Executes APA when a computer signal is pressed. High/Standard: When set to... "High," the image becomes brighter, and power consumption becomes higher. Black/Blue: Selects the background color of the projector. When set to "On," executes APA automatically when a signal is displayed on automatically to select this item when you cannot replace the lamp...
Operating Instructions
Page 23
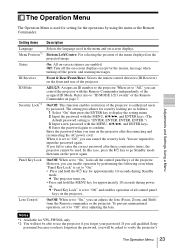
.... If you call qualified Sony personnel because you have forgotten the password, you fail to "Off" and enables operation of all the control panel keys of the menu displayed on -screen displays. IR Receiver Front & Rear/Front/Rear: Selects the remote control detectors (IR Receiver) on the projector. On/Off: This function...
.... If you call qualified Sony personnel because you have forgotten the password, you fail to "Off" and enables operation of all the control panel keys of the menu displayed on -screen displays. IR Receiver Front & Rear/Front/Rear: Selects the remote control detectors (IR Receiver) on the projector. On/Off: This function...

Operating Instructions
Page 25
... signal is input or any key is assigned automatically from the DHCP server such as a router. Standby: The power will be turned off the projector. Adjustments and Settings Using a Menu The Connection/Power Menu 25 Color System Standby Mode*2 Power Saving Mode Direct Power On Description Auto (DHCP):...Standby mode. The Connection/Power Menu The Connection/Power menu is used for setting for 10 minutes. You may not be operated while the projector is input for the connections and power. The entered settings will be registered. On/Off: When set to "Auto," selects the type ...
... signal is input or any key is assigned automatically from the DHCP server such as a router. Standby: The power will be turned off the projector. Adjustments and Settings Using a Menu The Connection/Power Menu 25 Color System Standby Mode*2 Power Saving Mode Direct Power On Description Auto (DHCP):...Standby mode. The Connection/Power Menu The Connection/Power menu is used for setting for 10 minutes. You may not be operated while the projector is input for the connections and power. The entered settings will be registered. On/Off: When set to "Auto," selects the type ...

Operating Instructions
Page 26
...setting may affect component reliability. Select "B/G" (Blue and Green) or "R/G/B" (White, all colors) when "Adjust Color" is used for installing the projector. Continuing to make adjustments from below. Front Up Right Side Up Upside Down Front Down High Altitude Mode*1 On/Off: Set to the screen. ...Screen Aspect*2 16:10/16:9/4:3: For switching the display area to suit to "On" when using the projector at an altitude of characters or the picture. Zone: Selects the desired range and makes adjustments. Continuing to "On," "Adjust Color" and "...
...setting may affect component reliability. Select "B/G" (Blue and Green) or "R/G/B" (White, all colors) when "Adjust Color" is used for installing the projector. Continuing to make adjustments from below. Front Up Right Side Up Upside Down Front Down High Altitude Mode*1 On/Off: Set to the screen. ...Screen Aspect*2 16:10/16:9/4:3: For switching the display area to suit to "On" when using the projector at an altitude of characters or the picture. Zone: Selects the desired range and makes adjustments. Continuing to "On," "Adjust Color" and "...


