

Operating Instructions
Page 2
... Adjustments and Settings Using a Menu Using a MENU 15 The Picture Menu 16 The Screen Menu 18 The Function Menu 22 The Operation Menu 23 The Connection/Power Menu .......... 25 The Installation Menu 26 The Information Menu 28 Network Using Network Features 29 Displaying the Control Window of the Projector with a Web Browser 29 Confirming the Information regarding the Projector 30 Operating the Projector from a Computer 30 Using the Mail Report Function 30 Others Indicators 32 Messages List 33 Troubleshooting 34 Replacing the Lamp 36 Replacing the Air Filter...
... Adjustments and Settings Using a Menu Using a MENU 15 The Picture Menu 16 The Screen Menu 18 The Function Menu 22 The Operation Menu 23 The Connection/Power Menu .......... 25 The Installation Menu 26 The Information Menu 28 Network Using Network Features 29 Displaying the Control Window of the Projector with a Web Browser 29 Confirming the Information regarding the Projector 30 Operating the Projector from a Computer 30 Using the Mail Report Function 30 Others Indicators 32 Messages List 33 Troubleshooting 34 Replacing the Lamp 36 Replacing the Air Filter...
Operating Instructions
Page 5
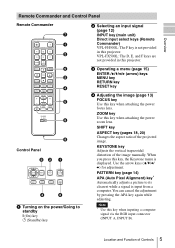
... projector. KEYSTONE key Adjusts the vertical trapezoidal distortion of the image manually. Use the arrow keys (V/v/B/ b) for adjustment. PATTERN key (page 14) APA (Auto Pixel Alignment) key* Automatically adjusts a picture to standby ? (On) key 1 (Standby) key b Selecting an input signal (page 12) INPUT key (main unit) Direct input select keys (Remote Commander) VPL-FH500L: The F key is not provided in this projector. APA TWIN FREEZE ID MODE 1 2 3 7 1 2 6 3 4 5 8 9 Control Panel 32 1 ENTER MENU INPUT SHIFT ZOOM FOCUS ECO MODE 4 6 a Turning...
... projector. KEYSTONE key Adjusts the vertical trapezoidal distortion of the image manually. Use the arrow keys (V/v/B/ b) for adjustment. PATTERN key (page 14) APA (Auto Pixel Alignment) key* Automatically adjusts a picture to standby ? (On) key 1 (Standby) key b Selecting an input signal (page 12) INPUT key (main unit) Direct input select keys (Remote Commander) VPL-FH500L: The F key is not provided in this projector. APA TWIN FREEZE ID MODE 1 2 3 7 1 2 6 3 4 5 8 9 Control Panel 32 1 ENTER MENU INPUT SHIFT ZOOM FOCUS ECO MODE 4 6 a Turning...
Operating Instructions
Page 6
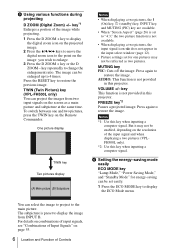
... Remote Commander. For details on combinations of input signals, see "Combinations of Input Signals" on the image you wish to 4 times. key repeatedly to restore the image. VOLUME +/- Press again to change the enlargement ratio. The subpicture is not available. • When displaying a two pictures, the input signal icon does not appear in the input select window (page 12). • Picture settings set to display the ECO Mode menu. TWIN (Twin Picture) key (VPL...
... Remote Commander. For details on combinations of input signals, see "Combinations of Input Signals" on the image you wish to 4 times. key repeatedly to restore the image. VOLUME +/- Press again to change the enlargement ratio. The subpicture is not available. • When displaying a two pictures, the input signal icon does not appear in the input select window (page 12). • Picture settings set to display the ECO Mode menu. TWIN (Twin Picture) key (VPL...

Operating Instructions
Page 7
... using the Remote Commander as you can control the projector becomes. • If there is supplied from the Remote Commander. Lamp Mode: Standard Power Saving Mode: Standby Standby Mode: Low (go to the optimum energy-saving value. i CONTROL S output connector Connects to step 6) User: Sets each item of the Remote Commander. Others g Infrared transmitter h ID MODE 1/2/3 switch (page 23) Sets an ID mode of Controls 7 For details on ECO Mode settings, see "Lamp Mode" (page 22) on the Function menu and "Standby Mode...
... using the Remote Commander as you can control the projector becomes. • If there is supplied from the Remote Commander. Lamp Mode: Standard Power Saving Mode: Standby Standby Mode: Low (go to the optimum energy-saving value. i CONTROL S output connector Connects to step 6) User: Sets each item of the Remote Commander. Others g Infrared transmitter h ID MODE 1/2/3 switch (page 23) Sets an ID mode of Controls 7 For details on ECO Mode settings, see "Lamp Mode" (page 22) on the Function menu and "Standby Mode...

Operating Instructions
Page 12
... input. The signal icon appears on the projector. Press the ?/1 key on the Remote Commander (page 5). 6 Switch your computer's setting. You can select the input source using Direct input select keys on the projector or the ? For details on the projector to external display by changing your computer to output to display the input select window. Press the INPUT key on projection distances and projected image sizes, see "Projection Distance and Lens Shift Range" (page 54). B Projecting/Adjusting an Image Projecting...
... input. The signal icon appears on the projector. Press the ?/1 key on the Remote Commander (page 5). 6 Switch your computer's setting. You can select the input source using Direct input select keys on the projector or the ? For details on the projector to external display by changing your computer to output to display the input select window. Press the INPUT key on projection distances and projected image sizes, see "Projection Distance and Lens Shift Range" (page 54). B Projecting/Adjusting an Image Projecting...

Operating Instructions
Page 15
... next menu window is restored. Using a pop-up menu Press the V/v/B/b key to select the item. Muting Mode Lamp Mode Lamp Light Mode Background Start Up Image On Off Shutter Standard Lamp 1 Blue On Sel Set Back Using the setting menu Press the V or v key to select an item. The previous screen is displayed, select the item according to the operations in step 3 and then press the ENTER key to reset the setting...
... next menu window is restored. Using a pop-up menu Press the V/v/B/b key to select the item. Muting Mode Lamp Mode Lamp Light Mode Background Start Up Image On Off Shutter Standard Lamp 1 Blue On Sel Set Back Using the setting menu Press the V or v key to select an item. The previous screen is displayed, select the item according to the operations in step 3 and then press the ENTER key to reset the setting...

Operating Instructions
Page 16
... setting, the more bluish the picture. The factory settings are rough around the edges when "Auto" is available. 16 The Picture Menu Notes *1: When a computer signal is input, this option is available. *2: When a video signal is input, this option is available. *3: When "Picture Mode" is set to suit the original film source. Reset The picture settings are initialized to the factory preset values. However, "Picture Mode" and "Custom1," "Custom2," and "Custom3" of "Color Temp...
... setting, the more bluish the picture. The factory settings are rough around the edges when "Auto" is available. 16 The Picture Menu Notes *1: When a computer signal is input, this option is available. *2: When a video signal is input, this option is available. *3: When "Picture Mode" is set to suit the original film source. Reset The picture settings are initialized to the factory preset values. However, "Picture Mode" and "Custom1," "Custom2," and "Custom3" of "Color Temp...

Operating Instructions
Page 22
... of the projector. On/Off: When set to "High," the image becomes brighter, and power consumption becomes higher. High/Standard: When set to be used for shorter duration than the other is turned on the screen upon startup of the projected image when no signal is turn off , the other when starting up the projector. Auto: Lights the lamp that is set to "On," executes APA automatically when a signal is displayed on...
... of the projector. On/Off: When set to "High," the image becomes brighter, and power consumption becomes higher. High/Standard: When set to be used for shorter duration than the other is turned on the screen upon startup of the projected image when no signal is turn off , the other when starting up the projector. Auto: Lights the lamp that is set to "On," executes APA automatically when a signal is displayed on...
Operating Instructions
Page 23
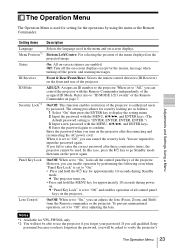
... display the setting menu. 2 Input the password with the MENU, V/v/B/b, and ENTER keys. (The default password setting is "ENTER, ENTER, ENTER, ENTER.") 3 Input a new password with the Remote Commander independently of the projector. Lens Control On/Off: When set it is used . You are enabled. Adjustments and Settings Using a Menu Setting items Description Language Selects the language used in the menu and on -screen displays except for the menus, message when turning off the power, and warning messages. However, you can enable operation by password...
... display the setting menu. 2 Input the password with the MENU, V/v/B/b, and ENTER keys. (The default password setting is "ENTER, ENTER, ENTER, ENTER.") 3 Input a new password with the Remote Commander independently of the projector. Lens Control On/Off: When set it is used . You are enabled. Adjustments and Settings Using a Menu Setting items Description Language Selects the language used in the menu and on -screen displays except for the menus, message when turning off the power, and warning messages. However, you can enable operation by password...

Operating Instructions
Page 25
... signal is input for the connections and power. In Lamp Cutoff, the ON/STANDBY indicator lights in standby mode. You may not be adjusted properly depending on without going to Standby mode when the AC power cord is connected to "Low," the network and network control function cannot be operated while the projector is assigned automatically from the DHCP server such as a router. When "Manual" is selected for 10 minutes. Adjustments and Settings Using a Menu The Connection/Power Menu...
... signal is input for the connections and power. In Lamp Cutoff, the ON/STANDBY indicator lights in standby mode. You may not be adjusted properly depending on without going to Standby mode when the AC power cord is connected to "Low," the network and network control function cannot be operated while the projector is assigned automatically from the DHCP server such as a router. When "Manual" is selected for 10 minutes. Adjustments and Settings Using a Menu The Connection/Power Menu...

Operating Instructions
Page 26
... High Altitude Mode*1 On/Off: Set to use the wrong setting may affect component reliability. Select "B/G" (Blue and Green) or "R/G/B" (White, all colors) when "Adjust Color" is "R" (Red). V Keystone*3 *4 The higher the setting, narrower the top of characters or the picture. Screen Aspect*2 16:10/16:9/4:3: For switching the display area to suit to adjust the gaps in the color of the projected image. When set to make adjustments based on "G" (Green). The Installation Menu The Installation menu is "B" (Blue). Adjust...
... High Altitude Mode*1 On/Off: Set to use the wrong setting may affect component reliability. Select "B/G" (Blue and Green) or "R/G/B" (White, all colors) when "Adjust Color" is "R" (Red). V Keystone*3 *4 The higher the setting, narrower the top of characters or the picture. Screen Aspect*2 16:10/16:9/4:3: For switching the display area to suit to adjust the gaps in the color of the projected image. When set to make adjustments based on "G" (Green). The Installation Menu The Installation menu is "B" (Blue). Adjust...

Operating Instructions
Page 29
... Connection/Power menu (page 25). 3 Start a web browser on the Connection/Power menu. B Network Using Network Features Connection to the network allows you to operate the following in the Web browser: Network Hub or router, etc 2 Set the network settings for the projector using a proxy server. Displaying the Control Window of the projector under "Network Setting" on the computer, enter the following features: • Checking the current status of this procedure. LAN cable (straight type) (not supplied) LAN Connector You can open...
... Connection/Power menu (page 25). 3 Start a web browser on the Connection/Power menu. B Network Using Network Features Connection to the network allows you to operate the following in the Web browser: Network Hub or router, etc 2 Set the network settings for the projector using a proxy server. Displaying the Control Window of the projector under "Network Setting" on the computer, enter the following features: • Checking the current status of this procedure. LAN cable (straight type) (not supplied) LAN Connector You can open...

Operating Instructions
Page 32
... power again. Turn off . B Others Indicators The indicators allow checking the status and notify you of abnormal operation of flashes Meaning/Remedies The projector is in accordance with qualified Sony personnel. ON/STANDBY indicator Status Lights in red Flashes in green Lights in green Lights in orange Flashes in red Flashes twice Flashes six times Other number of the projector. If the symptom is in red Symptoms are not attached securely. Unplug the AC power cord from a wall outlet. LAMP/COVER indicator Status Meaning/Remedies Flashes...
... power again. Turn off . B Others Indicators The indicators allow checking the status and notify you of abnormal operation of flashes Meaning/Remedies The projector is in accordance with qualified Sony personnel. ON/STANDBY indicator Status Lights in red Flashes in green Lights in green Lights in orange Flashes in red Flashes twice Flashes six times Other number of the projector. If the symptom is in red Symptoms are not attached securely. Unplug the AC power cord from a wall outlet. LAMP/COVER indicator Status Meaning/Remedies Flashes...

Operating Instructions
Page 33
... projected image, address the problem in accordance with the table below . • Check to one and replace the air filter. type to suit to "Auto" or select the input signal 25 Signal Sel. Please replace Lamp 1 and Filter. Change the output setting of the connected equipment to see if nothing is blocking the ventilation holes. • Check that nothing is blocking the ventilation holes. • Check to "On." 23 locked! Projector temperature is locked! Lens Control...
... projected image, address the problem in accordance with the table below . • Check to one and replace the air filter. type to suit to "Auto" or select the input signal 25 Signal Sel. Please replace Lamp 1 and Filter. Change the output setting of the connected equipment to see if nothing is blocking the ventilation holes. • Check that nothing is blocking the ventilation holes. • Check to "On." 23 locked! Projector temperature is locked! Lens Control...

Operating Instructions
Page 34
.... Operation menu is set for the Lens Shift function. In such a case, set to external - The settings for about two hours with a new one if necessary. Check 28 "Lamp Timer," and replace the lamp with the power on the projector. The image is connected to "Off." When the "Panel Key Lock" is set "Aspect" manually. recommended range, edges of the image. Check if the connecting cable is not clear. Check if the connecting cable is a trapezoid. Check if "Screen Aspect...
.... Operation menu is set for the Lens Shift function. In such a case, set to external - The settings for about two hours with a new one if necessary. Check 28 "Lamp Timer," and replace the lamp with the power on the projector. The image is connected to "Off." When the "Panel Key Lock" is set "Aspect" manually. recommended range, edges of the image. Check if the connecting cable is not clear. Check if the connecting cable is a trapezoid. Check if "Screen Aspect...

Operating Instructions
Page 36
... into the lamp replacement slot after turning off . Screws Tab Lamp 1 Lamp 2 36 Replacing the Lamp Use an LMP-F330 projector lamp (not supplied) for at least an hour after removing the lamp, otherwise it may cause injury. 1 Turn off the projector, and disconnect the AC power cord from a wall outlet. 2 When the lamp has cooled sufficiently, loosen the two screws of the LAMP/ COVER indicator. Do not replace the lamp yourself. • When removing the lamp, be...
... into the lamp replacement slot after turning off . Screws Tab Lamp 1 Lamp 2 36 Replacing the Lamp Use an LMP-F330 projector lamp (not supplied) for at least an hour after removing the lamp, otherwise it may cause injury. 1 Turn off the projector, and disconnect the AC power cord from a wall outlet. 2 When the lamp has cooled sufficiently, loosen the two screws of the LAMP/ COVER indicator. Do not replace the lamp yourself. • When removing the lamp, be...

Operating Instructions
Page 40
... projection lens. • Avoid removing/attaching the lens with the projector) to the projector. 3 Insert the four screws (supplied with the projector installed suspended from a wall outlet before you are using. 40 Attaching/Removing the Projection Lens Front panel VPLL-FM22/ZM32/ZM42/ZM102: A Removing the compensating glass (page 41) VPLL-FM21*1/ZM31*1/ZP41/FM22/ ZM32/ZM42/ZM102: B Attaching the projection lens adapter (page 42) VPLL-ZM101*1: B Attaching the projection lens adapter...
... projection lens. • Avoid removing/attaching the lens with the projector) to the projector. 3 Insert the four screws (supplied with the projector installed suspended from a wall outlet before you are using. 40 Attaching/Removing the Projection Lens Front panel VPLL-FM22/ZM32/ZM42/ZM102: A Removing the compensating glass (page 41) VPLL-FM21*1/ZM31*1/ZP41/FM22/ ZM32/ZM42/ZM102: B Attaching the projection lens adapter (page 42) VPLL-ZM101*1: B Attaching the projection lens adapter...
Operating Instructions
Page 48
Item Model name Supplied accessories Optional accessories*4 *5 48 Specifications Description VPL-FH500L/VPL-FX500L See "Checking the Supplied Accessories" in the supplied Quick Reference Manual. Projector Lamp LMP-F330 (for replacement) Projector Suspension Support PSS-630 Projector Suspension Support Joint Pole PSS-630P Projection Lens VPLL-FM22*6: Manual focus, Projected image size: 40" to 300" (1.02 m to 7.62 m), Maximum external dimensions (W × H × D): 88 × 88 × 169 mm (3 15/32" × 3 15/32...
Item Model name Supplied accessories Optional accessories*4 *5 48 Specifications Description VPL-FH500L/VPL-FX500L See "Checking the Supplied Accessories" in the supplied Quick Reference Manual. Projector Lamp LMP-F330 (for replacement) Projector Suspension Support PSS-630 Projector Suspension Support Joint Pole PSS-630P Projection Lens VPLL-FM22*6: Manual focus, Projected image size: 40" to 300" (1.02 m to 7.62 m), Maximum external dimensions (W × H × D): 88 × 88 × 169 mm (3 15/32" × 3 15/32...
Operating Instructions
Page 63
... G Gamma Mode 16 H High Altitude Mode 26 Hue 16 I ID Mode 23 ID MODE switch 7 Image Flip 26 Information menu 28 Input 4 Input-A Signal Sel 25 Installation menu 26 Installing the optional adapter 45 IP Address 25 IP Address Setup 25 IR Receiver 23 L Lamp cover 3 Lamp Light Mode 22 Lamp Mode 22 Lamp Timer 28 LAMP/COVER indicator 3, 32 LAN connector 4, 29 Language 23 Lens Control 23 Lens shift range 56, 59 Location and function of controls 3 M Main unit 3 Menu Position 23 Messages list 33 Model Name 28 N Network Setting 25...
... G Gamma Mode 16 H High Altitude Mode 26 Hue 16 I ID Mode 23 ID MODE switch 7 Image Flip 26 Information menu 28 Input 4 Input-A Signal Sel 25 Installation menu 26 Installing the optional adapter 45 IP Address 25 IP Address Setup 25 IR Receiver 23 L Lamp cover 3 Lamp Light Mode 22 Lamp Mode 22 Lamp Timer 28 LAMP/COVER indicator 3, 32 LAN connector 4, 29 Language 23 Lens Control 23 Lens shift range 56, 59 Location and function of controls 3 M Main unit 3 Menu Position 23 Messages list 33 Model Name 28 N Network Setting 25...

Operating Instructions
Page 64
... Projection distance formula 56, 58 R Remote commander 5 Remote control detectors 3 Replacing the air filter cartridges 38 Replacing the lamp 36 Reset 16 RS-232C connector 4 S Screen Aspect 26 Screen menu 18 Secondary DNS 25 Security Lock 23 Selecting an input signal 5 Serial No 28 Sharpness 16 Shift 5, 13, 18 Smart APA 22 Specifications 46 Standby Mode 25 Start Up Image 22 Status 23 Subnet Mask 25 T Troubleshooting 34 Turning off the power 5, 14 Turning on the power 5, 12 Twin picture 6 U Using a menu 15 V V Keystone...
... Projection distance formula 56, 58 R Remote commander 5 Remote control detectors 3 Replacing the air filter cartridges 38 Replacing the lamp 36 Reset 16 RS-232C connector 4 S Screen Aspect 26 Screen menu 18 Secondary DNS 25 Security Lock 23 Selecting an input signal 5 Serial No 28 Sharpness 16 Shift 5, 13, 18 Smart APA 22 Specifications 46 Standby Mode 25 Start Up Image 22 Status 23 Subnet Mask 25 T Troubleshooting 34 Turning off the power 5, 14 Turning on the power 5, 12 Twin picture 6 U Using a menu 15 V V Keystone...


