Operating Instructions
Page 1
2-887-661-11 (1) Video Projector Operating Instructions VPL-VW50 © 2006 Sony Corporation
2-887-661-11 (1) Video Projector Operating Instructions VPL-VW50 © 2006 Sony Corporation

Operating Instructions
Page 3
For customers in the same way. For disposal or recycling information, please contact your local authorities regarding safe disposal. Disposal of Used Lamp This projector's lamp contains mercury and should dispose of properly. Consult your local authorities or the Electronics Industries Alliance (http:// www.eiae.org). 3 The material contained in this product may be disposed of it in the United States This product contains mercury. Disposal of this lamp are similar to those of a fluorescent lamp, so you should be regulated if sold in the United States.
For customers in the same way. For disposal or recycling information, please contact your local authorities regarding safe disposal. Disposal of Used Lamp This projector's lamp contains mercury and should dispose of properly. Consult your local authorities or the Electronics Industries Alliance (http:// www.eiae.org). 3 The material contained in this product may be disposed of it in the United States This product contains mercury. Disposal of this lamp are similar to those of a fluorescent lamp, so you should be regulated if sold in the United States.

Operating Instructions
Page 5
... of Controls Front/Right Side 8 Rear/Bottom 9 Remote Control 10 Connections and Preparations Unpacking 11 Step 1: Installing the Projector .........12 Before Setting Up the Projector 12 Positioning the Projector and a screen 14 Step 2: Connecting the Projector .....17 Connecting to a VCR 17 Connecting to a Computer ..........20 Step 3: Adjusting the Picture Position 21 Step 4: Selecting the...
... of Controls Front/Right Side 8 Rear/Bottom 9 Remote Control 10 Connections and Preparations Unpacking 11 Step 1: Installing the Projector .........12 Before Setting Up the Projector 12 Positioning the Projector and a screen 14 Step 2: Connecting the Projector .....17 Connecting to a VCR 17 Connecting to a Computer ..........20 Step 3: Adjusting the Picture Position 21 Step 4: Selecting the...
Operating Instructions
Page 6
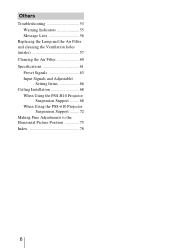
Others Troubleshooting 53 Warning Indicators 55 Message Lists 56 Replacing the Lamp and the Air Filter and cleaning the Ventilation holes (intake 57 Cleaning the Air Filter 60 Specifications 61 Preset Signals 63 Input Signals and Adjustable/ Setting Items 66 Ceiling Installation 68 When Using the PSS-H10 Projector Suspension Support ......... 68 When Using the PSS-610 Projector Suspension Support ......... 72 Making Fine Adjustments to the Horizontal Picture Position 75 Index 78 6
Others Troubleshooting 53 Warning Indicators 55 Message Lists 56 Replacing the Lamp and the Air Filter and cleaning the Ventilation holes (intake 57 Cleaning the Air Filter 60 Specifications 61 Preset Signals 63 Input Signals and Adjustable/ Setting Items 66 Ceiling Installation 68 When Using the PSS-H10 Projector Suspension Support ......... 68 When Using the PSS-610 Projector Suspension Support ......... 72 Making Fine Adjustments to the Horizontal Picture Position 75 Index 78 6

Operating Instructions
Page 7
... the operating voltage of your hand or objects near these holes, or internal heat build-up may occur, causing picture degradation or damage to the projector. On preventing internal heat buildup After you ever have it checked by qualified personnel before operating it was originally packed at the factory. 7 Never pull... wall outlet while the cooling fan is still running. The air coming out is equipped with ventilation holes (intake) and ventilation holes (exhaust). Caution The projector is hot.
... the operating voltage of your hand or objects near these holes, or internal heat build-up may occur, causing picture degradation or damage to the projector. On preventing internal heat buildup After you ever have it checked by qualified personnel before operating it was originally packed at the factory. 7 Never pull... wall outlet while the cooling fan is still running. The air coming out is equipped with ventilation holes (intake) and ventilation holes (exhaust). Caution The projector is hot.

Operating Instructions
Page 8
Location of Controls Front/Right Side You can use the buttons on the control panel with the same names as those on the remote control to operate the projector. LENS button (1 page 22) M/m/
Location of Controls Front/Right Side You can use the buttons on the control panel with the same names as those on the remote control to operate the projector. LENS button (1 page 22) M/m/

Operating Instructions
Page 9
Rear/Bottom Ventilation holes (intake) (1 page 13) Remote control detector (1 page 21) Ventilation holes (intake) (1 page 13) Ventilation holes (intake) Ventilation holes (intake) Ventilation holes (intake) Lamp cover Adjusters Filter holder Ventilation holes (intake) Projector suspension support attaching hole 9 Location of Controls
Rear/Bottom Ventilation holes (intake) (1 page 13) Remote control detector (1 page 21) Ventilation holes (intake) (1 page 13) Ventilation holes (intake) Ventilation holes (intake) Ventilation holes (intake) Lamp cover Adjusters Filter holder Ventilation holes (intake) Projector suspension support attaching hole 9 Location of Controls

Operating Instructions
Page 10
button (1 page 33) LIGHT INPUT DYNAMIC STANDARD CINEMA PICTURE MODE USER 1 USER 2 USER 3 ENTER LENS ADJ PIC MENU WIDE MODE RCP RESET REAL COLOR PROCESSING BRIGHT CONTRAST Infrared transmitter ?/1 (ON/STANDBY) switch (1 page 22) M/m/ PICTURE MODE buttons (1 page 32) ADJ PIC button (1 page 33) LENS button (1 page 22) WIDE MODE button (1 page 30) BRIGHT +/- Remote Control INPUT button (1 page 28) LIGHT button Illuminates the buttons on the remote control.
button (1 page 33) LIGHT INPUT DYNAMIC STANDARD CINEMA PICTURE MODE USER 1 USER 2 USER 3 ENTER LENS ADJ PIC MENU WIDE MODE RCP RESET REAL COLOR PROCESSING BRIGHT CONTRAST Infrared transmitter ?/1 (ON/STANDBY) switch (1 page 22) M/m/ PICTURE MODE buttons (1 page 32) ADJ PIC button (1 page 33) LENS button (1 page 22) WIDE MODE button (1 page 30) BRIGHT +/- Remote Control INPUT button (1 page 28) LIGHT button Illuminates the buttons on the remote control.

Operating Instructions
Page 11
...shown in the illustration. Connections and Preparations Connections and Preparations This section describes how to install the projector and screen, how to connect the equipment from which you use the projector. • Operating Instructions (this lens cap when you want to make sure it contains the ...following items: • Remote control (1) and Size AA (R6) batteries (2) • Lens cap (1) When you have purchased the projector, the lens cap was fitted onto the lens. Unpacking Check the carton to project the picture, etc. Inserting them forcibly or with the polarities...
...shown in the illustration. Connections and Preparations Connections and Preparations This section describes how to install the projector and screen, how to connect the equipment from which you use the projector. • Operating Instructions (this lens cap when you want to make sure it contains the ...following items: • Remote control (1) and Size AA (R6) batteries (2) • Lens cap (1) When you have purchased the projector, the lens cap was fitted onto the lens. Unpacking Check the carton to project the picture, etc. Inserting them forcibly or with the polarities...

Operating Instructions
Page 12
... which may occur. The lens shift allows you to have broader options for placing the projector and viewing pictures easily. Before Setting Up the Projector Unsuitable installation Do not place the projector in temperature. 12 Locations subject to direct cool or warm air from a VCR or... other device. Step 1: Installing the Projector The projector displays pictures output from an air-conditioner Installing the projector in such a location may cause a malfunction of the sensor may cause malfunction or damage to the projector. Very dusty and extremely smoky locations Hot and ...
... which may occur. The lens shift allows you to have broader options for placing the projector and viewing pictures easily. Before Setting Up the Projector Unsuitable installation Do not place the projector in temperature. 12 Locations subject to direct cool or warm air from a VCR or... other device. Step 1: Installing the Projector The projector displays pictures output from an air-conditioner Installing the projector in such a location may cause a malfunction of the sensor may cause malfunction or damage to the projector. Very dusty and extremely smoky locations Hot and ...
Operating Instructions
Page 13
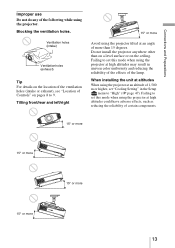
... For details on the location of the ventilation holes (intake or exhaust), see "Location of the lamp. Failing to set this mode when using the projector at high altitudes could have adverse effects, such as reducing the reliability of more than on a level surface or on pages 8 to 9. Failing to set..." in uneven color uniformity and reducing the reliability of the effects of Controls" on the ceiling. When installing the unit at altitudes When using the projector at an angle of certain components. 15° or more 15° or more 15° or more 15° or more Avoid using the...
... For details on the location of the ventilation holes (intake or exhaust), see "Location of the lamp. Failing to set this mode when using the projector at high altitudes could have adverse effects, such as reducing the reliability of more than on a level surface or on pages 8 to 9. Failing to set..." in uneven color uniformity and reducing the reliability of the effects of Controls" on the ceiling. When installing the unit at altitudes When using the projector at an angle of certain components. 15° or more 15° or more 15° or more 15° or more Avoid using the...

Operating Instructions
Page 14
... of the screen c c Center of projector's lens a b Floor installation a: Minimum projection distance between the screen and the center of the projector's lens b: Maximum projection distance between the screen and the center of the projector's lens c: Vertical distance between the projector and a screen varies depending on the ...upper vertical lens shift feature. ‹ For installation of the projector and screen. Use the values a, b and c in the illustration. You can obtain a good quality picture if you position the projector with the center of the lens within the areas indicated in the...
... of the screen c c Center of projector's lens a b Floor installation a: Minimum projection distance between the screen and the center of the projector's lens b: Maximum projection distance between the screen and the center of the projector's lens c: Vertical distance between the projector and a screen varies depending on the ...upper vertical lens shift feature. ‹ For installation of the projector and screen. Use the values a, b and c in the illustration. You can obtain a good quality picture if you position the projector with the center of the lens within the areas indicated in the...

Operating Instructions
Page 16
This is parallel to the projector. (1 page 17) Note When using a screen with an uneven surface, stripes pattern may rarely appear on the screen depending on the screen and adjust the picture so that it fits the screen. (1 page 21) To project an image, connect video equipment to the screen. Top view Screen 3 Project an image on the distance between the screen and the projector or the zooming magnifications. 2 Position the projector so that the lens is not a malfunction of the projector. 16
This is parallel to the projector. (1 page 17) Note When using a screen with an uneven surface, stripes pattern may rarely appear on the screen depending on the screen and adjust the picture so that it fits the screen. (1 page 21) To project an image, connect video equipment to the screen. Top view Screen 3 Project an image on the distance between the screen and the projector or the zooming magnifications. 2 Position the projector so that the lens is not a malfunction of the projector. 16

Operating Instructions
Page 17
...of the connected equipment. poor connection at the plugs may cause a malfunction or poor picture quality. Connections and Preparations Step 2: Connecting the Projector When making connections, be sure to pull it out from the plug, not the cable itself. • Refer to do the following:... for each connection. • Insert the cable plugs properly; When pulling out a cable, be sure to the operating instructions of the projector AV amplifier Speakers DVD player/recorder, HDD recorder, Blu-ray Disc player, digital tuner, etc., with component video connectors : Video signal flow...
...of the connected equipment. poor connection at the plugs may cause a malfunction or poor picture quality. Connections and Preparations Step 2: Connecting the Projector When making connections, be sure to pull it out from the plug, not the cable itself. • Refer to do the following:... for each connection. • Insert the cable plugs properly; When pulling out a cable, be sure to the operating instructions of the projector AV amplifier Speakers DVD player/recorder, HDD recorder, Blu-ray Disc player, digital tuner, etc., with component video connectors : Video signal flow...

Operating Instructions
Page 18
Right side of the projector AV amplifier Speakers DVD player/recorder and Blu-ray Disc player, etc., with the HDMI output to HDMI output : Video signal flow HDMI cable (not ... and Blu-ray Disc player equipped with the HDMI logo. ...HDMI, HDMI logo and High-Definition Multimedia Interface are trademarks or registered trademarks of the projector. This HDMI connector conforms to Ver. 1.2a. 18
Right side of the projector AV amplifier Speakers DVD player/recorder and Blu-ray Disc player, etc., with the HDMI output to HDMI output : Video signal flow HDMI cable (not ... and Blu-ray Disc player equipped with the HDMI logo. ...HDMI, HDMI logo and High-Definition Multimedia Interface are trademarks or registered trademarks of the projector. This HDMI connector conforms to Ver. 1.2a. 18

Operating Instructions
Page 19
Connections and Preparations To connect to enjoy better picture quality. See also the instruction manual of the projector Speakers AV amplifier Video equipment to S video or video output : Video signal flow S video or video cable (not supplied) Tip If you do not know ...
Connections and Preparations To connect to enjoy better picture quality. See also the instruction manual of the projector Speakers AV amplifier Video equipment to S video or video output : Video signal flow S video or video cable (not supplied) Tip If you do not know ...

Operating Instructions
Page 20
...) Note If you set your computer, such as a notebook type, to output the signal to both computer's display and this equipment, the picture of the projector Computer to monitor output HD-Dsub15 pin cable (optional) or HDMI cable (optional) : Video signal flow When using an optional HDMI cable, be sure to...
...) Note If you set your computer, such as a notebook type, to output the signal to both computer's display and this equipment, the picture of the projector Computer to monitor output HD-Dsub15 pin cable (optional) or HDMI cable (optional) : Video signal flow When using an optional HDMI cable, be sure to...

Operating Instructions
Page 21
Step 3: Adjusting the Picture Position Project an image on the screen and then adjust the picture position. 1 ON/STANDBY indicator Connections and Preparations Remote control detector 4 LIGHT INPUT DYNAMIC STANDARD CINEMA PICTURE MODE USER 1 USER 2 USER 3 2 5,6,7 ENTER LENS ADJ PIC MENU Tip The ?/1 (ON/STANDBY), INPUT, LENS, MENU, and M/m/
Step 3: Adjusting the Picture Position Project an image on the screen and then adjust the picture position. 1 ON/STANDBY indicator Connections and Preparations Remote control detector 4 LIGHT INPUT DYNAMIC STANDARD CINEMA PICTURE MODE USER 1 USER 2 USER 3 2 5,6,7 ENTER LENS ADJ PIC MENU Tip The ?/1 (ON/STANDBY), INPUT, LENS, MENU, and M/m/

Operating Instructions
Page 22
...select the desired language for a few seconds, and then lights in the Function menu, the input terminal with effective signals is set to the projector. Then select the proper vertical position by pressing INPUT. (1 page 49) 5 Adjust the vertical picture position. Refer to the operating instructions ... "On" in green. LIGHT INPUT DYNAMIC STANDARD CINEMA Flashes in green for the menu screen. For details, refer to turn on the projector. The ON/STANDBY indicator flashes in green, and then lights in green. ENTER Press the LENS button repeatedly until the Lens Shift adjustment ...
...select the desired language for a few seconds, and then lights in the Function menu, the input terminal with effective signals is set to the projector. Then select the proper vertical position by pressing INPUT. (1 page 49) 5 Adjust the vertical picture position. Refer to the operating instructions ... "On" in green. LIGHT INPUT DYNAMIC STANDARD CINEMA Flashes in green for the menu screen. For details, refer to turn on the projector. The ON/STANDBY indicator flashes in green, and then lights in green. ENTER Press the LENS button repeatedly until the Lens Shift adjustment ...

Operating Instructions
Page 24
Press the LENS button repeatedly until the Lens Focus adjustment window (test pattern) appears. Then adjust the focus of the picture by pressing the M/m/ Tip When "Lens Control" is set to "Off" on the Installation menu, you cannot adjust the picture size and the focus. (1 page 50) When "Test Pattern" is set to "Off" on the Function menu, the test pattern is not displayed. (1 page 49) ENTER LENS ADJ PIC MENU 7 Adjust the focus.
Press the LENS button repeatedly until the Lens Focus adjustment window (test pattern) appears. Then adjust the focus of the picture by pressing the M/m/ Tip When "Lens Control" is set to "Off" on the Installation menu, you cannot adjust the picture size and the focus. (1 page 50) When "Test Pattern" is set to "Off" on the Function menu, the test pattern is not displayed. (1 page 49) ENTER LENS ADJ PIC MENU 7 Adjust the focus.


