

Operating Instructions
Page 2
... a Class B digital device, pursuant to rain or moisture. Declaration of important operating and maintenance (servicing) instructions in a particular installation. Operation is connected. - However, there is encouraged to try to correct the interference by turning the equipment off and on a circuit different from that to which can radiate radio frequency energy and, if not installed and used in this manual could void...
... a Class B digital device, pursuant to rain or moisture. Declaration of important operating and maintenance (servicing) instructions in a particular installation. Operation is connected. - However, there is encouraged to try to correct the interference by turning the equipment off and on a circuit different from that to which can radiate radio frequency energy and, if not installed and used in this manual could void...

Operating Instructions
Page 5
... Projector .....17 Connecting to a VCR 17 Connecting to a Computer ..........20 Step 3: Adjusting the Picture Position 21 Step 4: Selecting the Menu Language 25 Projecting Projecting the Picture on the Screen 28 Turning Off the Power 29 Selecting the Wide Screen Mode .... 30 Selecting the Picture Viewing Mode 32 Adjusting the Picture Quality .......... 33 Adjusting the Picture Using Real Color Processing 35 Using the Menus Operation through the Menus .......... 37 Picture Menu 41 Advanced Picture Menu 44 Screen Menu 45 Setup Menu 47 Function Menu 49 Installation Menu...
... Projector .....17 Connecting to a VCR 17 Connecting to a Computer ..........20 Step 3: Adjusting the Picture Position 21 Step 4: Selecting the Menu Language 25 Projecting Projecting the Picture on the Screen 28 Turning Off the Power 29 Selecting the Wide Screen Mode .... 30 Selecting the Picture Viewing Mode 32 Adjusting the Picture Quality .......... 33 Adjusting the Picture Using Real Color Processing 35 Using the Menus Operation through the Menus .......... 37 Picture Menu 41 Advanced Picture Menu 44 Screen Menu 45 Setup Menu 47 Function Menu 49 Installation Menu...
Operating Instructions
Page 6
Others Troubleshooting 53 Warning Indicators 55 Message Lists 56 Replacing the Lamp and the Air Filter and cleaning the Ventilation holes (intake 57 Cleaning the Air Filter 60 Specifications 61 Preset Signals 63 Input Signals and Adjustable/ Setting Items 66 Ceiling Installation 68 When Using the PSS-H10 Projector Suspension Support ......... 68 When Using the PSS-610 Projector Suspension Support ......... 72 Making Fine Adjustments to the Horizontal Picture Position 75 Index 78 6
Others Troubleshooting 53 Warning Indicators 55 Message Lists 56 Replacing the Lamp and the Air Filter and cleaning the Ventilation holes (intake 57 Cleaning the Air Filter 60 Specifications 61 Preset Signals 63 Input Signals and Adjustable/ Setting Items 66 Ceiling Installation 68 When Using the PSS-H10 Projector Suspension Support ......... 68 When Using the PSS-610 Projector Suspension Support ......... 72 Making Fine Adjustments to the Horizontal Picture Position 75 Index 78 6

Operating Instructions
Page 11
... This section describes how to install the projector and screen, how to connect the equipment from which you want to make sure it contains the following items: • Remote control (1) and Size AA (R6) batteries (2) • Lens cap (1) When you use the projector. • Operating Instructions (this manual) • AC power cord (1) • ImageDirector2 CD-ROM (1) Inserting the batteries into the remote control Insert the batteries E side...
... This section describes how to install the projector and screen, how to connect the equipment from which you want to make sure it contains the following items: • Remote control (1) and Size AA (R6) batteries (2) • Lens cap (1) When you use the projector. • Operating Instructions (this manual) • AC power cord (1) • ImageDirector2 CD-ROM (1) Inserting the batteries into the remote control Insert the batteries E side...

Operating Instructions
Page 14
... picture if you position the projector with the center of the projector's lens c: Vertical distance between the projector and a screen varies depending on page 15 as a guide. Use the values a, b and c in the illustration. Ceiling installation Center of the screen c c Center of projector's lens a b Floor installation a: Minimum projection distance between the screen and the center of the projector's lens b: Maximum projection distance between the screen and the center of the lens within the areas indicated...
... picture if you position the projector with the center of the projector's lens c: Vertical distance between the projector and a screen varies depending on page 15 as a guide. Use the values a, b and c in the illustration. Ceiling installation Center of the screen c c Center of projector's lens a b Floor installation a: Minimum projection distance between the screen and the center of the projector's lens b: Maximum projection distance between the screen and the center of the lens within the areas indicated...

Operating Instructions
Page 20
..., refer to use a cable with your computer, such as a notebook type, to output the signal to both computer's display and this equipment, the picture of the projector Computer to monitor output HD-Dsub15 pin cable (optional) or HDMI cable (optional) : Video signal flow When using an optional HDMI cable, be sure to the computer's operating instructions supplied with the HDMI logo. Tip Set "Input-A Signal Sel." in the Setup menu to only the...
..., refer to use a cable with your computer, such as a notebook type, to output the signal to both computer's display and this equipment, the picture of the projector Computer to monitor output HD-Dsub15 pin cable (optional) or HDMI cable (optional) : Video signal flow When using an optional HDMI cable, be sure to the computer's operating instructions supplied with the HDMI logo. Tip Set "Input-A Signal Sel." in the Setup menu to only the...

Operating Instructions
Page 22
... INPUT to project the picture on the equipment connected to turn on the projector. For details, refer to "Step 4: Selecting the Menu Language". (1 page 25) • When "Auto Input Search" is automatically displayed by pressing the M/m/ When the ON/STANDBY indicator flashes, "Starting..." appears on the screen. 3 Turn on the screen. LIGHT INPUT DYNAMIC STANDARD CINEMA 2 Press the ?/1 (ON/STANDBY) switch to the projector. ENTER Press the LENS button repeatedly until the Lens Shift adjustment window (test LENS...
... INPUT to project the picture on the equipment connected to turn on the projector. For details, refer to "Step 4: Selecting the Menu Language". (1 page 25) • When "Auto Input Search" is automatically displayed by pressing the M/m/ When the ON/STANDBY indicator flashes, "Starting..." appears on the screen. 3 Turn on the screen. LIGHT INPUT DYNAMIC STANDARD CINEMA 2 Press the ?/1 (ON/STANDBY) switch to the projector. ENTER Press the LENS button repeatedly until the Lens Shift adjustment window (test LENS...

Operating Instructions
Page 24
Then adjust the focus of the picture by pressing the M/m/ Press the LENS button repeatedly until the Lens Focus adjustment window (test pattern) appears. Tip When "Lens Control" is set to "Off" on the Installation menu, you cannot adjust the picture size and the focus. (1 page 50) When "Test Pattern" is set to "Off" on the Function menu, the test pattern is not displayed. (1 page 49) ENTER LENS ADJ PIC MENU 7 Adjust the focus.
Then adjust the focus of the picture by pressing the M/m/ Press the LENS button repeatedly until the Lens Focus adjustment window (test pattern) appears. Tip When "Lens Control" is set to "Off" on the Installation menu, you cannot adjust the picture size and the focus. (1 page 50) When "Test Pattern" is set to "Off" on the Function menu, the test pattern is not displayed. (1 page 49) ENTER LENS ADJ PIC MENU 7 Adjust the focus.

Operating Instructions
Page 25
To change the current menu language, set the desired language with the menu screen. LIGHT INPUT DYNAMIC STANDARD CINEMA PICTURE MODE USER 1 USER 2 USER 3 ENTER 4,5,6 LENS ADJ PIC MENU 3 WIDE MODE RCP RESET REAL COLOR PROCESSING BRIGHT CONTRAST Tip You can select one of 16 languages for displaying the menu and other on-screen displays. The factory default setting is English. Connections and Preparations Step 4: Selecting the Menu Language You can operate the menu using the M/m/
To change the current menu language, set the desired language with the menu screen. LIGHT INPUT DYNAMIC STANDARD CINEMA PICTURE MODE USER 1 USER 2 USER 3 ENTER 4,5,6 LENS ADJ PIC MENU 3 WIDE MODE RCP RESET REAL COLOR PROCESSING BRIGHT CONTRAST Tip You can select one of 16 languages for displaying the menu and other on-screen displays. The factory default setting is English. Connections and Preparations Step 4: Selecting the Menu Language You can operate the menu using the M/m/

Operating Instructions
Page 35
The RCP (Real Color Processing) window appears. 3 Select the target color you want to select "User 1," "User 2" or "User 3," then press ,. LIGHT INPUT DYNAMIC STANDARD CINEMA PICTURE MODE USER 1 USER 2 USER 3 ENTER LENS ADJ PIC MENU WIDE MODE RCP RESET REAL COLOR PROCESSING BRIGHT CONTRAST 2, 3, 4, 5 1 1 Press RCP on the remote control. 2 Press M/m to adjust. Reference palette 1 Press M/m to specify the target color. Tip Freeze the scene of the projected picture you specify independently. Repeat steps...
The RCP (Real Color Processing) window appears. 3 Select the target color you want to select "User 1," "User 2" or "User 3," then press ,. LIGHT INPUT DYNAMIC STANDARD CINEMA PICTURE MODE USER 1 USER 2 USER 3 ENTER LENS ADJ PIC MENU WIDE MODE RCP RESET REAL COLOR PROCESSING BRIGHT CONTRAST 2, 3, 4, 5 1 1 Press RCP on the remote control. 2 Press M/m to adjust. Reference palette 1 Press M/m to specify the target color. Tip Freeze the scene of the projected picture you specify independently. Repeat steps...

Operating Instructions
Page 47
... standby mode is used in standby mode becomes normal. When set to change the factory preset settings, etc. Set to "Off" to "High", the number of turns of 1,500 m or higher. Note When this setting when using the projector at an altitude of the fan increases, and the fan noise becomes slightly louder. If you do not want to set to turn off the power, and warning messages. Using the Menus Status Language Cooling Setting Standby Mode Power Saving Sets...
... standby mode is used in standby mode becomes normal. When set to change the factory preset settings, etc. Set to "Off" to "High", the number of turns of 1,500 m or higher. Note When this setting when using the projector at an altitude of the fan increases, and the fan noise becomes slightly louder. If you do not want to set to turn off the power, and warning messages. Using the Menus Status Language Cooling Setting Standby Mode Power Saving Sets...

Operating Instructions
Page 49
... the INPUT button is used when adjusting the lens with "Lens Focus," "Lens Zoom," and "Lens Shift," or correcting the screen proportions with "V Keystone." When set to "On," a test pattern appears on the screen to "On", the projector detects whether a Component, HDMI 1, HDMI 2, Video, S-video or Input-A signal is input when the input terminal with no signal is automatically selected by pressing INPUT. Displays the test pattern. You can select "Black" or "Blue". 49 Selects the background color...
... the INPUT button is used when adjusting the lens with "Lens Focus," "Lens Zoom," and "Lens Shift," or correcting the screen proportions with "V Keystone." When set to "On," a test pattern appears on the screen to "On", the projector detects whether a Component, HDMI 1, HDMI 2, Video, S-video or Input-A signal is input when the input terminal with no signal is automatically selected by pressing INPUT. Displays the test pattern. You can select "Black" or "Blue". 49 Selects the background color...
Operating Instructions
Page 52
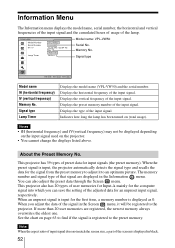
... memory. When you can also adjust the preset data through the Screen menu. Displays the type of preset data for the first time, a memory number is registered to an optimum picture. Displays the horizontal frequency of the lamp. When an unpreset signal is input for input signals (the preset memory). If more than 20 user memories are displayed in black. 52 Model name: VPL-VW50 Serial No. See the chart on...
... memory. When you can also adjust the preset data through the Screen menu. Displays the type of preset data for the first time, a memory number is registered to an optimum picture. Displays the horizontal frequency of the lamp. When an unpreset signal is input for input signals (the preset memory). If more than 20 user memories are displayed in black. 52 Model name: VPL-VW50 Serial No. See the chart on...
Operating Instructions
Page 53
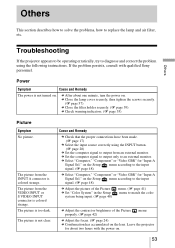
... the input source correctly using the following instructions. Leave the projector for about one minute, turn the power on the Setup menu according to output from the INPUT A connector is colored strange. c Close the lamp cover securely, then tighten the screws securely. (1 page 57) c Close the filter holder securely. (1 page 59) c Check warning indicators. (1 page 55) Picture Symptom No picture. on the Setup menu according to the input signal. (1 page 48) c Adjust the picture of the Picture c Set "Color...
... the input source correctly using the following instructions. Leave the projector for about one minute, turn the power on the Setup menu according to output from the INPUT A connector is colored strange. c Close the lamp cover securely, then tighten the screws securely. (1 page 57) c Close the filter holder securely. (1 page 59) c Check warning indicators. (1 page 55) Picture Symptom No picture. on the Setup menu according to the input signal. (1 page 48) c Adjust the picture of the Picture c Set "Color...
Operating Instructions
Page 55
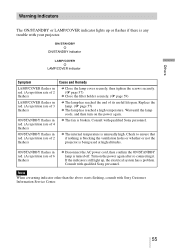
Others Warning Indicators The ON/STANDBY or LAMP/COVER indicator lights up , the electrical system has a problem. Replace the lamp. (1 page 57) c The lamp has reached a high temperature. Note When a warning indicator other than the above starts flashing, consult with qualified Sony personnel. ON/STANDBY flashes in red. (A repetition rate of 2 flashes) c The internal temperature is turned off. ON/STANDBY flashes in red. (A repetition rate of 4 flashes) c The fan is broken. ON/STANDBY flashes in red. (A repetition rate of 3 flashes) c The lamp has reached the...
Others Warning Indicators The ON/STANDBY or LAMP/COVER indicator lights up , the electrical system has a problem. Replace the lamp. (1 page 57) c The lamp has reached a high temperature. Note When a warning indicator other than the above starts flashing, consult with qualified Sony personnel. ON/STANDBY flashes in red. (A repetition rate of 2 flashes) c The internal temperature is turned off. ON/STANDBY flashes in red. (A repetition rate of 4 flashes) c The fan is broken. ON/STANDBY flashes in red. (A repetition rate of 3 flashes) c The lamp has reached the...
Operating Instructions
Page 56
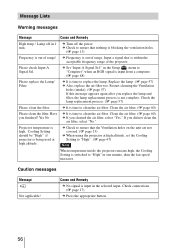
... in the Setup menu to clean the air filter. c Frequency is input in one minute, then the fan speed increases. in 1 min. Projector temperature is input from a computer. (1 page 48) Please replace the Lamp/ Filter. c Check to "High" in the selected input. Caution messages Message x Not applicable! Input a signal that nothing is blocking the ventilation holes. (1 page 13) Frequency is not complete. Message Lists Warning messages Message Cause and Remedy High temp.! c Set "Input-A Signal Sel." Restart cleaning the Ventilation...
... in the Setup menu to clean the air filter. c Frequency is input in one minute, then the fan speed increases. in 1 min. Projector temperature is input from a computer. (1 page 48) Please replace the Lamp/ Filter. c Check to "High" in the selected input. Caution messages Message x Not applicable! Input a signal that nothing is blocking the ventilation holes. (1 page 13) Frequency is not complete. Message Lists Warning messages Message Cause and Remedy High temp.! c Set "Input-A Signal Sel." Restart cleaning the Ventilation...
Operating Instructions
Page 57
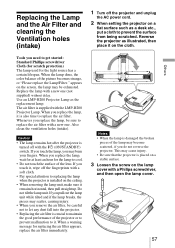
... screw on the lamp cover with a soft cloth. • Pay special attention to prevent the surface from being scratched. Replacing the Lamp and the Air Filter and cleaning the Ventilation holes (intake) 1 Turn off the projector and unplug the AC power cord. 2 When setting the projector on a flat surface such as a desk etc., put a cloth to replacing the lamp when the projector is installed on the ceiling. • When removing...
... screw on the lamp cover with a soft cloth. • Pay special attention to prevent the surface from being scratched. Replacing the Lamp and the Air Filter and cleaning the Ventilation holes (intake) 1 Turn off the projector and unplug the AC power cord. 2 When setting the projector on a flat surface such as a desk etc., put a cloth to replacing the lamp when the projector is installed on the ceiling. • When removing...
Operating Instructions
Page 59
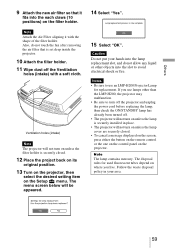
Others 9 Attach the new air filter so that is set deep inside the projector. 10 Attach the filter holder. 11 Wipe dust off . • The projector will not turn on unless the lamp is securely closed . • To cancel a message displayed on the screen, press either the button on the remote control or the one on the control panel on the Setup menu. Also, do not allow any liquid or...
Others 9 Attach the new air filter so that is set deep inside the projector. 10 Attach the filter holder. 11 Wipe dust off . • The projector will not turn on unless the lamp is securely closed . • To cancel a message displayed on the screen, press either the button on the remote control or the one on the control panel on the Setup menu. Also, do not allow any liquid or...

Operating Instructions
Page 60
... good performance of the projector or to prevent malfunction to it. Notes • When you clean the air filter, make sure you remove the air filter, be cleaned every 1,500 hours. When a warning message for cleaning the air filter appears, clean the air filter immediately. 60 Cleaning the Air Filter When "Please clean the filter." For details on how to attach and remove the air filter, see "Replacing the Lamp and the Air Filter and cleaning the Ventilation holes (intake...
... good performance of the projector or to prevent malfunction to it. Notes • When you clean the air filter, make sure you remove the air filter, be cleaned every 1,500 hours. When a warning message for cleaning the air filter appears, clean the air filter immediately. 60 Cleaning the Air Filter When "Please clean the filter." For details on how to attach and remove the air filter, see "Replacing the Lamp and the Air Filter and cleaning the Ventilation holes (intake...

Operating Instructions
Page 62
Supplied accessories Remote control RM-PJVW100 (1) Size AA (R6) batteries (2) AC power cord (1) Lens Cap (1) Operating Instructions (1) CD-ROM (ImageDirector2) (1) Design and specifications are subject to change without notice. Safe regulations UL60950, CSA No. 950, FCC class B, IC class B, EN60950 (DEMKO), CE, C-Tick Optional accessories Projector Lamp LMP-H200 (for replacement) Projector Suspension Support PSS-H10, PSS-610 62
Supplied accessories Remote control RM-PJVW100 (1) Size AA (R6) batteries (2) AC power cord (1) Lens Cap (1) Operating Instructions (1) CD-ROM (ImageDirector2) (1) Design and specifications are subject to change without notice. Safe regulations UL60950, CSA No. 950, FCC class B, IC class B, EN60950 (DEMKO), CE, C-Tick Optional accessories Projector Lamp LMP-H200 (for replacement) Projector Suspension Support PSS-H10, PSS-610 62


