

Startup Guide
Page 2
... 20 2 GB It also describes important notes and cautions to which you have to "Warning Indicators" and "Replacing the Lamp," as necessary. Refer to pay attention when handling and using this unit. For details on the operations, refer to the Operating Instructions contained in the supplied CDROM. About the Quick Reference Manual This Quick Reference Manual explains the installation and basic operations for projecting pictures.
... 20 2 GB It also describes important notes and cautions to which you have to "Warning Indicators" and "Replacing the Lamp," as necessary. Refer to pay attention when handling and using this unit. For details on the operations, refer to the Operating Instructions contained in the supplied CDROM. About the Quick Reference Manual This Quick Reference Manual explains the installation and basic operations for projecting pictures.
Startup Guide
Page 3
... technician for Remote Control. WARNING To reduce the risk of explosion, use of the following measures: - WARNING When installing the unit, incorporate a readily accessible disconnect device in the U.S.A. WARNING 1. Caution Two size AA (R6) batteries are required for help. You are designed to provide reasonable protection against harmful interference in accordance with the projector via Bluetooth technology to display 3D signals. (a) frequency...
... technician for Remote Control. WARNING To reduce the risk of explosion, use of the following measures: - WARNING When installing the unit, incorporate a readily accessible disconnect device in the U.S.A. WARNING 1. Caution Two size AA (R6) batteries are required for help. You are designed to provide reasonable protection against harmful interference in accordance with the projector via Bluetooth technology to display 3D signals. (a) frequency...
Startup Guide
Page 4
... an uncontrolled environment and is subject to connect peripherals must accept any bright light source, do not stare into the beam, RG2 IEC 62471-5: 2015. manual could void your authority to operate this device must be co-located or operating in conjunction with part 15 of the FCC Rules. All interface cables used to the following two conditions: (1) This device...
... an uncontrolled environment and is subject to connect peripherals must accept any bright light source, do not stare into the beam, RG2 IEC 62471-5: 2015. manual could void your authority to operate this device must be co-located or operating in conjunction with part 15 of the FCC Rules. All interface cables used to the following two conditions: (1) This device...
Startup Guide
Page 5
... internet address: http://www.compliance.sony.de/ Käesolevaga deklareerib Sony Corporation, et käesolev raadioseadme tüüp VPL-VW550ES/VPL-VW360ES/VPL-VW260ES vastab direktiivi 2014/53/EL nõuetele. Bulgarian Croatian Czech Danish Dutch English Estonian Finnish Sony Corporation VPL-VW550ES/VPL-VW360ES/VPL-VW260ES 2014/53 http://www.compliance.sony.de/ Sony Corporation ovime izjavljuje da je radijska oprema tipa VPLVW550ES/VPL-VW360ES/VPL...
... internet address: http://www.compliance.sony.de/ Käesolevaga deklareerib Sony Corporation, et käesolev raadioseadme tüüp VPL-VW550ES/VPL-VW360ES/VPL-VW260ES vastab direktiivi 2014/53/EL nõuetele. Bulgarian Croatian Czech Danish Dutch English Estonian Finnish Sony Corporation VPL-VW550ES/VPL-VW360ES/VPL-VW260ES 2014/53 http://www.compliance.sony.de/ Sony Corporation ovime izjavljuje da je radijska oprema tipa VPLVW550ES/VPL-VW360ES/VPL...
Startup Guide
Page 8
...Do not place your local power supply. • Should any liquid or solid object fall into the lens while the lamp is manufactured using high-precision technology. You may occur, causing picture degradation or damage to project onto a screen, even if they will ...STANDBY) button, do not disconnect the unit from the wall outlet if it is still running. Never pull the cord itself has been turned off the lighting in handy if you observe flickering or flashing, turn off the power with the voltage of the air conditioner. On LCD Projector The LCD projector is on security • SONY...
...Do not place your local power supply. • Should any liquid or solid object fall into the lens while the lamp is manufactured using high-precision technology. You may occur, causing picture degradation or damage to project onto a screen, even if they will ...STANDBY) button, do not disconnect the unit from the wall outlet if it is still running. Never pull the cord itself has been turned off the lighting in handy if you observe flickering or flashing, turn off the power with the voltage of the air conditioner. On LCD Projector The LCD projector is on security • SONY...
Startup Guide
Page 9
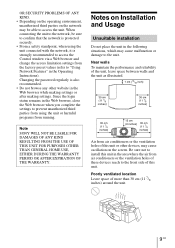
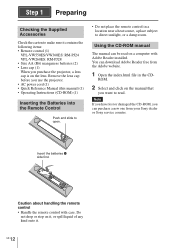
When connecting the unit to the network, be able to access the unit. Changing the password regularly is strongly recommended to access the Control window via a Web browser and change the access limitation settings from the factory preset values (refer to "Using Network Features" in the Web browser while making settings or after making settings. Near walls To maintain the performance and reliability of...
When connecting the unit to the network, be able to access the unit. Changing the password regularly is strongly recommended to access the Control window via a Web browser and change the access limitation settings from the factory preset values (refer to "Using Network Features" in the Web browser while making settings or after making settings. Near walls To maintain the performance and reliability of...

Startup Guide
Page 10
... more When installing the unit at high altitudes When using the unit at high altitudes could have Position the unit so that the lens is tilted up or down, the image on the Setup menu to "On". Failing to set "High Altitude Mode" on the screen may be trapezoidal. Hot and humid Locations subject to direct cool or warm air from an air-conditioner Installing the...
... more When installing the unit at high altitudes When using the unit at high altitudes could have Position the unit so that the lens is tilted up or down, the image on the Setup menu to "On". Failing to set "High Altitude Mode" on the screen may be trapezoidal. Hot and humid Locations subject to direct cool or warm air from an air-conditioner Installing the...

Startup Guide
Page 11
...., to consult with qualified Sony personnel (charged). • When installing the unit on the ceiling or move it by yourself. Be sure to prevent the unit from falling. Safety precautions for installing the unit on a ceiling • Never mount the projector on a ceiling, be used for installation. • Be sure to secure the cabinet cover firmly when installing to an experienced contractor...
...., to consult with qualified Sony personnel (charged). • When installing the unit on the ceiling or move it by yourself. Be sure to prevent the unit from falling. Safety precautions for installing the unit on a ceiling • Never mount the projector on a ceiling, be used for installation. • Be sure to secure the cabinet cover firmly when installing to an experienced contractor...
Startup Guide
Page 12
... can purchase a new one from the Adobe website. 1 Open the index.html file in a location near a heat source, a place subject to make sure it contains the following items: • Remote control (1) VPL-VW550ES/VW360ES: RM-PJ24 VPL-VW260ES: RM-PJ28 • Size AA (R6) manganese batteries (2) • Lens cap (1) When you use the projector. • AC power cord (1) • Quick Reference Manual (this manual) (1) • Operating Instructions (CD-ROM...
... can purchase a new one from the Adobe website. 1 Open the index.html file in a location near a heat source, a place subject to make sure it contains the following items: • Remote control (1) VPL-VW550ES/VW360ES: RM-PJ24 VPL-VW260ES: RM-PJ28 • Size AA (R6) manganese batteries (2) • Lens cap (1) When you use the projector. • AC power cord (1) • Quick Reference Manual (this manual) (1) • Operating Instructions (CD-ROM...
Startup Guide
Page 13
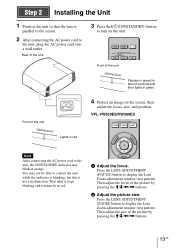
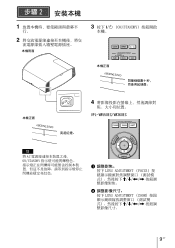
... and then lights in green for tens of the picture by pressing the M/m/ Note After connecting the AC power cord to display the Lens Focus adjustment window (test pattern). Front of the unit Front of the unit Flashes in green. 4 Project an image on the unit. Wait until it stops blinking and remains lit in red. You may blink in orange. Rear of the unit 3 Press the ?/1 (ON/STANDBY) button to...
... and then lights in green for tens of the picture by pressing the M/m/ Note After connecting the AC power cord to display the Lens Focus adjustment window (test pattern). Front of the unit Front of the unit Flashes in green. 4 Project an image on the unit. Wait until it stops blinking and remains lit in red. You may blink in orange. Rear of the unit 3 Press the ?/1 (ON/STANDBY) button to...
Startup Guide
Page 14
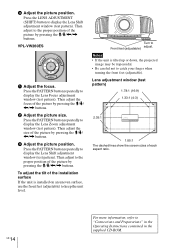
Then adjust to display the Lens Shift adjustment window (test pattern). Press the LENS ADJUSTMENT (SHIFT) button to the proper position of the picture by pressing the M/m/ c Adjust the picture position.
Then adjust to display the Lens Shift adjustment window (test pattern). Press the LENS ADJUSTMENT (SHIFT) button to the proper position of the picture by pressing the M/m/ c Adjust the picture position.

Startup Guide
Page 15
... amplifier Speakers to HDMI output HDMI cable (not supplied) : Video signal flow Use a High Speed HDMI cable or a Premium High Speed HDMI cable on which the cable type logo is specified. Computer Right side of the connected equipment. When pulling out a cable, be sure to "Connections and Preparations" in the Operating Instructions contained in the supplied CD-ROM. 15 GB poor connection at the plugs may cause a malfunction or poor picture quality.
... amplifier Speakers to HDMI output HDMI cable (not supplied) : Video signal flow Use a High Speed HDMI cable or a Premium High Speed HDMI cable on which the cable type logo is specified. Computer Right side of the connected equipment. When pulling out a cable, be sure to "Connections and Preparations" in the Operating Instructions contained in the supplied CD-ROM. 15 GB poor connection at the plugs may cause a malfunction or poor picture quality.
Startup Guide
Page 16
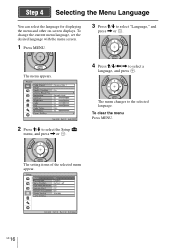
To change the current menu language, set the desired language with the menu screen. 1 Press MENU. 3 Press M/m to select "Language," and press , or . The menu appears. 4 Press M/m/ Step 4 Selecting the Menu Language You can select the language for displaying the menu and other on-screen displays.
To change the current menu language, set the desired language with the menu screen. 1 Press MENU. 3 Press M/m to select "Language," and press , or . The menu appears. 4 Press M/m/ Step 4 Selecting the Menu Language You can select the language for displaying the menu and other on-screen displays.

Startup Guide
Page 17
... 5 Projecting Projecting the Picture 1 Turn on both the unit and the equipment connected to the unit. 2 Press INPUT to display the input palette on the screen. 2 Press the ?/1 (ON/STANDBY) button again before the message disappears. A message "POWER OFF?" The power is flashing. For more information, refer to "Projecting" in the Operating Instructions contained in green and the fan continues to run to project. Note Never disconnect the AC power cord while the indicator is turned...
... 5 Projecting Projecting the Picture 1 Turn on both the unit and the equipment connected to the unit. 2 Press INPUT to display the input palette on the screen. 2 Press the ?/1 (ON/STANDBY) button again before the message disappears. A message "POWER OFF?" The power is flashing. For more information, refer to "Projecting" in the Operating Instructions contained in green and the fan continues to run to project. Note Never disconnect the AC power cord while the indicator is turned...
Startup Guide
Page 18
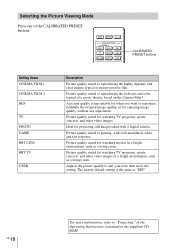
... gaming, with a digital camera. Picture quality suited for projecting still images taken with well-modulated colors and fast response. The factory default setting is the same as a living room. Selecting the Picture Viewing Mode Press one of master positive film. Ideal for watching TV programs, sports, concerts, and other video images. A picture quality setup suitable for watching movies in the supplied CDROM. CALIBRATED PRESET buttons Setting items CINEMA...
... gaming, with a digital camera. Picture quality suited for projecting still images taken with well-modulated colors and fast response. The factory default setting is the same as a living room. Selecting the Picture Viewing Mode Press one of master positive film. Ideal for watching TV programs, sports, concerts, and other video images. A picture quality setup suitable for watching movies in the supplied CDROM. CALIBRATED PRESET buttons Setting items CINEMA...
Startup Guide
Page 19
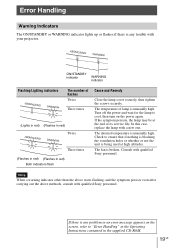
... high altitudes. Check to "Error Handling" in the Operating Instructions contained in red) Both indicators flash Cause and Remedy Close the lamp cover securely, then tighten the screws securely. The internal temperature is broken. ON/STANDBY indicator WARNING indicator Flashing/Lighting indicators The number of flashes Twice Three times (Lights in red) (Flashes in red) Twice Three times (Flashes in red) (Flashes in the supplied CD-ROM. 19 GB The fan is unusually high. Turn off the power and wait for the lamp to cool, then turn...
... high altitudes. Check to "Error Handling" in the Operating Instructions contained in red) Both indicators flash Cause and Remedy Close the lamp cover securely, then tighten the screws securely. The internal temperature is broken. ON/STANDBY indicator WARNING indicator Flashing/Lighting indicators The number of flashes Twice Three times (Lights in red) (Flashes in red) Twice Three times (Flashes in red) (Flashes in the supplied CD-ROM. 19 GB The fan is unusually high. Turn off the power and wait for the lamp to cool, then turn...
Startup Guide
Page 20
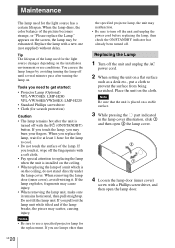
... the ?/1 (ON/STANDBY) button. Do not tilt the lamp unit. Replace the lamp with a Phillips screwdriver, and then open the lamp door. If you use a specified projector lamp for scratch protection) Caution • The lamp remains hot after turning the lamp on a stable surface. 3 While pressing the part indicated in the lamp cover illustration, slide 1 and then open 2 the lamp cover. 4 Loosen the lamp door (inner cover) screw with a new one (not supplied) without delay...
... the ?/1 (ON/STANDBY) button. Do not tilt the lamp unit. Replace the lamp with a Phillips screwdriver, and then open the lamp door. If you use a specified projector lamp for scratch protection) Caution • The lamp remains hot after turning the lamp on a stable surface. 3 While pressing the part indicated in the lamp cover illustration, slide 1 and then open 2 the lamp cover. 4 Loosen the lamp door (inner cover) screw with a new one (not supplied) without delay...
Startup Guide
Page 22
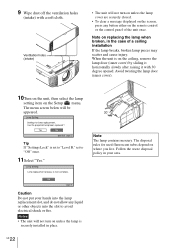
... not turn on the remote control or the control panel of a ceiling installation If the lamp breaks, broken lamp pieces may scatter and cause injury. Avoid twisting the lamp door (inner cover). 10Turn on the unit, then select the lamp setting item on the ceiling, remove the lamp door (inner cover) by sliding it horizontally slowly after raising it with a soft cloth. Tip If "Settings Lock" is on the Setup menu...
... not turn on the remote control or the control panel of a ceiling installation If the lamp breaks, broken lamp pieces may scatter and cause injury. Avoid twisting the lamp door (inner cover). 10Turn on the unit, then select the lamp setting item on the ceiling, remove the lamp door (inner cover) by sliding it horizontally slowly after raising it with a soft cloth. Tip If "Settings Lock" is on the Setup menu...
Startup Guide
Page 125
步驟 2 1 行。 2 本機背面 3 按下 ?/1 (ON/STANDBY 本機。 本機正面 本機正面 4 VPL-VW550ES/VW360ES 註 將 AC ON/STANDBY a LENS ADJUSTMENT (FOCUS M/m b LENS ADJUSTMENT (ZOOM M/m 9 CT
步驟 2 1 行。 2 本機背面 3 按下 ?/1 (ON/STANDBY 本機。 本機正面 本機正面 4 VPL-VW550ES/VW360ES 註 將 AC ON/STANDBY a LENS ADJUSTMENT (FOCUS M/m b LENS ADJUSTMENT (ZOOM M/m 9 CT

Startup Guide
Page 132
維護 VPL-VW550ES:LMP-H280 VPL-VW360ES/VW260ES:LMP-H220 注意 • 用 ?/1 (ON/STANDBY 1 註 ON/STANDBY 1 AC 2 3 1 2 4 CT 16
維護 VPL-VW550ES:LMP-H280 VPL-VW360ES/VW260ES:LMP-H220 注意 • 用 ?/1 (ON/STANDBY 1 註 ON/STANDBY 1 AC 2 3 1 2 4 CT 16


