
Startup Guide
Page 44
... as possible if a message displayed on for about two hours before the specified replacement time. • It may , however, see tiny black points and/or bright points (red, blue, or green) that has high internal pressure. the same model, the color reproduction among projectors may vary, since color balance may burn out. • The lamp life varies with a fan inside to project onto a screen, even if they are...
... as possible if a message displayed on for about two hours before the specified replacement time. • It may , however, see tiny black points and/or bright points (red, blue, or green) that has high internal pressure. the same model, the color reproduction among projectors may vary, since color balance may burn out. • The lamp life varies with a fan inside to project onto a screen, even if they are...
Startup Guide
Page 50
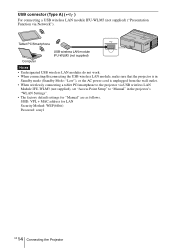
... in Standby mode (Standby Mode: "Low"), or the AC power cord is unplugged from the wall outlet. • When wirelessly connecting a tablet PC/smartphone to the projector via Network"). USB connector (Type A) ( ) For connecting a USB wireless LAN module IFU-WLM3 (not supplied) ("Presentation Function via USB wireless LAN Module IFU-WLM3 (not supplied), set "Access Point Setup" to "Manual" in the projector's "WLAN Settings". • The factory default settings for LAN Security Method: WEP(64bit) Password: sony1 14 GB Connecting the Projector
... in Standby mode (Standby Mode: "Low"), or the AC power cord is unplugged from the wall outlet. • When wirelessly connecting a tablet PC/smartphone to the projector via Network"). USB connector (Type A) ( ) For connecting a USB wireless LAN module IFU-WLM3 (not supplied) ("Presentation Function via USB wireless LAN Module IFU-WLM3 (not supplied), set "Access Point Setup" to "Manual" in the projector's "WLAN Settings". • The factory default settings for LAN Security Method: WEP(64bit) Password: sony1 14 GB Connecting the Projector
Startup Guide
Page 55
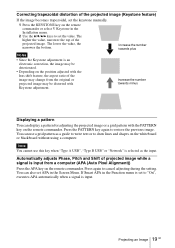
... menu is selected as a guide to write text or to restore the previous image. Increase the number towards minus Displaying a pattern You can use this key when "Type A USB", "Type B USB" or "Network" is set to cancel adjusting during the setting. You can display a pattern for adjusting the projected image or a grid pattern with the lens shift feature, the aspect ratio of the image may change from a computer (APA (Auto...
... menu is selected as a guide to write text or to restore the previous image. Increase the number towards minus Displaying a pattern You can use this key when "Type A USB", "Type B USB" or "Network" is set to cancel adjusting during the setting. You can display a pattern for adjusting the projected image or a grid pattern with the lens shift feature, the aspect ratio of the image may change from a computer (APA (Auto...

Startup Guide
Page 62
... turned on. • The lamp cools after the projector is ready to cool then turn on the projector. Consult with the following . GB 26 Indicators ON/STANDBY indicator Status Lights in red Flashes in green Lights in green Lights in orange Flashes in With No Input (Lamp Cutoff). The projector's power is in red Flashes twice Flashes six times Other number of flashes. Address the problem in the Installation menu is unusually high. Turn off . In this case, replace the lamp with the table below . • Check...
... turned on. • The lamp cools after the projector is ready to cool then turn on the projector. Consult with the following . GB 26 Indicators ON/STANDBY indicator Status Lights in red Flashes in green Lights in green Lights in orange Flashes in With No Input (Lamp Cutoff). The projector's power is in red Flashes twice Flashes six times Other number of flashes. Address the problem in the Installation menu is unusually high. Turn off . In this case, replace the lamp with the table below . • Check...

Startup Guide
Page 63
... burn your hands into the lamp replacement slot after the projector is tilted, the pieces may scatter if the lamp breaks any metallic or inflammable objects into the slot. 1 Turn off . Replacing the Lamp 27 GB Notes • If the lamp breaks, contact qualified Sony personnel. Replacing the Lamp Replace the lamp with a new one if a message displayed on the projected image or the LAMP/ COVER indicator notifies you to pull...
... burn your hands into the lamp replacement slot after the projector is tilted, the pieces may scatter if the lamp breaks any metallic or inflammable objects into the slot. 1 Turn off . Replacing the Lamp 27 GB Notes • If the lamp breaks, contact qualified Sony personnel. Replacing the Lamp Replace the lamp with a new one if a message displayed on the projected image or the LAMP/ COVER indicator notifies you to pull...

Startup Guide
Page 64
... regulated due to install the lamp securely as it is securely in this product contains mercury. Caution Disposal of the used lamp For the customers in the USA Lamp in place. When a message appears, select "Yes" to a wall outlet and turn on . 6 Connect the AC power cord to reset the lamp timer. Disposal of the next replacement time. 3 Loosen the 2 screws on the Function menu then press...
... regulated due to install the lamp securely as it is securely in this product contains mercury. Caution Disposal of the used lamp For the customers in the USA Lamp in place. When a message appears, select "Yes" to a wall outlet and turn on . 6 Connect the AC power cord to reset the lamp timer. Disposal of the next replacement time. 3 Loosen the 2 screws on the Function menu then press...

Operating Instructions
Page 2
...9 Connecting a Video equipment 11 Connecting a microphone .......... 12 Connecting a USB memory device 13 Connecting an External Monitor and Audio Equipment 13 Projecting/Adjusting an Image Projecting an Image 14 Adjusting the Projected image ... 16 Turning Off the Power 19 Adjustments and Settings Using a Menu Using a MENU 21 The Picture Menu 22 The Screen Menu 23 The Function Menu 27 The Operation Menu 28 2 Table of Contents The Connection/Power Menu ...........29 The Installation Menu 31 The Information Menu 32 Network Using Network Features 33 Displaying the Control Window of...
...9 Connecting a Video equipment 11 Connecting a microphone .......... 12 Connecting a USB memory device 13 Connecting an External Monitor and Audio Equipment 13 Projecting/Adjusting an Image Projecting an Image 14 Adjusting the Projected image ... 16 Turning Off the Power 19 Adjustments and Settings Using a Menu Using a MENU 21 The Picture Menu 22 The Screen Menu 23 The Function Menu 27 The Operation Menu 28 2 Table of Contents The Connection/Power Menu ...........29 The Installation Menu 31 The Information Menu 32 Network Using Network Features 33 Displaying the Control Window of...

Operating Instructions
Page 7
... g Infrared transmitter About remote commander operation • Direct the remote commander toward the remote control detector. • The shorter the distance between the remote commander and the remote control detector on the projector. FREEZE key*2 Pauses a projected image. Location and Function of "Lamp Mode," "With No Input," "With Static Signal," "Standby Mode." 1 Press the ECO MODE key to 4 times. Overview 3 Press the D ZOOM + key or the D ZOOM - key repeatedly to select ECO or User mode. Press again to...
... g Infrared transmitter About remote commander operation • Direct the remote commander toward the remote control detector. • The shorter the distance between the remote commander and the remote control detector on the projector. FREEZE key*2 Pauses a projected image. Location and Function of "Lamp Mode," "With No Input," "With Static Signal," "Standby Mode." 1 Press the ECO MODE key to 4 times. Overview 3 Press the D ZOOM + key or the D ZOOM - key repeatedly to select ECO or User mode. Press again to...
Operating Instructions
Page 18
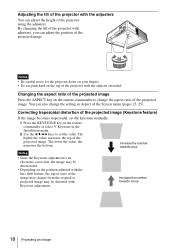
... the Screen menu (pages 23, 25). You can also change the setting in the Installation menu. 2 Use the V/v/B/b keys to change from the original or projected image may be deteriorated. • Depending on the position adjusted with the lens shift feature, the aspect ratio of the projector using the adjusters. Increase the number towards minus 18 Projecting an Image Adjusting the tilt of the projector with the adjusters You can adjust the...
... the Screen menu (pages 23, 25). You can also change the setting in the Installation menu. 2 Use the V/v/B/b keys to change from the original or projected image may be deteriorated. • Depending on the position adjusted with the lens shift feature, the aspect ratio of the projector using the adjusters. Increase the number towards minus 18 Projecting an Image Adjusting the tilt of the projector with the adjusters You can adjust the...

Operating Instructions
Page 28
... the power again. The Operation Menu The Operation menu is used for setting for the operations by password. On/Off: This function enables restriction of the projector. You are as follows: 1 Select "On" and press the ENTER key to authorized users by using the menu or the remote commander. c "Control Key Lock" is "ENTER, ENTER, ENTER, ENTER.") 3 Input a new password with the MENU, V/v/B/b and ENTER keys. 4 Enter the password again to use the projector...
... the power again. The Operation Menu The Operation menu is used for setting for the operations by password. On/Off: This function enables restriction of the projector. You are as follows: 1 Select "On" and press the ENTER key to authorized users by using the menu or the remote commander. c "Control Key Lock" is "ENTER, ENTER, ENTER, ENTER.") 3 Input a new password with the MENU, V/v/B/b and ENTER keys. 4 Enter the password again to use the projector...

Operating Instructions
Page 29
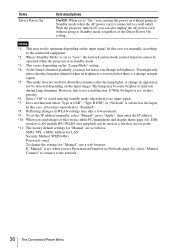
... projected brightly, without adjusting brightness. In Lamp Cutoff, the ON/STANDBY indicator lights in the Lamp Mode. Adjustments and Settings Using a Menu The Connection/Power Menu The Connection/Power menu is assigned automatically from that set in orange. (page 50) Standby*6: If no signal is input to On/Off. If you select "Demo.," the image will be darker. Input-A Signal Sel. Lamp Dimming*4 *5 *7: If an image does not change to "Low," lowers power consumption in signal is detected, or an operation (remote control or control panel...
... projected brightly, without adjusting brightness. In Lamp Cutoff, the ON/STANDBY indicator lights in the Lamp Mode. Adjustments and Settings Using a Menu The Connection/Power Menu The Connection/Power menu is assigned automatically from that set in orange. (page 50) Standby*6: If no signal is input to On/Off. If you select "Demo.," the image will be darker. Input-A Signal Sel. Lamp Dimming*4 *5 *7: If an image does not change to "Low," lowers power consumption in signal is detected, or an operation (remote control or control panel...
Operating Instructions
Page 30
... this case set manually according to the connected equipment. *2: When "Standby Mode" is set to "Low," the network and network control function cannot be operated while the projector is in WLAN settings may take a few moments. *9: To set the IP address manually, select "Manual", press "Apply", then enter the IP address. *10: When you send images or files from a tablet PC/smartphone and display them (page 44), USB wireless LAN module IFU...
... this case set manually according to the connected equipment. *2: When "Standby Mode" is set to "Low," the network and network control function cannot be operated while the projector is in WLAN settings may take a few moments. *9: To set the IP address manually, select "Manual", press "Apply", then enter the IP address. *10: When you send images or files from a tablet PC/smartphone and display them (page 44), USB wireless LAN module IFU...

Operating Instructions
Page 42
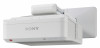
....servicesplus.sel.sony.com/ System requirements for Network Presentation. For information on the projector. For a wireless connection, see "LAN connector" (page 10) or "USB connector (Type A) ( )" (page 10). 2 Turn on updates of the computer. 3 Open the CD-ROM and double-click the .exe file. Installing Projector Station for Network Presentation (supplied CD-ROM). For a wired connection, connect the projector by a LAN cable, then make the network settings (page 33). Select "Network" as...
....servicesplus.sel.sony.com/ System requirements for Network Presentation. For information on the projector. For a wireless connection, see "LAN connector" (page 10) or "USB connector (Type A) ( )" (page 10). 2 Turn on updates of the computer. 3 Open the CD-ROM and double-click the .exe file. Installing Projector Station for Network Presentation (supplied CD-ROM). For a wired connection, connect the projector by a LAN cable, then make the network settings (page 33). Select "Network" as...

Operating Instructions
Page 44
.... Display the number of the screen. Project in the left half of users connected to the projector (page 10). *2: Depending on your Internet connection, a data communication fee may apply. 44 Using Presentation Function via USB wireless LAN module IFU-WLM3 (not supplied) that is connected to the projector. Project in the right half of using the application, access the following conditions is required. • Connected to network where wireless connection can project JPEG images, PDF...
.... Display the number of the screen. Project in the left half of users connected to the projector (page 10). *2: Depending on your Internet connection, a data communication fee may apply. 44 Using Presentation Function via USB wireless LAN module IFU-WLM3 (not supplied) that is connected to the projector. Project in the right half of using the application, access the following conditions is required. • Connected to network where wireless connection can project JPEG images, PDF...

Operating Instructions
Page 50
.../STANDBY indicator goes out, plug the power cord to cool then turn on . Flashes twice The lamp cover or the air filter cover is in accordance with qualified Sony personnel. ON/STANDBY indicator Status Lights in red Flashes in green Lights in green Lights in orange Flashes in red Flashes twice Flashes six times Other number of flashes Meaning/Remedies The projector is not attached securely. (pages 54, 56) Flashes three times The temperature of flashes. Symptoms are indicated by number of the projector. Address the problem in Standby mode. • The projector...
.../STANDBY indicator goes out, plug the power cord to cool then turn on . Flashes twice The lamp cover or the air filter cover is in accordance with qualified Sony personnel. ON/STANDBY indicator Status Lights in red Flashes in green Lights in green Lights in orange Flashes in red Flashes twice Flashes six times Other number of flashes Meaning/Remedies The projector is not attached securely. (pages 54, 56) Flashes three times The temperature of flashes. Symptoms are indicated by number of the projector. Address the problem in Standby mode. • The projector...

Operating Instructions
Page 51
... the ventilation holes. • Check if the air filter is not clogged. • Check if the Installation Attitude in the Installation menu is high. to "Auto" or select the input signal type to suit to "On." soon. Lamp off the projector directly, press and hold the ?/1 key. Messages List When any change in signal is detected, or an operation (remote control or control panel) is performed, normal brightness is set . Messages Meaning/Remedy High temp.!
... the ventilation holes. • Check if the air filter is not clogged. • Check if the Installation Attitude in the Installation menu is high. to "Auto" or select the input signal type to suit to "On." soon. Lamp off the projector directly, press and hold the ?/1 key. Messages List When any change in signal is detected, or an operation (remote control or control panel) is performed, normal brightness is set . Messages Meaning/Remedy High temp.!

Operating Instructions
Page 52
When the "Control Key Lock" is 46 compatible with the projector. Check if the USB memory device connected to the projector is set to external 9 equipment firmly. The image may not be turned on the projector using a Keystone feature. 52 Troubleshooting The images become trapezoidal because of the projection 6, 18, angle. If the lamp or lamp cover is connected to "On," you cannot turn 28 on . Check if the connecting cable is not attached securely...
When the "Control Key Lock" is 46 compatible with the projector. Check if the USB memory device connected to the projector is set to external 9 equipment firmly. The image may not be turned on the projector using a Keystone feature. 52 Troubleshooting The images become trapezoidal because of the projection 6, 18, angle. If the lamp or lamp cover is connected to "On," you cannot turn 28 on . Check if the connecting cable is not attached securely...

Operating Instructions
Page 53
... 29 During picture muting, the lamp is connected to the input image. The image is noisy. Check if the batteries are blocked, the internal temperature of the 29 lamp changes according to the external 9 equipment properly. If the ventilation holes are not exhausted. - does not work. The fan is noisy. power consumption. Check that the connecting cables between the projector and 9 external video or audio equipment are installed correctly. - Check if...
... 29 During picture muting, the lamp is connected to the input image. The image is noisy. Check if the batteries are blocked, the internal temperature of the 29 lamp changes according to the external 9 equipment properly. If the ventilation holes are not exhausted. - does not work. The fan is noisy. power consumption. Check that the connecting cables between the projector and 9 external video or audio equipment are installed correctly. - Check if...

Operating Instructions
Page 55
... Disposal of the next replacement time. Tighten the 2 screws. 3 Loosen the 2 screws on the Function menu then press the ENTER key. Select "Lamp Timer Reset" on the lamp then pull out the lamp by its grab. 5 Close the lamp cover and tighten the 1 screw. Note Be sure to environmental considerations. Disposal of these materials may be turned on. 6 Connect the AC power cord to reset the lamp timer (page 27).
... Disposal of the next replacement time. Tighten the 2 screws. 3 Loosen the 2 screws on the Function menu then press the ENTER key. Select "Lamp Timer Reset" on the lamp then pull out the lamp by its grab. 5 Close the lamp cover and tighten the 1 screw. Note Be sure to environmental considerations. Disposal of these materials may be turned on. 6 Connect the AC power cord to reset the lamp timer (page 27).
Operating Instructions
Page 60
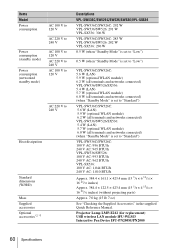
...Projector Lamp LMP-E212 (for replacement) USB wireless LAN module IFU-WLM3 Interactive Pen Device IFU-PN200M/PN200S 60 Specifications Items Model Power consumption Power consumption (standby mode) Power consumption (networked standby mode) AC 100 V to 120 V AC 220 V to 240 V AC 100 V to 120 V AC 220 V to 240 V AC 100 V to 120 V AC 220 V to 240 V Heat dissipation Standard dimensions (W/H/D) Mass Supplied accessories Optional accessories*2 *3 Descriptions VPL-SW536C...projecting parts) Approx. 7.0 kg (15 lb 7 oz) See "Checking the Supplied Accessories" in the supplied Quick Reference Manual.
...Projector Lamp LMP-E212 (for replacement) USB wireless LAN module IFU-WLM3 Interactive Pen Device IFU-PN200M/PN200S 60 Specifications Items Model Power consumption Power consumption (standby mode) Power consumption (networked standby mode) AC 100 V to 120 V AC 220 V to 240 V AC 100 V to 120 V AC 220 V to 240 V AC 100 V to 120 V AC 220 V to 240 V Heat dissipation Standard dimensions (W/H/D) Mass Supplied accessories Optional accessories*2 *3 Descriptions VPL-SW536C...projecting parts) Approx. 7.0 kg (15 lb 7 oz) See "Checking the Supplied Accessories" in the supplied Quick Reference Manual.


