Operating Instructions
Page 4
..... 10 Top/Front/Side 10 Rear/Side/Bottom 10 Control Panel 11 Connector Panel 12 Remote Commander 14 Projecting the Picture Installing the Projector 16 Connecting the Projector 17 Connecting a Computer 17 Connecting a VCR 18 Projecting 19 Turning Off the Power 21 Convenient Functions Selecting the Menu Language .......... 22...Memory No. ....31 The Setup Menu 32 The Function Menu 34 The Installation Menu 36 The Information Menu 38 Maintenance Replacing the Lamp 40 Cleaning the Air Filter 42 Others Troubleshooting 43 Messages List 46 Specifications 47 Dimensions 53 Index 56 4
..... 10 Top/Front/Side 10 Rear/Side/Bottom 10 Control Panel 11 Connector Panel 12 Remote Commander 14 Projecting the Picture Installing the Projector 16 Connecting the Projector 17 Connecting a Computer 17 Connecting a VCR 18 Projecting 19 Turning Off the Power 21 Convenient Functions Selecting the Menu Language .......... 22...Memory No. ....31 The Setup Menu 32 The Function Menu 34 The Installation Menu 36 The Information Menu 38 Maintenance Replacing the Lamp 40 Cleaning the Air Filter 42 Others Troubleshooting 43 Messages List 46 Specifications 47 Dimensions 53 Index 56 4

Operating Instructions
Page 5
...The wall outlet should not be changed to consult with a mild detergent solution. On preventing internal heat buildup • After you replace the lamp. Never install it with both sides of the unit. If the floor and walls are not of projection to the unit. Precautions Warning ...Manual for Dealers throughly for safe installation. For installation, be removed with a cloth lightly dampened with a Sony dealer. Do not use strong solvents, such as it out by qualified Sony personnel before operating it further. • Unplug the unit from the wall outlet if it is for...
...The wall outlet should not be changed to consult with a mild detergent solution. On preventing internal heat buildup • After you replace the lamp. Never install it with both sides of the unit. If the floor and walls are not of projection to the unit. Precautions Warning ...Manual for Dealers throughly for safe installation. For installation, be removed with a cloth lightly dampened with a Sony dealer. Do not use strong solvents, such as it out by qualified Sony personnel before operating it further. • Unplug the unit from the wall outlet if it is for...

Operating Instructions
Page 6
.... Poorly ventilated • Allow adequate air circulation to the block-up . This is a normal result of paper. On LCD projector • The LCD projector is very low. • To avoid moisture condensation, do not install the unit in 1 min." The power will come... in the following situations. Highly heated and humid 6 Notes on Installation and Usage Unsuitable Installation Do not install the unit in handy if you ever have to the unit. Lamp...
.... Poorly ventilated • Allow adequate air circulation to the block-up . This is a normal result of paper. On LCD projector • The LCD projector is very low. • To avoid moisture condensation, do not install the unit in 1 min." The power will come... in the following situations. Highly heated and humid 6 Notes on Installation and Usage Unsuitable Installation Do not install the unit in handy if you ever have to the unit. Lamp...

Operating Instructions
Page 7
Near a heat or smoke sensor magnifications. It may build up. Clean the air filter whenever you replace the lamp. Do not install the unit other than 20 degrees. Do not place a blocking object just in front of the lens Do not place any object ...
Near a heat or smoke sensor magnifications. It may build up. Clean the air filter whenever you replace the lamp. Do not install the unit other than 20 degrees. Do not place a blocking object just in front of the lens Do not place any object ...

Operating Instructions
Page 9
... because the replacement lamp is located at the front of the projector. Also, this projector is located at the side of the projector lamp, error occurrences, etc., to a LAN by wired or wireless connection, can be projected by means of a breaker or other countries. • VGA, SVGA, XGA and SXGA are ...AC power for the entire system can be turned on the time for replacement of the projector and the air filter is available for SNMP. * The optional lenses available for VPL-FE40 and VPL-FX40 equipped with one room. You can use Remote Commander that contains messages on and...
... because the replacement lamp is located at the front of the projector. Also, this projector is located at the side of the projector lamp, error occurrences, etc., to a LAN by wired or wireless connection, can be projected by means of a breaker or other countries. • VGA, SVGA, XGA and SXGA are ...AC power for the entire system can be turned on the time for replacement of the projector and the air filter is available for SNMP. * The optional lenses available for VPL-FE40 and VPL-FX40 equipped with one room. You can use Remote Commander that contains messages on and...

Operating Instructions
Page 10
d Lamp cover e Lens Remove the lens cap before projection. The lens is a trademark of Sony corporation. Unless otherwise specified in notes, the VPL-FE40 described in this manual refers to both the VPL-FE40 and VPL-FE40L, and the VPL-FX40 refers to the right or left... 4 5 2 6 Rear/Side/Bottom 7 8 9 0 qa qs qd a Front remote control detector b Adjusters Turn the appropriate adjuster to both the VPL-FX40 and VPL-FX40L. • Kensington is a registered trademark of Kensington Technology Group. • Macintosh is a registered trademark of Apple Computer, Inc. • VESA is ...
d Lamp cover e Lens Remove the lens cap before projection. The lens is a trademark of Sony corporation. Unless otherwise specified in notes, the VPL-FE40 described in this manual refers to both the VPL-FE40 and VPL-FE40L, and the VPL-FX40 refers to the right or left... 4 5 2 6 Rear/Side/Bottom 7 8 9 0 qa qs qd a Front remote control detector b Adjusters Turn the appropriate adjuster to both the VPL-FX40 and VPL-FX40L. • Kensington is a registered trademark of Kensington Technology Group. • Macintosh is a registered trademark of Apple Computer, Inc. • VESA is ...

Operating Instructions
Page 11
...on page 42. For details, see "Connector Panel" on with the ?/1 key. Once the projector is in orange under the following conditions: • A reception rate of 2 flashes when the lamp cover or air filter cover is plugged into a wall outlet. i Security lock Connects to an... optional security cable (from Kensington). Control Panel 1 2 3 4 5 6 7 8 9 a LAMP/COVER indicators Flashes in standby mode, you replace the lamp. b ON/STANDBY indicator Lights up . • Do not place your hand near the ventilation holes as this may cause injury. ...
...on page 42. For details, see "Connector Panel" on with the ?/1 key. Once the projector is in orange under the following conditions: • A reception rate of 2 flashes when the lamp cover or air filter cover is plugged into a wall outlet. i Security lock Connects to an... optional security cable (from Kensington). Control Panel 1 2 3 4 5 6 7 8 9 a LAMP/COVER indicators Flashes in standby mode, you replace the lamp. b ON/STANDBY indicator Lights up . • Do not place your hand near the ventilation holes as this may cause injury. ...

Operating Instructions
Page 33
... Reset When replacing the lamps, reset the lamp timer. - If the picture is set to "High", the number of turns of signal input from the equipment connected to "Low," the network presentation function ...
... Reset When replacing the lamps, reset the lamp timer. - If the picture is set to "High", the number of turns of signal input from the equipment connected to "Low," the network presentation function ...

Operating Instructions
Page 36
... higher value (+ direction). Use this item for installation for changing the settings of the projector. Flips the picture on the front and rear of the lens. Standard Avoids any operation of the projector. • Front & Rear: Activates both the front and rear detectors. • Front...: Activates the front detector only. • Rear: Activates the rear detector only. Sets the lamp brightness used for the backside projection or ceiling ...
... higher value (+ direction). Use this item for installation for changing the settings of the projector. Flips the picture on the front and rear of the lens. Standard Avoids any operation of the projector. • Front & Rear: Activates both the front and rear detectors. • Front...: Activates the front detector only. • Rear: Activates the rear detector only. Sets the lamp brightness used for the backside projection or ceiling ...

Operating Instructions
Page 38
... z z z - - Memory number Signal type Setting items Model Name Serial Number fH (horizontal frequency) fV (vertical frequency) Memory No. Displays the vertical frequency of the lamp. Displays the serial number. Picture menu Item Picture Mode Contrast Brightness Color Hue Color Temperature Video/S-Video (Y/C) z z z z*1 z*2 z Component z z z z z z...and fV(vertical frequency) may not be adjusted are not displayed in the menus cannot be adjusted depending on the projector. • You cannot change the displays listed above. z - z 38 The Information Menu The Information Menu ...
... z z z - - Memory number Signal type Setting items Model Name Serial Number fH (horizontal frequency) fV (vertical frequency) Memory No. Displays the vertical frequency of the lamp. Displays the serial number. Picture menu Item Picture Mode Contrast Brightness Color Hue Color Temperature Video/S-Video (Y/C) z z z z*1 z*2 z Component z z z z z z...and fV(vertical frequency) may not be adjusted are not displayed in the menus cannot be adjusted depending on the projector. • You cannot change the displays listed above. z - z 38 The Information Menu The Information Menu ...
Operating Instructions
Page 40
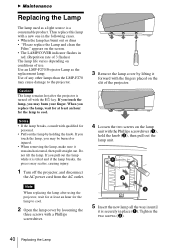
... by loosening the three screws with a Phillips screwdriver. 3 Remove the lamp cover by holding the knob. Note When replacing the lamp after the projector is a consumable product. B Maintenance Replacing the Lamp The lamp used as the replacement lamp. Caution The lamp remains hot after using the projector, wait for at least an hour for personal. • Pull out...
... by loosening the three screws with a Phillips screwdriver. 3 Remove the lamp cover by holding the knob. Note When replacing the lamp after the projector is a consumable product. B Maintenance Replacing the Lamp The lamp used as the replacement lamp. Caution The lamp remains hot after using the projector, wait for at least an hour for personal. • Pull out...

Operating Instructions
Page 41
...ENTER key. is displayed in the USA This product contains mercury. Maintenance Replacing the Lamp 41 Caution Do not put your local authorities or the Electronics Industries Alliance (http://www.eiae.org). If not, the projector cannot be regulated if sold in red. 8 Press the ?/1 key to turn on... the power cord. Notes • Be careful not to touch the glass surface of the lamp. • The power will not turn the projector on if the lamp is not secured properly. 6 Restore the lamp cover to the original position and tighten the three screws with the phillips screwdriver. Note To...
...ENTER key. is displayed in the USA This product contains mercury. Maintenance Replacing the Lamp 41 Caution Do not put your local authorities or the Electronics Industries Alliance (http://www.eiae.org). If not, the projector cannot be regulated if sold in red. 8 Press the ?/1 key to turn on... the power cord. Notes • Be careful not to touch the glass surface of the lamp. • The power will not turn the projector on if the lamp is not secured properly. 6 Restore the lamp cover to the original position and tighten the three screws with the phillips screwdriver. Note To...

Operating Instructions
Page 42
...the air filter so that it fits into the each claws (6 positions) on if it . Caution If you replace the lamp. Claws 4 Clean the air filter with a new one. As a result, the temperature may accumulate, clogging it is ...vary depending on new air filter, consult with a vacuum cleaner. For details on the environment or how the projector is not closed securely. • The air filter has face and reverse sides. Cleaning the Air Filter ... fire. Remove the air filter, and then remove the dust with qualified Sony personnnel. • Be sure to attach the air filter cover firmly;
...the air filter so that it fits into the each claws (6 positions) on if it . Caution If you replace the lamp. Claws 4 Clean the air filter with a new one. As a result, the temperature may accumulate, clogging it is ...vary depending on new air filter, consult with a vacuum cleaner. For details on the environment or how the projector is not closed securely. • The air filter has face and reverse sides. Cleaning the Air Filter ... fire. Remove the air filter, and then remove the dust with qualified Sony personnnel. • Be sure to attach the air filter cover firmly;

Operating Instructions
Page 43
...LCD panel. c Attach the air filter cover securely (see page 33). The picture from the computer and the numbers of pixels on the power (see page 21). • The lamp...B Others Troubleshooting If the projector appears to be operating erratically, try to an external monitor (see page 17). • The connections are wrong. c Close the lamp cover securely (see page ... qualified Sony personnel. If the problem persists, consult with the jitter. c Select the input source correctly using the following procedures. 1 Connect the projector to the computer. 2 Turn the projector on with...
...LCD panel. c Attach the air filter cover securely (see page 33). The picture from the computer and the numbers of pixels on the power (see page 21). • The lamp...B Others Troubleshooting If the projector appears to be operating erratically, try to an external monitor (see page 17). • The connections are wrong. c Close the lamp cover securely (see page ... qualified Sony personnel. If the problem persists, consult with the jitter. c Select the input source correctly using the following procedures. 1 Connect the projector to the computer. 2 Turn the projector on with...

Operating Instructions
Page 44
...sound is incorrect. key on the lens. in the Picture menu properly (see page 28). • The projector is set to the wrong color system. c Adjust the picture (see page 28). • The lamp has burnt out or is too dark. • Contrast or brightness has not been adjusted properly. c Adjust... the contrast or brightness in the Setup menu is muted. c Leave the projector for about two hours with a new one (see page 17). &#...
...sound is incorrect. key on the lens. in the Picture menu properly (see page 28). • The projector is set to the wrong color system. c Adjust the picture (see page 28). • The lamp has burnt out or is too dark. • Contrast or brightness has not been adjusted properly. c Adjust... the contrast or brightness in the Setup menu is muted. c Leave the projector for about two hours with a new one (see page 17). &#...

Operating Instructions
Page 45
... out, plug the power cord to see page 32). If the ON/STANDBY flashes in orange. c Set it to cool the lamp and then turn the projector on the Remote Commander. Cause and Remedy The control panel keys are dead. The approximate normal temperature is broken. ON/STANDBY flashes ...temperature is not too high. c Replace them with qualified Sony personnel. Indicators Symptom Cause and Remedy The LAMP/COVER • The lamp cover or the air filter cover is noisy. c Wait for 60 seconds to ON. • The ID number of the projector assigned in "ID Mode" in The fan is 25&#...
... out, plug the power cord to see page 32). If the ON/STANDBY flashes in orange. c Set it to cool the lamp and then turn the projector on the Remote Commander. Cause and Remedy The control panel keys are dead. The approximate normal temperature is broken. ON/STANDBY flashes ...temperature is not too high. c Replace them with qualified Sony personnel. Indicators Symptom Cause and Remedy The LAMP/COVER • The lamp cover or the air filter cover is noisy. c Wait for 60 seconds to ON. • The ID number of the projector assigned in "ID Mode" in The fan is 25&#...

Operating Instructions
Page 46
... The panel keys are not covered (see that nothing is out of the acceptable range of the projector. • The resolution setting of the output signal of the frequency. min. Please replace the Lamp and clean the Filter. • It is set to "High" in 1 The internal temperature ...used at high altitude, set to see page 11). Message Meaning and Remedy Not applicable! Message Meaning and Remedy High temp.! Lamp off the power. Operate the projector with the keys on the screen. c All the keys on the control panel of the messages displayed on the Remote Commander ...
... The panel keys are not covered (see that nothing is out of the acceptable range of the projector. • The resolution setting of the output signal of the frequency. min. Please replace the Lamp and clean the Filter. • It is set to "High" in 1 The internal temperature ...used at high altitude, set to see page 11). Message Meaning and Remedy Not applicable! Message Meaning and Remedy High temp.! Lamp off the power. Operate the projector with the keys on the screen. c All the keys on the control panel of the messages displayed on the Remote Commander ...
Operating Instructions
Page 47
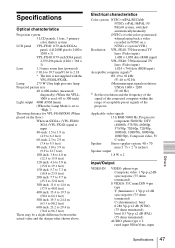
...projector. Lamp 275 W Ultra high pressure lamp Projected picture size 40 to 600-inches (measured diagonally) (When the VPLL- 1008 is used when playing back a video recorded in NTSC on the floor.) When an SXGA+ (VPL-FE40)/ XGA (VPL-FX40) signal is not supplied with the VPL-FE40L/FX40L... Others Specifications 47 Specifications Optical characteristics Projection system 3 LCD panels, 1 lens, 3 primary color shutter system LCD panel VPL-FE40: 0.79-inch SXGA+ panel, 4,410,000 pixels (1400 × 1050 × 3) VPL-FX40: 0.79-inch XGA panel, 2,359,296 pixels (1024 × 768...
...projector. Lamp 275 W Ultra high pressure lamp Projected picture size 40 to 600-inches (measured diagonally) (When the VPLL- 1008 is used when playing back a video recorded in NTSC on the floor.) When an SXGA+ (VPL-FE40)/ XGA (VPL-FX40) signal is not supplied with the VPL-FE40L/FX40L... Others Specifications 47 Specifications Optical characteristics Projection system 3 LCD panels, 1 lens, 3 primary color shutter system LCD panel VPL-FE40: 0.79-inch SXGA+ panel, 4,410,000 pixels (1400 × 1050 × 3) VPL-FX40: 0.79-inch XGA panel, 2,359,296 pixels (1024 × 768...

Operating Instructions
Page 48
... hole cover (1) (VPL-FE40L/ FX40L) AC power cord (1) CD-ROM (Operating Instructions, Application Software) (1) Quick Reference Manual (1) Safety Regulations (1) Security Label (1) Design and specifications are subject to change without the projection parts) Mass Approx. 9.8 kg (21 lb 10 oz) (VPL- FE40/FX40) Approx. 9.0 kg (19 lb 13 oz) (VPL- Optional accessories Projector Lamp LMP-F270 (for...
... hole cover (1) (VPL-FE40L/ FX40L) AC power cord (1) CD-ROM (Operating Instructions, Application Software) (1) Quick Reference Manual (1) Safety Regulations (1) Security Label (1) Design and specifications are subject to change without the projection parts) Mass Approx. 9.8 kg (21 lb 10 oz) (VPL- FE40/FX40) Approx. 9.0 kg (19 lb 13 oz) (VPL- Optional accessories Projector Lamp LMP-F270 (for...

Operating Instructions
Page 56
... Mode 29 56 Index H Hue 28 I Illumination 37 Image Flip 36 Input-C Signal Sel 33 Installation 16 Installation examples unsuitable conditions 7 unsuitable installation 6 L Lamp Mode 36 Lamp replacement 40 Lamp Timer 38 Language 32 selecting the menu language 22 Lens 10 Location and function of controls connector panel 12 control panel 11 rear...
... Mode 29 56 Index H Hue 28 I Illumination 37 Image Flip 36 Input-C Signal Sel 33 Installation 16 Installation examples unsuitable conditions 7 unsuitable installation 6 L Lamp Mode 36 Lamp replacement 40 Lamp Timer 38 Language 32 selecting the menu language 22 Lens 10 Location and function of controls connector panel 12 control panel 11 rear...


