
Operating Instructions
Page 4
... Altitude 7 Unsuitable Conditions 7 Overview About the Supplied Manuals 8 Features 8 Location and Function of Controls .. 10 Top/Front/Side 10 Rear/Side/Bottom 10 Control Panel 11 Connector Panel 12 Remote Commander 14 Projecting the Picture Installing the Projector 16 Connecting the Projector 17 Connecting a Computer 17 Connecting a VCR 19 Projecting 20 Turning Off the Power...
... Altitude 7 Unsuitable Conditions 7 Overview About the Supplied Manuals 8 Features 8 Location and Function of Controls .. 10 Top/Front/Side 10 Rear/Side/Bottom 10 Control Panel 11 Connector Panel 12 Remote Commander 14 Projecting the Picture Installing the Projector 16 Connecting the Projector 17 Connecting a Computer 17 Connecting a VCR 19 Projecting 20 Turning Off the Power...

Operating Instructions
Page 9
... allow you to connect to turn the projector on/off by wired or wireless connection, can also display VGA, SVGA, XGA, WXGA, SXGA, SXGA+ and UXGA ...computer from the installation location via a Web browser or to -use Remote Commander that have been specified. You can change the lamp or ...Overview * The optional lenses available for VPL-FE40, VPL-FX40 and VPL-FX41 equipped with one room. Accepts various input signals The projector accepts video signals of the composite,...or control each projector individually with a standard lens only. This enables easy setup, as the lamp...
... allow you to connect to turn the projector on/off by wired or wireless connection, can also display VGA, SVGA, XGA, WXGA, SXGA, SXGA+ and UXGA ...computer from the installation location via a Web browser or to -use Remote Commander that have been specified. You can change the lamp or ...Overview * The optional lenses available for VPL-FE40, VPL-FX40 and VPL-FX41 equipped with one room. Accepts various input signals The projector accepts video signals of the composite,...or control each projector individually with a standard lens only. This enables easy setup, as the lamp...
Operating Instructions
Page 10
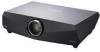
...qd a Front remote control detector b Adjusters Turn the appropriate adjuster to both the VPL-FX41 and VPL-FX41L. c Indicator For details, see "Control Panel" on page 11. In this manual refers to both the VPL-FE40 and VPL-FE40L, the VPL-FX40 refers to both the VPL-FX40 and VPL-FX40L, and the VPL-FX41 refers to... the right or left for minor tilt adjustment of Controls d Lamp cover e Lens Remove the lens cap before projection. The lens is a trademark of Sony corporation....
...qd a Front remote control detector b Adjusters Turn the appropriate adjuster to both the VPL-FX41 and VPL-FX41L. c Indicator For details, see "Control Panel" on page 11. In this manual refers to both the VPL-FE40 and VPL-FE40L, the VPL-FX40 refers to both the VPL-FX40 and VPL-FX40L, and the VPL-FX41 refers to... the right or left for minor tilt adjustment of Controls d Lamp cover e Lens Remove the lens cap before projection. The lens is a trademark of Sony corporation....
Operating Instructions
Page 11
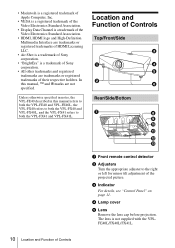
g Rear remote control detector h Connector Panel For details, see "Control Panel" on page 12. b ON/STANDBY indicator Lights up . • Do not place your hand near the ventilation holes as this may cause injury. Control Panel 1 2 3 4 5 6 7 8 9 a LAMP/COVER ...cover is plugged into a wall outlet. Once the projector is on one side only. Location and Function of Controls 11 Web page address: http://www.kensington.com/ j Control panel For details, see "Connector Panel" on page ...Overview f Air filter covers The air filter of VPL-FX41 can turn it on with the ?/1 key.
g Rear remote control detector h Connector Panel For details, see "Control Panel" on page 12. b ON/STANDBY indicator Lights up . • Do not place your hand near the ventilation holes as this may cause injury. Control Panel 1 2 3 4 5 6 7 8 9 a LAMP/COVER ...cover is plugged into a wall outlet. Once the projector is on one side only. Location and Function of Controls 11 Web page address: http://www.kensington.com/ j Control panel For details, see "Connector Panel" on page ...Overview f Air filter covers The air filter of VPL-FX41 can turn it on with the ?/1 key.

Operating Instructions
Page 13
... is output. Location and Function of the monitor. The volume of VIDEO IN is in the Remote Commander as when the projector is suspended from the INPUT A, INPUT B or INPUT C. Connects to the CONTROL S OUT jack on the Remote Commander. When VIDEO or S VIDEO is selected, the sound input to the AUDIO input connector... is for peripheral device wiring that might have excessive voltage to this port. Overview AUDIO input L (MONO)/R (phono type) Connect to the audio output of Sony equipment.
... is output. Location and Function of the monitor. The volume of VIDEO IN is in the Remote Commander as when the projector is suspended from the INPUT A, INPUT B or INPUT C. Connects to the CONTROL S OUT jack on the Remote Commander. When VIDEO or S VIDEO is selected, the sound input to the AUDIO input connector... is for peripheral device wiring that might have excessive voltage to this port. Overview AUDIO input L (MONO)/R (phono type) Connect to the audio output of Sony equipment.

Operating Instructions
Page 14
AUDIO - e ENTER key f RESET key Resets the value of the Remote Commander. FREEZE ID MODE 1 2 3 1 2 3 4 5 6 7 8 9 0 qa qs a ?/1 (On/Standby) key b INPUT A/B/C/D/E keys Selects the input signal output from a computer. 14 Location and ...the Network Presentation Home. g KEYSTONE (Vertical trapezoidal distortion correction) key Adjusts the vertical trapezoidal distortion of Controls For details, see Operating Instructions for Network (stored on the control panel function identically. Remote Commander The keys that have the same names as those on the CD-ROM). When you press this...
AUDIO - e ENTER key f RESET key Resets the value of the Remote Commander. FREEZE ID MODE 1 2 3 1 2 3 4 5 6 7 8 9 0 qa qs a ?/1 (On/Standby) key b INPUT A/B/C/D/E keys Selects the input signal output from a computer. 14 Location and ...the Network Presentation Home. g KEYSTONE (Vertical trapezoidal distortion correction) key Adjusts the vertical trapezoidal distortion of Controls For details, see Operating Instructions for Network (stored on the control panel function identically. Remote Commander The keys that have the same names as those on the CD-ROM). When you press this...

Operating Instructions
Page 15
Overview m MUTING keys Cut off the picture and sound. • PIC: Cuts off the picture. Press again or press the VOLUME+ key to temporarily cut the audio output from the speaker or audio signal from the AUDIO jack of the picture. n D ZOOM (Digital Zoom) +/- keys Adjusts the picture size. keys Adjusts the picture focus. o ZOOM +/- keys Adjusts the vertical/horizontal position of OUTPUT. key This function is not provided in this projector. r M/m/ Press again to restore the picture. • AUDIO: Press to restore the sound. q SHIFT +/- p FOCUS +/-
Overview m MUTING keys Cut off the picture and sound. • PIC: Cuts off the picture. Press again or press the VOLUME+ key to temporarily cut the audio output from the speaker or audio signal from the AUDIO jack of the picture. n D ZOOM (Digital Zoom) +/- keys Adjusts the picture size. keys Adjusts the picture focus. o ZOOM +/- keys Adjusts the vertical/horizontal position of OUTPUT. key This function is not provided in this projector. r M/m/ Press again to restore the picture. • AUDIO: Press to restore the sound. q SHIFT +/- p FOCUS +/-

Operating Instructions
Page 20
... are found. 20 Projecting connected to select the input source. The ON/STANDBY indicator flashes in green, and then lights in red and the projector goes into a wall outlet, then connect all equipment. Notes • If "Auto Input Search" is projected clearly. Projecting 7 8 8 ...INPUT C connector Computer/VCR, etc. The ON/STANDBY indicator lights in green. 3 Turn on the control panel, the input signal switches as follows: Input-AtInput-BtInput-CtInput-DtInput-E 1 Rear remote control detector COMMAND OFF ON INPUT A INPUT D INPUT B INPUT E INPUT C AIR SHOT VIDEO S ...
... are found. 20 Projecting connected to select the input source. The ON/STANDBY indicator flashes in green, and then lights in red and the projector goes into a wall outlet, then connect all equipment. Notes • If "Auto Input Search" is projected clearly. Projecting 7 8 8 ...INPUT C connector Computer/VCR, etc. The ON/STANDBY indicator lights in green. 3 Turn on the control panel, the input signal switches as follows: Input-AtInput-BtInput-CtInput-DtInput-E 1 Rear remote control detector COMMAND OFF ON INPUT A INPUT D INPUT B INPUT E INPUT C AIR SHOT VIDEO S ...
Operating Instructions
Page 23
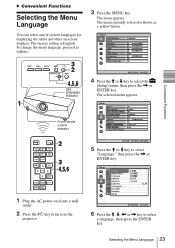
...is shown as follows: 3 2 4,5,6 ON/ STANDBY indicator 1 3 Press the MENU key. The selected menu appears. The menu appears. Convenient Functions Front remote control detector COMMAND OFF ON INPUT A INPUT D INPUT B INPUT E INPUT C AIR SHOT VIDEO S VIDEO MENU APA ENTER RESET FOCUS ZOOM SHIFT ASPECT KEY ...turn on -screen displays. B Convenient Functions Selecting the Menu Language You can select one of sixteen languages for displaying the menu and other on the projector. 5 Press the M or m key to select "Language," then press the , or ENTER key. 30 6 Press the M, m, < or...
...is shown as follows: 3 2 4,5,6 ON/ STANDBY indicator 1 3 Press the MENU key. The selected menu appears. The menu appears. Convenient Functions Front remote control detector COMMAND OFF ON INPUT A INPUT D INPUT B INPUT E INPUT C AIR SHOT VIDEO S VIDEO MENU APA ENTER RESET FOCUS ZOOM SHIFT ASPECT KEY ...turn on -screen displays. B Convenient Functions Selecting the Menu Language You can select one of sixteen languages for displaying the menu and other on the projector. 5 Press the M or m key to select "Language," then press the , or ENTER key. 30 6 Press the M, m, < or...

Operating Instructions
Page 26
...after the power off and the ON/ STANDBY indicator lights in red (except with the VPL-FX41). • When the power is any obstruction between the presentation tool and the remote control detector on the projector, the presentation tool may not function properly. • A black screen may take some...set "ID Mode" in the Installation menu to "All" or "1." 26 Other Functions If the projector has been on for a short time, unplug the AC power cord from a computer is pressed. Controlling the Computer Using a Presentation Tool, RM-PJPK1 (not supplied) (When Using the Network Presentation ...
...after the power off and the ON/ STANDBY indicator lights in red (except with the VPL-FX41). • When the power is any obstruction between the presentation tool and the remote control detector on the projector, the presentation tool may not function properly. • A black screen may take some...set "ID Mode" in the Installation menu to "All" or "1." 26 Other Functions If the projector has been on for a short time, unplug the AC power cord from a computer is pressed. Controlling the Computer Using a Presentation Tool, RM-PJPK1 (not supplied) (When Using the Network Presentation ...

Operating Instructions
Page 36
Notes • Press the APA key when the full image is automatically set to "On," keeping the ?/1 key on the control panel pressed for about 10 seconds when the power is on, the lock will not work properly and some parts of the image may not ... picture may not be displayed on the screen. • You can be operated only with the Remote Commander. If you adjust the picture manually. 36 The Function Menu For details, see "Security Lock" on the projector's security lock function. Off When set to "On," turns on the security lock function, which locks...
Notes • Press the APA key when the full image is automatically set to "On," keeping the ?/1 key on the control panel pressed for about 10 seconds when the power is on, the lock will not work properly and some parts of the image may not ... picture may not be displayed on the screen. • You can be operated only with the Remote Commander. If you adjust the picture manually. 36 The Function Menu For details, see "Security Lock" on the projector's security lock function. Off When set to "On," turns on the security lock function, which locks...

Operating Instructions
Page 37
...does not flip. When set to avoid any operation of the lens such as "Focus," "Zoom," On and "Shift," by mistake. Selects the remote control detectors (IR Receiver) on the screen horizontally and/or Off vertically. Front & Rear The Installation Menu 37 The Installation Menu The Installation menu is ...When the top of the trapezoid is longer than the bottom ( ): Sets a higher value (+ direction). Flips the picture on the front and rear of the projector. Use this item to "Off" to "On," you make this adjustment, it is longer than the top ( ): Sets a lower value (- Standard Avoids...
...does not flip. When set to avoid any operation of the lens such as "Focus," "Zoom," On and "Shift," by mistake. Selects the remote control detectors (IR Receiver) on the screen horizontally and/or Off vertically. Front & Rear The Installation Menu 37 The Installation Menu The Installation menu is ...When the top of the trapezoid is longer than the bottom ( ): Sets a higher value (+ direction). Flips the picture on the front and rear of the projector. Use this item to "Off" to "On," you make this adjustment, it is longer than the top ( ): Sets a lower value (- Standard Avoids...

Operating Instructions
Page 38
...SONY logo on the picture position adjusted with the supplied Remote Commander. Select each screen edge "left / right / up / bottom" on /off without pressing the power key on . When you use Blanking, set the V Keystone to "0." • Since the displayable area becomes narrower when Blanking value is set to "1," you can control the projector... with the Remote Commander with the ID MODE key set to turn the power on/ off the entire system. When this item...
...SONY logo on the picture position adjusted with the supplied Remote Commander. Select each screen edge "left / right / up / bottom" on /off without pressing the power key on . When you use Blanking, set the V Keystone to "0." • Since the displayable area becomes narrower when Blanking value is set to "1," you can control the projector... with the Remote Commander with the ID MODE key set to turn the power on/ off the entire system. When this item...

Operating Instructions
Page 42
...this product contains mercury. Notes • Be careful not to touch the glass surface of the lamp. • The power will not turn the projector on the Remote Commander. The ON/STANDBY indicator lights in red. 8 Press the ?/1 key to the original position and tighten the three screws with the phillips ... cord. Note To erase a message, press any liquid or other objects into the lamp replacement slot, and do not allow any key on the control panel of the projector or on . 9 Press the MENU key, and then select the Setup menu. 10Select "Lamp Timer Reset", and then press the ENTER key....
...this product contains mercury. Notes • Be careful not to touch the glass surface of the lamp. • The power will not turn the projector on the Remote Commander. The ON/STANDBY indicator lights in red. 8 Press the ?/1 key to the original position and tighten the three screws with the phillips ... cord. Note To erase a message, press any liquid or other objects into the lamp replacement slot, and do not allow any key on the control panel of the projector or on . 9 Press the MENU key, and then select the Setup menu. 10Select "Lamp Timer Reset", and then press the ENTER key....

Operating Instructions
Page 43
... inside the unit, leading to attach the air filter cover firmly; The air filter of the projector or on the remote commander. 3 Remove the air filter from the air filter, replace the air filter with a ... the air filter are visible. • To erase a message, press any key on the control panel of the VPL-FX41 is on one . For details on the air filter cover. the power can not be...on the air filter covers and replace the cover. Claws Maintenance 4 Clean the air filter with qualified Sony personnnel. • Be sure to a possible malfunction or fire. Cleaning the Air Filter The air ...
... inside the unit, leading to attach the air filter cover firmly; The air filter of the projector or on the remote commander. 3 Remove the air filter from the air filter, replace the air filter with a ... the air filter are visible. • To erase a message, press any key on the control panel of the VPL-FX41 is on one . For details on the air filter cover. the power can not be...on the air filter covers and replace the cover. Claws Maintenance 4 Clean the air filter with qualified Sony personnnel. • Be sure to a possible malfunction or fire. Cleaning the Air Filter The air ...

Operating Instructions
Page 46
... control panel keys (see page 41). • The lamp has reached a high temperature. To maintain the product reliability of the projector's components, the rotation speed of the ID MODE keys on the power again. • The internal temperature is set to "On." Remote Commander Symptom The Remote Commander does not work. c Consult with qualified Sony...
... control panel keys (see page 41). • The lamp has reached a high temperature. To maintain the product reliability of the projector's components, the rotation speed of the ID MODE keys on the power again. • The internal temperature is set to "On." Remote Commander Symptom The Remote Commander does not work. c Consult with qualified Sony...

Operating Instructions
Page 47
... and Remedy Not applicable! "High Altitude Mode" should be projected as the frequency is out of the acceptable range of the projector. • The resolution setting of the output signal of the projector or on the control panel of the computer is set to ensure that the ventilation holes on the...to see page 36). Caution Messages Use the list below to replace the lamp and clean the air filter. c All the keys on the control panel of the messages displayed on the Remote Commander (see that is high. c Check to "On". c When using the projector at high altitude.
... and Remedy Not applicable! "High Altitude Mode" should be projected as the frequency is out of the acceptable range of the projector. • The resolution setting of the output signal of the projector or on the control panel of the computer is set to ensure that the ventilation holes on the...to see page 36). Caution Messages Use the list below to replace the lamp and clean the air filter. c All the keys on the control panel of the messages displayed on the Remote Commander (see that is high. c Check to "On". c When using the projector at high altitude.

Operating Instructions
Page 49
...500 mVrms), output impedance 5 kilohms REMOTE RS-232C: D-sub 9 pin CONTROL S IN/PLUG IN POWER Stereo ...Supplied accessories Remote Commander (1) Size AA (R6) batteries (2) Lens cap (1) (VPL-FE40/FX40/ FX41) Lens hole cover (1) (VPL-FE40L/ FX40L.../FX41L) AC power cord (1) CD-ROM (Operating Instructions, Application Software) (1) Quick Reference Manual (1) Safety Regulations (1) Security Label (1) Design and specifications are subject to change without the projection parts) Mass Approx. 9.8 kg (21 lb 10 oz) (VPL- SONY...
...500 mVrms), output impedance 5 kilohms REMOTE RS-232C: D-sub 9 pin CONTROL S IN/PLUG IN POWER Stereo ...Supplied accessories Remote Commander (1) Size AA (R6) batteries (2) Lens cap (1) (VPL-FE40/FX40/ FX41) Lens hole cover (1) (VPL-FE40L/ FX40L.../FX41L) AC power cord (1) CD-ROM (Operating Instructions, Application Software) (1) Quick Reference Manual (1) Safety Regulations (1) Security Label (1) Design and specifications are subject to change without the projection parts) Mass Approx. 9.8 kg (21 lb 10 oz) (VPL- SONY...

Operating Instructions
Page 57
... Mode 37 Lamp replacement 41 Lamp Timer 39 Language 33 selecting the menu language 23 Lens 10 Location and function of controls connector panel 12 control panel 11 rear/side/bottom 10 Remote Commander 14 top/front/side 10 M Menu clearing the menu display 28 Function menu 35 Information menu 39 Installation menu...
... Mode 37 Lamp replacement 41 Lamp Timer 39 Language 33 selecting the menu language 23 Lens 10 Location and function of controls connector panel 12 control panel 11 rear/side/bottom 10 Remote Commander 14 top/front/side 10 M Menu clearing the menu display 28 Function menu 35 Information menu 39 Installation menu...

Operating Instructions
Page 58
Precautions 5 Projecting 20 R Remote Commander 14 front remote control detector 10 location and function of controls ......... 14 rear remote control detector 11 Reset 29 resetting an item 28 S Screen size 16, 48 Security Lock 36 Sharpness 29 Smart APA 35 Specifications 48 Standby Mode 33 Status 33 Supplied accessories 49 T Troubleshooting 44 V V Keystone 37 58 Index
Precautions 5 Projecting 20 R Remote Commander 14 front remote control detector 10 location and function of controls ......... 14 rear remote control detector 11 Reset 29 resetting an item 28 S Screen size 16, 48 Security Lock 36 Sharpness 29 Smart APA 35 Specifications 48 Standby Mode 33 Status 33 Supplied accessories 49 T Troubleshooting 44 V V Keystone 37 58 Index

