Operating Instructions
Page 1
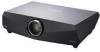
2-687-435-17 (2) Data Projector Operating Instructions VPL-FE40/FE40L VPL-FX40/FX40L VPL-FX41/FX41L © 2006 Sony Corporation
2-687-435-17 (2) Data Projector Operating Instructions VPL-FE40/FE40L VPL-FX40/FX40L VPL-FX41/FX41L © 2006 Sony Corporation

Operating Instructions
Page 2
To reduce the risk of fire or electric shock, refer servicing to an easily accessible socket-outlet near the unit. This equipment generates, uses, and can radiate radio frequency energy and, if not installed and used to connect peripherals must be required to correct the interference at a voltage other than 2.5 m (8 ft .3 in.) Rating Minimum 10 A, 125 V Using this equipment. All interface cables used in the fixed wiring, or connect the power plug to qualified service personnel. WARNING When installing the unit, incorporate a readily accessible disconnect device in accordance ...
To reduce the risk of fire or electric shock, refer servicing to an easily accessible socket-outlet near the unit. This equipment generates, uses, and can radiate radio frequency energy and, if not installed and used to connect peripherals must be required to correct the interference at a voltage other than 2.5 m (8 ft .3 in.) Rating Minimum 10 A, 125 V Using this equipment. All interface cables used in the fixed wiring, or connect the power plug to qualified service personnel. WARNING When installing the unit, incorporate a readily accessible disconnect device in accordance ...

Operating Instructions
Page 3
...case the user may cause radio interference in Europe The manufacturer of California, USA only Perchlorate Material - this product is Sony Corporation, 1-7-1 Konan, Minato-ku, Tokyo, Japan. For the customers in separate service or guarantee documents. The Authorized Representative for ...EMC and product safety is Sony Deutschland GmbH, Hedelfinger Strasse 61, 70327 Stuttgart, Germany. For any interference received, including interference that may apply, See www.dtsc...
...case the user may cause radio interference in Europe The manufacturer of California, USA only Perchlorate Material - this product is Sony Corporation, 1-7-1 Konan, Minato-ku, Tokyo, Japan. For the customers in separate service or guarantee documents. The Authorized Representative for ...EMC and product safety is Sony Deutschland GmbH, Hedelfinger Strasse 61, 70327 Stuttgart, Germany. For any interference received, including interference that may apply, See www.dtsc...

Operating Instructions
Page 4
... Controls .. 10 Top/Front/Side 10 Rear/Side/Bottom 10 Control Panel 11 Connector Panel 12 Remote Commander 14 Projecting the Picture Installing the Projector 16 Connecting the Projector 17 Connecting a Computer 17 Connecting a VCR 19 Projecting 20 Turning Off the Power 22 Convenient Functions Selecting the Menu Language .......... 23 Security Lock...
... Controls .. 10 Top/Front/Side 10 Rear/Side/Bottom 10 Control Panel 11 Connector Panel 12 Remote Commander 14 Projecting the Picture Installing the Projector 16 Connecting the Projector 17 Connecting a Computer 17 Connecting a VCR 19 Projecting 20 Turning Off the Power 22 Convenient Functions Selecting the Menu Language .......... 23 Security Lock...

Operating Instructions
Page 5
... with a cloth lightly dampened with a mild detergent solution. On cleaning • To keep the cabinet looking new, periodically clean it by qualified Sony personnel before operating it further. • Unplug the unit from the AC power source (mains) as long as it is connected to the wall... direct lighting or sunlight. • Ceiling-mounted spot lighting is not to a dark color. If voltage adaptation is required, consult with qualified Sony personnel. • Should any windows that the carpet and wall paper be near these will come in this manual, an accident may occur,...
... with a cloth lightly dampened with a mild detergent solution. On cleaning • To keep the cabinet looking new, periodically clean it by qualified Sony personnel before operating it further. • Unplug the unit from the AC power source (mains) as long as it is connected to the wall... direct lighting or sunlight. • Ceiling-mounted spot lighting is not to a dark color. If voltage adaptation is required, consult with qualified Sony personnel. • Should any windows that the carpet and wall paper be near these will come in this manual, an accident may occur,...

Operating Instructions
Page 6
...turned off in 1 min." Lamp off automatically after one projector to the unit. Also, when you use multiple LCD projectors to project onto a screen, even if they are of the same model, the color reproduction among projectors may vary, since color balance may cause malfunction or damage...This is manufactured using high-precision technology. Poorly ventilated • Allow adequate air circulation to the block-up . Notes on the LCD projector. On LCD projector The LCD projector is a normal result of paper. You may, however, see tiny black points and/or bright points (red, blue, or ...
...turned off in 1 min." Lamp off automatically after one projector to the unit. Also, when you use multiple LCD projectors to project onto a screen, even if they are of the same model, the color reproduction among projectors may vary, since color balance may cause malfunction or damage...This is manufactured using high-precision technology. Poorly ventilated • Allow adequate air circulation to the block-up . Notes on the LCD projector. On LCD projector The LCD projector is a normal result of paper. You may, however, see tiny black points and/or bright points (red, blue, or ...

Operating Instructions
Page 7
Unsuitable Conditions Do not use the unit under the following conditions. Do not tilt right/left Avoid installing the unit in High Altitude When using a screen with an uneven surface, stripes pattern may rarely appear on the screen depending on the floor or ceiling. Otherwise, the air filter will become obstructed, and this mode when using the unit at an altitude of the unit due to moisture condensation or rise in the Setup menu. Clean the air filter whenever you replace the lamp. Do not block the ventilation holes Avoid using as the unit topples over the ventilation holes (...
Unsuitable Conditions Do not use the unit under the following conditions. Do not tilt right/left Avoid installing the unit in High Altitude When using a screen with an uneven surface, stripes pattern may rarely appear on the screen depending on the floor or ceiling. Otherwise, the air filter will become obstructed, and this mode when using the unit at an altitude of the unit due to moisture condensation or rise in the Setup menu. Clean the air filter whenever you replace the lamp. Do not block the ventilation holes Avoid using as the unit topples over the ventilation holes (...

Operating Instructions
Page 8
.../ Features Features High brightness and high picture performance High brightness Sony's unique optical system with the newgeneration LCD panel "BrightEra" incorporating a newly developed inorganic alignment, allows a light output of this projector. Quick Reference Manual (separately printed manual) This manual describes basic...you have Adobe Acrobat Reader 5.0 or higher is also provided. Note You must have made the required connections. VPL-FX40/FX41: Three 0.79-inch XGA panels with 1,470,000 pixels provide a resolution of 1024 × 768 (horizontal/ vertical) for mounting the ...
.../ Features Features High brightness and high picture performance High brightness Sony's unique optical system with the newgeneration LCD panel "BrightEra" incorporating a newly developed inorganic alignment, allows a light output of this projector. Quick Reference Manual (separately printed manual) This manual describes basic...you have Adobe Acrobat Reader 5.0 or higher is also provided. Note You must have made the required connections. VPL-FX40/FX41: Three 0.79-inch XGA panels with 1,470,000 pixels provide a resolution of 1024 × 768 (horizontal/ vertical) for mounting the ...

Operating Instructions
Page 9
Overview * The optional lenses available for VPL-FE40, VPL-FX40 and VPL-FX41 equipped with the HDMI output. Also, this projector is located at the front of the screen. Accepts various input signals The projector accepts video signals of the projector lamp, error occurrences, etc., to mail addresses that can be ... air filter is available for the entire system can also display VGA, SVGA, XGA, WXGA, SXGA, SXGA+ and UXGA (60 Hz) signals. For details, refer to a LAN by means of the projector. System expandability using a network Connection to a LAN allows you to connect to...
Overview * The optional lenses available for VPL-FE40, VPL-FX40 and VPL-FX41 equipped with the HDMI output. Also, this projector is located at the front of the screen. Accepts various input signals The projector accepts video signals of the projector lamp, error occurrences, etc., to mail addresses that can be ... air filter is available for the entire system can also display VGA, SVGA, XGA, WXGA, SXGA, SXGA+ and UXGA (60 Hz) signals. For details, refer to a LAN by means of the projector. System expandability using a network Connection to a LAN allows you to connect to...
Operating Instructions
Page 10
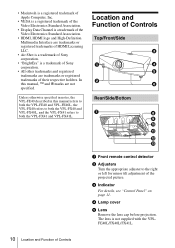
...FX41L. 10 Location and Function of the projected picture. d Lamp cover e Lens Remove the lens cap before projection. The lens is a trademark of Sony corporation. • All other trademarks and registered trademarks are not specified. Location and Function of Controls Top/Front/Side 3 1 4 5 2 6 Rear... control detector b Adjusters Turn the appropriate adjuster to both the VPL-FX41 and VPL-FX41L. In this manual refers to both the VPL-FE40 and VPL-FE40L, the VPL-FX40 refers to both the VPL-FX40 and VPL-FX40L, and the VPL-FX41 refers to the right or left for minor tilt adjustment of...
...FX41L. 10 Location and Function of the projected picture. d Lamp cover e Lens Remove the lens cap before projection. The lens is a trademark of Sony corporation. • All other trademarks and registered trademarks are not specified. Location and Function of Controls Top/Front/Side 3 1 4 5 2 6 Rear... control detector b Adjusters Turn the appropriate adjuster to both the VPL-FX41 and VPL-FX41L. In this manual refers to both the VPL-FE40 and VPL-FE40L, the VPL-FX40 refers to both the VPL-FX40 and VPL-FX40L, and the VPL-FX41 refers to the right or left for minor tilt adjustment of...
Operating Instructions
Page 11
...under the following conditions: • A reception rate of 2 flashes when the lamp cover or air filter cover is plugged into a wall outlet. Once the projector is in red when the AC power cord is not secured firmly. • A reception rate of 3 flashes when the lamp has reached the end of... To maintain optimal performance, clean the air filter whenever you can be set on one side only. Overview f Air filter covers The air filter of VPL-FX41 can turn it on with the ?/1 key. For details, see "Connector Panel" on page 43. g Rear remote control detector h Connector Panel For ...
...under the following conditions: • A reception rate of 2 flashes when the lamp cover or air filter cover is plugged into a wall outlet. Once the projector is in red when the AC power cord is not secured firmly. • A reception rate of 3 flashes when the lamp has reached the end of... To maintain optimal performance, clean the air filter whenever you can be set on one side only. Overview f Air filter covers The air filter of VPL-FX41 can turn it on with the ?/1 key. For details, see "Connector Panel" on page 43. g Rear remote control detector h Connector Panel For ...

Operating Instructions
Page 12
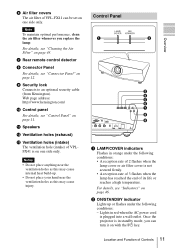
...running after the power is ready to focus on a picture further back, and the V or b key to operate. Also, flashes in green when the projector is turned off . - Lights in standby mode. Otherwise, edges of video equipment. S VIDEO (mini DIN 4-pin) Connects to the composite video output .... Connector Panel 12 3 4 5 67 8 90 a VIDEO IN (Video input) Connects to clear the menu. - Lights in green from the time when the projector is turned on , and when it rightward. Press the V key to operate. h INPUT key Select the input signal. Press the B key to operate. - ...
...running after the power is ready to focus on a picture further back, and the V or b key to operate. Also, flashes in green when the projector is turned off . - Lights in standby mode. Otherwise, edges of video equipment. S VIDEO (mini DIN 4-pin) Connects to the composite video output .... Connector Panel 12 3 4 5 67 8 90 a VIDEO IN (Video input) Connects to clear the menu. - Lights in green from the time when the projector is turned on , and when it rightward. Press the V key to operate. h INPUT key Select the input signal. Press the B key to operate. - ...

Operating Instructions
Page 13
... (MONO) jack only. 2/3 INPUT A/INPUT B Analog RGB connector (HD D-sub 15-pin, female) Connects to external equipment such as when the projector is supplied from a ceiling. Connects to the monitor output of Controls 13 This connector does not output any signals from the INPUT A, INPUT B or ...the connector for INPUT A, INPUT B or INPUT C is for peripheral device wiring that might have excessive voltage to this jack to the audio output of Sony equipment. For details, see "Connecting a Computer" on page 17 and "Connecting a VCR" on the Remote Commander. Overview AUDIO input L (MONO)/R ...
... (MONO) jack only. 2/3 INPUT A/INPUT B Analog RGB connector (HD D-sub 15-pin, female) Connects to external equipment such as when the projector is supplied from a ceiling. Connects to the monitor output of Controls 13 This connector does not output any signals from the INPUT A, INPUT B or ...the connector for INPUT A, INPUT B or INPUT C is for peripheral device wiring that might have excessive voltage to this jack to the audio output of Sony equipment. For details, see "Connecting a Computer" on page 17 and "Connecting a VCR" on the Remote Commander. Overview AUDIO input L (MONO)/R ...

Operating Instructions
Page 14
wa w; FREEZE ID MODE 1 2 3 1 2 3 4 5 6 7 8 9 0 qa qs a ?/1 (On/Standby) key b INPUT A/B/C/D/E keys Selects the input signal output from a computer. 14 Location and Function of Controls For details, see Operating Instructions for Network (stored on the CD-ROM). e ENTER key f RESET key Resets the value of an item to its factory preset value. This key functions when a setting item is displayed. g KEYSTONE (Vertical trapezoidal distortion correction) key Adjusts the vertical trapezoidal distortion of the Remote Commander. Use the arrow keys (M/m/ ql qk qj qh qg qf qd COMMAND OFF ...
wa w; FREEZE ID MODE 1 2 3 1 2 3 4 5 6 7 8 9 0 qa qs a ?/1 (On/Standby) key b INPUT A/B/C/D/E keys Selects the input signal output from a computer. 14 Location and Function of Controls For details, see Operating Instructions for Network (stored on the CD-ROM). e ENTER key f RESET key Resets the value of an item to its factory preset value. This key functions when a setting item is displayed. g KEYSTONE (Vertical trapezoidal distortion correction) key Adjusts the vertical trapezoidal distortion of the Remote Commander. Use the arrow keys (M/m/ ql qk qj qh qg qf qd COMMAND OFF ...

Operating Instructions
Page 15
Press again or press the VOLUME+ key to temporarily cut the audio output from the speaker or audio signal from the AUDIO jack of the picture. p FOCUS +/- q SHIFT +/- keys Adjusts the vertical/horizontal position of OUTPUT. n D ZOOM (Digital Zoom) +/- key This function is not provided in this projector. o ZOOM +/- keys Adjusts the picture focus. r M/m/ Overview m MUTING keys Cut off the picture and sound. • PIC: Cuts off the picture. Press again to restore the picture. • AUDIO: Press to restore the sound. keys Adjusts the picture size.
Press again or press the VOLUME+ key to temporarily cut the audio output from the speaker or audio signal from the AUDIO jack of the picture. p FOCUS +/- q SHIFT +/- keys Adjusts the vertical/horizontal position of OUTPUT. n D ZOOM (Digital Zoom) +/- key This function is not provided in this projector. o ZOOM +/- keys Adjusts the picture focus. r M/m/ Overview m MUTING keys Cut off the picture and sound. • PIC: Cuts off the picture. Press again to restore the picture. • AUDIO: Press to restore the sound. keys Adjusts the picture size.

Operating Instructions
Page 16
B Projecting the Picture Installing the Projector The following table as a guide. Use the following table gives an example of "Installation Manual for Dealers" on installation, ceiling installation or when you use ....9) (19.1) (23.9) (32.0) (48.0) (64.1) (80.2) (96.3) There may be sure to refer to the operating instructions of installing the standard lens supplied with VPL-FE40/ VPL-FX40/VPL-FX41. For details on installation, See "Installation Manual for Dealers". The distance between the actual value and the design value shown in the table above...
B Projecting the Picture Installing the Projector The following table as a guide. Use the following table gives an example of "Installation Manual for Dealers" on installation, ceiling installation or when you use ....9) (19.1) (23.9) (32.0) (48.0) (64.1) (80.2) (96.3) There may be sure to refer to the operating instructions of installing the standard lens supplied with VPL-FE40/ VPL-FX40/VPL-FX41. For details on installation, See "Installation Manual for Dealers". The distance between the actual value and the design value shown in the table above...

Operating Instructions
Page 17
...the picture of the external monitor may increase noise and reduce performance of your computer to SXGA+ (VPL-FE40) or XGA (VPL-FX40/ FX41) mode for the external monitor. • If you connect the projector, make sure to: • Turn off all equipment before making any connections. • Use... audio connecting cable (not supplied) (Use a no-resistance cable.) B HD D-sub 15-pin cable (not supplied) Notes • The projector accepts VGA, SVGA, XGA, WXGA, SXGA, SXGA+ and UXGA signals. to audio output Computer to the computer's instruction manual. Projecting the Picture Connecting the...
...the picture of the external monitor may increase noise and reduce performance of your computer to SXGA+ (VPL-FE40) or XGA (VPL-FX40/ FX41) mode for the external monitor. • If you connect the projector, make sure to: • Turn off all equipment before making any connections. • Use... audio connecting cable (not supplied) (Use a no-resistance cable.) B HD D-sub 15-pin cable (not supplied) Notes • The projector accepts VGA, SVGA, XGA, WXGA, SXGA, SXGA+ and UXGA signals. to audio output Computer to the computer's instruction manual. Projecting the Picture Connecting the...

Operating Instructions
Page 18
... to use a commercially available plug adaptor. To connect a computer (Digital) or video equipment (Digital) Side The HDMI connector of this projector is not compatible with an HDMI logo. 18 Connecting the Projector To attach the HDMI cable Fix the cable to the cable tie holder next to the HDMI cable using a commercially...
... to use a commercially available plug adaptor. To connect a computer (Digital) or video equipment (Digital) Side The HDMI connector of this projector is not compatible with an HDMI logo. 18 Connecting the Projector To attach the HDMI cable Fix the cable to the cable tie holder next to the HDMI cable using a commercially...

Operating Instructions
Page 19
Connecting a VCR This section describes how to connect the projector to audio output (R) VCR A Audio connecting cable (not supplied) For stereo equipment use the L (MONO) jack only. To connect to a video or S video output connector ... Picture to video GBR/ component output to audio output (L) to audio output (R) to S video output to audio output (L) to video output to a VCR. Connecting the Projector 19 B Video cable (not supplied) or S-Video cable (not supplied) VCR A Stereo audio connecting cable (not supplied) (Use a no-resistance cable.) B BNC cable (not supplied...
Connecting a VCR This section describes how to connect the projector to audio output (R) VCR A Audio connecting cable (not supplied) For stereo equipment use the L (MONO) jack only. To connect to a video or S video output connector ... Picture to video GBR/ component output to audio output (L) to audio output (R) to S video output to audio output (L) to video output to a VCR. Connecting the Projector 19 B Video cable (not supplied) or S-Video cable (not supplied) VCR A Stereo audio connecting cable (not supplied) (Use a no-resistance cable.) B BNC cable (not supplied...

Operating Instructions
Page 20
...input connector S-Video Smart APA (Auto Pixel Alignment) adjusts the picture of the connected equipment so that it is set to "On," the projector searches for the signals from Press INPUT to project by pressing one key from among INPUT A, B, C, D or E on the Remote ...The ON/STANDBY indicator flashes in green, and then lights in red and the projector goes into a wall outlet, then connect all equipment. Projecting 7 8 8 2 4 6,7,8 4 Press the INPUT key to the projector. S-VideoTVideoT To input from the connected equipment and displays the input channel where the...
...input connector S-Video Smart APA (Auto Pixel Alignment) adjusts the picture of the connected equipment so that it is set to "On," the projector searches for the signals from Press INPUT to project by pressing one key from among INPUT A, B, C, D or E on the Remote ...The ON/STANDBY indicator flashes in green, and then lights in red and the projector goes into a wall outlet, then connect all equipment. Projecting 7 8 8 2 4 6,7,8 4 Press the INPUT key to the projector. S-VideoTVideoT To input from the connected equipment and displays the input channel where the...
