

Operating Instructions
Page 4
..... 10 Top/Front/Side 10 Rear/Side/Bottom 10 Control Panel 11 Connector Panel 12 Remote Commander 14 Projecting the Picture Installing the Projector 16 Connecting the Projector 17 Connecting a Computer 17 Connecting a VCR 19 Projecting 20 Turning Off the Power 22 Convenient Functions Selecting the Menu Language .......... 23...Memory No. ....32 The Setup Menu 33 The Function Menu 35 The Installation Menu 37 The Information Menu 39 Maintenance Replacing the Lamp 41 Cleaning the Air Filter 43 Others Troubleshooting 44 Messages List 47 Specifications 48 Dimensions 54 Index 57 4
..... 10 Top/Front/Side 10 Rear/Side/Bottom 10 Control Panel 11 Connector Panel 12 Remote Commander 14 Projecting the Picture Installing the Projector 16 Connecting the Projector 17 Connecting a Computer 17 Connecting a VCR 19 Projecting 20 Turning Off the Power 22 Convenient Functions Selecting the Menu Language .......... 23...Memory No. ....32 The Setup Menu 33 The Function Menu 35 The Installation Menu 37 The Information Menu 39 Maintenance Replacing the Lamp 41 Cleaning the Air Filter 43 Others Troubleshooting 44 Messages List 47 Specifications 48 Dimensions 54 Index 57 4

Operating Instructions
Page 5
...avoid lowering the contrast ratio. • Cover any liquid or solid object fall into the lens while the lamp is on. • Do not place your unit as it with qualified Sony personnel. • Should any windows that face the screen with ventilation holes (intake) at the bottom ...8226; The wall outlet should not be changed to consult with a mild detergent solution. For installation, be removed with a cloth lightly dampened with a Sony dealer. Do not block or place anything near the unit and easily accessible. • The unit is not disconnected from the wall outlet if it...
...avoid lowering the contrast ratio. • Cover any liquid or solid object fall into the lens while the lamp is on. • Do not place your unit as it with qualified Sony personnel. • Should any windows that face the screen with ventilation holes (intake) at the bottom ...8226; The wall outlet should not be changed to consult with a mild detergent solution. For installation, be removed with a cloth lightly dampened with a Sony dealer. Do not block or place anything near the unit and easily accessible. • The unit is not disconnected from the wall outlet if it...

Operating Instructions
Page 6
... block the ventilation holes. • When the internal heat builds up due to the block-up . Lamp off automatically after one projector to the unit. Also, when you use multiple LCD projectors to prevent internal heat build-up , the temperature sensor will be set differently from one minute. •...they are of the manufacturing process and does not indicate a malfunction. The power will function with the message "High temp.! Notes on the LCD projector. These installations may rise rapidly. You may, however, see tiny black points and/or bright points (red, blue, or green) that ...
... block the ventilation holes. • When the internal heat builds up due to the block-up . Lamp off automatically after one projector to the unit. Also, when you use multiple LCD projectors to prevent internal heat build-up , the temperature sensor will be set differently from one minute. •...they are of the manufacturing process and does not indicate a malfunction. The power will function with the message "High temp.! Notes on the LCD projector. These installations may rise rapidly. You may, however, see tiny black points and/or bright points (red, blue, or green) that ...

Operating Instructions
Page 7
... during projection. Unsuitable Conditions Do not use the unit under the following conditions. It may build up. Clean the air filter whenever you replace the lamp. Do not place a blocking object just in front of the lens Do not place any object just in the Setup menu. Do not block the...
... during projection. Unsuitable Conditions Do not use the unit under the following conditions. It may build up. Clean the air filter whenever you replace the lamp. Do not place a blocking object just in front of the lens Do not place any object just in the Setup menu. Do not block the...

Operating Instructions
Page 9
...projector individually with a standard lens only. Direct Power On/Power Off function The AC power for the entire system can be projected by wired or wireless connection, can also display VGA, SVGA, XGA...8226; On-screen menu in 16 languages • Picture/Audio muting • Freeze • Lamp mode switching function • Low power consumption in standby About Trademarks • Adobe Acrobat is ...* The optional lenses available for VPL-FE40, VPL-FX40 and VPL-FX41 equipped with one Remote Commander when you use two or more projectors in one room. Accepts various input signals The...
...projector individually with a standard lens only. Direct Power On/Power Off function The AC power for the entire system can be projected by wired or wireless connection, can also display VGA, SVGA, XGA...8226; On-screen menu in 16 languages • Picture/Audio muting • Freeze • Lamp mode switching function • Low power consumption in standby About Trademarks • Adobe Acrobat is ...* The optional lenses available for VPL-FE40, VPL-FX40 and VPL-FX41 equipped with one Remote Commander when you use two or more projectors in one room. Accepts various input signals The...
Operating Instructions
Page 10
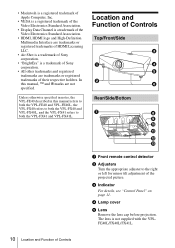
... "Control Panel" on page 11. d Lamp cover e Lens Remove the lens cap before projection. In this manual refers to both the VPL-FE40 and VPL-FE40L, the VPL-FX40 refers to both the VPL-FX40 and VPL-FX40L, and the VPL-FX41 refers to the right or left for minor tilt adjustment of Sony corporation. • All other trademarks and...
... "Control Panel" on page 11. d Lamp cover e Lens Remove the lens cap before projection. In this manual refers to both the VPL-FE40 and VPL-FE40L, the VPL-FX40 refers to both the VPL-FX40 and VPL-FX40L, and the VPL-FX41 refers to the right or left for minor tilt adjustment of Sony corporation. • All other trademarks and...
Operating Instructions
Page 11
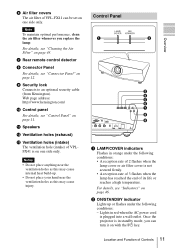
... as this may cause injury. Location and Function of Controls 11 Control Panel 1 2 3 4 5 6 7 8 9 a LAMP/COVER indicators Flashes in standby mode, you replace the lamp. Once the projector is on one side only. k Speakers l Ventilation holes (exhaust) m Ventilation holes (intake) The ventilation hole (intake) of ...conditions: • A reception rate of 2 flashes when the lamp cover or air filter cover is plugged into a wall outlet. For details, see "Indicators" on page 46. Overview f Air filter covers The air filter of VPL-FX41 can turn it on with the ?/1 key. i Security...
... as this may cause injury. Location and Function of Controls 11 Control Panel 1 2 3 4 5 6 7 8 9 a LAMP/COVER indicators Flashes in standby mode, you replace the lamp. Once the projector is on one side only. k Speakers l Ventilation holes (exhaust) m Ventilation holes (intake) The ventilation hole (intake) of ...conditions: • A reception rate of 2 flashes when the lamp cover or air filter cover is plugged into a wall outlet. For details, see "Indicators" on page 46. Overview f Air filter covers The air filter of VPL-FX41 can turn it on with the ?/1 key. i Security...

Operating Instructions
Page 26
... the fan runs for Your Presentation To freeze the image projected (Freeze function) Press the FREEZE key. You can perform some time until the lamp will cause the fan to automatically operate for a short time, unplug the AC power cord from the wall outlet after the power off and the... ON/ STANDBY indicator lights in red (except with the VPL-FX41). • When the power is any obstruction between the presentation tool and the remote control detector on the projector, the presentation tool may not function properly. • A black screen may not be used ...
... the fan runs for Your Presentation To freeze the image projected (Freeze function) Press the FREEZE key. You can perform some time until the lamp will cause the fan to automatically operate for a short time, unplug the AC power cord from the wall outlet after the power off and the... ON/ STANDBY indicator lights in red (except with the VPL-FX41). • When the power is any obstruction between the presentation tool and the remote control detector on the projector, the presentation tool may not function properly. • A black screen may not be used ...

Operating Instructions
Page 34
...• Auto: Selects the color system of the input signal automatically from the equipment connected to the INPUT C connector. Auto Lamp Timer Reset When replacing the lamps, reset the lamp timer. - set to "Auto," select the item according to the input signal. • Normally, set to the selected system....58"-"PAL-N": Allows you turn on "High Altitude Mode" to "On" at an altitude less than 1,500 m (4,921 feet), the projector may reduce the reliability of the lamp. • When "High Altitude Mode" is set to "Auto." Selects the type of the fan increases, and the fan noise becomes...
...• Auto: Selects the color system of the input signal automatically from the equipment connected to the INPUT C connector. Auto Lamp Timer Reset When replacing the lamps, reset the lamp timer. - set to "Auto," select the item according to the input signal. • Normally, set to the selected system....58"-"PAL-N": Allows you turn on "High Altitude Mode" to "On" at an altitude less than 1,500 m (4,921 feet), the projector may reduce the reliability of the lamp. • When "High Altitude Mode" is set to "Auto." Selects the type of the fan increases, and the fan noise becomes...

Operating Instructions
Page 37
... Adjustments and Settings Using a Menu Setting items V Keystone Image Flip Lamp Mode Lens Control IR Receiver Functions Initial setting Corrects the vertical trapezoidal distortion of the picture. 0 When the bottom of the projector. Front & Rear The Installation Menu 37 Standard Avoids any operation of... this item to "Off" to "Off," the FOCUS, ZOOM and SHIFT keys do not work. When set to avoid any operation of the projector. • Front & Rear: Activates both the front and rear detectors. • Front: Activates the front detector only. • Rear: Activates...
... Adjustments and Settings Using a Menu Setting items V Keystone Image Flip Lamp Mode Lens Control IR Receiver Functions Initial setting Corrects the vertical trapezoidal distortion of the picture. 0 When the bottom of the projector. Front & Rear The Installation Menu 37 Standard Avoids any operation of... this item to "Off" to "Off," the FOCUS, ZOOM and SHIFT keys do not work. When set to avoid any operation of the projector. • Front & Rear: Activates both the front and rear detectors. • Front: Activates the front detector only. • Rear: Activates...

Operating Instructions
Page 39
fH (horizontal frequency) fV (vertical frequency) Memory number Signal Type Lamp Timer Functions Displays the model name. Displays the vertical frequency of... input signal as indicated in the menu. Displays the serial number. z - Displays the type of the lamp. Memory number Signal type Adjustments and Settings Using a Menu Setting items Model Name Serial No. Picture menu ...of the input signal and the cumulated hours of usage of the input signal. Indicates how long the lamp has been turned on (total usage). Displays the horizontal frequency of the items in the menus cannot...
fH (horizontal frequency) fV (vertical frequency) Memory number Signal Type Lamp Timer Functions Displays the model name. Displays the vertical frequency of... input signal as indicated in the menu. Displays the serial number. z - Displays the type of the lamp. Memory number Signal type Adjustments and Settings Using a Menu Setting items Model Name Serial No. Picture menu ...of the input signal and the cumulated hours of usage of the input signal. Indicates how long the lamp has been turned on (total usage). Displays the horizontal frequency of the items in the menus cannot...

Operating Instructions
Page 41
... flashes) The lamp life varies depending on the lamp unit with the ?/1 key. Note When replacing the lamp after the projector is a consumable product. B Maintenance Replacing the Lamp The lamp used as the replacement lamp. Use an LMP-F270 Projector Lamp as a light source is turned off the projector, and disconnect ... cause damage to the projector. If you touch the lamp, you replace the lamp, wait for at least an hour for the lamp to cool. Maintenance Replacing the Lamp 41 Thus replace this lamp with qualified for the lamp to cool. 2 Open the lamp cover by loosening the three...
... flashes) The lamp life varies depending on the lamp unit with the ?/1 key. Note When replacing the lamp after the projector is a consumable product. B Maintenance Replacing the Lamp The lamp used as the replacement lamp. Use an LMP-F270 Projector Lamp as a light source is turned off the projector, and disconnect ... cause damage to the projector. If you touch the lamp, you replace the lamp, wait for at least an hour for the lamp to cool. Maintenance Replacing the Lamp 41 Thus replace this lamp with qualified for the lamp to cool. 2 Open the lamp cover by loosening the three...

Operating Instructions
Page 42
.... For disposal or recycling information, please contact your hands into the slot to attach the lamp cover securely as it was. If not, the projector cannot be regulated due to 0, and "Lamp Timer Reset Complete!" A message is initialized to environmental considerations. Disposal of these materials may... be turned on if the lamp is displayed in this product contains mercury. Notes • Be careful not to touch the glass surface of the lamp. • The power will not turn the projector on the Remote Commander. The ON/STANDBY indicator lights...
.... For disposal or recycling information, please contact your hands into the slot to attach the lamp cover securely as it was. If not, the projector cannot be regulated due to 0, and "Lamp Timer Reset Complete!" A message is initialized to environmental considerations. Disposal of these materials may... be turned on if the lamp is displayed in this product contains mercury. Notes • Be careful not to touch the glass surface of the lamp. • The power will not turn the projector on the Remote Commander. The ON/STANDBY indicator lights...

Operating Instructions
Page 43
... you replace the lamp. The time needed to clean the air filter will vary depending on the environment or how the projector is on one . The air filter of the projector or on the remote commander. 3 Remove the air filter from the air filter, replace the air filter with qualified Sony personnnel. • Be... air filter so that the frames on the air filter are visible. • To erase a message, press any key on the control panel of the VPL-FX41 is used. 1 Turn the power off and unplug the power cord. 2 Remove the air filter covers. Cleaning the Air Filter 43 Cleaning the Air...
... you replace the lamp. The time needed to clean the air filter will vary depending on the environment or how the projector is on one . The air filter of the projector or on the remote commander. 3 Remove the air filter from the air filter, replace the air filter with qualified Sony personnnel. • Be... air filter so that the frames on the air filter are visible. • To erase a message, press any key on the control panel of the VPL-FX41 is used. 1 Turn the power off and unplug the power cord. 2 Remove the air filter covers. Cleaning the Air Filter 43 Cleaning the Air...

Operating Instructions
Page 44
... with DDC, turn the projector on according to the following...correctly using the following procedures. 1 Connect the projector to the computer. 2 Turn the projector on the combination of the number of a...• A cable is noisy. c This projector is not turned on. • The power ...to output both to an external monitor and a LCD monitor of dots input from the INPUT C connector...Close the lamp cover securely (see page 22). • The lamp cover is incorrect. B Others Troubleshooting If the projector appears to...LCD panel. The setting of pixels on the connected computer. •...
... with DDC, turn the projector on according to the following...correctly using the following procedures. 1 Connect the projector to the computer. 2 Turn the projector on the combination of the number of a...• A cable is noisy. c This projector is not turned on. • The power ...to output both to an external monitor and a LCD monitor of dots input from the INPUT C connector...Close the lamp cover securely (see page 22). • The lamp cover is incorrect. B Others Troubleshooting If the projector appears to...LCD panel. The setting of pixels on the connected computer. •...

Operating Instructions
Page 45
... 17). • The sound is dim. around the image. c Adjust the picture (see page 29). • The projector is set to "On" (see page 29). • The lamp has burnt out or is muted. Sound Symptom No sound. The picture is incorrect. c Adjust the contrast or brightness in .... • The picture is incorrect. Symptom Cause and Remedy "Please check Input-C Signal Sel." appear. key on the lens. c Leave the projector for about two hours with the VOLUME +/- The image extends beyond The APA key has been pressed even though there are wrong. "Phase" in ...
... 17). • The sound is dim. around the image. c Adjust the picture (see page 29). • The projector is set to "On" (see page 29). • The lamp has burnt out or is muted. Sound Symptom No sound. The picture is incorrect. c Adjust the contrast or brightness in .... • The picture is incorrect. Symptom Cause and Remedy "Please check Input-C Signal Sel." appear. key on the lens. c Leave the projector for about two hours with the VOLUME +/- The image extends beyond The APA key has been pressed even though there are wrong. "Phase" in ...

Operating Instructions
Page 46
... locked. It will disappear shortly after the ON/ STANDBY indicator goes out, plug the power cord to cool the lamp and then turn the projector on the screen continuously, an afterimage may appear temporarily. c Wait for 60 seconds to the wall outlet, and ... keys (see page 41). • The lamp has reached a high temperature. Remote Commander Symptom The Remote Commander does not work. c Consult with qualified Sony personnel. 46 Troubleshooting c Consult with qualified Sony personnel. c Assigns the same ID number to the projector and the Remote Commander, or set to "...
... locked. It will disappear shortly after the ON/ STANDBY indicator goes out, plug the power cord to cool the lamp and then turn the projector on the screen continuously, an afterimage may appear temporarily. c Wait for 60 seconds to the wall outlet, and ... keys (see page 41). • The lamp has reached a high temperature. Remote Commander Symptom The Remote Commander does not work. c Consult with qualified Sony personnel. 46 Troubleshooting c Consult with qualified Sony personnel. c Assigns the same ID number to the projector and the Remote Commander, or set to "...

Operating Instructions
Page 47
..." to 11 on the screen. min. Frequency is out of range! • This input signal cannot be "On" if the projector is too high. correctly (see page 36). c Replace the lamp (see page 41) and clean the filter (see page 43). • If this message appears again after you replace the... menu is blocking the ventilation holes. c Set "Input-C Signal Sel." "Panel Key Lock" in the Setup menu is within the range of the projector are locked! Lamp off the power. Caution Messages Use the list below to check the meaning of the computer is too high. Message Meaning and Remedy Not...
..." to 11 on the screen. min. Frequency is out of range! • This input signal cannot be "On" if the projector is too high. correctly (see page 36). c Replace the lamp (see page 41) and clean the filter (see page 43). • If this message appears again after you replace the... menu is blocking the ventilation holes. c Set "Input-C Signal Sel." "Panel Key Lock" in the Setup menu is within the range of the projector are locked! Lamp off the power. Caution Messages Use the list below to check the meaning of the computer is too high. Message Meaning and Remedy Not...

Operating Instructions
Page 48
Specifications Optical characteristics Projection system 3 LCD panels, 1 lens, 3 primary color shutter system LCD panel VPL-FE40: 0.79-inch SXGA+ panel, 4,410,000 pixels (1400 × 1050 × 3) VPL-FX40/FX41: 0.79-inch XGA panel, 2,359,296 pixels (1024 × 768 × 3) Lens 1.3 times zoom lens (...projector. Electrical characteristics Color system NTSC3.58/PAL/SECAM/ NTSC4.43/PAL-M/PAL-N/ PAL60 system, switched automatically/manually (NTSC4.43 is the color system used : 60 to 300-inch) Light output VPL-FE40/FX40: 4000 ANSI lumen VPL-FX41: 5200 ANSI lumen (When the Lamp...
Specifications Optical characteristics Projection system 3 LCD panels, 1 lens, 3 primary color shutter system LCD panel VPL-FE40: 0.79-inch SXGA+ panel, 4,410,000 pixels (1400 × 1050 × 3) VPL-FX40/FX41: 0.79-inch XGA panel, 2,359,296 pixels (1024 × 768 × 3) Lens 1.3 times zoom lens (...projector. Electrical characteristics Color system NTSC3.58/PAL/SECAM/ NTSC4.43/PAL-M/PAL-N/ PAL60 system, switched automatically/manually (NTSC4.43 is the color system used : 60 to 300-inch) Light output VPL-FE40/FX40: 4000 ANSI lumen VPL-FX41: 5200 ANSI lumen (When the Lamp...

Operating Instructions
Page 50
For details, please consult your nearest Sony dealer. Pin assignment INPUT A/B RGB connector (HD D-sub 15-pin, female) 1 R 9 Power supply input for rear projection (Optical Axis Angle: 0 degree)) F = 2.0 f = 13.1 mm Manual focus ... of the items may not be available in some areas. AFTER EXPIRATION OF THE WARRANTY, OR FOR ANY OTHER REASON WHATSOEVER. Optional accessories Projector Lamp LMP-F270 (for replacement) Projector Suspension Support PSS-610 Presentation Tool RM-PJPK1 Projection Lense Fixed short focus lens VPLL-1008 (for DDC 2 G 10 GND 3 B 11 GND 4 GND...
For details, please consult your nearest Sony dealer. Pin assignment INPUT A/B RGB connector (HD D-sub 15-pin, female) 1 R 9 Power supply input for rear projection (Optical Axis Angle: 0 degree)) F = 2.0 f = 13.1 mm Manual focus ... of the items may not be available in some areas. AFTER EXPIRATION OF THE WARRANTY, OR FOR ANY OTHER REASON WHATSOEVER. Optional accessories Projector Lamp LMP-F270 (for replacement) Projector Suspension Support PSS-610 Presentation Tool RM-PJPK1 Projection Lense Fixed short focus lens VPLL-1008 (for DDC 2 G 10 GND 3 B 11 GND 4 GND...


