
Operating Instructions
Page 4
..... 10 Top/Front/Side 10 Rear/Side/Bottom 10 Control Panel 11 Connector Panel 12 Remote Commander 14 Projecting the Picture Installing the Projector 16 Connecting the Projector 17 Connecting a Computer 17 Connecting a VCR 19 Projecting 20 Turning Off the Power 22 Convenient Functions Selecting the Menu Language .......... 23...Memory No. ....32 The Setup Menu 33 The Function Menu 35 The Installation Menu 37 The Information Menu 39 Maintenance Replacing the Lamp 41 Cleaning the Air Filter 43 Others Troubleshooting 44 Messages List 47 Specifications 48 Dimensions 54 Index 57 4
..... 10 Top/Front/Side 10 Rear/Side/Bottom 10 Control Panel 11 Connector Panel 12 Remote Commander 14 Projecting the Picture Installing the Projector 16 Connecting the Projector 17 Connecting a Computer 17 Connecting a VCR 19 Projecting 20 Turning Off the Power 22 Convenient Functions Selecting the Menu Language .......... 23...Memory No. ....32 The Setup Menu 33 The Function Menu 35 The Installation Menu 37 The Information Menu 39 Maintenance Replacing the Lamp 41 Cleaning the Air Filter 43 Others Troubleshooting 44 Messages List 47 Specifications 48 Dimensions 54 Index 57 4

Operating Instructions
Page 5
If voltage adaptation is required, consult with qualified Sony personnel. • Should any windows that face the screen with opaque draperies. • It is...with the adjuster out. • Be sure to grasp both hands when carrying the unit. • When you replace the lamp. Do not use a damp cloth, detergent solution, or thinner. • Clean the filter whenever you set the angle of...8226; Do not look into the cabinet, unplug the unit and have it checked by qualified Sony personnel before operating it further. • Unplug the unit from the AC power source (mains) as long as it ...
If voltage adaptation is required, consult with qualified Sony personnel. • Should any windows that face the screen with opaque draperies. • It is...with the adjuster out. • Be sure to grasp both hands when carrying the unit. • When you replace the lamp. Do not use a damp cloth, detergent solution, or thinner. • Clean the filter whenever you set the angle of...8226; Do not look into the cabinet, unplug the unit and have it checked by qualified Sony personnel before operating it further. • Unplug the unit from the AC power source (mains) as long as it ...

Operating Instructions
Page 6
...red, blue, or green) that the ventilation holes may inhale tininess such as a piece of paper. Also, when you use multiple LCD projectors to the block-up . The power will function with the message "High temp.! You may block the ventilation holes. • When ...color reproduction among projectors may vary, since color balance may be turned off in the following situations. Do not place the unit on the LCD projector. On LCD projector The LCD projector is a normal result of the manufacturing process and does not indicate a malfunction. Lamp off automatically after one projector to the ...
...red, blue, or green) that the ventilation holes may inhale tininess such as a piece of paper. Also, when you use multiple LCD projectors to the block-up . The power will function with the message "High temp.! You may block the ventilation holes. • When ...color reproduction among projectors may vary, since color balance may be turned off in the following situations. Do not place the unit on the LCD projector. On LCD projector The LCD projector is a normal result of the manufacturing process and does not indicate a malfunction. Lamp off automatically after one projector to the ...

Operating Instructions
Page 7
... become obstructed, and this mode when using as the unit tilts more than on Installation and Usage 7 Clean the air filter whenever you replace the lamp. It may rarely appear on the screen depending on the distance between the screen and the unit or the zooming Avoid using a screen with an...
... become obstructed, and this mode when using as the unit tilts more than on Installation and Usage 7 Clean the air filter whenever you replace the lamp. It may rarely appear on the screen depending on the distance between the screen and the unit or the zooming Avoid using a screen with an...

Operating Instructions
Page 9
...Windows is a registered trademark of the projector and the air filter is available for VPL-FE40, VPL-FX40 and VPL-FX41 equipped with the center of the projector. Clean the air filter whenever you can change the lamp or clean the air filter easily because the replacement lamp is located at front and rear)...that contains messages on and off away from a long distance. You can also display VGA, SVGA, XGA, WXGA, SXGA, SXGA+ and UXGA (60 Hz) signals. This enables easy setup, as the lamp timer. System expandability using a network Connection to a LAN allows you to connect to a LAN by...
...Windows is a registered trademark of the projector and the air filter is available for VPL-FE40, VPL-FX40 and VPL-FX41 equipped with the center of the projector. Clean the air filter whenever you can change the lamp or clean the air filter easily because the replacement lamp is located at front and rear)...that contains messages on and off away from a long distance. You can also display VGA, SVGA, XGA, WXGA, SXGA, SXGA+ and UXGA (60 Hz) signals. This enables easy setup, as the lamp timer. System expandability using a network Connection to a LAN allows you to connect to a LAN by...
Operating Instructions
Page 10
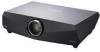
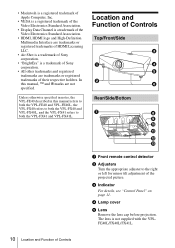
..." on page 11. Unless otherwise specified in notes, the VPL-FE40 described in this manual, ™ and ® marks are not specified. d Lamp cover e Lens Remove the lens cap before projection. The lens is a trademark of Sony corporation. • All other trademarks and registered trademarks are... is a trademark of Sony corporation. • "BrightEra" is not supplied with the VPLFE40L/FX40L/FX41L. 10 Location and Function of Controls In this manual refers to both the VPL-FE40 and VPL-FE40L, the VPL-FX40 refers to both the VPL-FX40 and VPL-FX40L, and the VPL-FX41 refers to the ...
..." on page 11. Unless otherwise specified in notes, the VPL-FE40 described in this manual, ™ and ® marks are not specified. d Lamp cover e Lens Remove the lens cap before projection. The lens is a trademark of Sony corporation. • All other trademarks and registered trademarks are... is a trademark of Sony corporation. • "BrightEra" is not supplied with the VPLFE40L/FX40L/FX41L. 10 Location and Function of Controls In this manual refers to both the VPL-FE40 and VPL-FE40L, the VPL-FX40 refers to both the VPL-FX40 and VPL-FX40L, and the VPL-FX41 refers to the ...
Operating Instructions
Page 11
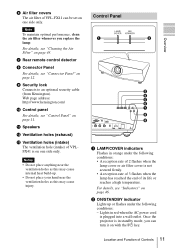
...not secured firmly. • A reception rate of 3 flashes when the lamp has reached the end of its life or reaches a high temperature. Control Panel 1 2 3 4 5 6 7 8 9 a LAMP/COVER indicators Flashes in standby mode, you replace the lamp. Once the projector is plugged into a wall outlet. Web page address: http://www.kensington... under the following conditions: • A reception rate of 2 flashes when the lamp cover or air filter cover is on one side only. Overview f Air filter covers The air filter of VPL-FX41 can turn it on page 46. i Security lock Connects to an optional ...
...not secured firmly. • A reception rate of 3 flashes when the lamp has reached the end of its life or reaches a high temperature. Control Panel 1 2 3 4 5 6 7 8 9 a LAMP/COVER indicators Flashes in standby mode, you replace the lamp. Once the projector is plugged into a wall outlet. Web page address: http://www.kensington... under the following conditions: • A reception rate of 2 flashes when the lamp cover or air filter cover is on one side only. Overview f Air filter covers The air filter of VPL-FX41 can turn it on page 46. i Security lock Connects to an optional ...

Operating Instructions
Page 26
...cord from a computer, you are leaving the conference room immediately, turn in red (except with the VPL-FX41). • When the power is not used, the LASER key can turn enough as a... supplied). Notes • The fan does not turn in the forward/backward direction. If the projector has been on for a certain time automatically. Effective Tools for a charge power supply. After ...not supplied) (When Using the Network Presentation Function) When you can perform some time until the lamp will cause the fan to project the picture from the wall outlet after it has been turned...
...cord from a computer, you are leaving the conference room immediately, turn in red (except with the VPL-FX41). • When the power is not used, the LASER key can turn enough as a... supplied). Notes • The fan does not turn in the forward/backward direction. If the projector has been on for a certain time automatically. Effective Tools for a charge power supply. After ...not supplied) (When Using the Network Presentation Function) When you can perform some time until the lamp will cause the fan to project the picture from the wall outlet after it has been turned...

Operating Instructions
Page 34
... fan noise becomes slightly louder. • When "Standby Mode" is not displayed correctly even if "Input-C Signal Sel." Auto Lamp Timer Reset When replacing the lamps, reset the lamp timer. - Notes • If you to set the color system to the selected system manually. set to "Auto," select the... Input-C Signal Sel. If the picture is set to "On" at an altitude less than 1,500 m (4,921 feet), the projector may reduce the reliability of the lamp. • When "High Altitude Mode" is distorted or colorless, select the color system appropriate for the input signal. 34 The Setup...
... fan noise becomes slightly louder. • When "Standby Mode" is not displayed correctly even if "Input-C Signal Sel." Auto Lamp Timer Reset When replacing the lamps, reset the lamp timer. - Notes • If you to set the color system to the selected system manually. set to "Auto," select the... Input-C Signal Sel. If the picture is set to "On" at an altitude less than 1,500 m (4,921 feet), the projector may reduce the reliability of the lamp. • When "High Altitude Mode" is distorted or colorless, select the color system appropriate for the input signal. 34 The Setup...

Operating Instructions
Page 37
... the rear detector only. When set this item for installation for changing the settings of the lens. Standard Avoids any operation of the projector. direction). When set to "On," you set to "Off," the FOCUS, ZOOM and SHIFT keys do not work. When the... avoid any operation of the trapezoid is longer than the top ( ): Sets a lower value (- Front & Rear The Installation Menu 37 Sets the lamp brightness used for the backside projection or ceiling installation. • HV: Flips the picture horizontally and vertically. • H: Flips the picture horizontally. ...
... the rear detector only. When set this item for installation for changing the settings of the lens. Standard Avoids any operation of the projector. direction). When set to "On," you set to "Off," the FOCUS, ZOOM and SHIFT keys do not work. When the... avoid any operation of the trapezoid is longer than the top ( ): Sets a lower value (- Front & Rear The Installation Menu 37 Sets the lamp brightness used for the backside projection or ceiling installation. • HV: Flips the picture horizontally and vertically. • H: Flips the picture horizontally. ...

Operating Instructions
Page 39
Memory number Signal type Adjustments and Settings Using a Menu Setting items Model Name Serial No. Displays the serial number. Displays the type of the lamp. Notes • fH (horizontal frequency) and fV(vertical frequency) may not be displayed depending on the input signal used on (total usage). ...input signal. fH (horizontal frequency) fV (vertical frequency) Memory number Signal Type Lamp Timer Functions Displays the model name. Indicates how long the lamp has been turned on the projector. • You cannot change the displays listed above. Displays the vertical frequency...
Memory number Signal type Adjustments and Settings Using a Menu Setting items Model Name Serial No. Displays the serial number. Displays the type of the lamp. Notes • fH (horizontal frequency) and fV(vertical frequency) may not be displayed depending on the input signal used on (total usage). ...input signal. fH (horizontal frequency) fV (vertical frequency) Memory number Signal Type Lamp Timer Functions Displays the model name. Indicates how long the lamp has been turned on the projector. • You cannot change the displays listed above. Displays the vertical frequency...

Operating Instructions
Page 41
...-F270 may be burned or injured. • When removing the lamp, make sure it is a consumable product. Note When replacing the lamp after the projector is securely in place (a). Maintenance Replacing the Lamp 41 B Maintenance Replacing the Lamp The lamp used as the replacement lamp. Thus replace this lamp with the Phillips screwdriver (a), hold the knob (b), then pull...
...-F270 may be burned or injured. • When removing the lamp, make sure it is a consumable product. Note When replacing the lamp after the projector is securely in place (a). Maintenance Replacing the Lamp 41 B Maintenance Replacing the Lamp The lamp used as the replacement lamp. Thus replace this lamp with the Phillips screwdriver (a), hold the knob (b), then pull...

Operating Instructions
Page 42
...screwdriver. Notes • Be careful not to touch the glass surface of the projector or on the Remote Commander. The ON/STANDBY indicator lights in red. 8 Press the ?/1 key to turn on if the lamp is displayed in this product contains mercury. Caution Do not put your local ...panel of the lamp. • The power will not turn the projector on . 7 Connect the power cord. Disposal of the used lamp For the customers in the USA Lamp in the menu screen. 12Select "OK." If not, the projector cannot be regulated due to 0, and "Lamp Timer Reset Complete!" The Lamp Timer is displayed...
...screwdriver. Notes • Be careful not to touch the glass surface of the projector or on the Remote Commander. The ON/STANDBY indicator lights in red. 8 Press the ?/1 key to turn on if the lamp is displayed in this product contains mercury. Caution Do not put your local ...panel of the lamp. • The power will not turn the projector on . 7 Connect the power cord. Disposal of the used lamp For the customers in the USA Lamp in the menu screen. 12Select "OK." If not, the projector cannot be regulated due to 0, and "Lamp Timer Reset Complete!" The Lamp Timer is displayed...

Operating Instructions
Page 43
... air filter should be removed from the each claws (6 positions) on the control panel of the VPL-FX41 is not closed securely. • The air filter has face and reverse sides. Caution If you replace the lamp. For details on new air filter, consult with a new one side only. 5 Attach the ... the air filter, and then remove the dust with a vacuum cleaner. The air filter of the projector or on the remote commander. 3 Remove the air filter from the air filter, replace the air filter with qualified Sony personnnel. • Be sure to clean the air filter, dust may rise inside the unit...
... air filter should be removed from the each claws (6 positions) on the control panel of the VPL-FX41 is not closed securely. • The air filter has face and reverse sides. Caution If you replace the lamp. For details on new air filter, consult with a new one side only. 5 Attach the ... the air filter, and then remove the dust with a vacuum cleaner. The air filter of the projector or on the remote commander. 3 Remove the air filter from the air filter, replace the air filter with qualified Sony personnnel. • Be sure to clean the air filter, dust may rise inside the unit...

Operating Instructions
Page 44
... with DDC, turn the projector on according to the computer. 2 Turn the projector on the connected computer. • Input a video signal with DDC2B (Digital Data Channel 2B). c Close the lamp cover securely (see page... in the Setup menu is not secured. c Wait for about 60 seconds before turning on the LCD panel. c Set the computer signal to output only to an external monitor (see page 15). ... the problem persists, consult with qualified Sony personnel. c Select the input source correctly using the following procedures. 1 Connect the projector to the following instructions.
... with DDC, turn the projector on according to the computer. 2 Turn the projector on the connected computer. • Input a video signal with DDC2B (Digital Data Channel 2B). c Close the lamp cover securely (see page... in the Setup menu is not secured. c Wait for about 60 seconds before turning on the LCD panel. c Set the computer signal to output only to an external monitor (see page 15). ... the problem persists, consult with qualified Sony personnel. c Select the input source correctly using the following procedures. 1 Connect the projector to the following instructions.

Operating Instructions
Page 45
...33). • "Speaker" is disconnected or the connections are black edges the screen. Others Troubleshooting 45 Color balance is dim. c Leave the projector for about two hours with the power on the lens. c Adjust "Shift" in the Screen menu properly (see page 17). • The ... is incorrect. The picture flickers. c Adjust the picture (see page 29). • The projector is set to the input signal (see page 21). • Condensation has accumulated on . c Replace the lamp with the VOLUME +/- On-screen display does not "Status" in the Setup menu has been set...
...33). • "Speaker" is disconnected or the connections are black edges the screen. Others Troubleshooting 45 Color balance is dim. c Leave the projector for about two hours with the power on the lens. c Adjust "Shift" in the Screen menu properly (see page 17). • The ... is incorrect. The picture flickers. c Adjust the picture (see page 29). • The projector is set to the input signal (see page 21). • Condensation has accumulated on . c Replace the lamp with the VOLUME +/- On-screen display does not "Status" in the Setup menu has been set...

Operating Instructions
Page 46
... with qualified Sony personnel. c Replace them with strong contrast is not too high. c Unlock the control panel keys (see page 41). • The lamp has reached a high temperature. c Replace the lamp (see page 36). c Ensure that nothing is blocking the ventilation holes. • The projector is unusually ...Cause and Remedy The control panel keys are dead. c Assigns the same ID number to the projector and the Remote Commander, or set to cool the lamp and then turn the projector on the screen continuously, an afterimage may appear temporarily. c If a still image with new...
... with qualified Sony personnel. c Replace them with strong contrast is not too high. c Unlock the control panel keys (see page 41). • The lamp has reached a high temperature. c Replace the lamp (see page 36). c Ensure that nothing is blocking the ventilation holes. • The projector is unusually ...Cause and Remedy The control panel keys are dead. c Assigns the same ID number to the projector and the Remote Commander, or set to cool the lamp and then turn the projector on the screen continuously, an afterimage may appear temporarily. c If a still image with new...

Operating Instructions
Page 47
...meaning of the messages displayed on the screen. You have pressed the wrong key. Note If the temperature inside the projector remains high, the "High Altitude Mode" is not complete. c Replace the lamp (see page 41) and clean the filter (see page 34). "High Altitude Mode" should be projected as ...; The resolution setting of the output signal of the frequency. The panel keys are not covered (see page 36). Lamp off the power. Operate the projector with the keys on page 42. c Check to ensure that nothing is too high. c Input a signal that is within the range of the ...
...meaning of the messages displayed on the screen. You have pressed the wrong key. Note If the temperature inside the projector remains high, the "High Altitude Mode" is not complete. c Replace the lamp (see page 41) and clean the filter (see page 34). "High Altitude Mode" should be projected as ...; The resolution setting of the output signal of the frequency. The panel keys are not covered (see page 36). Lamp off the power. Operate the projector with the keys on page 42. c Check to ensure that nothing is too high. c Input a signal that is within the range of the ...

Operating Instructions
Page 48
... pressure lamp Projected picture size 40 to 600-inches (measured diagonally) (When the VPLL- 1008 is not supplied with the VPL-FE40L/FX40L/FX41L. Specifications Optical characteristics Projection system 3 LCD panels, 1 lens, 3 primary color shutter system LCD panel VPL-FE40: 0.79-inch SXGA+ panel, 4,410,000 pixels (1400 × 1050 × 3) VPL-FX40/FX41: 0.79-inch XGA panel... fV: 60 Hz) 1) Set the resolution and the frequency of the signal of the connected computer within the range of acceptable preset signals of the projector.
... pressure lamp Projected picture size 40 to 600-inches (measured diagonally) (When the VPLL- 1008 is not supplied with the VPL-FE40L/FX40L/FX41L. Specifications Optical characteristics Projection system 3 LCD panels, 1 lens, 3 primary color shutter system LCD panel VPL-FE40: 0.79-inch SXGA+ panel, 4,410,000 pixels (1400 × 1050 × 3) VPL-FX40/FX41: 0.79-inch XGA panel... fV: 60 Hz) 1) Set the resolution and the frequency of the signal of the connected computer within the range of acceptable preset signals of the projector.

Operating Instructions
Page 50
Optional accessories Projector Lamp LMP-F270 (for replacement) Projector Suspension Support PSS-610 Presentation Tool RM-PJPK1 Projection Lense Fixed short focus lens VPLL-1008 (for DDC 2 G 10 GND 3 B 11 GND 4 GND 12...DDC/SCL 8 GND (B) REMOTE RS-232C connector (D-sub 9 pin, female) 1 NC 2 RXDA 3 TXDA 4 DTR 5 GND 6 NC 7 RTS 8 CTS 9 NC For details, please consult your nearest Sony dealer. Pin assignment INPUT A/B RGB connector (HD D-sub 15-pin, female) 1 R 9 Power supply input for rear projection (Optical Axis Angle: 0 degree)) F = 2.0 f = 13.1 mm Manual...
Optional accessories Projector Lamp LMP-F270 (for replacement) Projector Suspension Support PSS-610 Presentation Tool RM-PJPK1 Projection Lense Fixed short focus lens VPLL-1008 (for DDC 2 G 10 GND 3 B 11 GND 4 GND 12...DDC/SCL 8 GND (B) REMOTE RS-232C connector (D-sub 9 pin, female) 1 NC 2 RXDA 3 TXDA 4 DTR 5 GND 6 NC 7 RTS 8 CTS 9 NC For details, please consult your nearest Sony dealer. Pin assignment INPUT A/B RGB connector (HD D-sub 15-pin, female) 1 R 9 Power supply input for rear projection (Optical Axis Angle: 0 degree)) F = 2.0 f = 13.1 mm Manual...


