

Operating Instructions
Page 2
... Connecting the Projector 8 Connecting a Computer 8 Connecting a Video Equipment ... 9 Connecting an External Monitor and Audio Equipment 11 Projecting/Adjusting an Image Projecting an Image 12 Adjusting the Focus, Size, and Position of the Projected image 13 Turning Off the Power 14 Adjustments and Settings Using a Menu Using a MENU 15 The Picture Menu 16 The...
... Connecting the Projector 8 Connecting a Computer 8 Connecting a Video Equipment ... 9 Connecting an External Monitor and Audio Equipment 11 Projecting/Adjusting an Image Projecting an Image 12 Adjusting the Focus, Size, and Position of the Projected image 13 Turning Off the Power 14 Adjustments and Settings Using a Menu Using a MENU 15 The Picture Menu 16 The...

Operating Instructions
Page 4
The image is supplied from the YPBPR input connector (INPUT A). The audio inputs of Controls Others g RS-232C connector RS-232C compatible control connector h LAN connector (page ... and VIDEO also are shared. 1 6 Output (page 11) f OUTPUT Video: Monitor output connector (MONITOR) Audio: Audio output connector (AUDIO) Note This connector outputs the projected image or audio. You do not need to external equipment. Connector Panel q; 8 7 9 23 45 1 6 45 23 Input (pages 8) a INPUT A Video: RGB/YPBPR input connector (RGB HD...
The image is supplied from the YPBPR input connector (INPUT A). The audio inputs of Controls Others g RS-232C connector RS-232C compatible control connector h LAN connector (page ... and VIDEO also are shared. 1 6 Output (page 11) f OUTPUT Video: Monitor output connector (MONITOR) Audio: Audio output connector (AUDIO) Note This connector outputs the projected image or audio. You do not need to external equipment. Connector Panel q; 8 7 9 23 45 1 6 45 23 Input (pages 8) a INPUT A Video: RGB/YPBPR input connector (RGB HD...
Operating Instructions
Page 5
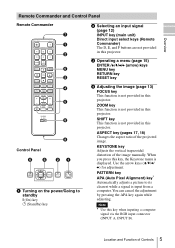
...distortion of Controls 5 When you press this key, the Keystone menu is not provided in this projector. Location and Function of the image manually. Note * Use this projector. PATTERN key APA (Auto Pixel Alignment) key* Automatically adjusts a picture to standby ? (On)...cancel the adjustment by pressing the APA key again while adjusting. ASPECT key (pages 17, 18) Changes the aspect ratio of the projected image. SHIFT key This function is displayed. Use the arrow keys (V/v/B/ b) for adjustment. AUDIO - Overview Remote Commander and Control Panel Remote ...
...distortion of Controls 5 When you press this key, the Keystone menu is not provided in this projector. Location and Function of the image manually. Note * Use this projector. PATTERN key APA (Auto Pixel Alignment) key* Automatically adjusts a picture to standby ? (On)...cancel the adjustment by pressing the APA key again while adjusting. ASPECT key (pages 17, 18) Changes the aspect ratio of the projected image. SHIFT key This function is displayed. Use the arrow keys (V/v/B/ b) for adjustment. AUDIO - Overview Remote Commander and Control Panel Remote ...
Operating Instructions
Page 6
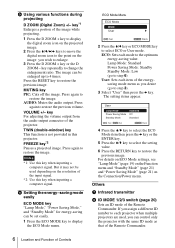
... select ECO or User mode. ECO Mode Menu ECO Mode ECO User Sel Back 2 Press the V/v key or ECO MODE key to restore the previous image. Lamp Mode: Standard Power Saving Mode: Standby Standby Mode: Low (go to display the ECO Mode menu. For details on ECO Mode settings, see "Lamp... h ID MODE 1/2/3 switch (page 20) Sets an ID mode of the projector. key*1 Enlarges a portion of Controls key repeatedly to 4 times. FREEZE key*2 Pauses a projected image. Notes *1: Use this projector. But it may not be used , you can control only the projector with the same ID mode as you desire (go...
... select ECO or User mode. ECO Mode Menu ECO Mode ECO User Sel Back 2 Press the V/v key or ECO MODE key to restore the previous image. Lamp Mode: Standard Power Saving Mode: Standby Standby Mode: Low (go to display the ECO Mode menu. For details on ECO Mode settings, see "Lamp... h ID MODE 1/2/3 switch (page 20) Sets an ID mode of the projector. key*1 Enlarges a portion of Controls key repeatedly to 4 times. FREEZE key*2 Pauses a projected image. Notes *1: Use this projector. But it may not be used , you can control only the projector with the same ID mode as you desire (go...
Operating Instructions
Page 11
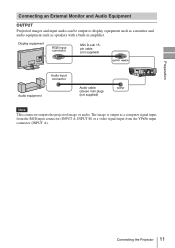
Connecting the Projector 11 Preparation Connecting an External Monitor and Audio Equipment OUTPUT Projected images and input audio can be output to display equipment such as a monitor and audio equipment such as a computer signal input from the RGB input connector (... connector Mini D-sub 15pin cable (not supplied) Audio input connector Audio equipment Audio cable (stereo mini plug) (not supplied) Note This connector outputs the projected image or audio. The image is output as speakers with a built-in amplifier.
Connecting the Projector 11 Preparation Connecting an External Monitor and Audio Equipment OUTPUT Projected images and input audio can be output to display equipment such as a monitor and audio equipment such as a computer signal input from the RGB input connector (... connector Mini D-sub 15pin cable (not supplied) Audio input connector Audio equipment Audio cable (stereo mini plug) (not supplied) Note This connector outputs the projected image or audio. The image is output as speakers with a built-in amplifier.

Operating Instructions
Page 12
...connected equipment. 5 Select the input source. key on the Remote Commander. 4 Turn on the main unit or the ? For details on projection distances and projected image sizes, see "Projection Distance and Lens Shift Range" (page 42). 5 Input Video 4 S-Videoo Input-A Input-B Input-C Sel Skip 6 Computer 2 3 ...the input source using Direct input select keys on the distance between the projector and screen. Install the projector so that the projected image fits the screen size. How to switch the computer to output to the projector varies, depending on the type of computer. (...
...connected equipment. 5 Select the input source. key on the Remote Commander. 4 Turn on the main unit or the ? For details on projection distances and projected image sizes, see "Projection Distance and Lens Shift Range" (page 42). 5 Input Video 4 S-Videoo Input-A Input-B Input-C Sel Skip 6 Computer 2 3 ...the input source using Direct input select keys on the distance between the projector and screen. Install the projector so that the projected image fits the screen size. How to switch the computer to output to the projector varies, depending on the type of computer. (...
Operating Instructions
Page 13
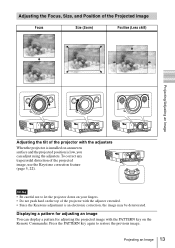
... the Keystone correction feature (page 5, 22). Adjusting the Focus, Size, and Position of the Projected image Focus Size (Zoom) Position (Lens shift) Projecting/Adjusting an Image Adjusting the tilt of the projector with the adjusters When the projector is installed on an uneven surface and the... projected position is an electronic correction, the image may be deteriorated. To correct any trapezoidal distortion of the projector with the PATTERN key on the Remote Commander. Projecting an Image 13 Notes • Be careful not to restore the previous...
... the Keystone correction feature (page 5, 22). Adjusting the Focus, Size, and Position of the Projected image Focus Size (Zoom) Position (Lens shift) Projecting/Adjusting an Image Adjusting the tilt of the projector with the adjusters When the projector is installed on an uneven surface and the... projected position is an electronic correction, the image may be deteriorated. To correct any trapezoidal distortion of the projector with the PATTERN key on the Remote Commander. Projecting an Image 13 Notes • Be careful not to restore the previous...
Operating Instructions
Page 14
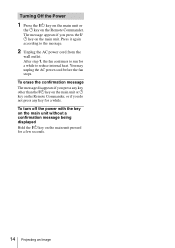
... the ?/ 1 key on the Remote Commander. To erase the confirmation message The message disappears if you press any key for a few seconds. 14 Projecting an Image Press it again according to reduce internal heat. Turning Off the Power 1 Press the ?/1 key on the main unit or the 1 key on the main...
... the ?/ 1 key on the Remote Commander. To erase the confirmation message The message disappears if you press any key for a few seconds. 14 Projecting an Image Press it again according to reduce internal heat. Turning Off the Power 1 Press the ?/1 key on the main unit or the 1 key on the main...
Operating Instructions
Page 15
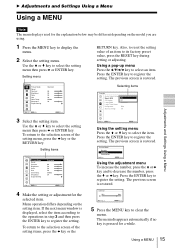
... b or ENTER key. Selecting items Function Audio Output Volume Smart APA OSntandard CC Display Off Lamp Mode Standard Lamp Timer Reset Background Blue Start Up Image On 3 Select the setting item. Sharpness Expert Setting Standard 80 50 50 50 Middle 50 Sel Set Back RETURN key. Use the V or v key to...
... b or ENTER key. Selecting items Function Audio Output Volume Smart APA OSntandard CC Display Off Lamp Mode Standard Lamp Timer Reset Background Blue Start Up Image On 3 Select the setting item. Sharpness Expert Setting Standard 80 50 50 50 Middle 50 Sel Set Back RETURN key. Use the V or v key to...
Operating Instructions
Page 16
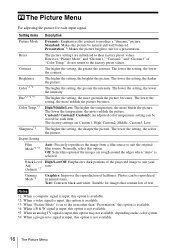
...signal is input, this option is available. *3: When "Picture Mode" is set to their factory preset values. Normally, select this option if the images are rough around the edges when "Auto" is not available. 16 The Picture Menu Photos can be stored for a presentation. Notes *1: When a.... The lower the temperature, the more reddish the picture becomes. Text: Contrasts black and white. The Picture Menu For adjusting the picture for images that contain lots of text. Contrast The higher the setting, the greater the contrast. Brightness Color*2 *4 Hue*2 *4 *5 Color Temp.*3 Sharpness...
...signal is input, this option is available. *3: When "Picture Mode" is set to their factory preset values. Normally, select this option if the images are rough around the edges when "Auto" is not available. 16 The Picture Menu Photos can be stored for a presentation. Notes *1: When a.... The lower the temperature, the more reddish the picture becomes. Text: Contrasts black and white. The Picture Menu For adjusting the picture for images that contain lots of text. Contrast The higher the setting, the greater the contrast. Brightness Color*2 *4 Hue*2 *4 *5 Color Temp.*3 Sharpness...
Operating Instructions
Page 17
... YPBPR input connector (INPUT A) or DVI-D input connector. *3: Available when a computer signal is projected on the center point of the projected image without changing the aspect ratio of the display pixel and the input signal. Notes *1: • Note that if the projector is used for ...each input signal. When the computer signal is input from the RGB input connector (INPUT A, INPUT B) or a video signal is input Normal: Displays the image on the screen. Use this case, adjust the "Phase," "Pitch," and "Shift" items manually. *5: Available when a computer signal is input from ...
... YPBPR input connector (INPUT A) or DVI-D input connector. *3: Available when a computer signal is projected on the center point of the projected image without changing the aspect ratio of the display pixel and the input signal. Notes *1: • Note that if the projector is used for ...each input signal. When the computer signal is input from the RGB input connector (INPUT A, INPUT B) or a video signal is input Normal: Displays the image on the screen. Use this case, adjust the "Phase," "Pitch," and "Shift" items manually. *5: Available when a computer signal is input from ...

Operating Instructions
Page 18
...:9." *4: Depending on the input signal, the projected image may be projected as the input signal without changing the aspect ratio of the original image. (16:9) (Full1)*1 *2 *2: If you select "Full2," the image is projected to fit the projected image size, regardless of the aspect ratio of the image. Computer signal (16:10) (4:3) (16:9) (Full1)*1 *2 (4:3)*3 (16...
...:9." *4: Depending on the input signal, the projected image may be projected as the input signal without changing the aspect ratio of the original image. (16:9) (Full1)*1 *2 *2: If you select "Full2," the image is projected to fit the projected image size, regardless of the aspect ratio of the image. Computer signal (16:10) (4:3) (16:9) (Full1)*1 *2 (4:3)*3 (16...
Operating Instructions
Page 19
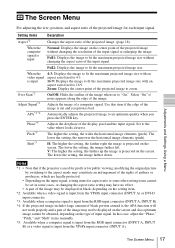
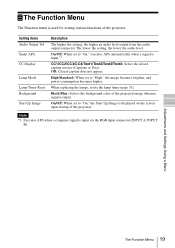
... When set to "On," executes APA automatically when a signal is input. High/Standard: When set to "On," the Start Up Image is displayed on the screen upon startup of the projected image when no signal is input.*1 CC1/CC2/CC3/CC4/Text1/Text2/Text3/Text4: Select the closed caption service (Captions or... The Function menu is input via the RGB input connector (INPUT A, INPUT B). Smart APA CC Display Lamp Mode Lamp Timer Reset Background Start Up Image Description The higher the setting, the higher an audio level output from the audio output connector. Setting items Audio Output Vol.
... When set to "On," executes APA automatically when a signal is input. High/Standard: When set to "On," the Start Up Image is displayed on the screen upon startup of the projected image when no signal is input.*1 CC1/CC2/CC3/CC4/Text1/Text2/Text3/Text4: Select the closed caption service (Captions or... The Function menu is input via the RGB input connector (INPUT A, INPUT B). Smart APA CC Display Lamp Mode Lamp Timer Reset Background Start Up Image Description The higher the setting, the higher an audio level output from the audio output connector. Setting items Audio Output Vol.
Operating Instructions
Page 21
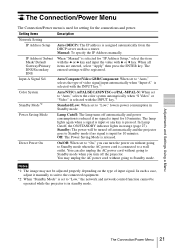
.... In such a case, adjust it manually to suit to Standby mode. When all items are entered, select "Apply" then press the ENTER key. Notes *1: The image may unplug the AC power cord without going to the connected equipment. *2: When "Standby Mode" is selected with V or v key. The entered settings will be...
.... In such a case, adjust it manually to suit to Standby mode. When all items are entered, select "Apply" then press the ENTER key. Notes *1: The image may unplug the AC power cord without going to the connected equipment. *2: When "Standby Mode" is selected with V or v key. The entered settings will be...
Operating Instructions
Page 22
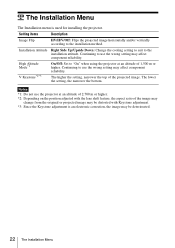
... vertically according to use the wrong setting may affect component reliability. The Installation Menu The Installation menu is an electronic correction, the image may be deteriorated. 22 The Installation Menu The lower the setting, the narrower the bottom. The higher the setting, narrower the... m or higher. *2: Depending on the position adjusted with the lens shift feature, the aspect ratio of the image may change from the original or projected image may affect component reliability. Notes *1: Do not use the wrong setting may be distorted with Keystone adjustment. *3: Since...
... vertically according to use the wrong setting may affect component reliability. The Installation Menu The Installation menu is an electronic correction, the image may be deteriorated. 22 The Installation Menu The lower the setting, the narrower the bottom. The higher the setting, narrower the... m or higher. *2: Depending on the position adjusted with the lens shift feature, the aspect ratio of the image may change from the original or projected image may affect component reliability. Notes *1: Do not use the wrong setting may be distorted with Keystone adjustment. *3: Since...
Operating Instructions
Page 28
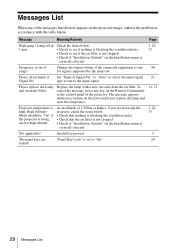
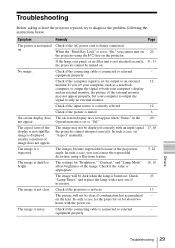
... whenever you replace the lamp and reset the lamp timer. 31, 33 Projector temperature is not clogged. • Check if "Installation Attitude" on the projected image, address the problem in 1 min. Invalid key pressed. 5 The panel keys are not using the projector, check the items below. • Check that the air...
... whenever you replace the lamp and reset the lamp timer. 31, 33 Projector temperature is not clogged. • Check if "Installation Attitude" on the projected image, address the problem in 1 min. Invalid key pressed. 5 The panel keys are not using the projector, check the items below. • Check that the air...
Operating Instructions
Page 29
... the lamp is set for "Brightness," "Contrast," and "Lamp Mode" affect brightness of the external monitor may not be turned on . The image is firmly connected. - When the "Panel Key Lock" is connected to external - equipment properly. Check if the connecting cable is set your ...external monitor. In such a case, you set to "On," you cannot turn on 20 the projector using a Keystone feature. 5, 22 The image is connected to external - Others Troubleshooting 29 Check if the projector is set "Aspect" manually. Operation menu is in the 20 not appear. ...
... the lamp is set for "Brightness," "Contrast," and "Lamp Mode" affect brightness of the external monitor may not be turned on . The image is firmly connected. - When the "Panel Key Lock" is connected to external - equipment properly. Check if the connecting cable is set your ...external monitor. In such a case, you set to "On," you cannot turn on 20 the projector using a Keystone feature. 5, 22 The image is connected to external - Others Troubleshooting 29 Check if the projector is set "Aspect" manually. Operation menu is in the 20 not appear. ...

Operating Instructions
Page 31
Use an LMP-F230 projector lamp (for VPL-FX30)(not supplied), LMP-F272 projector lamp (for VPL-FX35)(not supplied) for the lamp to cool sufficiently. ... When removing the lamp, be burned or injured. Rear Screws 3 Loosen the three screws on the projected image or the LAMP/ COVER indicator notifies you may scatter if the lamp breaks any metallic or inflammable objects into... the slot. • If the lamp breaks, contact qualified Sony personnel. Caution • The lamp remains hot after turning off the projector for replacement. When you ...
Use an LMP-F230 projector lamp (for VPL-FX30)(not supplied), LMP-F272 projector lamp (for VPL-FX35)(not supplied) for the lamp to cool sufficiently. ... When removing the lamp, be burned or injured. Rear Screws 3 Loosen the three screws on the projected image or the LAMP/ COVER indicator notifies you may scatter if the lamp breaks any metallic or inflammable objects into... the slot. • If the lamp breaks, contact qualified Sony personnel. Caution • The lamp remains hot after turning off the projector for replacement. When you ...
Operating Instructions
Page 33
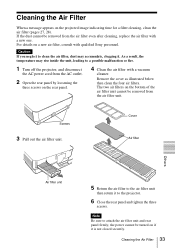
... a message appears on the bottom of the air filter unit cannot be removed from the air filter unit. The two air filters on the projected image indicating time for a filter cleaning, clean the air filter (pages 27, 28). Note Be sure to clean the air filter, dust may rise inside the... then clean the four air filters. If the dust cannot be removed from the air filter even after cleaning, replace the air filter with qualified Sony personnel.
... a message appears on the bottom of the air filter unit cannot be removed from the air filter unit. The two air filters on the projected image indicating time for a filter cleaning, clean the air filter (pages 27, 28). Note Be sure to clean the air filter, dust may rise inside the... then clean the four air filters. If the dust cannot be removed from the air filter even after cleaning, replace the air filter with qualified Sony personnel.
Operating Instructions
Page 38
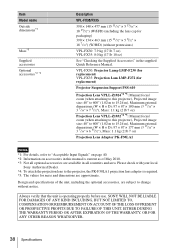
... 13/16" × 3 7/16" × 7 3/32"), Mass: 1.1 kg (2 lb 7 oz) Projection Lens VPLL-Z1032*4 *5: Manual focus/ zoom (when attaching to this projector), Projected image size: 40" to 600" (1.02 m to 15.24 m), Maximum external dimensions (W × H × D): 97 × 87 × 177 mm (3 13/16" × 3 ...PK-F30LA1 projection lens adapter is operating properly before use. Please check with your local Sony Authorized Dealer. *4: To attach the projection lens to change without protrusions) VPL-FX30: 7.9 kg (17 lb 7 oz) VPL-FX35: 8.0 kg (17 lb 10 oz) See "Checking the Supplied Accessories" in ...
... 13/16" × 3 7/16" × 7 3/32"), Mass: 1.1 kg (2 lb 7 oz) Projection Lens VPLL-Z1032*4 *5: Manual focus/ zoom (when attaching to this projector), Projected image size: 40" to 600" (1.02 m to 15.24 m), Maximum external dimensions (W × H × D): 97 × 87 × 177 mm (3 13/16" × 3 ...PK-F30LA1 projection lens adapter is operating properly before use. Please check with your local Sony Authorized Dealer. *4: To attach the projection lens to change without protrusions) VPL-FX30: 7.9 kg (17 lb 7 oz) VPL-FX35: 8.0 kg (17 lb 10 oz) See "Checking the Supplied Accessories" in ...


