

Startup Guide - Quick Reference Manual
Page 34
...may cause the short-circuit and physical incidents. • Do not catch your finger between the unit and surface of the floor when moving the projector installed on the floor. • Be careful not to catch your fingers by the feet (adjustable) when you lift the unit by the Security...any objects (page 7). • Avoid using something to cover the ventilation holes (exhaust/intake). • Do not place the unit on and with qualified Sony personnel. • Should any liquid or solid object fall and be damaged, and may result in a place subject to direct sunlight, excessive dust or ...
...may cause the short-circuit and physical incidents. • Do not catch your finger between the unit and surface of the floor when moving the projector installed on the floor. • Be careful not to catch your fingers by the feet (adjustable) when you lift the unit by the Security...any objects (page 7). • Avoid using something to cover the ventilation holes (exhaust/intake). • Do not place the unit on and with qualified Sony personnel. • Should any liquid or solid object fall and be damaged, and may result in a place subject to direct sunlight, excessive dust or ...

Startup Guide - Quick Reference Manual
Page 35
.... On Installation • When installing the unit, leave space between any walls, etc. Be sure to consult the store where you purchased the projector or a dedicated installer. Safety precautions for installation. • Be sure to secure the cabinet cover firmly when installing to the ceiling firmly. For... tilted more than 50 cm (19 11/16") • Install the projector on the ceiling or move it . • Avoid using if the unit is mounted on the ceiling, a Sony bracket or recommended equivalent must be sure to use a safety wire, etc., to prevent the unit from an air...
.... On Installation • When installing the unit, leave space between any walls, etc. Be sure to consult the store where you purchased the projector or a dedicated installer. Safety precautions for installation. • Be sure to secure the cabinet cover firmly when installing to the ceiling firmly. For... tilted more than 50 cm (19 11/16") • Install the projector on the ceiling or move it . • Avoid using if the unit is mounted on the ceiling, a Sony bracket or recommended equivalent must be sure to use a safety wire, etc., to prevent the unit from an air...
Startup Guide - Quick Reference Manual
Page 36
...or thinner, or acid, alkaline or abrasive detergent, or a chemical cleaning cloth. On Fan Since the projector is in a case of the same model, the color reproduction among projectors may vary, since color balance may be scratched. • If the unit is exposed to project ...detergent, or a chemical cleaning cloth. • On cleaning the cabinet: Clean the cabinet gently with qualified Sony personnel. This is a normal result of the unit. On LCD Projector The LCD projector is precision equipment. Never use ; This is not a malfunction. • Set "Installation Attitude" on the...
...or thinner, or acid, alkaline or abrasive detergent, or a chemical cleaning cloth. On Fan Since the projector is in a case of the same model, the color reproduction among projectors may vary, since color balance may be scratched. • If the unit is exposed to project ...detergent, or a chemical cleaning cloth. • On cleaning the cabinet: Clean the cabinet gently with qualified Sony personnel. This is a normal result of the unit. On LCD Projector The LCD projector is precision equipment. Never use ; This is not a malfunction. • Set "Installation Attitude" on the...
Startup Guide - Quick Reference Manual
Page 37
On condensation If the room temperature where the projector is installed changes rapidly, or if the projector is moved suddenly from running. Notes on security • SONY WILL NOT BE LIABLE FOR DAMAGES OF ANY KIND RESULTING FROM A FAILURE TO IMPLEMENT PROPER SECURITY MEASURES ON TRANSMISSION DEVICES, ... OR MADE BY THIRD PARTIES. • SONY WILL NOT BE LIABLE FOR THE TERMINATION OR DISCONTINUATION OF ANY SERVICES RELATED TO THIS UNIT THAT MAY RESULT DUE TO CIRCUMSTANCES OF ANY KIND. 9 Precautions GB If condensation occurs, leave the projector turned on the network may be able to...
On condensation If the room temperature where the projector is installed changes rapidly, or if the projector is moved suddenly from running. Notes on security • SONY WILL NOT BE LIABLE FOR DAMAGES OF ANY KIND RESULTING FROM A FAILURE TO IMPLEMENT PROPER SECURITY MEASURES ON TRANSMISSION DEVICES, ... OR MADE BY THIRD PARTIES. • SONY WILL NOT BE LIABLE FOR THE TERMINATION OR DISCONTINUATION OF ANY SERVICES RELATED TO THIS UNIT THAT MAY RESULT DUE TO CIRCUMSTANCES OF ANY KIND. 9 Precautions GB If condensation occurs, leave the projector turned on the network may be able to...

Startup Guide - Quick Reference Manual
Page 39
key on the projector. Selecting the Menu Language The factory setting for the language for displaying menus, messages, etc. To change the on-screen language, proceed as follows: 1 Plug ...
key on the projector. Selecting the Menu Language The factory setting for the language for displaying menus, messages, etc. To change the on-screen language, proceed as follows: 1 Plug ...

Startup Guide - Quick Reference Manual
Page 40
... manuals of the equipment you are recommended.) • The HDMI terminal of picture signals or cause a malfunction. Loose connections may reduce performance of this projector is specified. (Sony products are connecting. GB 12 Connecting For information on which the cable type logo is not compatible with DSD (Direct Stream Digital) signal or.... When pulling out a cable, be sure to grip it by the plug, not the cable itself. • For more information, refer also to "Connecting the Projector" in the Operating Instructions contained in the supplied CD-ROM.
... manuals of the equipment you are recommended.) • The HDMI terminal of picture signals or cause a malfunction. Loose connections may reduce performance of this projector is specified. (Sony products are connecting. GB 12 Connecting For information on which the cable type logo is not compatible with DSD (Direct Stream Digital) signal or.... When pulling out a cable, be sure to grip it by the plug, not the cable itself. • For more information, refer also to "Connecting the Projector" in the Operating Instructions contained in the supplied CD-ROM.

Startup Guide - Quick Reference Manual
Page 42
... on the distance between the projector and screen. Press the ?/1 key on the right side in the input select window when a signal is input. Press the INPUT key on the projector to the projector (page 12). 3 Turn on the projector. Install the projector so that the projected image ...fits the screen size. 4 Input select window 5 Wall outlet 1 2 Projector 6 Computer Video equipment 35 1 Plug the AC power cord into ...
... on the distance between the projector and screen. Press the ?/1 key on the right side in the input select window when a signal is input. Press the INPUT key on the projector to the projector (page 12). 3 Turn on the projector. Install the projector so that the projected image ...fits the screen size. 4 Input select window 5 Wall outlet 1 2 Projector 6 Computer Video equipment 35 1 Plug the AC power cord into ...

Startup Guide - Quick Reference Manual
Page 43
... Size (Zoom) Position (Lens shift) When attaching the Electric When attaching the Electric Press the LENS SHIFT/SHIFT focus lens zoom lens key on the projector or the Press the FOCUS key on the Press the ZOOM key on the the focus. the size. Focus lever Zoom lever Peripheral focus ring... the projected image Turn the Focus Ring to adjust Turn the Zoom Ring to adjust Press the RESET key on the Remote Commander then press projector or the Remote projector or the Remote the V/v/B/b key to adjust the Commander then press the V/ Commander then press the V/ position.
... Size (Zoom) Position (Lens shift) When attaching the Electric When attaching the Electric Press the LENS SHIFT/SHIFT focus lens zoom lens key on the projector or the Press the FOCUS key on the Press the ZOOM key on the the focus. the size. Focus lever Zoom lever Peripheral focus ring... the projected image Turn the Focus Ring to adjust Turn the Zoom Ring to adjust Press the RESET key on the Remote Commander then press projector or the Remote projector or the Remote the V/v/B/b key to adjust the Commander then press the V/ Commander then press the V/ position.

Startup Guide - Quick Reference Manual
Page 44
... unit or the 1 key on the unit soon after the unit is turned off, it may take a longer time for the unit to let the projector down on your fingers. • Do not push hard on the Remote Commander. Notes • If you turn off . • If you turn on the... need to further adjust projected images, refer to turn off the unit soon after the lamp lights. It may cause a malfunction. The projector starts shutdown and turns off the projector soon after the lamp is turned on, the confirmation message will be displayed and may take a longer time for the unit to...
... unit or the 1 key on the unit soon after the unit is turned off, it may take a longer time for the unit to let the projector down on your fingers. • Do not push hard on the Remote Commander. Notes • If you turn off . • If you turn on the... need to further adjust projected images, refer to turn off the unit soon after the lamp lights. It may cause a malfunction. The projector starts shutdown and turns off the projector soon after the lamp is turned on, the confirmation message will be displayed and may take a longer time for the unit to...

Startup Guide - Quick Reference Manual
Page 45
... warming up /Cool- ON/STANDBY WARNING indicator indicator Operating status indication Indicator status Operating status Meaning Standby The power is supplied to the projector and the projector is in a standby mode according to the setting. (Lights in red) (Off) Warm-up after it is turned on, or down cooling ...If the indicators flash in red, address the problem in accordance with "Warning indicators and remedies" (page 18). Indicators You can check the projector status or abnormality by checking the lighting/flashing status of the ON/STANDBY indicator and WARNING indicator on The...
... warming up /Cool- ON/STANDBY WARNING indicator indicator Operating status indication Indicator status Operating status Meaning Standby The power is supplied to the projector and the projector is in a standby mode according to the setting. (Lights in red) (Off) Warm-up after it is turned on, or down cooling ...If the indicators flash in red, address the problem in accordance with "Warning indicators and remedies" (page 18). Indicators You can check the projector status or abnormality by checking the lighting/flashing status of the ON/STANDBY indicator and WARNING indicator on The...

Startup Guide - Quick Reference Manual
Page 46
...page 20), then check if the lamp is • Refer to "On Installation" installed at a correct angle. The lens is unusually high. The projector is not broken. The temperature of flashes Twice (Lights (Flashes in red) in Quick Reference angle. If the symptom occurs again, the lamp may...18 Indicators If the same symptom occurs, turn it securely. Consult a qualified Sony consultant. In this case, replace the lamp with a new one (page 20). If the lamp is attached and install it on the projector again. Check how the lens is broken, do not exchange the lamp by...
...page 20), then check if the lamp is • Refer to "On Installation" installed at a correct angle. The lens is unusually high. The projector is not broken. The temperature of flashes Twice (Lights (Flashes in red) in Quick Reference angle. If the symptom occurs again, the lamp may...18 Indicators If the same symptom occurs, turn it securely. Consult a qualified Sony consultant. In this case, replace the lamp with a new one (page 20). If the lamp is attached and install it on the projector again. Check how the lens is broken, do not exchange the lamp by...

Startup Guide - Quick Reference Manual
Page 47
If the problem still persists, consult with qualified Sony personnel. Indicators 19 GB If the indicators flash in a manner other than described above, unplug the AC power cord and make sure the ON/STANDBY ... on the screen, refer to "Messages List" or "Troubleshooting" in the Operating Instructions contained in the projector is abnormal. • Check if the air filter is any problem or an error message appears on the projector. Indicator status The number of Meaning flashes Remedies Twice (Flashes (Flashes in red) in red) Both...
If the problem still persists, consult with qualified Sony personnel. Indicators 19 GB If the indicators flash in a manner other than described above, unplug the AC power cord and make sure the ON/STANDBY ... on the screen, refer to "Messages List" or "Troubleshooting" in the Operating Instructions contained in the projector is abnormal. • Check if the air filter is any problem or an error message appears on the projector. Indicator status The number of Meaning flashes Remedies Twice (Flashes (Flashes in red) in red) Both...
Startup Guide - Quick Reference Manual
Page 48
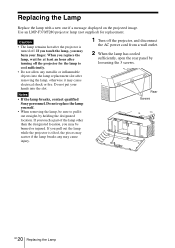
...the lamp, otherwise it out straight, by loosening the 3 screws. Do not put your finger. Notes • If the lamp breaks, contact qualified Sony personnel. Caution • The lamp remains hot after turning off . Rear Screws GB 20 Replacing the Lamp If you touch the lamp, you pull out... Replace the lamp with a new one if a message displayed on the projected image. Use an LMP-F370/F280 projector lamp (not supplied) for at least an hour after the projector is tilted, the pieces may scatter if the lamp breaks any metallic or inflammable objects into the slot. When you...
...the lamp, otherwise it out straight, by loosening the 3 screws. Do not put your finger. Notes • If the lamp breaks, contact qualified Sony personnel. Caution • The lamp remains hot after turning off . Rear Screws GB 20 Replacing the Lamp If you touch the lamp, you pull out... Replace the lamp with a new one if a message displayed on the projected image. Use an LMP-F370/F280 projector lamp (not supplied) for at least an hour after the projector is tilted, the pieces may scatter if the lamp breaks any metallic or inflammable objects into the slot. When you...

Startup Guide - Quick Reference Manual
Page 49
...its grab (2). Dispose according to install the lamp and rear panel securely as it is securely in place (1). If not, the projector cannot be turned on the projector. 7 Reset the lamp timer for notification of the next replacement time. New lamp a 5 Close the rear panel and tighten ...the 3 screws. Caution For the customers in until it was. For additional information, see www.sony.com/mercury Grab b Screws Replacing the Lamp 21...
...its grab (2). Dispose according to install the lamp and rear panel securely as it is securely in place (1). If not, the projector cannot be turned on the projector. 7 Reset the lamp timer for notification of the next replacement time. New lamp a 5 Close the rear panel and tighten ...the 3 screws. Caution For the customers in until it was. For additional information, see www.sony.com/mercury Grab b Screws Replacing the Lamp 21...

Startup Guide - Quick Reference Manual
Page 50
... air filter even after the message is displayed, dust may rise inside the unit, leading to use the projector even after cleaning, replace the air filter with qualified Sony personnel. As a result, the temperature may accumulate, clogging it. Caution If you continue to a possible ...malfunction or fire. 1 Turn off the projector and disconnect the AC power cord from a wall outlet. 2 Slide the lock switch on ...
... air filter even after the message is displayed, dust may rise inside the unit, leading to use the projector even after cleaning, replace the air filter with qualified Sony personnel. As a result, the temperature may accumulate, clogging it. Caution If you continue to a possible ...malfunction or fire. 1 Turn off the projector and disconnect the AC power cord from a wall outlet. 2 Slide the lock switch on ...

Startup Guide - Quick Reference Manual
Page 51
...turn the filter cover using the right side as an axis, and fit the two tabs on if it . 6 Clean the air filter with the projector installed suspended from a ceiling. • For usable projection lenses, see "Optional accessories". • Do not attach any lens other than the specified accessory... lens sold separately. • Be careful not to the center position. 2 Turn off the projector and then unplug the AC power cord. 3 While pressing and holding down the LENS RELEASE button, rotate the 23 Replacing the Projection Lens GB Tabs...
...turn the filter cover using the right side as an axis, and fit the two tabs on if it . 6 Clean the air filter with the projector installed suspended from a ceiling. • For usable projection lenses, see "Optional accessories". • Do not attach any lens other than the specified accessory... lens sold separately. • Be careful not to the center position. 2 Turn off the projector and then unplug the AC power cord. 3 While pressing and holding down the LENS RELEASE button, rotate the 23 Replacing the Projection Lens GB Tabs...

Operating Instructions
Page 1
Please check with your local Sony Authorized Dealer. © 2015 Sony Corporation 4-577-702-17 (1) Data Projector Operating Instructions Before operating the unit, please read this manual and supplied Quick Reference Manual thoroughly and retain it for future reference. VPL-FH65/FH60 VPL-FW65/FW60 Not all models are available in all countries and area.
Please check with your local Sony Authorized Dealer. © 2015 Sony Corporation 4-577-702-17 (1) Data Projector Operating Instructions Before operating the unit, please read this manual and supplied Quick Reference Manual thoroughly and retain it for future reference. VPL-FH65/FH60 VPL-FW65/FW60 Not all models are available in all countries and area.

Operating Instructions
Page 2
... Overview Location and Function of Controls .... 4 Main Unit 4 Terminals 5 Remote Commander and Control Panel 6 Preparation Connecting the Projector 9 Connecting a Computer 9 Connecting Video Equipment .... 10 Connecting an External Monitor and Audio Equipment 12 Connecting Network Equipment 13 ... for Trapezoidal Distortion of the Projected Image (Keystone Adjustment 19 Correcting Image Twist (Warp Correction Feature 20 Blending Projections from Multiple Projectors on a Screen 22 Turning Off the Power 23 Adjustments and Settings Using a Menu Using a Menu 24 The Picture Menu ...
... Overview Location and Function of Controls .... 4 Main Unit 4 Terminals 5 Remote Commander and Control Panel 6 Preparation Connecting the Projector 9 Connecting a Computer 9 Connecting Video Equipment .... 10 Connecting an External Monitor and Audio Equipment 12 Connecting Network Equipment 13 ... for Trapezoidal Distortion of the Projected Image (Keystone Adjustment 19 Correcting Image Twist (Warp Correction Feature 20 Blending Projections from Multiple Projectors on a Screen 22 Turning Off the Power 23 Adjustments and Settings Using a Menu Using a Menu 24 The Picture Menu ...

Operating Instructions
Page 4
... site. o Rear panel (page 48) 4 Do not place your hand near the ventilation holes as this may cause injury. B Overview Location and Function of the projector. j ON/STANDBY indicator (page 47) k WARNING indicator (page 47) l Control panel (page 6) m Antitheft lock Connects to a commercially available antitheft chain or wire. http://www.kensington...
... site. o Rear panel (page 48) 4 Do not place your hand near the ventilation holes as this may cause injury. B Overview Location and Function of the projector. j ON/STANDBY indicator (page 47) k WARNING indicator (page 47) l Control panel (page 6) m Antitheft lock Connects to a commercially available antitheft chain or wire. http://www.kensington...

Operating Instructions
Page 5
Connect external audio equipment to output audio (page 12). • The audio inputs of the projector are shared. As for audio, when INPUT A or B, or VIDEO is selected, the audio signal input from the audio input terminal is supplied from OUTPUT B. ...
Connect external audio equipment to output audio (page 12). • The audio inputs of the projector are shared. As for audio, when INPUT A or B, or VIDEO is selected, the audio signal input from the audio input terminal is supplied from OUTPUT B. ...


