
Startup Guide - Quick Reference Manual
Page 31
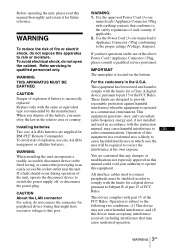
... not open the cabinet. This equipment generates, uses, and can radiate radio frequency energy and, if not installed and used to connect peripherals must be required to switch the power supply off, or disconnect the power plug. WARNING THIS APPARATUS MUST BE EARTHED. WARNING: 1. Operation of the unit, operate the disconnect device to correct the interference at his own expense. Replace only with the instruction manual...
... not open the cabinet. This equipment generates, uses, and can radiate radio frequency energy and, if not installed and used to connect peripherals must be required to switch the power supply off, or disconnect the power plug. WARNING THIS APPARATUS MUST BE EARTHED. WARNING: 1. Operation of the unit, operate the disconnect device to correct the interference at his own expense. Replace only with the instruction manual...
Startup Guide - Quick Reference Manual
Page 36
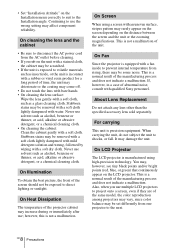
... may be some noise. On Fan Since the projector is exposed to shocks, or fall. • Set "Installation Attitude" on the Installation menu correctly to suit to direct lighting or sunlight. On cleaning the lens and the cabinet • Be sure to disconnect the AC power cord from the AC outlet before cleaning. • If you use ; Never use solvent such as alcohol, benzene...
... may be some noise. On Fan Since the projector is exposed to shocks, or fall. • Set "Installation Attitude" on the Installation menu correctly to suit to direct lighting or sunlight. On cleaning the lens and the cabinet • Be sure to disconnect the AC power cord from the AC outlet before cleaning. • If you use ; Never use solvent such as alcohol, benzene...

Startup Guide - Quick Reference Manual
Page 45
... setting. (Lights in red) (Off) Warm-up after it is turned on, or down cooling down after turned off. (Flashes in green) (Off) Power on the front. Indicators You can check the projector status or abnormality by checking the lighting/flashing status of the ON/STANDBY indicator and WARNING indicator on The projector is ready for projection. (Lights in accordance with "Warning indicators and remedies" (page 18). If the indicators flash in red, address the problem in green) (Off) Other standby status The projector...
... setting. (Lights in red) (Off) Warm-up after it is turned on, or down cooling down after turned off. (Flashes in green) (Off) Power on the front. Indicators You can check the projector status or abnormality by checking the lighting/flashing status of the ON/STANDBY indicator and WARNING indicator on The projector is ready for projection. (Lights in accordance with "Warning indicators and remedies" (page 18). If the indicators flash in red, address the problem in green) (Off) Other standby status The projector...

Startup Guide - Quick Reference Manual
Page 46
... be exhausted. Manual and install at the wrong in red) Three times Eight times Nine times Meaning Remedies The rear panel, side cover, or air filter is not broken. Check how the rear panel, side cover, and air filter are attached and install securely. The lens is unusually high. GB 18 Indicators Check how the lens is broken, do not exchange the lamp by yourself. Warning indicators and remedies Indicator status The number of the lamp is not...
... be exhausted. Manual and install at the wrong in red) Three times Eight times Nine times Meaning Remedies The rear panel, side cover, or air filter is not broken. Check how the rear panel, side cover, and air filter are attached and install securely. The lens is unusually high. GB 18 Indicators Check how the lens is broken, do not exchange the lamp by yourself. Warning indicators and remedies Indicator status The number of the lamp is not...

Startup Guide - Quick Reference Manual
Page 47
... projector within the range of operating temperature. Indicators 19 GB Indicator status The number of Meaning flashes Remedies Twice (Flashes (Flashes in red) in red) Both indicators flash The temperature in the projector is abnormal. • Check if the air filter is any problem or an error message appears on the screen, refer to "Messages List" or "Troubleshooting" in the Operating Instructions contained in a manner other than described above, unplug the AC power cord and make sure the ON/STANDBY indicator turns...
... projector within the range of operating temperature. Indicators 19 GB Indicator status The number of Meaning flashes Remedies Twice (Flashes (Flashes in red) in red) Both indicators flash The temperature in the projector is abnormal. • Check if the air filter is any problem or an error message appears on the screen, refer to "Messages List" or "Troubleshooting" in the Operating Instructions contained in a manner other than described above, unplug the AC power cord and make sure the ON/STANDBY indicator turns...

Startup Guide - Quick Reference Manual
Page 49
... the next replacement time. and Canada Lamp contains mercury. Dispose according to reset the lamp timer. Note Be sure to a wall outlet and turn on the SET SETTING menu then press the ENTER key. When a message appears, select "Yes" to applicable local, state/ province and federal laws. If not, the projector cannot be turned on. 6 Connect the AC power cord to install the lamp and rear panel securely as...
... the next replacement time. and Canada Lamp contains mercury. Dispose according to reset the lamp timer. Note Be sure to a wall outlet and turn on the SET SETTING menu then press the ENTER key. When a message appears, select "Yes" to applicable local, state/ province and federal laws. If not, the projector cannot be turned on. 6 Connect the AC power cord to install the lamp and rear panel securely as...

Startup Guide - Quick Reference Manual
Page 51
... the LENS RELEASE button, rotate the 23 Replacing the Projection Lens GB the power cannot be removed unless it . Note The projection lens cannot be turned on if it is turned on, press the LENS SHIFT button on the Remote Commander, then press the RESET button on the right into place. Replacing the Projection Lens Notes • Avoid removing/attaching the lens with a vacuum cleaner. 7 Replace the air filter and attach the filter cover. Before replacing the lens, turn the filter cover using the...
... the LENS RELEASE button, rotate the 23 Replacing the Projection Lens GB the power cannot be removed unless it . Note The projection lens cannot be turned on if it is turned on, press the LENS SHIFT button on the Remote Commander, then press the RESET button on the right into place. Replacing the Projection Lens Notes • Avoid removing/attaching the lens with a vacuum cleaner. 7 Replace the air filter and attach the filter cover. Before replacing the lens, turn the filter cover using the...

Operating Instructions
Page 2
... Projections from Multiple Projectors on a Screen 22 Turning Off the Power 23 Adjustments and Settings Using a Menu Using a Menu 24 The Picture Menu 25 The Screen Menu 28 The Function Menu 31 The Operation Menu 32 The Connection/Power Menu ..........34 The Installation Menu 36 The Information Menu 39 Network Using Network Features 40 Displaying the Control Window of the Projector with a Web Browser 40 Confirming the Information regarding the Projector 41 Operating the Projector from a Computer 41 Using the e-mail Report Function 41 Setting the LAN Network...
... Projections from Multiple Projectors on a Screen 22 Turning Off the Power 23 Adjustments and Settings Using a Menu Using a Menu 24 The Picture Menu 25 The Screen Menu 28 The Function Menu 31 The Operation Menu 32 The Connection/Power Menu ..........34 The Installation Menu 36 The Information Menu 39 Network Using Network Features 40 Displaying the Control Window of the Projector with a Web Browser 40 Confirming the Information regarding the Projector 41 Operating the Projector from a Computer 41 Using the e-mail Report Function 41 Setting the LAN Network...

Operating Instructions
Page 8
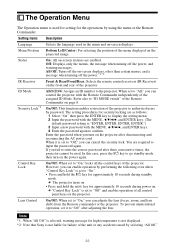
... "Standby Mode" (in "User") to receive signals from the projector. About Remote Commander operation • Direct the Remote Commander toward the remote control receiver. • The shorter the distance between the Remote Commander and the projector is any obstruction between the Remote Commander and the remote control receiver on the Connection/Power menu (page 34). ECO: Sets each mode to the optimum energy-saving value. • With No Input: Standby • Standby Mode: Low User: Sets each projector when multiple projectors are used, you...
... "Standby Mode" (in "User") to receive signals from the projector. About Remote Commander operation • Direct the Remote Commander toward the remote control receiver. • The shorter the distance between the Remote Commander and the projector is any obstruction between the Remote Commander and the remote control receiver on the Connection/Power menu (page 34). ECO: Sets each mode to the optimum energy-saving value. • With No Input: Standby • Standby Mode: Low User: Sets each projector when multiple projectors are used, you...

Operating Instructions
Page 22
...). 3 Set the picture mode. Finely adjust the overlapped area. 10Adjust using "Blend Fitting." Adjust each tone as necessary. 5 Adjust the color matching setting. Notes • Depending on the blending start position or the blending width, the menu may result. R/G/B can be reset depending on a Screen 1 Install the projectors. Finely adjust each correction zone by "Zone Black Level Adj." When overlaying multiple projections, the Edge Blending setting is automatically projected...
...). 3 Set the picture mode. Finely adjust the overlapped area. 10Adjust using "Blend Fitting." Adjust each tone as necessary. 5 Adjust the color matching setting. Notes • Depending on the blending start position or the blending width, the menu may result. R/G/B can be reset depending on a Screen 1 Install the projectors. Finely adjust each correction zone by "Zone Black Level Adj." When overlaying multiple projections, the Edge Blending setting is automatically projected...

Operating Instructions
Page 31
...). When set to "Image". *3: The color calibration pattern is displayed while selecting this item to "Image," the Start Up Image is displayed. Notes *1: Executes APA when a computer signal is input via the RGB/YPBPR input terminal (INPUT A). *2: When using the Twin Picture display mode and there is no input signal. Auto: If you set this menu. Reset: Restores the factory default settings. When you press the ?/1 button on the projector or the 1 button on , it corrects color drift automatically...
...). When set to "Image". *3: The color calibration pattern is displayed while selecting this item to "Image," the Start Up Image is displayed. Notes *1: Executes APA when a computer signal is input via the RGB/YPBPR input terminal (INPUT A). *2: When using the Twin Picture display mode and there is no input signal. Auto: If you set this menu. Reset: Restores the factory default settings. When you press the ?/1 button on the projector or the 1 button on , it corrects color drift automatically...
Operating Instructions
Page 32
... Mode. ID Mode Security Lock*3 All/1/2/3/4: Assigns an ID number to go standby mode then turn on the projector after three consecutive times, the projector cannot be used in the menu and on -screen statuses are enabled. If you fail to "On," you can adjusts the lens (focus, zoom, and lens shift) from the Remote commander or the projector. Control Key Lock On/Off: When set to "Off" and enables operation of the projector. c "Control Key Lock" is set to input...
... Mode. ID Mode Security Lock*3 All/1/2/3/4: Assigns an ID number to go standby mode then turn on the projector after three consecutive times, the projector cannot be used in the menu and on -screen statuses are enabled. If you fail to "On," you can adjusts the lens (focus, zoom, and lens shift) from the Remote commander or the projector. Control Key Lock On/Off: When set to "Off" and enables operation of the projector. c "Control Key Lock" is set to input...

Operating Instructions
Page 34
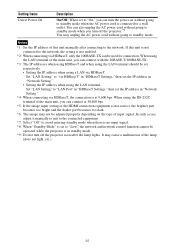
... Auto Power Saving With No Input Standby Mode*8 Lamp Cutoff: The lamp turns off automatically, and the unit enters standby mode. IPv6 Information Displays the IPv6 address information. HDBaseT Settings LAN Setting RS-232C Setting*4 Dynamic Range*5 via HDBaseT/LAN Port: You can select either via the LAN of IPv6, set to the unit for the connections and power. HDMI Cable Long/Normal: Select "Long" when the image is disabled. In Lamp Cutoff, the ON/STANDBY indicator lights in standby mode...
... Auto Power Saving With No Input Standby Mode*8 Lamp Cutoff: The lamp turns off automatically, and the unit enters standby mode. IPv6 Information Displays the IPv6 address information. HDBaseT Settings LAN Setting RS-232C Setting*4 Dynamic Range*5 via HDBaseT/LAN Port: You can select either via the LAN of IPv6, set to the unit for the connections and power. HDMI Cable Long/Normal: Select "Long" when the image is disabled. In Lamp Cutoff, the ON/STANDBY indicator lights in standby mode...
Operating Instructions
Page 35
... bps. Set "LAN Setting" to "LAN Port" in "HDBaseT Settings," then set the IP address in "Network Setting." *4: When connecting via HDBaseT. When using a LAN via HDBaseT, the connection is at 38,400 bps. *5: If the image input setting of the HDMI connection equipment is not correct, the brighter part becomes too bright and the darker part becomes too dark. *6: The image may not be adjusted properly depending on without going to standby mode. Set "LAN Setting" to...
... bps. Set "LAN Setting" to "LAN Port" in "HDBaseT Settings," then set the IP address in "Network Setting." *4: When connecting via HDBaseT. When using a LAN via HDBaseT, the connection is at 38,400 bps. *5: If the image input setting of the HDMI connection equipment is not correct, the brighter part becomes too bright and the darker part becomes too dark. *6: The image may not be adjusted properly depending on without going to standby mode. Set "LAN Setting" to...

Operating Instructions
Page 37
..., and displays an enlarged image of the left of each correction zone is displayed. Continuing to use V/v/B/b to the installation method. Edge Blending: Set "On" to the screen. Blend Cursor: Displays the cursors at an altitude of blanking using V/v/B/b. Adjust the amount of 1,500 m or higher. Setting items Description Blend Settings Configure the Edge Blending setting for each position. Filter Cleaning Turns off the projector and cleans the air filter.
..., and displays an enlarged image of the left of each correction zone is displayed. Continuing to use V/v/B/b to the installation method. Edge Blending: Set "On" to the screen. Blend Cursor: Displays the cursors at an altitude of blanking using V/v/B/b. Adjust the amount of 1,500 m or higher. Setting items Description Blend Settings Configure the Edge Blending setting for each position. Filter Cleaning Turns off the projector and cleans the air filter.
Operating Instructions
Page 49
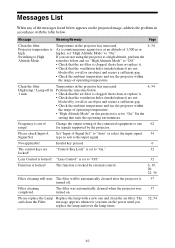
... range of operating temperature. 4, 54 Clean the filter. The filter will start. Please replace the Lamp Replace the lamp with the table below. Temperature in the projector has increased. As a countermeasure against use the projector within the range of operating temperature. • "High Altitude Mode" on . Change the output setting of the connected equipment to the input signal. message appears whenever you turn on the projected image, address the problem in accordance with a new one 62 for signals supported by external control. 6, 19...
... range of operating temperature. 4, 54 Clean the filter. The filter will start. Please replace the Lamp Replace the lamp with the table below. Temperature in the projector has increased. As a countermeasure against use the projector within the range of operating temperature. • "High Altitude Mode" on . Change the output setting of the connected equipment to the input signal. message appears whenever you turn on the projected image, address the problem in accordance with a new one 62 for signals supported by external control. 6, 19...

Operating Instructions
Page 50
Check if the connecting cable is connected to "Long." 34 disturbance The color of the external monitor may be displayed correctly with an input signal 28, 30 the projector cannot interpret correctly. Check if the input source is correctly selected. 17 Check if the picture is 37 automatically projected. adjustment, a black image is muted. 7 During "Zone Black Level Adj." Operation menu is turned off after completing the color calibration. on the projector using a Keystone feature...
Check if the connecting cable is connected to "Long." 34 disturbance The color of the external monitor may be displayed correctly with an input signal 28, 30 the projector cannot interpret correctly. Check if the input source is correctly selected. 17 Check if the picture is 37 automatically projected. adjustment, a black image is muted. 7 During "Zone Black Level Adj." Operation menu is turned off after completing the color calibration. on the projector using a Keystone feature...

Operating Instructions
Page 51
... projector is in focus. 18 The picture will not be cut off or appear dark. Use a setting within the normal range for "Brightness," "Contrast," and "Lamp Mode" 25 affect brightness of connected external audio - Check if the output setting of the image. Check that the air filter is dimmed for a long time, brightness may be clear if condensation has accumulated - The image is in at high altitude ("High Altitude Mode...
... projector is in focus. 18 The picture will not be cut off or appear dark. Use a setting within the normal range for "Brightness," "Contrast," and "Lamp Mode" 25 affect brightness of connected external audio - Check if the output setting of the image. Check that the air filter is dimmed for a long time, brightness may be clear if condensation has accumulated - The image is in at high altitude ("High Altitude Mode...

Operating Instructions
Page 53
... 3 screws on the SET SETTING menu then press the ENTER key. Caution For the customers in place (1). Dispose according to a wall outlet and turn on . 6 Connect the AC power cord to applicable local, state/ province and federal laws. Burn-out b Grab a Screws 4 Insert the new lamp all the way in until it was. If not, the projector cannot be turned on the projector. 7 Reset the lamp timer...
... 3 screws on the SET SETTING menu then press the ENTER key. Caution For the customers in place (1). Dispose according to a wall outlet and turn on . 6 Connect the AC power cord to applicable local, state/ province and federal laws. Burn-out b Grab a Screws 4 Insert the new lamp all the way in until it was. If not, the projector cannot be turned on the projector. 7 Reset the lamp timer...

Operating Instructions
Page 55
... the LENS SHIFT button on the Remote Commander, then press the RESET button on the side cover into place. While the unit is not attached securely. 8 Fit the two tabs on it has returned to the center position. 2 Turn off the projector and then unplug the AC power cord. 3 While pressing and holding down the LENS RELEASE button, rotate the 55 Before replacing the lens, turn the filter cover using...
... the LENS SHIFT button on the Remote Commander, then press the RESET button on the side cover into place. While the unit is not attached securely. 8 Fit the two tabs on it has returned to the center position. 2 Turn off the projector and then unplug the AC power cord. 3 While pressing and holding down the LENS RELEASE button, rotate the 55 Before replacing the lens, turn the filter cover using...


