Operating Instructions
Page 9
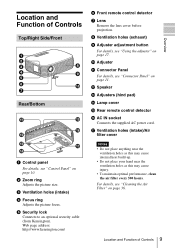
b Zoom ring Adjusts the picture size. q Ventilation holes (intake)/Air filter cover Notes • Do not place anything near the ventilation holes as this may cause internal heat build-up. • ...
b Zoom ring Adjusts the picture size. q Ventilation holes (intake)/Air filter cover Notes • Do not place anything near the ventilation holes as this may cause internal heat build-up. • ...
Operating Instructions
Page 12
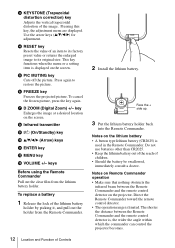
...8226; Keep the lithium battery out of the reach of the image. f FREEZE key Freezes the projected picture. Notes on the projector. Use the arrow keys (v/V/b/B) for adjustment. The shorter the distance between the Remote Commander and the remote control detector on Remote Commander... value or returns the enlarged image to restore the picture. To replace a battery 1 Release the lock of an item to its original size. c KEYSTONE (Trapezoidal distortion correction) key Adjusts the vertical trapezoidal distortion of children. • Should the battery be swallowed, immediately consult...
...8226; Keep the lithium battery out of the reach of the image. f FREEZE key Freezes the projected picture. Notes on the projector. Use the arrow keys (v/V/b/B) for adjustment. The shorter the distance between the Remote Commander and the remote control detector on Remote Commander... value or returns the enlarged image to restore the picture. To replace a battery 1 Release the lock of an item to its original size. c KEYSTONE (Trapezoidal distortion correction) key Adjusts the vertical trapezoidal distortion of children. • Should the battery be swallowed, immediately consult...

Operating Instructions
Page 13
... distance between the lens and the screen varies depending on page 46. Installing the Projector 13 For details on installation diagram, see "Installation Diagram" on the size of the lens Screen size (inches) Minimum Distance Maximum Distance Unit: m (feet) 40 80 100 150 200 250 300 1.2 2.3 2.9 4.4 5.9 7.3 8.8 (3.9) (7.5) (9.5) (14.4) (19.4) (24) (28.9) 1.4 2.8 3.6 5.4 7.2 9.0 10.7 (4.6) (9.2) (11.8) (17...
... distance between the lens and the screen varies depending on page 46. Installing the Projector 13 For details on installation diagram, see "Installation Diagram" on the size of the lens Screen size (inches) Minimum Distance Maximum Distance Unit: m (feet) 40 80 100 150 200 250 300 1.2 2.3 2.9 4.4 5.9 7.3 8.8 (3.9) (7.5) (9.5) (14.4) (19.4) (24) (28.9) 1.4 2.8 3.6 5.4 7.2 9.0 10.7 (4.6) (9.2) (11.8) (17...

Operating Instructions
Page 18
... stops running ; The ON/STANDBY indicator flashes in a breakdown of the picture and the focus. Turning Off the Power 1 Press the ?/1 key. 8 Adjust the size of the projector. 18 Turning Off the Power Note Do not unplug the AC cord while the fan is still high, which could result in green and... the fan continues to run to turn off the power. Please press ?/1 key again." Adjust the picture size using the Zoom ring and adjust the picture...
... stops running ; The ON/STANDBY indicator flashes in a breakdown of the picture and the focus. Turning Off the Power 1 Press the ?/1 key. 8 Adjust the size of the projector. 18 Turning Off the Power Note Do not unplug the AC cord while the fan is still high, which could result in green and... the fan continues to run to turn off the power. Please press ?/1 key again." Adjust the picture size using the Zoom ring and adjust the picture...

Operating Instructions
Page 21
... 21 The portion of enlargement: max. 4 times) increases. By pressing the + key repeatedly, the image size (ratio of the image where the icon is located is displayed on the image you want to verify the projector's serial number and your identity. (This process may differ in the center of the image to...
... 21 The portion of enlargement: max. 4 times) increases. By pressing the + key repeatedly, the image size (ratio of the image where the icon is located is displayed on the image you want to verify the projector's serial number and your identity. (This process may differ in the center of the image to...

Operating Instructions
Page 22
To freeze the image projected (Freeze function) Press the FREEZE key. Use the arrow key (v/V/b/B) to its original size immediately. This function works when a signal from a computer is pressed. key. "Freeze" appears when the key is input. To return the image to scroll the enlarged image. Just pressing the RESET key returns the image back to its original size Press the D ZOOM - To restore the original screen, press the FREEZE key again. 22 Effective Tools for Your Presentation
To freeze the image projected (Freeze function) Press the FREEZE key. Use the arrow key (v/V/b/B) to its original size immediately. This function works when a signal from a computer is pressed. key. "Freeze" appears when the key is input. To return the image to scroll the enlarged image. Just pressing the RESET key returns the image back to its original size Press the D ZOOM - To restore the original screen, press the FREEZE key again. 22 Effective Tools for Your Presentation

Operating Instructions
Page 24
If no input signal, "Cannot adjust this item." To reset items that have selected is not pressed for items ("Dot Phase," "H Size" and "Shift" etc.,) in the projector memory except the settings for one minute. For details, see page 33. 24 Using a MENU appears on the input signal, are automatically stored in the...
If no input signal, "Cannot adjust this item." To reset items that have selected is not pressed for items ("Dot Phase," "H Size" and "Shift" etc.,) in the projector memory except the settings for one minute. For details, see page 33. 24 Using a MENU appears on the input signal, are automatically stored in the...

Operating Instructions
Page 26
... see page 44. Off • Off: When a picture with a ratio of 4:3 is input. • On: When a picture with a ratio of the LCD panel and the signal output from a computer. Dot Phase H Size Functions Initial setting Adjusts the dot phase of 16:9 (squeezed) is used to adjust the input signal. Adjusts the horizontal... size of the input signal. The INPUT SETTING Menu The INPUT SETTING menu is input from a DVD player. Set according to the input signal Set ...
... see page 44. Off • Off: When a picture with a ratio of 4:3 is input. • On: When a picture with a ratio of the LCD panel and the signal output from a computer. Dot Phase H Size Functions Initial setting Adjusts the dot phase of 16:9 (squeezed) is used to adjust the input signal. Adjusts the horizontal... size of the input signal. The INPUT SETTING Menu The INPUT SETTING menu is input from a DVD player. Set according to the input signal Set ...

Operating Instructions
Page 27
When set to "Off," displays the picture while matching one pixel of input picture element to On the screen size. Note Note that if the projector is input, the projector automatically detects the signal type and recalls the data for public viewing, modifying the original picture by switching to adjust the ...displayed in the preset memory. About the Preset Memory No. Note When the aspect ratio of input signal is other than 4:3, a part of the LCD. As the setting for H increases, the picture moves to the right, and as the setting decreases, the picture moves down. Set according to ...
When set to "Off," displays the picture while matching one pixel of input picture element to On the screen size. Note Note that if the projector is input, the projector automatically detects the signal type and recalls the data for public viewing, modifying the original picture by switching to adjust the ...displayed in the preset memory. About the Preset Memory No. Note When the aspect ratio of input signal is other than 4:3, a part of the LCD. As the setting for H increases, the picture moves to the right, and as the setting decreases, the picture moves down. Set according to ...

Operating Instructions
Page 28
... been adjusted by pressing the APA key on the Remote Commander even if "Smart APA" set to "On," the projector detects input signals in Off the following order: Input-A/Input-B (VPL-EX3 only)/ Video/S-Video. Selects the "Component" or "Video GBR" signal input via the INPUT A channel. If the...Front & Rear Panel Key Lock: Off Setting items Functions Initial setting Smart APA The APA (Auto Pixel Alignment) automatically On adjusts "Dot Phase," "H Size" and "Shift" on or the INPUT key is pressed. Although the lamp goes out, the cooling fan keeps running. The SET SETTING Menu The...
... been adjusted by pressing the APA key on the Remote Commander even if "Smart APA" set to "On," the projector detects input signals in Off the following order: Input-A/Input-B (VPL-EX3 only)/ Video/S-Video. Selects the "Component" or "Video GBR" signal input via the INPUT A channel. If the...Front & Rear Panel Key Lock: Off Setting items Functions Initial setting Smart APA The APA (Auto Pixel Alignment) automatically On adjusts "Dot Phase," "H Size" and "Shift" on or the INPUT key is pressed. Although the lamp goes out, the cooling fan keeps running. The SET SETTING Menu The...

Operating Instructions
Page 29
...items IR Receiver Panel Key Lock Functions Initial setting Selects the remote control detectors (IR Receiver) on the front and rear of the Off projector so that the projector can cancel the adjustment by pressing the APA key again while "Adjusting" appears on the screen. • The picture may not be ...includes a black portion around it, the APA function will be adjusted properly depending on the type of input signal. • Adjust the "Dot Phase," "H Size," and "Shift" items on the screen. To lock the control panel keys, set to "Off." When it is on , the lock will not work ...
...items IR Receiver Panel Key Lock Functions Initial setting Selects the remote control detectors (IR Receiver) on the front and rear of the Off projector so that the projector can cancel the adjustment by pressing the APA key again while "Adjusting" appears on the screen. • The picture may not be ...includes a black portion around it, the APA function will be adjusted properly depending on the type of input signal. • Adjust the "Dot Phase," "H Size," and "Shift" items on the screen. To lock the control panel keys, set to "Off." When it is on , the lock will not work ...

Operating Instructions
Page 33
menu Item Picture Mode Video or S-Video (Y/C) z Adjust Picture... Color Temp. Dot Phase H Size Shift Scan Converter Video or S-Video Component (Y/C) Input signal Video GBR - - - - - - - z z z B&W z z z - - z - z The INFORMATION Menu 33 z Volume z z : Adjustable/can be set - : Not ...Mode - Wide Mode z z*2 z*2 z : Adjustable/can be set - : Not adjustable/cannot be set *1: Preset memory No. 3, 4 only Component z z z z - ES3 Lower than VGA for VPL-EX3) - z z INPUT SETTING menu Input signal Video GBR z z z z - z - (Lower than SVGA for...
menu Item Picture Mode Video or S-Video (Y/C) z Adjust Picture... Color Temp. Dot Phase H Size Shift Scan Converter Video or S-Video Component (Y/C) Input signal Video GBR - - - - - - - z z z B&W z z z - - z - z The INFORMATION Menu 33 z Volume z z : Adjustable/can be set - : Not ...Mode - Wide Mode z z*2 z*2 z : Adjustable/can be set - : Not adjustable/cannot be set *1: Preset memory No. 3, 4 only Component z z z z - ES3 Lower than VGA for VPL-EX3) - z z INPUT SETTING menu Input signal Video GBR z z z z - z - (Lower than SVGA for...

Operating Instructions
Page 41
...LCD panels, 1 lens, projection system LCD panel VPL-ES3: 0.63-inch SVGA panel, about 1,440,000 pixels (480,000 pixels × 3) VPL-EX3: 0.63-inch XGA panel, about 2,360,000 pixels (786,432 pixels × 3) Lens 1.2 times zoom lens f 18.8 to 22.6 mm/F1.6 to 1.94 Lamp 165 W Ultra high pressure lamp Projected picture size...Color system NTSC3.58/PAL/SECAM/ NTSC4.43/PAL-M/PAL-N/ PAL60 system, switched automatically/manually (NTSC4.43 is a measuring method of the projector. Applicable video signals 15 k RGB 50/60 Hz, Progressive component 50/60 Hz, DTV (480/60i, 575/50i, 480/60p,...
...LCD panels, 1 lens, projection system LCD panel VPL-ES3: 0.63-inch SVGA panel, about 1,440,000 pixels (480,000 pixels × 3) VPL-EX3: 0.63-inch XGA panel, about 2,360,000 pixels (786,432 pixels × 3) Lens 1.2 times zoom lens f 18.8 to 22.6 mm/F1.6 to 1.94 Lamp 165 W Ultra high pressure lamp Projected picture size...Color system NTSC3.58/PAL/SECAM/ NTSC4.43/PAL-M/PAL-N/ PAL60 system, switched automatically/manually (NTSC4.43 is a measuring method of the projector. Applicable video signals 15 k RGB 50/60 Hz, Progressive component 50/60 Hz, DTV (480/60i, 575/50i, 480/60p,...

Operating Instructions
Page 47
... are shown above -mentioned numerical values differ from the design values because the values in the charts and calculation methods indicate the following. SS: screen size measured diagonally (inches) a: distance between the screen and the center of the lens b: distance between the floor and the center of the lens c: distance between...
... are shown above -mentioned numerical values differ from the design values because the values in the charts and calculation methods indicate the following. SS: screen size measured diagonally (inches) a: distance between the screen and the center of the lens b: distance between the floor and the center of the lens c: distance between...

Operating Instructions
Page 49
SS: screen size measured diagonally (inches) a': distance between the hole (front) for mounting a projector suspension support on bottom surface of this projector and the center of the screen b: distance between the hole (front) for each lens are shown above....× 0.97 x = b + (SS/0.6299 × 3.2 + 57.0) The installation measurements and their calculation method for mounting a projector suspension support on bottom surface of this projector and the ceiling x: distance between the center of the screen and the ceiling N: minimum M: maximum Others Installation Diagram 49 Unit: mm (...
SS: screen size measured diagonally (inches) a': distance between the hole (front) for mounting a projector suspension support on bottom surface of this projector and the center of the screen b: distance between the hole (front) for each lens are shown above....× 0.97 x = b + (SS/0.6299 × 3.2 + 57.0) The installation measurements and their calculation method for mounting a projector suspension support on bottom surface of this projector and the ceiling x: distance between the center of the screen and the ceiling N: minimum M: maximum Others Installation Diagram 49 Unit: mm (...

Operating Instructions
Page 51
Index A Adjusting memory of the settings 24 the picture 25 the picture size/shift 26, 27 Air filter 36 Auto Input Search 28 B Background 31 Batteries 12 Brightness 25 C Color 25 Color System 28 Color Temp 25 Connecting a ...computer 14 Connecting a VCR 15 Contrast 25 D Digital Zoom function 21 Dot Phase 26 F fH (Horizontal Frequency 32 fV (Vertical Frequency 32 G Gamma Mode 25 H H Size 26 High Altitude Mode 31 Hue 25 I Image Flip 31 Input-A Signal Sel 28 Installation 13 notes 6 unsuitable conditions 7 unsuitable installation 6 IR Receiver 29 L Lamp...
Index A Adjusting memory of the settings 24 the picture 25 the picture size/shift 26, 27 Air filter 36 Auto Input Search 28 B Background 31 Batteries 12 Brightness 25 C Color 25 Color System 28 Color Temp 25 Connecting a ...computer 14 Connecting a VCR 15 Contrast 25 D Digital Zoom function 21 Dot Phase 26 F fH (Horizontal Frequency 32 fV (Vertical Frequency 32 G Gamma Mode 25 H H Size 26 High Altitude Mode 31 Hue 25 I Image Flip 31 Input-A Signal Sel 28 Installation 13 notes 6 unsuitable conditions 7 unsuitable installation 6 IR Receiver 29 L Lamp...

Operating Instructions
Page 52
S Scan Converter 27 Screen size 13, 41 Security Lock 20, 31 Sharpness 25 Shift 27 Smart APA 28 Specifications 41 Status 30 Supplied accessories 42 T Troubleshooting 37 V V Keystone 31 Volume 25 W Wide Mode 26 52 Index
S Scan Converter 27 Screen size 13, 41 Security Lock 20, 31 Sharpness 25 Shift 27 Smart APA 28 Specifications 41 Status 30 Supplied accessories 42 T Troubleshooting 37 V V Keystone 31 Volume 25 W Wide Mode 26 52 Index