
Operating Instructions
Page 4
... INSTALL SETTING Menu .......31 The INFORMATION Menu 32 Overview Features 8 Location and Function of Controls .... 9 Top/Right Side/Front 9 Rear/Bottom 9 Control Panel 10 Connector Panel 11 Remote Commander 11 Projecting the Picture Installing the Projector 13 Connecting the Projector 14 Connecting a Computer 14 Connecting a VCR 15 Projecting 16 Turning Off the Power 18 Maintenance...
... INSTALL SETTING Menu .......31 The INFORMATION Menu 32 Overview Features 8 Location and Function of Controls .... 9 Top/Right Side/Front 9 Rear/Bottom 9 Control Panel 10 Connector Panel 11 Remote Commander 11 Projecting the Picture Installing the Projector 13 Connecting the Projector 14 Connecting a Computer 14 Connecting a VCR 15 Projecting 16 Turning Off the Power 18 Maintenance...
Operating Instructions
Page 8
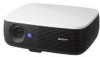
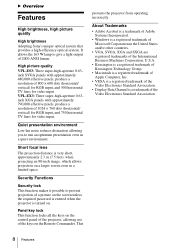
...80-inch image, which allows projection on the Remote Commander. B Overview Features High brightness, high picture quality High brightness Adopting Sony's unique optical system that provides a high-efficiency ...Video Electronics Standard Association. • Display Data Channel is turned on the control panel of the projector, allowing use of the Video Electronics Standard Association. 8 Features It allows ...projector is a trademark of the keys on a larger screen even in a limited space. Panel key lock This function locks all the keys on . VPL-EX3: Three super-high-aperture 0.63inch XGA...
...80-inch image, which allows projection on the Remote Commander. B Overview Features High brightness, high picture quality High brightness Adopting Sony's unique optical system that provides a high-efficiency ...Video Electronics Standard Association. • Display Data Channel is turned on the control panel of the projector, allowing use of the Video Electronics Standard Association. 8 Features It allows ...projector is a trademark of the keys on a larger screen even in a limited space. Panel key lock This function locks all the keys on . VPL-EX3: Three super-high-aperture 0.63inch XGA...
Operating Instructions
Page 9
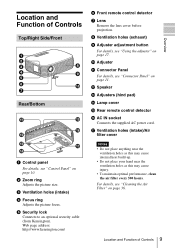
... performance, clean the air filter every 500 hours. Location and Function of Controls 9 Overview b Zoom ring Adjusts the picture size. l Speaker m Adjusters (hind pad) n Lamp cover o Rear remote control detector p AC IN socket Connects the supplied AC power cord. e Security... lock Connects to an optional security cable (from Kensington). Location and Function of Controls Top/Right Side/Front 1 2 3 8 4 9 5 6 0 7...
... performance, clean the air filter every 500 hours. Location and Function of Controls 9 Overview b Zoom ring Adjusts the picture size. l Speaker m Adjusters (hind pad) n Lamp cover o Rear remote control detector p AC IN socket Connects the supplied AC power cord. e Security... lock Connects to an optional security cable (from Kensington). Location and Function of Controls Top/Right Side/Front 1 2 3 8 4 9 5 6 0 7...

Operating Instructions
Page 11
... jack (stereo minijack): To listen to sound output from video equipment, connect via this jack to the audio output of the speakers can be controlled by the VOLUME +/- The volume of the video equipment. When VIDEO or S VIDEO is selected, the sound input to the monitor output of... signals from the INPUT A or INPUT B (VPL-EX3 only). • AUDIO (stereo minijack): Connects to operate the projector from a computer, connect via this jack to the output connector of the monitor. Connects to the audio output of VIDEO IN is output. Remote Commander The keys that have the same names as...
... jack (stereo minijack): To listen to sound output from video equipment, connect via this jack to the audio output of the speakers can be controlled by the VOLUME +/- The volume of the video equipment. When VIDEO or S VIDEO is selected, the sound input to the monitor output of... signals from the INPUT A or INPUT B (VPL-EX3 only). • AUDIO (stereo minijack): Connects to operate the projector from a computer, connect via this jack to the output connector of the monitor. Connects to the audio output of VIDEO IN is output. Remote Commander The keys that have the same names as...
Operating Instructions
Page 12
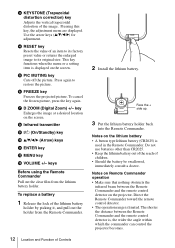
... battery holder. Face the + side up. 3 Put the lithium battery holder back into the Remote Commander. Direct the Remote Commander toward the remote control detector. • The operation range is , the wider the angle within which the commander can control the projector becomes. Pressing this key, the adjustment menu are displayed. d RESET key Resets the value...
... battery holder. Face the + side up. 3 Put the lithium battery holder back into the Remote Commander. Direct the Remote Commander toward the remote control detector. • The operation range is , the wider the angle within which the commander can control the projector becomes. Pressing this key, the adjustment menu are displayed. d RESET key Resets the value...
Operating Instructions
Page 16
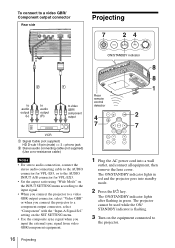
...VPL-EX3. • Set the aspect ratio using "Wide Mode" on the INPUT SETTING menu according to the input signal. • When you connect the projector to a video GBR output connector, select "Video GBR" or when you input the external sync signal from video GBR/component equipment. 16 Projecting Rear remote control... detector APA INPUT KEY STONE ENTER RESET PIC MUTING D ZOOM FREEZE MENU VOLUME 1 Plug the AC power cord into standby mode. 2 Press the ?/1 key. The ON/STANDBY indicator lights after flashing in red and the projector goes into a wall...
...VPL-EX3. • Set the aspect ratio using "Wide Mode" on the INPUT SETTING menu according to the input signal. • When you connect the projector to a video GBR output connector, select "Video GBR" or when you input the external sync signal from video GBR/component equipment. 16 Projecting Rear remote control... detector APA INPUT KEY STONE ENTER RESET PIC MUTING D ZOOM FREEZE MENU VOLUME 1 Plug the AC power cord into standby mode. 2 Press the ?/1 key. The ON/STANDBY indicator lights after flashing in red and the projector goes into a wall...
Operating Instructions
Page 19
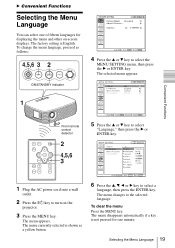
.../STANDBY indicator 4 Press the v or V key to select the MENU SETTING menu, then press the B or ENTER key. The menu currently selected is English. Front remote control detector 5 Press the v or V key to the selected language. To clear the menu Press the MENU key. The menu changes to select "Language," then press..., then press the ENTER key. The menu appears. The menu disappears automatically if a key is not pressed for displaying the menu and other on the projector. 3 Press the MENU key. The selected menu appears.
.../STANDBY indicator 4 Press the v or V key to select the MENU SETTING menu, then press the B or ENTER key. The menu currently selected is English. Front remote control detector 5 Press the v or V key to the selected language. To clear the menu Press the MENU key. The menu changes to select "Language," then press..., then press the ENTER key. The menu appears. The menu disappears automatically if a key is not pressed for displaying the menu and other on the projector. 3 Press the MENU key. The selected menu appears.

Operating Instructions
Page 29
... and turns the projector to standby mode when the power is on. If you adjust the picture manually. If the projected image includes a black portion around it is set to "On." Setting items IR Receiver Panel Key Lock Functions Initial setting Selects the remote control detectors (IR Receiver)... on the front and rear of the Off projector so that the projector can cancel the adjustment by pressing the APA key again while "Adjusting" appears on the screen....
... and turns the projector to standby mode when the power is on. If you adjust the picture manually. If the projected image includes a black portion around it is set to "On." Setting items IR Receiver Panel Key Lock Functions Initial setting Selects the remote control detectors (IR Receiver)... on the front and rear of the Off projector so that the projector can cancel the adjustment by pressing the APA key again while "Adjusting" appears on the screen....
Operating Instructions
Page 36
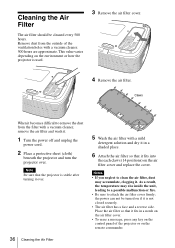
...Claws When it fits into the each claws (14 positions) on the environment or how the projector is stable after turning it over . Cleaning the Air Filter The air filter should be turned... or fire. • Be sure to remove the dust from the outside of the projector or on the control panel of the ventilation holes with a vacuum cleaner, remove the air filter and wash ...1 Turn the power off and unplug the power cord. 2 Place a protective sheet (cloth) beneath the projector and turn the projector over . 36 Cleaning the Air Filter 5 Wash the air filter with a mild detergent solution and dry...
...Claws When it fits into the each claws (14 positions) on the environment or how the projector is stable after turning it over . Cleaning the Air Filter The air filter should be turned... or fire. • Be sure to remove the dust from the outside of the projector or on the control panel of the ventilation holes with a vacuum cleaner, remove the air filter and wash ...1 Turn the power off and unplug the power cord. 2 Place a protective sheet (cloth) beneath the projector and turn the projector over . 36 Cleaning the Air Filter 5 Wash the air filter with a mild detergent solution and dry...

Operating Instructions
Page 39
... at a high altitude. c Check to see that "High Altitude Mode" on the remote commander. c Perform the operation of the projector or on the INSTALL SETTING menu is time to clean the filter. c Unlock the control panel keys (see page 34). • The lamp has reached a high temperature. ...8226; The electrical system may have replaced the lamp, the electrical system may break down. Please clean the filter. c Consult with qualified Sony personnel. The TEMP/FAN indicator lights up . Others Messages List Warning Messages Use the list below to cool the lamp and then turn...
... at a high altitude. c Check to see that "High Altitude Mode" on the remote commander. c Perform the operation of the projector or on the INSTALL SETTING menu is time to clean the filter. c Unlock the control panel keys (see page 34). • The lamp has reached a high temperature. ...8226; The electrical system may have replaced the lamp, the electrical system may break down. Please clean the filter. c Consult with qualified Sony personnel. The TEMP/FAN indicator lights up . Others Messages List Warning Messages Use the list below to cool the lamp and then turn...

Operating Instructions
Page 40
"Panel Key Lock" on the SET SETTING menu is set to check the meaning of the projector are locked! c Press the appropriate key. c All the keys on the control panel of the messages displayed on the Remote Commander (see page 29). 40 Troubleshooting Message Meaning and Remedy Not applicable! Operate the projector with the keys on the screen. Caution Messages Use the list below to "On." The panel keys are locked. You have pressed the wrong key.
"Panel Key Lock" on the SET SETTING menu is set to check the meaning of the projector are locked! c Press the appropriate key. c All the keys on the control panel of the messages displayed on the Remote Commander (see page 29). 40 Troubleshooting Message Meaning and Remedy Not applicable! Operate the projector with the keys on the screen. Caution Messages Use the list below to "On." The panel keys are locked. You have pressed the wrong key.

Operating Instructions
Page 51
...Lamp replacement 34 Lamp Timer 32 Language 30 selecting the menu language 19 Lens 9 Location and function of controls connector panel 11 control panel 10 rear/bottom 9 Remote Commander 11 top/right side/front 9 M Menu clearing the menu display 24 INFORMATION Menu 32 INPUT ... Lock 29 Picture Mode 25 Pin assignment 42 Power turn on 16 Power Saving 28 Projecting 16 R Remote Commander 11 front remote control detector .......... 9, 29 location and function of controls ........ 11 rear remote control detector 9, 29 Reset resetting an item 24 RS-232C connector 43 Others Index 51
...Lamp replacement 34 Lamp Timer 32 Language 30 selecting the menu language 19 Lens 9 Location and function of controls connector panel 11 control panel 10 rear/bottom 9 Remote Commander 11 top/right side/front 9 M Menu clearing the menu display 24 INFORMATION Menu 32 INPUT ... Lock 29 Picture Mode 25 Pin assignment 42 Power turn on 16 Power Saving 28 Projecting 16 R Remote Commander 11 front remote control detector .......... 9, 29 location and function of controls ........ 11 rear remote control detector 9, 29 Reset resetting an item 24 RS-232C connector 43 Others Index 51

