
Operating Instructions
Page 2
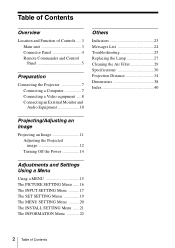
... Panel 4 Remote Commander and Control Panel 5 Preparation Connecting the Projector 7 Connecting a Computer 7 Connecting a Video equipment .... 8 Connecting an External Monitor and Audio Equipment 10 Others Indicators 23 Messages List 24 Troubleshooting 25 Replacing the Lamp 27 Cleaning the Air Filter 29 Specifications 30 Projection Distance 34 Dimensions 38 Index 40 Projecting/Adjusting an Image Projecting an Image 11 Adjusting the Projected image 12 Turning Off the Power 14 Adjustments and Settings Using a Menu Using a MENU 15 The PICTURE SETTING Menu ...... 16 The INPUT...
... Panel 4 Remote Commander and Control Panel 5 Preparation Connecting the Projector 7 Connecting a Computer 7 Connecting a Video equipment .... 8 Connecting an External Monitor and Audio Equipment 10 Others Indicators 23 Messages List 24 Troubleshooting 25 Replacing the Lamp 27 Cleaning the Air Filter 29 Specifications 30 Projection Distance 34 Dimensions 38 Index 40 Projecting/Adjusting an Image Projecting an Image 11 Adjusting the Projected image 12 Turning Off the Power 14 Adjustments and Settings Using a Menu Using a MENU 15 The PICTURE SETTING Menu ...... 16 The INPUT...

Operating Instructions
Page 6
The setting items appear. Others g Infrared transmitter About Remote Commander operation • Direct the Remote Commander toward the remote control detector. • The shorter the distance between the Remote Commander and the remote control detector on the projector. 6 Location and Function of "Lamp Mode," "Power Saving Mode" and "Standby Mode." 1 Press the ECO MODE key to select ECO or User mode. key For adjusting the volume output. Notes *1: Use this key when inputting a computer signal. ECO Mode Menu ECO Mode ECO User Sel...
The setting items appear. Others g Infrared transmitter About Remote Commander operation • Direct the Remote Commander toward the remote control detector. • The shorter the distance between the Remote Commander and the remote control detector on the projector. 6 Location and Function of "Lamp Mode," "Power Saving Mode" and "Standby Mode." 1 Press the ECO MODE key to select ECO or User mode. key For adjusting the volume output. Notes *1: Use this key when inputting a computer signal. ECO Mode Menu ECO Mode ECO User Sel...

Operating Instructions
Page 15
... MENU key to the operations in step 3. To return to the selection screen of the setting items, press the B key. Setting menu PICTURE SETTING Picture Mode Adjust Picture... Selecting items PICTURE SETTING Picture Mode Adjust Picture... If the next menu window is displayed, select the item according to clear the menu. Volume Input-A DSytannadmaicrd Standard Game L3i0ving Cinema Presentation Sel: Set: Back: Eixt: Using the setting menu Press the V or v key to its Using a MENU 15 Also, to reset the setting...
... MENU key to the operations in step 3. To return to the selection screen of the setting items, press the B key. Setting menu PICTURE SETTING Picture Mode Adjust Picture... Selecting items PICTURE SETTING Picture Mode Adjust Picture... If the next menu window is displayed, select the item according to clear the menu. Volume Input-A DSytannadmaicrd Standard Game L3i0ving Cinema Presentation Sel: Set: Back: Eixt: Using the setting menu Press the V or v key to its Using a MENU 15 Also, to reset the setting...
Operating Instructions
Page 19
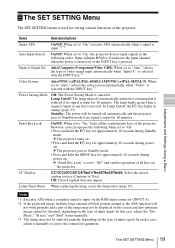
... lamp turns off automatically and the projector goes to Standby mode if no signal is input.*1 *2 Auto Input Search On/Off: When set to "On": • Press and hold the MENU key for approximately 10 seconds during power on the type of input signal. Off: Closed caption does not appear. In this case, adjust the "Dot Phase," "H size," and "Shift" items manually. *3: The image may not be displayed on the screen...
... lamp turns off automatically and the projector goes to Standby mode if no signal is input.*1 *2 Auto Input Search On/Off: When set to "On": • Press and hold the MENU key for approximately 10 seconds during power on the type of input signal. Off: Closed caption does not appear. In this case, adjust the "Dot Phase," "H size," and "Shift" items manually. *3: The image may not be displayed on the screen...
Operating Instructions
Page 21
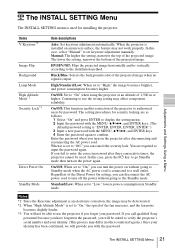
... V Keystone*1 Image Flip Background Lamp Mode High Altitude Mode*2 Security Lock*3 Direct Power On Standby Mode Item descriptions Auto: Set keystone adjustment automatically. Black/Blue: Selects the background color of the projected image when no signal is installed on the power again. You are as follows: 1 Select "On" and press ENTER to display the setting menu. 2 Input the password with the MENU, V/v/B/b, and ENTER keys. (The default password setting is "ENTER, ENTER, ENTER, ENTER.") 3 Input a new password with the password. In this case, select "Manual" to set...
... V Keystone*1 Image Flip Background Lamp Mode High Altitude Mode*2 Security Lock*3 Direct Power On Standby Mode Item descriptions Auto: Set keystone adjustment automatically. Black/Blue: Selects the background color of the projected image when no signal is installed on the power again. You are as follows: 1 Select "On" and press ENTER to display the setting menu. 2 Input the password with the MENU, V/v/B/b, and ENTER keys. (The default password setting is "ENTER, ENTER, ENTER, ENTER.") 3 Input a new password with the password. In this case, select "Manual" to set...

Operating Instructions
Page 23
... turn on . • The lamp cools after the projector is in accordance with a new one (page 27). LAMP/COVER indicator Status Meaning/Remedies Flashes in Power Saving Mode (lamp cut off the power and wait for lamp to operate after having been turned on the projector. Check the items below . ?/1 key Status Lights in red Flashes in green Lights in green Lights in orange Flashes in red Flashes twice Flashes six times Other number of flashes. If the projector exhibits abnormal status, address the problem in abnormal status. The projector's power...
... turn on . • The lamp cools after the projector is in accordance with a new one (page 27). LAMP/COVER indicator Status Meaning/Remedies Flashes in Power Saving Mode (lamp cut off the power and wait for lamp to operate after having been turned on the projector. Check the items below . ?/1 key Status Lights in red Flashes in green Lights in green Lights in orange Flashes in red Flashes twice Flashes six times Other number of flashes. If the projector exhibits abnormal status, address the problem in abnormal status. The projector's power...
Operating Instructions
Page 24
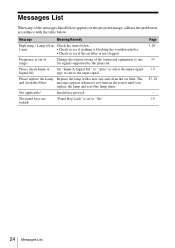
.... • Check to one and clean the air filter. Not applicable! Change the output setting of the connected equipment to see if nothing is not clogged. Lamp off in accordance with a new one for signals supported by the projector. "Panel Key Lock" is out of range! Messages List When any of the messages listed below appears on the power until you turn on the projected image, address the problem in Check the items...
.... • Check to one and clean the air filter. Not applicable! Change the output setting of the connected equipment to see if nothing is not clogged. Lamp off in accordance with a new one for signals supported by the projector. "Panel Key Lock" is out of range! Messages List When any of the messages listed below appears on the power until you turn on the projected image, address the problem in Check the items...
Operating Instructions
Page 25
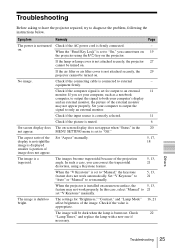
.... Check if the input source is correctly selected. 11 Check if the picture is muted. 6 On-screen display does The on . Set "Aspect" manually. 5, 17, 18 The image is set to "Off." Check 22 "Lamp Timer," and replace the lamp with a new one if necessary. No image. MENU SETTING menu is a trapezoid. Others Troubleshooting 25 Troubleshooting Before asking to have the projector repaired, try to 21 set "V Keystone" manually. If the lamp or lamp cover is not attached securely, the projector 27...
.... Check if the input source is correctly selected. 11 Check if the picture is muted. 6 On-screen display does The on . Set "Aspect" manually. 5, 17, 18 The image is set to "Off." Check 22 "Lamp Timer," and replace the lamp with a new one if necessary. No image. MENU SETTING menu is a trapezoid. Others Troubleshooting 25 Troubleshooting Before asking to have the projector repaired, try to 21 set "V Keystone" manually. If the lamp or lamp cover is not attached securely, the projector 27...

Operating Instructions
Page 26
The image is connected to output the audio signal from the fan is noisy. Remedy Check if the projector is in the location where the temperature is high. Check if the connecting cable is noisy. The sound from the projector. The Remote Commander does not work. In such a case, let the projector sit for about two hours with the power on the lens. Check that the batteries are blocked, the internal temperature of connected external audio equipment...
The image is connected to output the audio signal from the fan is noisy. Remedy Check if the projector is in the location where the temperature is high. Check if the connecting cable is noisy. The sound from the projector. The Remote Commander does not work. In such a case, let the projector sit for about two hours with the power on the lens. Check that the batteries are blocked, the internal temperature of connected external audio equipment...

Operating Instructions
Page 27
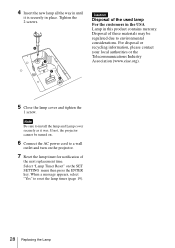
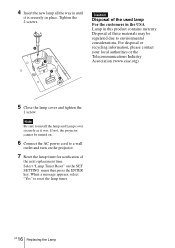
When you replace the lamp, wait for at least an hour after turning off the projector for replacement. Do not put your finger. If you pull out the lamp while the projector is turned off the projector, and disconnect the AC power cord from a wall outlet. 2 When the lamp has cooled sufficiently, open the lamp cover by loosening 1 screw. 3 Loosen the 2 screws on the projected image or the LAMP/ COVER indicator notifies you to...
When you replace the lamp, wait for at least an hour after turning off the projector for replacement. Do not put your finger. If you pull out the lamp while the projector is turned off the projector, and disconnect the AC power cord from a wall outlet. 2 When the lamp has cooled sufficiently, open the lamp cover by loosening 1 screw. 3 Loosen the 2 screws on the projected image or the LAMP/ COVER indicator notifies you to...
Operating Instructions
Page 28
... turned on. 6 Connect the AC power cord to environmental considerations. If not, the projector cannot be regulated due to a wall outlet and turn on the SET SETTING menu then press the ENTER key. When a message appears, select "Yes" to install the lamp and Lamp cover securely as it is securely in this product contains mercury. Note Be sure to reset the lamp timer (page 19). 28 Replacing the Lamp...
... turned on. 6 Connect the AC power cord to environmental considerations. If not, the projector cannot be regulated due to a wall outlet and turn on the SET SETTING menu then press the ENTER key. When a message appears, select "Yes" to install the lamp and Lamp cover securely as it is securely in this product contains mercury. Note Be sure to reset the lamp timer (page 19). 28 Replacing the Lamp...
Operating Instructions
Page 30
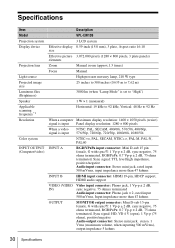
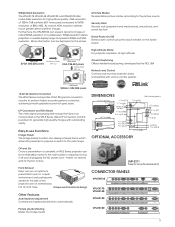
... Model Projection system Display device Projection lens Light source Projected image size Luminous flux (Brightness) Speaker Applicable scanning frequency*1 Resolution Color system INPUT OUTPUT (Computer/video) Description VPL-EW130 3 LCD system Effective display 0.59-inch (15.0 mm), 3 plate, Aspect ratio 16:10 size Effective picture 3,072,000 pixels (1280 × 800 pixels, 3 plate panels) elements Zoom Manual zoom (approx.1.3 times) Focus Manual High-pressure mercury lamp, 210 W type 25 inches to 300 inches (0.635 m to 7,62 m) 3000 lm (when "Lamp Mode...
... Model Projection system Display device Projection lens Light source Projected image size Luminous flux (Brightness) Speaker Applicable scanning frequency*1 Resolution Color system INPUT OUTPUT (Computer/video) Description VPL-EW130 3 LCD system Effective display 0.59-inch (15.0 mm), 3 plate, Aspect ratio 16:10 size Effective picture 3,072,000 pixels (1280 × 800 pixels, 3 plate panels) elements Zoom Manual zoom (approx.1.3 times) Focus Manual High-pressure mercury lamp, 210 W type 25 inches to 300 inches (0.635 m to 7,62 m) 3000 lm (when "Lamp Mode...
Operating Instructions
Page 31
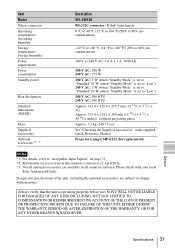
.... *3: Not all countries and area. Always verify that the unit is operating properly before use. Others Specifications 31 Please check with your local Sony Authorized Dealer. Item Model Others connector Operating temperature/ Operating humidity Storage temperature/ Storage humidity Power requirements Power consumption Standby power Heat dissipation Standard dimensions (W/H/D) Mass Supplied accessories Optional accessories*2 *3 Description VPL-EW130 RS-232C connector: D-Sub 9 pin female 0 °C to 40 °C (32...
.... *3: Not all countries and area. Always verify that the unit is operating properly before use. Others Specifications 31 Please check with your local Sony Authorized Dealer. Item Model Others connector Operating temperature/ Operating humidity Storage temperature/ Storage humidity Power requirements Power consumption Standby power Heat dissipation Standard dimensions (W/H/D) Mass Supplied accessories Optional accessories*2 *3 Description VPL-EW130 RS-232C connector: D-Sub 9 pin female 0 °C to 40 °C (32...

Operating Instructions
Page 40
... Digital Zoom 5 Direct Power On 21 Dot Phase 17 E ECO MODE (Energy-saving mode) ......... 6 F fH 22 Focus 12 Focus ring 3 Freeze 6 fV 22 G Gamma Mode 16 H H Size 17 High Altitude Mode 21 Hue 16 I Image Flip 21 Information menu 22 Input 4 INPUT SETTING menu 17 Input-A Signal Sel 19 INSTALL SETTING menu 21 K Keystone 5 L Lamp cover 3 Lamp Mode 21 Lamp Timer 22 Lamp Timer Reset 19 LAMP/COVER indicator 3, 23 Language 20 Location and function of controls 3 M Main unit 3 MENU SETTING menu 20 Messages list 24 Model Name 22 O Output 4 Over Scan 17 P Panel Key Lock...
... Digital Zoom 5 Direct Power On 21 Dot Phase 17 E ECO MODE (Energy-saving mode) ......... 6 F fH 22 Focus 12 Focus ring 3 Freeze 6 fV 22 G Gamma Mode 16 H H Size 17 High Altitude Mode 21 Hue 16 I Image Flip 21 Information menu 22 Input 4 INPUT SETTING menu 17 Input-A Signal Sel 19 INSTALL SETTING menu 21 K Keystone 5 L Lamp cover 3 Lamp Mode 21 Lamp Timer 22 Lamp Timer Reset 19 LAMP/COVER indicator 3, 23 Language 20 Location and function of controls 3 M Main unit 3 MENU SETTING menu 20 Messages list 24 Model Name 22 O Output 4 Over Scan 17 P Panel Key Lock...
Quick Reference Manual
Page 26
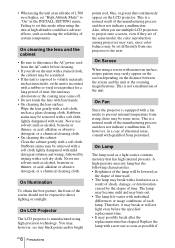
... the unit is a normal result of time, the unit may deteriorate or the coating may be set "High Altitude Mode" to prevent internal temperature from one as soon as a light source contains mercury that continuously appear on the LCD projector. Never use multiple LCD projectors to the next. On Fan Since the projector is exposed to set this mode when using high-precision technology. If, however, in contact...
... the unit is a normal result of time, the unit may deteriorate or the coating may be set "High Altitude Mode" to prevent internal temperature from one as soon as a light source contains mercury that continuously appear on the LCD projector. Never use multiple LCD projectors to the next. On Fan Since the projector is exposed to set this mode when using high-precision technology. If, however, in contact...

Quick Reference Manual
Page 34
... the AC power cord from a wall outlet. Address the problem in Standby mode. • The projector is ready to operate after having been turned on. • The lamp cools after the projector is turned off the power and wait for lamp to a wall outlet again then turn on the projector. Check the items below . ?/1 key Status Lights in red Flashes in green Lights in green Lights in orange Flashes in red Flashes twice Flashes six times Other number of lamp is unusually high. If...
... the AC power cord from a wall outlet. Address the problem in Standby mode. • The projector is ready to operate after having been turned on. • The lamp cools after the projector is turned off the power and wait for lamp to a wall outlet again then turn on the projector. Check the items below . ?/1 key Status Lights in red Flashes in green Lights in green Lights in orange Flashes in red Flashes twice Flashes six times Other number of lamp is unusually high. If...
Quick Reference Manual
Page 36
... regulated due to a wall outlet and turn on the SET SETTING menu then press the ENTER key. Select "Lamp Timer Reset" on the projector. 7 Reset the lamp timer for notification of these materials may be turned on. 6 Connect the AC power cord to environmental considerations. GB 16 Replacing the Lamp Disposal of the next replacement time. When a message appears, select "Yes" to install the lamp and Lamp cover securely as it is securely in...
... regulated due to a wall outlet and turn on the SET SETTING menu then press the ENTER key. Select "Lamp Timer Reset" on the projector. 7 Reset the lamp timer for notification of these materials may be turned on. 6 Connect the AC power cord to environmental considerations. GB 16 Replacing the Lamp Disposal of the next replacement time. When a message appears, select "Yes" to install the lamp and Lamp cover securely as it is securely in...

VPL-E Series Data Projectors Brochure and Speifications
Page 2
...ECO MODE key Lamp Mode Power Saving Mode Standby Mode High Standard Off Lamp-Off Standard ECO MODE menu Remote Commander ECO setting Low Standby Low Lamp and Filter Synchronized Maintenance When it's time to clean the air filter, a reminder message is displayed on either the projector or the supplied Remote Commander® unit, users can switch to change ceiling mount positions. Like the lamp, the air filter has a recommended 6,000-hour cleaning cycle. Power Saving Mode If no need to the ECO setting. Simple Projector Replacement The standard 1.3x zoom lens enables installation...
...ECO MODE key Lamp Mode Power Saving Mode Standby Mode High Standard Off Lamp-Off Standard ECO MODE menu Remote Commander ECO setting Low Standby Low Lamp and Filter Synchronized Maintenance When it's time to clean the air filter, a reminder message is displayed on either the projector or the supplied Remote Commander® unit, users can switch to change ceiling mount positions. Like the lamp, the air filter has a recommended 6,000-hour cleaning cycle. Power Saving Mode If no need to the ECO setting. Simple Projector Replacement The standard 1.3x zoom lens enables installation...
VPL-E Series Data Projectors Brochure and Speifications
Page 3
... lock (password and mechanical), security bar, and panel key lock Direct Power On/Off Direct power control using the circuit breaker on the screen. 6 Picture Modes Six selectable picture modes according to SVGA and XGA resolution. As a result, XGA resolution delivers much greater detail and finer images. Furthermore, the VPL-EW130 can be displayed on the switch board 768 pixels 600 pixels High Altitude Mode For projector operation at high altitude 800 pixels SVGA 480,000 pixels Number...
... lock (password and mechanical), security bar, and panel key lock Direct Power On/Off Direct power control using the circuit breaker on the screen. 6 Picture Modes Six selectable picture modes according to SVGA and XGA resolution. As a result, XGA resolution delivers much greater detail and finer images. Furthermore, the VPL-EW130 can be displayed on the switch board 768 pixels 600 pixels High Altitude Mode For projector operation at high altitude 800 pixels SVGA 480,000 pixels Number...
VPL-E Series Data Projectors Brochure and Speifications
Page 4
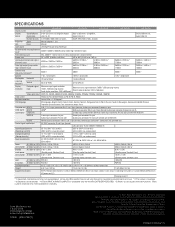
... - SPECIFICATIONS VPL-EW130 VPL-EX175 VPL-EX145 VPL-EX120 VPL-EX100 Display system 3 LCD system Display Size of effective 0.59" (15.0 mm) x 3, BrightEra, Aspect 0.63" (16.0 mm) x 3, BrightEra, 0.63" (16.0 mm) x 3, device display area ratio: 16:10 Aspect ratio: 4:3 Aspect ratio: 4:3 Number of pixels 3,072,000 (1280 x 800 x 3) pixels 2,359,296 (1024 x 768 x 3) pixels Projection Zoom Manual (Approx. 1.3 x) lens Focus Manual Light source Ultra High Pressure lamp 210 W type Recommended lamp replacement time*1 3000 H / 4500 H / 6000 H (Lamp mode: High...
... - SPECIFICATIONS VPL-EW130 VPL-EX175 VPL-EX145 VPL-EX120 VPL-EX100 Display system 3 LCD system Display Size of effective 0.59" (15.0 mm) x 3, BrightEra, Aspect 0.63" (16.0 mm) x 3, BrightEra, 0.63" (16.0 mm) x 3, device display area ratio: 16:10 Aspect ratio: 4:3 Aspect ratio: 4:3 Number of pixels 3,072,000 (1280 x 800 x 3) pixels 2,359,296 (1024 x 768 x 3) pixels Projection Zoom Manual (Approx. 1.3 x) lens Focus Manual Light source Ultra High Pressure lamp 210 W type Recommended lamp replacement time*1 3000 H / 4500 H / 6000 H (Lamp mode: High...


